OEM Engine/transmission mount replacement

fourfive

Senior Member
After changing out all my old suspension parts, steering components, bushings, etc & noticing progressive improvements in ride quality & handling, I wanted to change out my engine/trans mounts & dynamic damper for the transfer case. The DIY link is no longer valid so I did a little google research on replacing motor mounts & got some advice from members and gave it a shot. There are 3 total engine/trans mounts. 2 in the engine bay and 1 for the transmission. What I thought was a 2nd trans mount was actually the dynamic damper for the transfer case.

Part numbers for Engine/transmssion mounts:
-Right & left engine mounts 1336162160 (same mount for both sides)
-Engine mount bolts, total of 4 (2 bolts per side): 9011910811 (nuts not included)

-Transmission mount: 1237162120
-Transmission mount bolts, total of 4: 9011908B75

-Dynamic damper for transfer case: 3318335050

--------------------------------------------------------------------------------------
*Update with pics 6/5/16
Installation of driver & passenger side engine mounts:

I ended up using a floor jack and a 4x4 block of wood that was about 6" in length b/c I wasn't able to get access to an engine lift. I also did not know where on my engine to attatch the hoist and felt it would be just as risky improperly using a hoist vs a floor jack from underneath. I reasearched the site, googled, & youtubed where to hook up the hoist on the 5vzfe engine but didnt find anything. Could be one of those common sense things not worth writing about but i had no idea where to hook things up. After removing my skid plates I was looking for the best & safest place to gently lift/support the engine.

Lift points I considered:
1. Bellhousing: seemed to be a safe place to lift but the hard lines from my steering rack was in the way. Could be a good option but didn't want unbolt my rack to move out of the way.

2. Crankshaft pulley: front crossmember was in the way and not enough room to get my floor jack with the 4x4 block of wood under the pulley

Option I ended up using:
3. Oil pan: was trying to avoid using the oil pan b/c I didn't want to risk damaging it but it turned out to be the best spot out of my options.
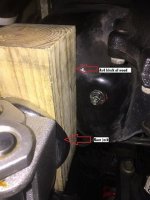
engine support.jpg

-I loosened the 2 bolts & 1 nut on each engine mount to test how the oil pan would work out (there isn't much room to access the bolts). I started very slow and each time I would apply a LITTLE lift pressure & check to make sure the oil pan wasn't taking any damage & see if the mounts were beginning to loosen.
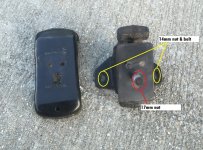
engine mount 14mm 17mm.jpg

-Once I was able to confirm the oil pan was not compromised, I removed the 2 bolts & 1 nut on each mount.

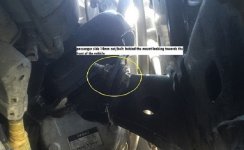
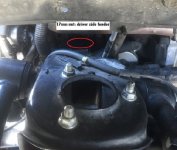
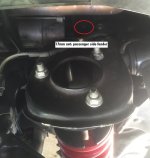
-After slowly adding more lift pressure & checking my oil pan and engine mounts several times, the mounts began to move freely when I wiggled them by hand & the oil pan seemed to be fine. A couple pics of the driver & passenger side mounts.
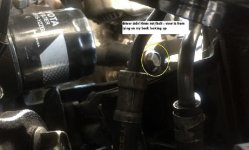
engine mount driver side looking up.jpg

passenger side mount 14mm looking towards front.jpg

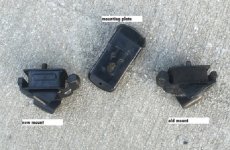
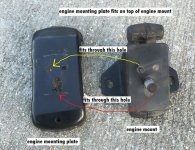
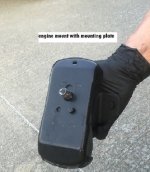
-Ended up lifting the engine by the oil pan about 1" to create enough room to wiggle the mounts off the mounting points on the frame. Removing them wasn't that bad but putting the new ones back in took a little while b/c there isn't very much room to work. A few pics of the new vs old mounts.
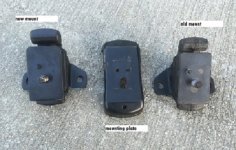
old vs new mount 1.jpg

old vs new mount 2.jpg

engine mounting plate fits on mount.jpg

engine mount 17mm fixed bolt close up with mounting plate.jpg
 

Attachments

  • engine support.jpg
    engine support.jpg
    80.3 KB · Views: 14,632
  • engine mount 14mm 17mm.jpg
    engine mount 14mm 17mm.jpg
    130.7 KB · Views: 15,496
  • old vs new mount 1.jpg
    old vs new mount 1.jpg
    118 KB · Views: 15,657
  • old vs new mount 2.jpg
    old vs new mount 2.jpg
    115.7 KB · Views: 13,516
  • engine mounting plate fits on mount.jpg
    engine mounting plate fits on mount.jpg
    117.3 KB · Views: 15,493
  • engine mount 17mm fixed bolt close up with mounting plate.jpg
    engine mount 17mm fixed bolt close up with mounting plate.jpg
    123.6 KB · Views: 13,489
  • engine mount driver side looking up.jpg
    engine mount driver side looking up.jpg
    90.9 KB · Views: 13,992
  • passenger side mount 14mm looking towards front.jpg
    passenger side mount 14mm looking towards front.jpg
    87.4 KB · Views: 14,501
Last edited:
Register to hide this ad
Installation of driver & passenger side engine mounts continued:

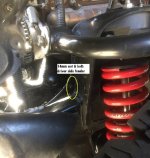
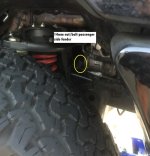
-To access the bolts and to remove & install the mounts I had to go back and forth between reaching through the fenders (fender liners removed) and from underneath the truck. I also had my hood open to get more light. The mounts are located just behind the coil bucket if you're trying to access it through the fenders & from underneath the 4runner they are just above where the cv shaft goes into the front diff.
engine mount driver side wheel well.jpg

engine mount driver front 14mm nut bolt.jpg

passenger side fender 17mm.jpg

14mm nut bolt engine mount passenger front.jpg

Tools for driver & passenger side engine mounts:
1. Standard 17mm socket for the engine mount to engine mount bracket nut (unable to find torque spec in fsm).
2. Standard 14mm socket for the engine mount to the mounting plate on the frame (2 bolts on each mount that is 28ft/lbs). There is a nut for each of these bolts that will require another 14mm flex head ratcheting box end wrench. Not sure how well a non flex head wrench would fit b/c of the limited space.
3. Flex head 3/8 ratchet or 1/4 ratchet depending on what socket size you have available. 1/4 ratchet would be best b/c those mounts are packed in tight but I was able to barely fit a 3/8 ratchet. 1/2 ratchet may work but the one I had was too big.

I was only able to reach the 17mm nut and 1 14mm bolt on each mount with my torque wrench.

Would be a good idea to spray the bolts with penetrating oil before removal. I didn't do this initially and all the bolts came out with minimal effort but I struggled with one 14mm bolt for about 2 hours before I decided to spray it with penetrating oil and it came loose within a few minutes.

I didn't remove my tires and didn't lift my front end up on jack stands in case I had to quickly lower my 4runner back down if the oil pan began to look compromised. BUT, I'd imagine having the tires off would have made it much easier to access the bolts and engine mounts.

Installation of trans mount:
1. Place floor jack on transfer case protector plate to support the transfer case.
2. Remove 4 bolts attaching trans mount to crossmember (13 ft/lbs).
3. Remove 2 bolts attaching exhaust hanger to crossmember (torque spec ?).
4. Remove 4 bolts attaching crossmember to frame (53 ft/lbs).
5. Remove 4 bolts attaching trans mount to transmission (48 ft/lbs).
 

Attachments

  • engine mount driver side wheel well.jpg
    engine mount driver side wheel well.jpg
    115.9 KB · Views: 14,391
  • engine mount driver front 14mm nut bolt.jpg
    engine mount driver front 14mm nut bolt.jpg
    125.7 KB · Views: 14,130
  • passenger side fender 17mm.jpg
    passenger side fender 17mm.jpg
    115.9 KB · Views: 13,310
  • 14mm nut bolt engine mount passenger front.jpg
    14mm nut bolt engine mount passenger front.jpg
    119 KB · Views: 19,257
Last edited:
I have nothing to give other than you can rent a hoist at Sunbelt Rentals. It might be worth it, and should make things a bit easier.

Looking forward to what you figure out on the engine mounts. This is something I'll have to do pretty soon.
 
Still trying to figure out how to safely take pressure off the engine using a floor jack to to change out the engine mounts. May try the bellhousing but not sure how that's going to work out b/c there's no real flat spot to place the floor jack against. ....Also wondering if there is any reason I should NOT use the bellhousing?

If I get access to an engine hoist, are there specific lift points to connect the hoist to on the engine?
 
trans is easy. did it a few weeks ago. engine, well, easy as well, at least for me. support it by the balancer. put the jack under it with a piece of wood. it's just to support while removing the mounts. that's how I've done it.
 
trans is easy. did it a few weeks ago. engine, well, easy as well, at least for me. support it by the balancer. put the jack under it with a piece of wood. it's just to support while removing the mounts. that's how I've done it.

What is the balancer?
 
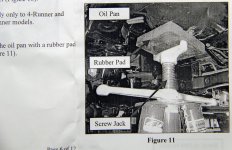
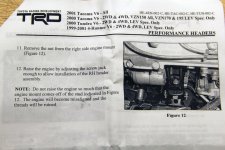
FWIW the installation instructions for installing the TRD headers have you use a screw jack with a rubber pad under the oil pan. "remove nut from the right side engine mount". Raise engine enough to allow installation of header. There's a big note warning not to raise it so high as to lift it off the stud. The photo shows about a 2" thick rubber pad. It looks like closed cell foam.
 
FWIW the installation instructions for installing the TRD headers have you use a screw jack with a rubber pad under the oil pan. "remove nut from the right side engine mount". Raise engine enough to allow installation of header. There's a big note warning not to raise it so high as to lift it off the stud. The photo shows about a 2" thick rubber pad. It looks like closed cell foam.

Do you happen to have a link or a copy of the instructions you're referring too?

Saw a picture you posted in another thread about removing the crank pulley & if I looked at it correctly, did you have a floor jack supporting the harmonic balancer also?
 
Do you happen to have a link or a copy of the instructions you're referring too?

Saw a picture you posted in another thread about removing the crank pulley & if I looked at it correctly, did you have a floor jack supporting the harmonic balancer also?

You'll have to wait until I get home tonight. They're in the garage. I googled the part number plus 3.4 Header installation .pdf but came up empty. I'll check the TRD website for a document library. Anyway, I'll either scan or take a pic of the photo tonight.

The floor jack you saw in this picture was used to support the breaker bar attached to the Schley tool during the balancer removal. It wasn't supporting the engine at all. http://www.toyota-4runner.org/3rd-gen-t4rs/194291-crank-pulley-removal-timing-belt.html#post1982933
 
You'll have to wait until I get home tonight. They're in the garage. I googled the part number plus 3.4 Header installation .pdf but came up empty. I'll check the TRD website for a document library. Anyway, I'll either scan or take a pic of the photo tonight.

That would be great thanks man.

The floor jack you saw in this picture was used to support the breaker bar attached to the Schley tool during the balancer removal. It wasn't supporting the engine at all. http://www.toyota-4runner.org/3rd-gen-t4rs/194291-crank-pulley-removal-timing-belt.html#post1982933

Got you, thanks for the clarification.
 
That would be great thanks man.

OK just took a picture of the TRD header installation instructions. Basically you need to evenly distribute the pressure of the jack across the entire bottom of the oil pan. Or use a 4x4 under the balancer. Hope this helps. BTW - I'm having a custom header shop install my headers! I don't have the time. Good luck with the motor mounts. Feedback is much appreciated. Be careful not to gack up the threads.
 

Attachments

  • Headers Instructions_1.jpg
    Headers Instructions_1.jpg
    137.5 KB · Views: 12,996
  • Headers Instructions_2.jpg
    Headers Instructions_2.jpg
    122.2 KB · Views: 14,045
[MENTION=116877]fourfive[/MENTION]


Thanks for your efforts and research dude!

My question is how do you know when you need a to replace your engine and transmission mounts???
 
[MENTION=116877]fourfive[/MENTION]


Thanks for your efforts and research dude!

My question is how do you know when you need a to replace your engine and transmission mounts???

Glad to help. You can actually see the mounts pretty easily to inspect them...cracked rubber, movement/play, etc. If the mounts are bad, usually you'll notice vibration or clunking/knocking coming from the engine bay, engine will look misaligned or lower on one side, or increased engine movement when shifting through the gears.

My engine mounts looked good but my transmission mount looked pretty worn out. The main reason I replaced mine was b/c of the age & I've been in the process of replacing all my bushings/mounts. The last thing on my list is replacing my body mount bushings with polys from 4crawler. Should have done that when I did my body lift but didn't have much experience with polys at the time & heard mixed reviews. But after changing out all my suspension/steering bushings to polyurethane, I like them much better then rubber.
 
Did the new engine mounts make any difference in vibration?

I havent driven it since replacing the 2 mounts in the engine bay but after replacing my transmission mount and dynamic damper for the transfer case there was a noticable reduction in vibration in the front cabin area when driving and at a stop.

Before i replaced the transmission mount and dynamic damper, i could feel a gentle vibration throughout the front cabin and hear the change rattling around in the ashtray. Now, it is almost completely quiet and i have to really try and listen for vibration. Bc my damper looked and felt a lot more worn out compared to my trans mount, im suspecting the damper may have had more of an impact on lessening the vibration.

Both of my original engine mounts looked to be in really good shape so not sure if there will be much of a difference but will report back once i drive it around this weekend.
 
Small Update:
After about a week of driving with the new mounts the overall feel and handling is noticeably smoother. I inspected my oil pan after using it as my lift/support point and everything still looks fine. I used to have a light vibration/rattling that was felt in the front cabin area & around the center console. It was enough to occasionally hear the change rattling around in the ash tray. After replacing the engine/trans mounts & dynamic damper, I haven't experienced any vibration or rattling at idle & also noticed it feels much smoother shifting gears (park-reverse-drive). Didn't think much of the jerkiness shifting gears until after I replaced the mounts.

In my case, I still feel like I noticed the biggest improvement when i changed my trans mount and dynamic damper for the transfer case b/c they were noticeably worn out. My engine mounts still looked and felt good but still noticed an improvement after replacing them & I think that may have resolved the the last little bit of vibration I felt at idle. This whole week I've been trying to listen and feel for vibration especially at idle & haven't been able to detect anything. My wife even noticed the smoother overall feel so I know it wasn't just in my head.

I still plan posting the few pics I took just haven't had the time to get them loaded.


................................................................................................................
Off topic but now I just need to solve the infamous vibration under load between 55-65mph experienced by many but mine only occurs in AWD mode at 55-65mph. In 2wd, no vibration at any speed. I grease my drive shaft as part of my regular oil change maintenance but it's still there. It's always been a very light vibration but would still like to resolve it. The suggested culprits appear to be a drive shaft lacking grease or a bad u-joint but what I don't understand is how can that contribute to the vibration in such a specific speed range.
 
I'm in no way an expert, but perhaps the play in ujoint allows shaft to rotate in a now unbalanced state. The speed effects the amount of play in a given state of wear, so a certain speed range would be needed to have enough play to create a felt vibration.
 
Thanks for posting this. I suspect I need to replace at least some major bushings for engine, trans, and front diff with the miles I have. Last oil change I noticed one of the front drive train support bushings is in need of repair, looks like oil drains on it every time it's changed.
 

Members online

No members online now.

Forum statistics

Threads
278,306
Messages
3,554,045
Members
248,016
Latest member
Advally Service

Trending content

Back
Top