onepremiere
New member
First let’s get a few things out of the way.
I am a terrible decision maker when it comes to parts for my vehicle
I am a 5th-6th Time is the Charm.
I am putting my foot in my mouth.
Ok so now that we’ve got that handled. Let’s talk about the 4Runner and the BP-51.
First Impressions
Huge. I know, thank you. These things are no joke. I seriously wondered if the front coil overs where going to fit in the bucket, because they are massive looking. The same applies to the rear, the shocks remind me of something you’d find on the back of a Class 1 car. In my head I was thinking, these are way too for this little baby 4Runner, it’s going to ride like a dump truck. – More on this later. The anodizing is very nice, all of the components look tough and durable. All of the hardware is black.
So if you’re familiar with my build thread you’ll know I have been through the 4Runner Suspension a few times. More than a few times. Enough times that I can change shocks, and coil springs on the front end in 1.5 hrs. using a floor jack and hand tools. (Patting myself on the back). This time around took me all day. Literally all day. Here’s why.
Prep
The BP-51 comes from the factory set to 20mm of preload.
I knew right away this was going to be too much lift for me. So I planned on taking 10mm of preload out. This required my trusty/sketchy Harbor-Freight Spring Compressor. I proceeded to attempt to compress the spring for about an hour. There is very little clearance between the body of the shock and coil spring. I chewed up the body of the shock pretty good and didn’t get very far. I was pretty upset. Before I did any more damage, I went to the Auto Parts store to get a different compressor. The spring compressor I got was a no go, same scenario. So I decided to take the “hooks” on the spring compressor and grind them down on a bench grinder for more clearance. This worked. I was able to compress the spring enough to adjust the collar without the hooks digging into the shock body.
Notes:
Use a lot of oil when making collar/ride height adjustments. On the threads, and especially between the spring and collar.
DO NOT back the pinch screw all the way out. If there is any tension on the collar while making the adjustments with a spanner wrench, the collar will skip/jump threads on the body of the shock. Loosen the bolt enough to allow the collar to spin.
Make sure your pinch bolt is positioned “out” so it is accessible once the coil over is mounted on the vehicle for future adjustments. Although from my experience, it is best to remove the shock.
Rebound and Compression Adjustments
I decided this was a good time to make changes to the rebound and compression while it was easily accessible. I adjusted all 4 shocks with 0
Comp / 4 Rebound.
For the Front OME Recommends
0-4 Compression (For Unloaded Vehicles)
4-8 Rebound (For Unloaded Vehicles)
Note: I made these adjustments off the vehicle, using a vice with soft jaws to hold the shock. Using the supplied spanner wrench it does take a little bit of force to turn the adjusting barrels. If you’re making adjustments while the shocks are installed, coil overs will be easy, rear shocks will be a little more difficult because they will want to spin. Tip: Use a leather belt wrapped around the body of the shock to hold the shock in place while you make the adjustments.
Install
Now all (4) Shocks were adjusted and ready to be installed. I tore down the front end and began installing.
Specific to the 4Runner, the Front “Fitting” Kit varies Left to Right. So it is important to follow the instructions. The same applies to the rear fitting kit.
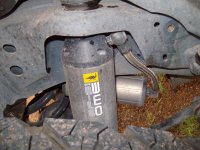
Mounting the front coil over is straight forward. Mounting the reservoir takes some penitence. Unlike other manufactures, OME is using a really nice machined collar to mount the reservoir. The base of the collar has a t-slot that slides over the head of a 6mm bolt. Takes some finesse to get situated, and secured. The mounting position of the front coil over reservoir is outside the splash guard on the driver side and inside the splash guard on the passenger side.
On the right side, after install I noticed a bolt on the outside of the AC compressor was making contact with the reservoir when the engine was running. There wasn’t much I could to fix this (moving the reservoir forward or backward would not have made a difference). So I flipped the bracket, using one existing hole and drilling an additional 6mm hole I was able to make the reservoir mount outside the splash guard, similar to the driver side. There is less room inside the fender on the right side vs. the left side on the 4Runner. The right side houses a portion of the window washer tank. I addressed this issue with OME.
Note: OME emphasizes the proper position of the reservoir to avoid contact with the hose. So keep that in mind when mounting.
Mounting the rear shocks was pretty straight forward. The reservoir brackets mount under frame using existing 8mm bolt holes.
Again, the brackets are specific right to left.
Once the reservoir is mounted, check the clearance on your hose.
The Ride
Most peoples first and only question.
Adding large, heavier, stiffer tires to any vehicle is going to significantly reduce the on road comfort. Adding a suspension system capable of handling those larger wheels and tires is the key. I think I’ve found that with the BP-51.
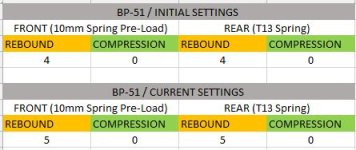
Settings: See attached
I started with the settings attached. This gave me a very plush ride. The suspension absorbed everything. The rear carried on a bit after larger bumps so I knew right away I was going to need more rebound. After I made the adjustment, it was pretty amazing to be able to feel just (1) incremental adjustment. The rear was much more controlled now. I will likely increase by rebound in the rear by (1) more, putting the rear rebound adjustments at (6) and increase the front rebound by (1) putting the rebound adjustments at (5)
The 4Runner feels very controlled and planted now. It handles all road imperfections with ease. Doesn’t toss you all over the road or the cab. The 4Runner feels flat in the corners, I am much more confident carrying a little more speed around corners knowing I am not going to get thrown around. Basically, I can’t hear anything rattling inside the cab any more (The sound of plastic interior panels shaking/rattling over rough terrain).
All of these observations were made on the road, I have not taken it in the dirt-yet.
The biggest improvement is the compression dampening. You can feel the shock working. You can feel the suspension compress. You can feel it absorb the road bumps.
While driving a rough freeway, I tilted my mirror down to watch the rear tires, I was amazed at how much the suspension was moving, and how almost none of the movement was being transferred into the body. Basically the suspension was doing its job.
Conclusion
Yes, these are expensive shocks. But the moment you open the box, you will understand why. Once you mount them on your rig, all of your buyer’s remorse will vanish as you sail across the land in your new cloud.
I am seriously impressed, I thought I was impressed prior, but those impressions changed. There are a ton of great suspension products out there for the 4Runner, a lot of them I’ve tried and ultimately changed for something different. That’s not to say the parts I swapped out were no good, they just didn’t check my boxes. I am constantly telling myself, it could be better, and my OCD tendencies take control.
I didn’t receive these shocks for free or discounted in exchange for this review. This is my unbiased opinion.
More photos and some GoPro footage of the suspension working, coming soon.
I will be adding to this post as more comes to mind, and as I find all of my writing mistakes.
Feel free to ask questions, I am sure there is info I missed.
Cheers,
Jeff


I am a terrible decision maker when it comes to parts for my vehicle
I am a 5th-6th Time is the Charm.
I am putting my foot in my mouth.
Ok so now that we’ve got that handled. Let’s talk about the 4Runner and the BP-51.
First Impressions
Huge. I know, thank you. These things are no joke. I seriously wondered if the front coil overs where going to fit in the bucket, because they are massive looking. The same applies to the rear, the shocks remind me of something you’d find on the back of a Class 1 car. In my head I was thinking, these are way too for this little baby 4Runner, it’s going to ride like a dump truck. – More on this later. The anodizing is very nice, all of the components look tough and durable. All of the hardware is black.
So if you’re familiar with my build thread you’ll know I have been through the 4Runner Suspension a few times. More than a few times. Enough times that I can change shocks, and coil springs on the front end in 1.5 hrs. using a floor jack and hand tools. (Patting myself on the back). This time around took me all day. Literally all day. Here’s why.
Prep
The BP-51 comes from the factory set to 20mm of preload.
I knew right away this was going to be too much lift for me. So I planned on taking 10mm of preload out. This required my trusty/sketchy Harbor-Freight Spring Compressor. I proceeded to attempt to compress the spring for about an hour. There is very little clearance between the body of the shock and coil spring. I chewed up the body of the shock pretty good and didn’t get very far. I was pretty upset. Before I did any more damage, I went to the Auto Parts store to get a different compressor. The spring compressor I got was a no go, same scenario. So I decided to take the “hooks” on the spring compressor and grind them down on a bench grinder for more clearance. This worked. I was able to compress the spring enough to adjust the collar without the hooks digging into the shock body.
Notes:
Use a lot of oil when making collar/ride height adjustments. On the threads, and especially between the spring and collar.
DO NOT back the pinch screw all the way out. If there is any tension on the collar while making the adjustments with a spanner wrench, the collar will skip/jump threads on the body of the shock. Loosen the bolt enough to allow the collar to spin.
Make sure your pinch bolt is positioned “out” so it is accessible once the coil over is mounted on the vehicle for future adjustments. Although from my experience, it is best to remove the shock.
Rebound and Compression Adjustments
I decided this was a good time to make changes to the rebound and compression while it was easily accessible. I adjusted all 4 shocks with 0
Comp / 4 Rebound.
For the Front OME Recommends
0-4 Compression (For Unloaded Vehicles)
4-8 Rebound (For Unloaded Vehicles)
Note: I made these adjustments off the vehicle, using a vice with soft jaws to hold the shock. Using the supplied spanner wrench it does take a little bit of force to turn the adjusting barrels. If you’re making adjustments while the shocks are installed, coil overs will be easy, rear shocks will be a little more difficult because they will want to spin. Tip: Use a leather belt wrapped around the body of the shock to hold the shock in place while you make the adjustments.
Install
Now all (4) Shocks were adjusted and ready to be installed. I tore down the front end and began installing.
Specific to the 4Runner, the Front “Fitting” Kit varies Left to Right. So it is important to follow the instructions. The same applies to the rear fitting kit.
Mounting the front coil over is straight forward. Mounting the reservoir takes some penitence. Unlike other manufactures, OME is using a really nice machined collar to mount the reservoir. The base of the collar has a t-slot that slides over the head of a 6mm bolt. Takes some finesse to get situated, and secured. The mounting position of the front coil over reservoir is outside the splash guard on the driver side and inside the splash guard on the passenger side.
On the right side, after install I noticed a bolt on the outside of the AC compressor was making contact with the reservoir when the engine was running. There wasn’t much I could to fix this (moving the reservoir forward or backward would not have made a difference). So I flipped the bracket, using one existing hole and drilling an additional 6mm hole I was able to make the reservoir mount outside the splash guard, similar to the driver side. There is less room inside the fender on the right side vs. the left side on the 4Runner. The right side houses a portion of the window washer tank. I addressed this issue with OME.
Note: OME emphasizes the proper position of the reservoir to avoid contact with the hose. So keep that in mind when mounting.
Mounting the rear shocks was pretty straight forward. The reservoir brackets mount under frame using existing 8mm bolt holes.
Again, the brackets are specific right to left.
Once the reservoir is mounted, check the clearance on your hose.
The Ride
Most peoples first and only question.
Adding large, heavier, stiffer tires to any vehicle is going to significantly reduce the on road comfort. Adding a suspension system capable of handling those larger wheels and tires is the key. I think I’ve found that with the BP-51.
Settings: See attached
I started with the settings attached. This gave me a very plush ride. The suspension absorbed everything. The rear carried on a bit after larger bumps so I knew right away I was going to need more rebound. After I made the adjustment, it was pretty amazing to be able to feel just (1) incremental adjustment. The rear was much more controlled now. I will likely increase by rebound in the rear by (1) more, putting the rear rebound adjustments at (6) and increase the front rebound by (1) putting the rebound adjustments at (5)
The 4Runner feels very controlled and planted now. It handles all road imperfections with ease. Doesn’t toss you all over the road or the cab. The 4Runner feels flat in the corners, I am much more confident carrying a little more speed around corners knowing I am not going to get thrown around. Basically, I can’t hear anything rattling inside the cab any more (The sound of plastic interior panels shaking/rattling over rough terrain).
All of these observations were made on the road, I have not taken it in the dirt-yet.
The biggest improvement is the compression dampening. You can feel the shock working. You can feel the suspension compress. You can feel it absorb the road bumps.
While driving a rough freeway, I tilted my mirror down to watch the rear tires, I was amazed at how much the suspension was moving, and how almost none of the movement was being transferred into the body. Basically the suspension was doing its job.
Conclusion
Yes, these are expensive shocks. But the moment you open the box, you will understand why. Once you mount them on your rig, all of your buyer’s remorse will vanish as you sail across the land in your new cloud.
I am seriously impressed, I thought I was impressed prior, but those impressions changed. There are a ton of great suspension products out there for the 4Runner, a lot of them I’ve tried and ultimately changed for something different. That’s not to say the parts I swapped out were no good, they just didn’t check my boxes. I am constantly telling myself, it could be better, and my OCD tendencies take control.
I didn’t receive these shocks for free or discounted in exchange for this review. This is my unbiased opinion.
More photos and some GoPro footage of the suspension working, coming soon.
I will be adding to this post as more comes to mind, and as I find all of my writing mistakes.
Feel free to ask questions, I am sure there is info I missed.
Cheers,
Jeff
Attachments
Last edited: