octanejunkie
Elite Member
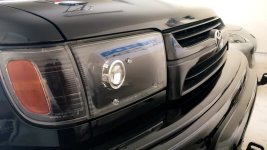
In preparation for my "Black Out" project, featuring a projector retrofit, I decided to paint the insides of my front corner markers today.
Parts List:
Mechanix Gloves, or similar
Plastic putty knives (optional)
2" Blue Painters Tape
000 steel wool
Plastic adhesion promoter or primer
Black paint (need not be high heat)
How I did it:
I removed the marker housings from the vehicle (won't detail that process here) and left the bulbs and wires hanging on the vehicle.
After doing some research and getting advice from folks here, I decided to try use a heat gun to open the corners. This did not pan out well. I could not get the glue heated evenly enough, nor enough, and I did set out to try to pry them apart. This was a big mistake. DO NOT TRY TO PRY YOUR MARKER HOUSINGS APART. The best bet, just like the headlamps, baking them in the oven is your best bet.
TIP: You should REMOVE THE HEX STUD AND BREATHER HOSE BEFORE BAKING. The hex stud takes a 10mm wrench or socket and the breather hose pulls off easily by hand. Mark the breather so you remember which end connects to the housing and which end is free and blow the breather out with air once off the housing.

That being said, and again heeding the advice of those that have melted theirs, I oven-baked mine low and slow. I set my oven to 200°F and verified using a non-contact digital infrared thermometer. Once I got the middle of the oven to a stable temp, baked my housings one at a time.
Parts List:
Mechanix Gloves, or similar
Plastic putty knives (optional)
2" Blue Painters Tape
000 steel wool
Plastic adhesion promoter or primer
Black paint (need not be high heat)
How I did it:
I removed the marker housings from the vehicle (won't detail that process here) and left the bulbs and wires hanging on the vehicle.
After doing some research and getting advice from folks here, I decided to try use a heat gun to open the corners. This did not pan out well. I could not get the glue heated evenly enough, nor enough, and I did set out to try to pry them apart. This was a big mistake. DO NOT TRY TO PRY YOUR MARKER HOUSINGS APART. The best bet, just like the headlamps, baking them in the oven is your best bet.
TIP: You should REMOVE THE HEX STUD AND BREATHER HOSE BEFORE BAKING. The hex stud takes a 10mm wrench or socket and the breather hose pulls off easily by hand. Mark the breather so you remember which end connects to the housing and which end is free and blow the breather out with air once off the housing.
That being said, and again heeding the advice of those that have melted theirs, I oven-baked mine low and slow. I set my oven to 200°F and verified using a non-contact digital infrared thermometer. Once I got the middle of the oven to a stable temp, baked my housings one at a time.
Last edited: