
You are using an out of date browser. It may not display this or other websites correctly.
You should upgrade or use an alternative browser.
You should upgrade or use an alternative browser.
Power steering rack removal '03 4runner V8
- Thread starter alia176
- Start date
Register to hide this ad

montijo505
Senior Member
If memory serves maybe [MENTION=459231]xtremewlr[/MENTION] ? I remember seeing someone had to do it twice because the first one they got was bad.
Sent from my iPhone using Tapatalk
Sent from my iPhone using Tapatalk
Last edited:
montijo505
Senior Member
Seems I don’t remember his username, but I found an older write up.
4th Gen 4Runner 2003-2009 Power Steering Rack Replacement How-to / DIY
Sent from my iPhone using Tapatalk
4th Gen 4Runner 2003-2009 Power Steering Rack Replacement How-to / DIY
Sent from my iPhone using Tapatalk

y=mx+b
Active member
Look at EatSleepTacos' Build Thread "The Lair" on TacomaWorld. You'll have to use the "Search this thread only" function, and should be able to track down the posts. Hes replaced it three times now I believe. I'd imagine the process is similar on 4runners and tacomas since the front suspensions are very similar

xtremewlr
Member
If memory serves maybe [MENTION=459231]xtremewlr[/MENTION] ? I remember seeing someone had to do it twice because the first one they got was bad.
Sent from my iPhone using Tapatalk
Nope, weren't me. At least not yet. My steering rack is still original with over 309k miles on it. Even the bushings are original, if they're even still there :biggrin1:
montijo505
Senior Member
Nope, weren't me. At least not yet. My steering rack is still original with over 309k miles on it. Even the bushings are original, if they're even still there :biggrin1:
Lol
Sent from my iPhone using Tapatalk
gimlithepirate
New member
Has anyone swapped out their power steering rack? I watched one video by Eric the Car guy and also read the FSM. Curious to see some real life feedback on this fun process.
I did!
Like so many of the things on this vehicle, how hard it is is going to majorly depend on how rusty your vehicle is, and v8 vs v6. Mine was a v8.
I got my rack from rackdoctor. They were running behind, but knock on wood it seems like a solid refurb option. A heck of a lot cheaper than a new OEM unit too. Also, plan to replace the lower intermediate steering shaft and out tie rod ends while your at it. That's another 100$ in parts and they all need to come off the car anyway.
In terms of getting the bad boy out, removal is easier if you take off the drivers side inner tie rod. If you have the v8, you will be able to finagle the mounting bolts out without removing anything else. If you have a v6, you will need to either cut the old mounting bolts off or unbolt the AC compressor to get those bolts out.
For the v8, draining the oil and removing the oil filter is a must. When I went to my new rack in, I also had to disconnect the oil filter housing mount, and a coolant line to get it in there. This was because I didn't have a clamp to stabilize the new rack so I could get the drivers side inner tie rod off. By removing the oil filter mount and the coolant line, I had just enough space to get the new rack in.
In terms of difficulty, if its not rusty I'd put it as a little more difficult than a suspension swap. Its significantly easier than something like a timing belt, but there is lots of finagling to get things in place.
If you have questions feel free to ping me.
I did!
Like so many of the things on this vehicle, how hard it is is going to majorly depend on how rusty your vehicle is, and v8 vs v6. Mine was a v8.
I got my rack from rackdoctor. They were running behind, but knock on wood it seems like a solid refurb option. A heck of a lot cheaper than a new OEM unit too. Also, plan to replace the lower intermediate steering shaft and out tie rod ends while your at it. That's another 100$ in parts and they all need to come off the car anyway.
In terms of getting the bad boy out, removal is easier if you take off the drivers side inner tie rod. If you have the v8, you will be able to finagle the mounting bolts out without removing anything else. If you have a v6, you will need to either cut the old mounting bolts off or unbolt the AC compressor to get those bolts out.
For the v8, draining the oil and removing the oil filter is a must. When I went to my new rack in, I also had to disconnect the oil filter housing mount, and a coolant line to get it in there. This was because I didn't have a clamp to stabilize the new rack so I could get the drivers side inner tie rod off. By removing the oil filter mount and the coolant line, I had just enough space to get the new rack in.
In terms of difficulty, if its not rusty I'd put it as a little more difficult than a suspension swap. Its significantly easier than something like a timing belt, but there is lots of finagling to get things in place.
If you have questions feel free to ping me.
Great info, thanks for replying. I did see some of the things you mentioned like removing the inner tie rod, oil filter housing, etc from the video I mentioned.
I'm torn between a brand new rack from Toyota at a cost of $659 or a reman unit from Rack doctor or CVJ. I only want to do this project once and the OEM unit lasted 370k.
44200-60100 - Steering Gear - 2003-2007 Toyota Land Cruiser | Conicelli Toyota of Conshohock
gimlithepirate
New member
That's a Land Cruiser steering rack, a 4runner one is 950: 44200-35070 - Steering Gear - 2004-2009 Toyota 4Runner | Conicelli Toyota of Conshohock
I went with rackdoctor because across all the models they do, I found exactly one person with an issue. And Rackdoctor replaced it for them free of charge because lifetime warranty. They rebuild only using OEM parts, so I figured it was as close as I was going to get.
I prefer OEM parts, but if it's a replacement I can do myself, is unlikely to strand me on the trail, and the cost diff is more than double, I'm firmly in "good aftermarket" territory. My CVs are OEM, but my brake calipers are NAPA reman for example.
I went with rackdoctor because across all the models they do, I found exactly one person with an issue. And Rackdoctor replaced it for them free of charge because lifetime warranty. They rebuild only using OEM parts, so I figured it was as close as I was going to get.
I prefer OEM parts, but if it's a replacement I can do myself, is unlikely to strand me on the trail, and the cost diff is more than double, I'm firmly in "good aftermarket" territory. My CVs are OEM, but my brake calipers are NAPA reman for example.

AuSeeker
Elite Member
Great info, thanks for replying. I did see some of the things you mentioned like removing the inner tie rod, oil filter housing, etc from the video I mentioned.
I'm torn between a brand new rack from Toyota at a cost of $659 or a reman unit from Rack doctor or CVJ. I only want to do this project once and the OEM unit lasted 370k.
44200-60100 - Steering Gear - 2003-2007 Toyota Land Cruiser | Conicelli Toyota of Conshohock
[MENTION=119796]alia176[/MENTION] I was going to mentioned that the rack you posted a link too was for a Land Cruiser as well but [MENTION=451306]gimlithepirate[/MENTION] took care of that...BUT the rack he posted a link too doesn't fit a 2003 4Runner, that one seems to only fits 2004 to 2009 4Runners, the following link fits the 2003 4Runner.That's a Land Cruiser steering rack, a 4runner one is 950: 44200-35070 - Steering Gear - 2004-2009 Toyota 4Runner | Conicelli Toyota of Conshohock
I went with rackdoctor because across all the models they do, I found exactly one person with an issue. And Rackdoctor replaced it for them free of charge because lifetime warranty. They rebuild only using OEM parts, so I figured it was as close as I was going to get.
I prefer OEM parts, but if it's a replacement I can do myself, is unlikely to strand me on the trail, and the cost diff is more than double, I'm firmly in "good aftermarket" territory. My CVs are OEM, but my brake calipers are NAPA reman for example.
44200-35061 - Gear Assembly - 2003-2005 Toyota 4Runner | Conicelli Toyota of Conshohock
It's very possible that any of those will fit any 4th Gen but not worth taking the chance, IMHO.
Last edited:
That's a Land Cruiser steering rack, a 4runner one is 950: 44200-35070 - Steering Gear - 2004-2009 Toyota 4Runner | Conicelli Toyota of Conshohock
I went with rackdoctor because across all the models they do, I found exactly one person with an issue. And Rackdoctor replaced it for them free of charge because lifetime warranty. They rebuild only using OEM parts, so I figured it was as close as I was going to get.
I prefer OEM parts, but if it's a replacement I can do myself, is unlikely to strand me on the trail, and the cost diff is more than double, I'm firmly in "good aftermarket" territory. My CVs are OEM, but my brake calipers are NAPA reman for example.
HOLY mother of gawd, $946? Jeeebus, WTF are these things made of - Paladium, Kryptonite? Does that include some sexual favors? Maybe even a tickle in the nether regions? Something at least?
Rackdoctor it is, thank you for the recommendation. CVJ is north of $400 and three year warr.
[MENTION=119796]alia176[/MENTION] I was going to mentioned that the rack you posted a link too was for a Land Cruiser as well but [MENTION=451306]gimlithepirate[/MENTION] took care of that...BUT the rack he posted a link too doesn't fit a 2003 4Runner, that one seems to only fits 2004 to 2009 4Runners, the following link fits the 2003 4Runner.
44200-35061 - Gear Assembly - 2003-2005 Toyota 4Runner | Conicelli Toyota of Conshohock
It's very possible that any of those will fit any 4th Gen but not worth taking the chance, IMHO.
Good catch, lower price at $574. It's interesting that Toyota changed their rack design in 2005, wonder what they did? Still, mucho $$$$ for this guy.
Thank you for the reply, will help others if they stumble on to this thread.
Forgot to mention that my rig is a NM vehicle so it has zero rust. I'm going to push this project out til aug, after I return from my trip to the San Juan mountains at the end of this month.
I'd like to other cool things like build out the cargo area and do some work on the camper. Projects like the steering rack will destroy my back and overall state of happiness and nobody needs me to be that *****y :boom:
I have an used rack from a '04 2wd that I thought about swapping in but given the PITA factory (especially with my back issues), I don't even want to take a chance of re-visiting this fun project. So, I'll save up for a reman unit with lifetime warr from the Doctor.
Thanks again for your input, fellas. Have a nice weekend.
I'd like to other cool things like build out the cargo area and do some work on the camper. Projects like the steering rack will destroy my back and overall state of happiness and nobody needs me to be that *****y :boom:
I have an used rack from a '04 2wd that I thought about swapping in but given the PITA factory (especially with my back issues), I don't even want to take a chance of re-visiting this fun project. So, I'll save up for a reman unit with lifetime warr from the Doctor.
Thanks again for your input, fellas. Have a nice weekend.
Flesh Eater
Member
Forgot to mention that my rig is a NM vehicle so it has zero rust. I'm going to push this project out til aug, after I return from my trip to the San Juan mountains at the end of this month.
I'd like to other cool things like build out the cargo area and do some work on the camper. Projects like the steering rack will destroy my back and overall state of happiness and nobody needs me to be that *****y :boom:
I have an used rack from a '04 2wd that I thought about swapping in but given the PITA factory (especially with my back issues), I don't even want to take a chance of re-visiting this fun project. So, I'll save up for a reman unit with lifetime warr from the Doctor.
Thanks again for your input, fellas. Have a nice weekend.
Hey, we’re headed to the San Juans at the beginning of August! Hope you have a good time!
I’ve never done this but I’ve torn down the whole suspension and rebuilt the entire braking system on this 08’ in preparation for long distance travels. One thing I have to say is I am super impressed with Toyota engineering. The Chilton book said I might have to cut off a bolt head for the upper control arms. Nope, Toyota made everything move just enough to get them out just fine.
I’m sure the steering rack will be as well thought out. Just take your time and look for things that quickly unbolt to move out of the way. I’ve never worked on anything like this Toyota. I’m not a brand whore, but I appreciate their thought process on repairs.
Good luck!
The rack swap started yesterday and going as well as could be expected. I realized that the rack comes out from the front, not from the hole in the driver side of the chassis. The plan for today is to drop the front diff just enough to pull out the rack. Remove all hard pipes that have hoses attach to them and take them to a hydraulic hose shop to have replacement hoses built and attached.
Removing the front sway bar gains you a TON of room and should be done as it takes five min.
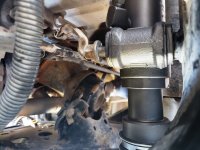
One thing to note, the two long bolts that keeps the rack to the front of the chassis has special nuts that should NOT be spun. These nuts have four serration that dig into the metal they live on and if you spin them, you ruin these "biting edges". You have to turn only the bolt which is a PITA to get to. Upon re-assembly, I'm going to insert the bolt upside down so that the nuts are on top. This way, you can easily torque the bolt heads from down below. I'm not sure why Toyota did this in a such a f'ed up orientation.
I bought two OEM tie rod ends and will attach the pass side to the new rebuilt (rackdoctor) rack on the ground before inserting. As stated in multiple threads and vids, removal of the driver side inner tie rod end is required. You don't have to separate the outer from the inner tie rod end but you can remove the whole shebang as one to facilitate the removal of the rack.
Removing the front sway bar gains you a TON of room and should be done as it takes five min.
One thing to note, the two long bolts that keeps the rack to the front of the chassis has special nuts that should NOT be spun. These nuts have four serration that dig into the metal they live on and if you spin them, you ruin these "biting edges". You have to turn only the bolt which is a PITA to get to. Upon re-assembly, I'm going to insert the bolt upside down so that the nuts are on top. This way, you can easily torque the bolt heads from down below. I'm not sure why Toyota did this in a such a f'ed up orientation.
I bought two OEM tie rod ends and will attach the pass side to the new rebuilt (rackdoctor) rack on the ground before inserting. As stated in multiple threads and vids, removal of the driver side inner tie rod end is required. You don't have to separate the outer from the inner tie rod end but you can remove the whole shebang as one to facilitate the removal of the rack.
Last edited:
Project is completed, rack is bled and vehicle is ready for an alignment this morning. I took this opportunity to install 555 Senkei sway bar end links as the boots on the current (non OEM) end links were shot after couple of years but there were no play.
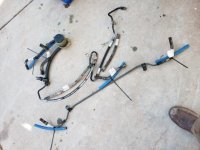
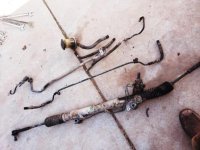
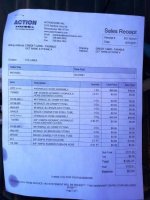
I also took this opportunity to replace every single hose on the PS system and this was a royal PITA. Even though they weren't leaking, they were rock hard. There is a total of seven hoses that were replaced. The hose shop cut off part of the OEM hard pipes and brazed them on to USA made hyd fittings with flare ends. The total cost for this was $120 and bulk off that was the brazing work. If you price out these hoses from Toyota, the price would've been astronomical, approaching $500, with the high pressure hose being the most expensive.
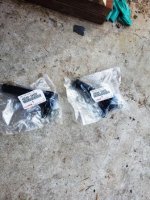
Just a quick note/tip: be sure to label every single hose like I did and give the hose shop as you see it in the pics. I asked them to return the old hoses, labels, and pinch clamps back to me so I knew where everything went and how long was each OEM hose.
I now understand why Toyota went with hard pipes behind the front bumper from the pass side to the drive side, they act as a cooler. They could've easily followed the front cross member to do this but the air flow would've been reduced.
Couple of observations on the newly rebuilt rack from the Rackdoctor.com. -
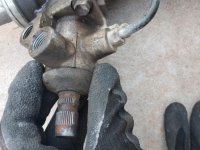
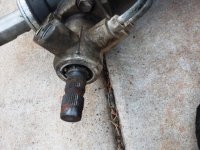
-My rebuilt rack was missing the large washer that is bent to prevent the inner tie rod from spinning. Probably not a big deal as the inner tie rod isn't going spin by itself. I re-used the one from my current rack.
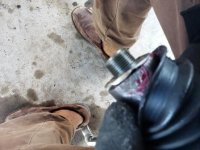
-the rubber dust boot that keeps the dirt out of the rack input splined shaft didn't make it back with my rebuilt rack. I re-used the one from my current rack.
-they used a CV clamp on the steering boot on the large end but used a zip tie on the small end. Again, they could've transferred the OEM pinch clamp that was present when they received my rack for a rebuilt. I re-used the ones from my current rack.
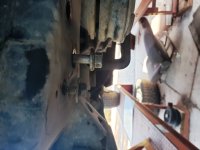
I'm sorry about the sideways pic as it doesn't seem to matter which was I turn it then save it on my PC.
I also took this opportunity to replace every single hose on the PS system and this was a royal PITA. Even though they weren't leaking, they were rock hard. There is a total of seven hoses that were replaced. The hose shop cut off part of the OEM hard pipes and brazed them on to USA made hyd fittings with flare ends. The total cost for this was $120 and bulk off that was the brazing work. If you price out these hoses from Toyota, the price would've been astronomical, approaching $500, with the high pressure hose being the most expensive.
Just a quick note/tip: be sure to label every single hose like I did and give the hose shop as you see it in the pics. I asked them to return the old hoses, labels, and pinch clamps back to me so I knew where everything went and how long was each OEM hose.
I now understand why Toyota went with hard pipes behind the front bumper from the pass side to the drive side, they act as a cooler. They could've easily followed the front cross member to do this but the air flow would've been reduced.
Couple of observations on the newly rebuilt rack from the Rackdoctor.com. -
-My rebuilt rack was missing the large washer that is bent to prevent the inner tie rod from spinning. Probably not a big deal as the inner tie rod isn't going spin by itself. I re-used the one from my current rack.
-the rubber dust boot that keeps the dirt out of the rack input splined shaft didn't make it back with my rebuilt rack. I re-used the one from my current rack.
-they used a CV clamp on the steering boot on the large end but used a zip tie on the small end. Again, they could've transferred the OEM pinch clamp that was present when they received my rack for a rebuilt. I re-used the ones from my current rack.
I'm sorry about the sideways pic as it doesn't seem to matter which was I turn it then save it on my PC.
Attachments
Last edited:
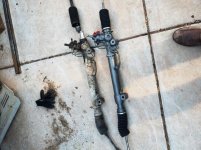
more pics. Notice the mounting bolt is now upside down, this makes it super easy to install then torque to spec. Also notice the serration marks on the nut. This is why you shouldn't turn the nut, ONLY the bolt.
Attachments
Similar threads
- Replies
- 22
- Views
- 16K
- Replies
- 2
- Views
- 3K


