sure74
New member
Goal here was to add a Qi wireless charger that could be mistaken for an option that came from Toyota or just not be seen at all.
The lower bin in the center stack seemed like a logical choice. My phone fit there pretty well (also tested with a note 4 which is just over 6") and it is easy to grab the phone from that spot at stoplights and such. Also, the plastic there is pretty thin and the 12V power outlet was the perfect spot to grab power for the mod.
Parts for the mod were actually pretty cheap, the whole thing came in under $30. I used the PowerBot PB1020 Qi Enabled Wireless Charger for its wireless charging component and I used the HitCar DC 12V to 5V Power Inverter Mini / Micro USB DC 3.5 Hard Wired Converter Kit to supply the power. I also used an old Digital Optical Audio cable to redirect the LED from the charging board and I used some Extreme Mounting Tape to secure the charging board to the underside of the bin.
Here you can see where I grabbed power from the 12V power outlet. I removed the protective cover, soldered the wires from the HitCar DC 12V Inverter and slid the cover back on.


I removed the board from the PowerBot Wireless Charger to mount it to the bottom of the bin. The other side of the board has the wireless charging coil which has to be as close to the bin plastic as possible. Two layers of the extreme mounting tape provided the perfect spacing. I carefully trimmed two layers of tape to fit around the coil and applied it to the bottom of the bin.
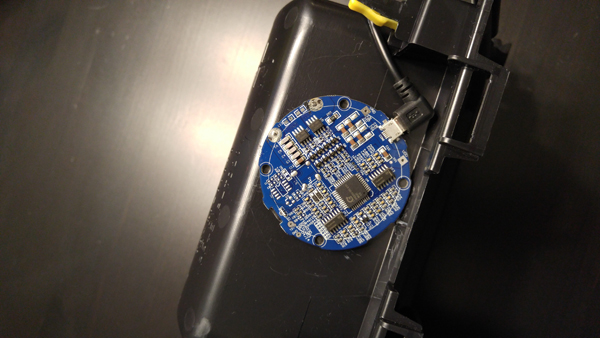
The LED indicator is soldered to the board and I was definitely going to need to know the status of my new charger. I used an old optical audio cable to redirect the light from the LED to the top of the bin. In this pic you can see how I used hot glue to fix the cut end of the optical cable directly in front of the LED to pick up the light.
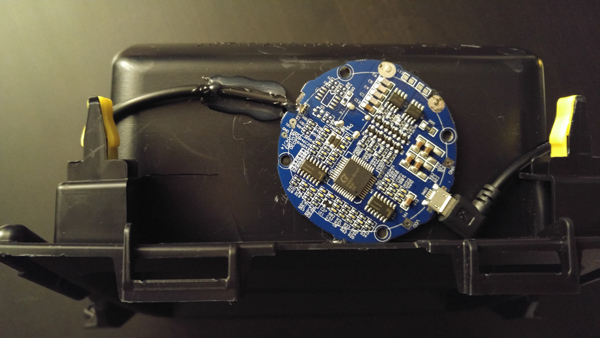
The other end of the optical cable is attached to the top of the bin using hot glue. The original connection was perfect since the exposed core is about as long as the bin plastic is thick. I just needed to make a pin size hole in the top of the bin to let the light shine through. Behind the optical cable you can see the power inverter which is also attached with mounting tape.
Added bonus, once I disconnect the the AUX and 12V power outlet connectors the unit comes out same as before the mod.

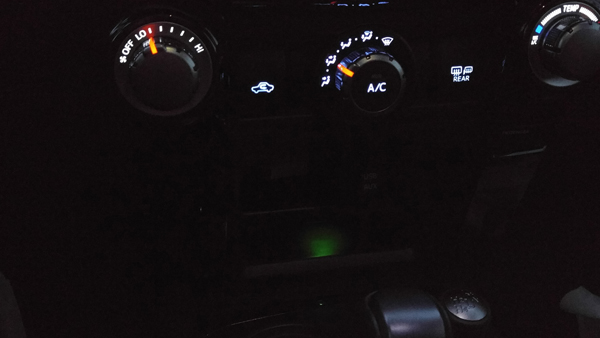
The finished product. When the unit is not charging the LED is green. It actually makes for a pretty nice little light for the lower bin. When it is charging (most of the time I am in the truck) the light is blue.
So far so good. It's been installed for a month or so and I have had no issues with overheating or my phone not charging. I just throw the phone (or any Qi enabled phone that fits) in the bin and it charges.
Let me know what you think & thanks for checking out my mod.
The lower bin in the center stack seemed like a logical choice. My phone fit there pretty well (also tested with a note 4 which is just over 6") and it is easy to grab the phone from that spot at stoplights and such. Also, the plastic there is pretty thin and the 12V power outlet was the perfect spot to grab power for the mod.
Parts for the mod were actually pretty cheap, the whole thing came in under $30. I used the PowerBot PB1020 Qi Enabled Wireless Charger for its wireless charging component and I used the HitCar DC 12V to 5V Power Inverter Mini / Micro USB DC 3.5 Hard Wired Converter Kit to supply the power. I also used an old Digital Optical Audio cable to redirect the LED from the charging board and I used some Extreme Mounting Tape to secure the charging board to the underside of the bin.
Here you can see where I grabbed power from the 12V power outlet. I removed the protective cover, soldered the wires from the HitCar DC 12V Inverter and slid the cover back on.
I removed the board from the PowerBot Wireless Charger to mount it to the bottom of the bin. The other side of the board has the wireless charging coil which has to be as close to the bin plastic as possible. Two layers of the extreme mounting tape provided the perfect spacing. I carefully trimmed two layers of tape to fit around the coil and applied it to the bottom of the bin.
The LED indicator is soldered to the board and I was definitely going to need to know the status of my new charger. I used an old optical audio cable to redirect the light from the LED to the top of the bin. In this pic you can see how I used hot glue to fix the cut end of the optical cable directly in front of the LED to pick up the light.
The other end of the optical cable is attached to the top of the bin using hot glue. The original connection was perfect since the exposed core is about as long as the bin plastic is thick. I just needed to make a pin size hole in the top of the bin to let the light shine through. Behind the optical cable you can see the power inverter which is also attached with mounting tape.
Added bonus, once I disconnect the the AUX and 12V power outlet connectors the unit comes out same as before the mod.
The finished product. When the unit is not charging the LED is green. It actually makes for a pretty nice little light for the lower bin. When it is charging (most of the time I am in the truck) the light is blue.
So far so good. It's been installed for a month or so and I have had no issues with overheating or my phone not charging. I just throw the phone (or any Qi enabled phone that fits) in the bin and it charges.
Let me know what you think & thanks for checking out my mod.