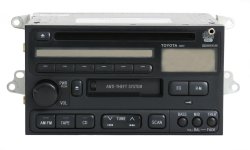
Radio works but it wont light up or illuminate

1999 4Runner radio backlights not working!

Hello I'm am new to this forum and wanted to share some input. My 1999 4Runner Limited radio backlights weren't working, but my LCD display backlights were working normal. After reading this forum and others about similar problems with the radio backlights, I decided to take my radio apart. Discovered that none of the bulbs were burnt out (5 bulbs) they were not getting power from the radio circuitry. Unfortunately without a schematic of the radio itself I couldn't figure out what actually powers the 5 backlight bulbs. Something in the circuit card failed. So now what. Since the LCD backlights work normal I jumped the power from one of the LCD backlight bulbs to one of the other 5 backlight bulbs. I confirmed the power wire with a voltmeter with the radio face removed and the circuit card plugged in to the radio. I placed the ground lead to the radio chassis and the power lead to the LCD bulb and that told me which wire is power (approx 6.5 volts). I then used a small jumper (wire) and jumped from the LCD bulb power wire to one of the 5 backlight bulbs. If you touch the wrong side of the bulb ( meaning ground) with power from the LCD bulb, it will probably spark meaning you touch ground. So then touch the other side and voila the 5 backlights will turn on! I used power from the left LCD display bulb and jumped to the closest backlight bulb, which was about 1 inch away. I then soldered 1 jumper in place. The backlights are in series/parallel so you only need one jumper. So now my radio backlights come on when the radio is on. Before they would only work when the exterior lights were on. Who cares, my lights work beautifully and no more fumbling with the radio in the dark! They will also dim with the light rheostat. When car is turned off all lights go off as usual.
This is what I did to solve my problem and I am not telling anyone to do this. You can buy a new or used radio too. Anyway lots of information here and hopefully you can understand what I wrote. Take care.
 
1999 4R with a dim LCD factory radio

Okay, so like everyone else, my factory radio's LCD is going dim. I'm not an electrical engineer, so the fix it videos on youtube are not going to help. I'm going to upgrade. I'm looking for anyone with personal experience installing and using "radio" controls with a backup camera.

I need some recommendations of what works and what does not. Thanks in advance.
 
Not easy, but fixed.

If anyone is still looking and really wants to keep the factory radio, this worked for me.

1) Remove radio. Be careful not to break the dash bezel (experience).
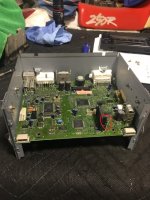
2) Disassemble radio down to its component level: the face plate, front circuit board, CD player, cassette deck, main circuit board, housing. Sorry I didn't take good pictures of this part. You'll need a small nut driver. Take your time. The front board simply pulls away from the main board. The tape deck has a ribbon cable that will come loose. The CD fits into a raised connector on the main board.
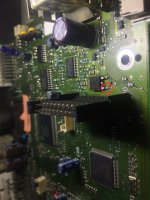
3) On the main board, there was a component that had a broken solder joint (see pics). I re-soldered that connection circled in red which fixed the problem.

The broken solder joint was extremely hard to find. Only after being suspicious of this part was I able to confirm the broken joint by placing it under a microscope and gently lifting it with a small pic to see that it was in fact broken.

I have no idea if this is the common failure point of this vintage radio, but it was for mine. Good luck!
 

Attachments

  • 20190415_025347847_iOS (Small).jpg
    20190415_025347847_iOS (Small).jpg
    84.3 KB · Views: 3,681
  • 20190415_034933860_iOS_LI (Small).jpg
    20190415_034933860_iOS_LI (Small).jpg
    101.2 KB · Views: 3,603
If anyone is still looking and really wants to keep the factory radio, this worked for me.

1) Remove radio. Be careful not to break the dash bezel (experience).
2) Disassemble radio down to its component level: the face plate, front circuit board, CD player, cassette deck, main circuit board, housing. Sorry I didn't take good pictures of this part. You'll need a small nut driver. Take your time. The front board simply pulls away from the main board. The tape deck has a ribbon cable that will come loose. The CD fits into a raised connector on the main board.
3) On the main board, there was a component that had a broken solder joint (see pics). I re-soldered that connection circled in red which fixed the problem.

The broken solder joint was extremely hard to find. Only after being suspicious of this part was I able to confirm the broken joint by placing it under a microscope and gently lifting it with a small pic to see that it was in fact broken.

I have no idea if this is the common failure point of this vintage radio, but it was for mine. Good luck!

I dont ever post but I felt obligated to say that I resoldered the component shown in the post above and it fixed my issue with the backlight of the radio not working.

Finally someone that answers the question rather than saying "just get a new headunit". Props to you sir.
 
Last edited:
Also wanted to say thanks as I was able to make the simple heating of the solder to fix my stereo backlighting!!!
Very pleased!


another thanks to P-bod! Fixed my radio today and can confirm soldering the same thing he has circled in red fixed my light. First time working in this truck for me!
 
This person is a genius!I have a 2000 T4R sr5 4x4 with this same radio backlight issue.I took the radio out and did exactly what they said.It works perfectly now after years of not being able to see the radio at night.Thank you for your outstanding determination!
 
another happy customer !

If anyone is still looking and really wants to keep the factory radio, this worked for me.

1) Remove radio. Be careful not to break the dash bezel (experience).
2) Disassemble radio down to its component level: the face plate, front circuit board, CD player, cassette deck, main circuit board, housing. Sorry I didn't take good pictures of this part. You'll need a small nut driver. Take your time. The front board simply pulls away from the main board. The tape deck has a ribbon cable that will come loose. The CD fits into a raised connector on the main board.
3) On the main board, there was a component that had a broken solder joint (see pics). I re-soldered that connection circled in red which fixed the problem.

The broken solder joint was extremely hard to find. Only after being suspicious of this part was I able to confirm the broken joint by placing it under a microscope and gently lifting it with a small pic to see that it was in fact broken.

I have no idea if this is the common failure point of this vintage radio, but it was for mine. Good luck!

well, thanks again , from me now, 2 years after the fact ! just bought our 00 4Runner a few months back, and am in the process of loving it up ! I love getting all the original features working as new, plus a little careful hotrodding.
the exact same lug was cold soldered in our radio. lighting works ! took 20 minutes, thanks to great instructions. cheers !
 
Created an account just to share the same success story: P-bod's solder did the trick.

I was quite skeptical at first: after I got the board isolated, my solder *looked* reasonable; at least not obviously disconnected. Reheating the solder fixed it right up though. Amazing fix.
 
For those that fixed their illumination issue was it both sides of display not lighting? On mine it is only the right half of the long thin rectangular strip not lighting. My LED for the channel display works fine.
 

Attachments

  • Part Number- 86120-33040. Part Number on Face- 56807.jpg
    Part Number- 86120-33040. Part Number on Face- 56807.jpg
    65.8 KB · Views: 618
Thank you P-bod!!!

If anyone is still looking and really wants to keep the factory radio, this worked for me.

1) Remove radio. Be careful not to break the dash bezel (experience).
2) Disassemble radio down to its component level: the face plate, front circuit board, CD player, cassette deck, main circuit board, housing. Sorry I didn't take good pictures of this part. You'll need a small nut driver. Take your time. The front board simply pulls away from the main board. The tape deck has a ribbon cable that will come loose. The CD fits into a raised connector on the main board.
3) On the main board, there was a component that had a broken solder joint (see pics). I re-soldered that connection circled in red which fixed the problem.

The broken solder joint was extremely hard to find. Only after being suspicious of this part was I able to confirm the broken joint by placing it under a microscope and gently lifting it with a small pic to see that it was in fact broken.

I have no idea if this is the common failure point of this vintage radio, but it was for mine. Good luck!


I created an account just to share the success found in this thread. The soldering does WORK! I have never soldered before. I did this on a 2000 SR5 5 speed. The whole project takes an hour and uses four tools:

1. Flathead screwdriver
2. T10 torx driver
3. 3/16 nut driver
4. Cheap soldering iron with the smallest tip you can find. I bought a "Weller Cordless Soldering Iron 4.5 W" battery powered, cheap, and comes with everything you need to go

I've included a couple pictures to share how to take apart the radio since that hasn't been covered. Directions assume you've removed the radio from the dash already. There are plenty of videos that demonstrate how to remove the dash and access the radio online, like this one: 1997 Toyota 4runner radio removal replacement and install - YouTube

First, remove the faceplate. There are 2 plastic tabs on each side of the faceplate. There are too many to grab all at once with your hands to remove safely. I found it easiest to lift the plastic tabs up with a flat head screwdriver and stuck a paper clip underneath each of the 8 tabs. Once this is done, the faceplate simply lifts off.


Next, you need to remove the metal housing on the front and top of the radio. Take the top off first. You need to simply bend 3 metal tabs downwards with a flathead. The top should easily lift off. Next, the front metal housing. You need to unscrew 4 T10 screws and 2 bolts to remove the front plate.


Next, remove the CD player. There are two T10 screws in the back. After unscrewing those, pull the CD player straight up and it should be disconnected completely.


After the CD player is removed, you should be able to see what needs to be soldered. See previous images in this thread from p-bod for where and what it looks like BEFORE the solder. I found it easiest to place the solder wire directly where p-bod circled. I stuck the wire through the opening left from the front of the radio after the CD player is removed. Then I came in from the top with the iron. First few tries the solder came back up with the iron. You gotta make sure you get some new metal to stick. I think my problem was I was scared of burning the circuit board and didnt want to hold the iron there too long. Here's my first solder ever and it worked.


Finally, crack open a beer and enjoy the illumination!

 
Last edited:
Thanks for posting! I've got this on my to do list...my right side doesn't illuminate. Also my cd player ejects all disks so might hunt around and see if I can do anything for a repair.
 

Members online

Forum statistics

Threads
278,317
Messages
3,554,129
Members
248,016
Latest member
Advally Service

Trending content

Back
Top