Rear Double deck storage system

NativeRunner

New member
Has anyone made a drawer system to use with/wo the rear cargo tray? Currently attempting to build drawers to fit under the cargo tray in the back. Need recommendations for bottom mount slides.

 
Register to hide this ad
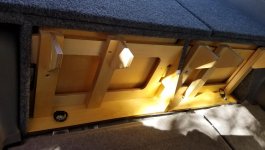
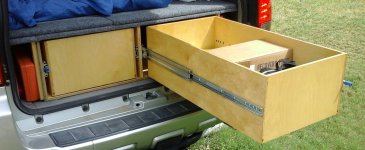
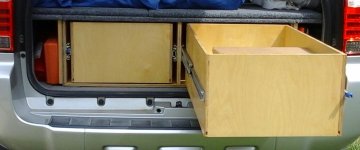
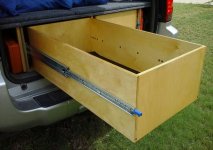
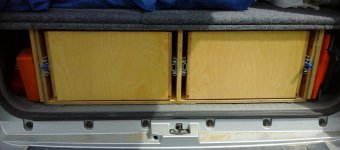
I didn't build them. Bought them used from a 5th gen owner and just painted them to clean them up, they ended up fitting perfectly under my rear deck lid. Its such a tight fit that the deck lid holds them in place pretty much.

IMG_7196.jpg

IMG_7197.jpg

IMG_7198.jpg

IMG_7200.jpg


It measures 41" wide x 30" long x 9 1/4" tall.
 
Has anyone made a drawer system to use with/wo the rear cargo tray? Currently attempting to build drawers to fit under the cargo tray in the back. Need recommendations for bottom mount slides.

[MENTION=219057]NativeRunner[/MENTION]

I removed my cargo tray and used it's mounting points for fwd anchor points for my drawer system.

Why undermount? Something specific that is wide but shallow that needs to fit in the drawer?

Bottom mount drawer slides will depend a lot on the size/weight of the drawer you'll have + the expected contents. Strongest I know of off the top are Heavy duty slides used for a Sliding Pantry, IIRC they are about $120 a pair and are rated for up to 130lbs. You'll lose about 1.5" of drawer depth though.

You might look at Ryadon out of California.
The 36" ones of these are what I used, I remember that they had a 500lb rating when used as side mount and a lower weight rating if used as undermount. 3600 Series up to 500 LB Full Extension Lock In/Out Drawer Slide —
If you can stay within the the lower load rating these would only cost 3/4" of depth when mounted undermount.

Boort
 
I didn't build them. Bought them used from a 5th gen owner and just painted them to clean them up, they ended up fitting perfectly under my rear deck lid. Its such a tight fit that the deck lid holds them in place pretty much.

IMG_7196.jpg

IMG_7197.jpg

IMG_7198.jpg

IMG_7200.jpg


It measures 41" wide x 30" long x 9 1/4" tall.

This is exactly what i was looking for, my first measurements are almost the exact same as your box. I plan on extending it to the hatch, and adding side storage.
 
[MENTION=219057]NativeRunner[/MENTION]

I removed my cargo tray and used it's mounting points for fwd anchor points for my drawer system.

Why undermount? Something specific that is wide but shallow that needs to fit in the drawer?

Bottom mount drawer slides will depend a lot on the size/weight of the drawer you'll have + the expected contents. Strongest I know of off the top are Heavy duty slides used for a Sliding Pantry, IIRC they are about $120 a pair and are rated for up to 130lbs. You'll lose about 1.5" of drawer depth though.

You might look at Ryadon out of California.
The 36" ones of these are what I used, I remember that they had a 500lb rating when used as side mount and a lower weight rating if used as undermount. 3600 Series up to 500 LB Full Extension Lock In/Out Drawer Slide —
If you can stay within the the lower load rating these would only cost 3/4" of depth when mounted undermount.

Boort

I wanted to try and build something useful while keeping factory looks. are you using any rear anchor points?

No reason for under mount, but seeing how the drawers are shallow enough as is. I think the ones you mentioned will do the trick, if my drawer is 36" can I still use 36" slides or do I need shorter/longer ones?
 
I didn't build them. Bought them used from a 5th gen owner and just painted them to clean them up, they ended up fitting perfectly under my rear deck lid. Its such a tight fit that the deck lid holds them in place pretty much.

It measures 41" wide x 30" long x 9 1/4" tall.

Man this is whatI"m lookign for too. I want to keep factory looks too. Probably have to end up building my own.
 
I wanted to try and build something useful while keeping factory looks. are you using any rear anchor points?

No reason for under mount, but seeing how the drawers are shallow enough as is. I think the ones you mentioned will do the trick, if my drawer is 36" can I still use 36" slides or do I need shorter/longer ones?

[MENTION=219057]NativeRunner[/MENTION]

What you are looking for should be doable. Currently I'm not using the rear mounts. On my 2006 I have the 2 plastic trays with a mounting point in them. Most folks use these to mount the box at the rear. there are a couple of ways I've seen used.
1) Turnbuckles from the side of the box to the existing tie down points in the plastic trays.
- I don't use this because the turn buckles get in the way of
other things that I store in this location.

2) "Ears" on the bottom of the box system that use the tiedown points or remove them and bolt to the tiedown point mounting locations.
- I tied to use this method as described by [MENTION=96727]bagelsjustbagels[/MENTION] in his plans posted on this forum and his site TheAdventureIndex.com. I ended up cutting them off as my less modular, taller, design would not let me remove the drawers once installed.


I plan to get a strap of steel bar and run it under the trays and Drawer box between the mounting points, then countersink a few bolts into the bottom of the box to hold it down at the rear. You could do probably do the same at the front sliding metal under the tray mount to it's mounting points.

I went with 36" slides about 1/2 the way up my drawers. (This would put them near the top of your proposed drawers.) to use the 36" drawers I recessed them into the front of the drawer box; Just behind he back seats.

Here is a pic showing the front of the box with back seats down, and the mounts visible. Also shows the cutouts for the 36" drawer slides for the passenger side drawer.

Boort
 

Attachments

  • 2018_132811_small.jpg
    2018_132811_small.jpg
    136.4 KB · Views: 5,163
Last edited:
I just decided to remove the cargo shelf as well as the backseats in my 2005 4Runner, I thought about building something around the cargo shelf but opted to go all-in on this project:

cJVk0QQ.jpg


The plan is to build a short platform, bed, and cabinets inside the 4Runner's interior, here's where I'm at now:

VSHnaD5.jpg
 
Last edited:
[MENTION=219057]NativeRunner[/MENTION]

What you are looking for should be doable. Currently I'm not using the rear mounts. On my 2006 I have the 2 plastic trays with a mounting point in them. Most folks use these to mount the box at the rear. there are a couple of ways I've seen used.
1) Turnbuckles from the side of the box to the existing tie down points in the plastic trays.
- I don't use this because the turn buckles get in the way of
other things that I store in this location.

2) "Ears" on the bottom of the box system that use the tiedown points or remove them and bolt to the tiedown point mounting locations.
- I tied to use this method as described by [MENTION=96727]bagelsjustbagels[/MENTION] in his plans posted on this forum and his site TheAdventureIndex.com. I ended up cutting them off as my less modular, taller, design would not let me remove the drawers once installed.


I plan to get a strap of steel bar and run it under the trays and Drawer box between the mounting points, then countersink a few bolts into the bottom of the box to hold it down at the rear. You could do probably do the same at the front sliding metal under the tray mount to it's mounting points.

I went with 36" slides about 1/2 the way up my drawers. (This would put them near the top of your proposed drawers.) to use the 36" drawers I recessed them into the front of the drawer box; Just behind he back seats.

Here is a pic showing the front of the box with back seats down, and the mounts visible. Also shows the cutouts for the 36" drawer slides for the passenger side drawer.

Boort

That looks good, have anymore pictures? I still debating between paint and carpet for the finished box. as for anchor points, I think I'm going to try to use the "anchor points" in the rear floor that the deck "locks" into. drill holes underneath the drawer and use as a anti-slid anchor. the weight and the fact that the box is less than 1/4" from the hatch should keep it secure.


Man this is whatI"m lookign for too. I want to keep factory looks too. Probably have to end up building my own.

Currently in the R&D phase. My box will similar in size (6" longer), and I plan to add a few things, like top mount Plexi-glass windows (quick viewing when lifting the deck), rear top opening (hatch doesn't need to open to access drawers), side pockets, and maybe a table.
 
Last edited:
I just decided to remove the cargo shelf as well as the backseats in my 2005 4Runner, I thought about building something around the cargo shelf but opted to go all-in on this project:

cJVk0QQ.jpg


The plan is to build a short platform, bed, and cabinets inside the 4Runner's interior, here's where I'm at now:

VSHnaD5.jpg


I thought about doing this as my second (if I remove the deck lid) option. there's enough space back there, the customization could be endless. keep the updates coming.
 
Are those raised sections in the floor left over after taking out the top deck? How is the floor designed in the 4runners without the top deck? Thanks
 
That looks good, have anymore pictures?
...

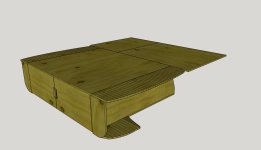
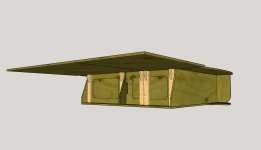
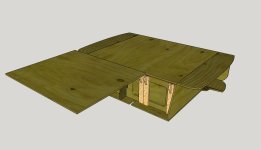
Sure I have a few. Here are a few renders from my R&D for the sleeping platform.

What would you like to see?

Boort
 

Attachments

  • 4genT4RDrawers4_PlatformLegsISO.jpg
    4genT4RDrawers4_PlatformLegsISO.jpg
    65 KB · Views: 5,202
  • 4genT4RDrawers4_PlatformLegsDVRSideLow.jpg
    4genT4RDrawers4_PlatformLegsDVRSideLow.jpg
    51.8 KB · Views: 5,087
  • 4genT4RDrawers4_PlatformLegsNo40Platform.jpg
    4genT4RDrawers4_PlatformLegsNo40Platform.jpg
    68.6 KB · Views: 5,111
Sure I have a few. Here are a few renders from my R&D for the sleeping platform.

What would you like to see?

Boort


that looks really nice, thanks. could I see the front of the drawers and how they pull out? how did you attach the side wings/ears to the box? I want to add those for side pockets.
 
that looks really nice, thanks. could I see the front of the drawers and how they pull out? how did you attach the side wings/ears to the box? I want to add those for side pockets.


I'll see if I can get some pics of the unit with the drawers open after work tonight.

These were early renderings some of the features did not survive to the finished product. The side wings were one of those features. The side wings were part of the base plate. When I switched from the 4 part modular approach used in the TheAdventureIndex plans to the single box approach in my final design. There was a single sheet of 5' x 5' x 1/2" BB Plywood used for the bottom. The Wings were part of that piece just like the Pic posted by [MENTION=439084]4Running4Adventure[/MENTION].

The side wings were cut off early on in the actual build so I could take the system in and out. I needed taller drawers than the plans called for. Keeping the wings would have meant muscling the 100LB system up on an angle rather than simply sliding it in and out.

My unit with sleeping platforms weighs in at 150lbs. 50 Lbs are the 4 drawer slides. If I were to build again I would look for ways to lighten the unit even more.
  • Route holes in sides of box above and below the slides where it is in contact with the wheel wells
  • Route out the thickness of the bottom under each drawer to 1/4"
  • Maybe - Lighten the drawers by switching from 1/2" plywood to 3ply Coroplast with Aluminum reinforcements around top and Drawer Slides.
  • Use 9mm Baltic birch for the sleeping platform and side flaps

Boort
 
Last edited:
I found this on Youtube a while back. Was thinking of doing this but ended up not wanthing a drawer system as I sleep in the back of my 4R all the time and have to haul kids. Looks like a solid design though.

YouTube

I too really like the factory look. I ended up making a flush mount slide out shelf/table system instead so I can sit out the table like a tailgate or cook in the back with the hatch open. I sit my kids on there all the time to clean them up, etc.

I completely ripped out floor to the metal floor, cut out a new subfloor, reused the padding stuff on the old carpet and bolted it down using existing anchor points. I didn't drill through the body at all.

There were boltholes towards the front side just behind the seat that I used.
r4SYnOZ.jpg


For the mounting points to the rear, I used a small flat piece of wood, a t-nut and a washer (for extra strength).
OFQvQnq.jpg


This could be a good base to mount stuff on to. You can drill holes into this base where you need them and install tnuts on the underside.

This was my end product
uAXRvgh.jpg
 
that looks really nice, thanks. could I see the front of the drawers and how they pull out?

The drawer fronts are currently off for an upgrade. This gives a good look at the drawers and how the locking slides can be used as handles.

Boort
 

Attachments

  • 20200625_152926-1.jpg
    20200625_152926-1.jpg
    138 KB · Views: 1,281
  • 20200625_152914-1.jpg
    20200625_152914-1.jpg
    114.6 KB · Views: 1,309
  • 20200625_152837-1.jpg
    20200625_152837-1.jpg
    134 KB · Views: 1,287
  • 20200625_152818-1.jpg
    20200625_152818-1.jpg
    139.3 KB · Views: 1,314
The drawer fronts are currently off for an upgrade. This gives a good look at the drawers and how the locking slides can be used as handles.

Boort

This is great. I saw your posts on the other thread as well. The wings are just a single piece of wood (cut with a band saw I'm assuming?), correct? I saw all of the lines on the drawings, but I'm guessing that's just an artifact?
 
[MENTION=595447]wiz329[/MENTION]
This is great. I saw your posts on the other thread as well. The wings are just a single piece of wood (cut with a band saw I'm assuming?), correct? I saw all of the lines on the drawings, but I'm guessing that's just an artifact?

Yes, the base plate and wings was designed as a single piece of plywood. The pattern was traced to the 5' wide piece from the full sized cardboard mockup then cut with a circular saw and jig saw then sanded to final dimension.

The lines you see in my sketchup renderings on the "top wings" and bottom "ears" are the contour measurements to get a tight fit with the side of the 4runner. (https://www.toyota-4runner.org/atta...ge-system-4gent4rdrawers4_platformlegsiso-jpg) Since my drawer box was taller ~2" over the wheel wells, the than the plans I needed to make my own curve measurements. since the the profile of the interior of the truck was different than the one at the level in the plans. They are an old boat builders trick to copy complex curves into a 2d plan. The wider spacing was 1" and the narrow spacing was 1/4" IIRC. The 1/4" spacing was needed where the curve around the wheel wells changed too quickly for the 1" and I needed more resolution to avoid just cutting a straight line that would not mate up as well as I would have liked. When in Sketchup I drew a straight reference line then I draw out each line to the measured distance, then connect the end points to draw the curve in the Sketchup model.

As mentioned earlier some of the design changes that I made to the plans from TheAdventureIndex Required that I remove the wings from the base plate that tucked in behind the wheel wells to mate with the tie down points.

Since I made my drawer box a single 2 drawer unit to reduce weight and slightly increase storage space in the drawers as well as increased the height over what was in the plans. These 2 changes required that I remove the wings so that the box could be removed from the truck once assembled.

Boort
 
[MENTION=595447]wiz329[/MENTION]


Yes, the base plate and wings was designed as a single piece of plywood. The pattern was traced to the 5' wide piece from the full sized cardboard mockup then cut with a circular saw and jig saw then sanded to final dimension.

The lines you see in my sketchup renderings on the "top wings" and bottom "ears" are the contour measurements to get a tight fit with the side of the 4runner. (https://www.toyota-4runner.org/atta...ge-system-4gent4rdrawers4_platformlegsiso-jpg) Since my drawer box was taller ~2" over the wheel wells, the than the plans I needed to make my own curve measurements. since the the profile of the interior of the truck was different than the one at the level in the plans. They are an old boat builders trick to copy complex curves into a 2d plan. The wider spacing was 1" and the narrow spacing was 1/4" IIRC. The 1/4" spacing was needed where the curve around the wheel wells changed too quickly for the 1" and I needed more resolution to avoid just cutting a straight line that would not mate up as well as I would have liked. When in Sketchup I drew a straight reference line then I draw out each line to the measured distance, then connect the end points to draw the curve in the Sketchup model.

As mentioned earlier some of the design changes that I made to the plans from TheAdventureIndex Required that I remove the wings from the base plate that tucked in behind the wheel wells to mate with the tie down points.

Since I made my drawer box a single 2 drawer unit to reduce weight and slightly increase storage space in the drawers as well as increased the height over what was in the plans. These 2 changes required that I remove the wings so that the box could be removed from the truck once assembled.

Boort

Thanks for the detailed reply. I really like how you made the drawer a single unit and increased the height.

A couple follow-on questions:
(1) What is supporting the wings? Are there vertical supports somewhere? It looks like you have a front panel in your plans, but I didn't see one in the picture (https://www.toyota-4runner.org/3162774-post63.html) you posted (I'm guessing it was just temporarily moved at the time?)
(2) Was the increase 2" height of the drawer box to make the entire platform level when you insert the front panels resting on the front seats? How precise did this have to be?
(3) How did you translate the sketchup designs onto the cardboard template? A projector scaled 1:1 using a ruler on the projection PDF?

If you've got a cut list or any plans that incorporated the modifications you made and wouldn't mind sharing, I could definitely make good use of them. Love the look and functionality of what you put together.
 

Members online

Forum statistics

Threads
278,308
Messages
3,554,058
Members
248,016
Latest member
Advally Service

Trending content

Back
Top