Rear storage door for 5th..my quick and dirty

Whats that covering the bottom opening? something you made with a twist handle?

That is left over from my first attempt from several years ago to make a cover for both openings with a twist handle at the bottom. the larger cover would never stay on, but I made both covers at that time with a cardboard cutout covered with fiberglass cloth/epoxy covered with some black vinyl. The cover for the small opening at the bottom was able to stay with that small latch so I just kept it there.

Mcat707 - thanks - was thrilled 83mule did this since my attempt from about 4 years ago didn't hold. the 4th gen 4runner has several conveniences like this I wish were included with the 5th gens.
 
Guys.....that is why these sites EXIST! To help others out with ideas and different views. Great job and I knew the ABS would be better than my aluminum so yours is ''Cover, 2.0''!
 
[MENTION=167491]83Mule[/MENTION] - thanks for posting this and the idea. Not sure why it took me so long to find that you did this mod - it has been driving me crazy not having a cover there like my son's 4th gen 4runner. I took your advice and used ABS plastic (textured).

Guys.....that is why these sites EXIST! To help others out with ideas and different views. Great job and I knew the ABS would be better than my aluminum so yours is ''Cover, 2.0''!

I've been trying for a couple months now to get answers from colo4runner, or frankly anybody who can help with this project. Because i have little to no experience tinkering with auto mods.
I don't know where to even begin here. I have the ABS plastic sheet. But i don't know how to create a template pattern so i can transfer that to the ABS to cut it out. I want to make the exact same thing as colo4runner did. I need help! PLEASE. Step by baby step instructions are what i need. Anything to get me on the right track here. General instructions like "trace it and cut it out" won't help me at all. It will just create more delay and many more questions for clarity. PLEASE help. Someone!
Thanks!
 
I've been trying for a couple months now to get answers from colo4runner, or frankly anybody who can help with this project. Because i have little to no experience tinkering with auto mods.
I don't know where to even begin here. I have the ABS plastic sheet. But i don't know how to create a template pattern so i can transfer that to the ABS to cut it out. I want to make the exact same thing as colo4runner did. I need help! PLEASE. Step by baby step instructions are what i need. Anything to get me on the right track here. General instructions like "trace it and cut it out" won't help me at all. It will just create more delay and many more questions for clarity. PLEASE help. Someone!
Thanks!

Thom - sorry about that, things have been a little hectic lately, but will try to provide some specifics. Sounds like you got the abs plastic, but below is a link of the plastic and lock that I used in mine if needed for others.

Amazon.com: ABS Textured Plastic Sheet 1/8 Thick x 12 x 24: Industrial & Scientific

Admiral Locks Tubular Cam Lock, Keyed Alike Removable Key (1 Inch 90deg, Black Pack of 2) - - Amazon.com

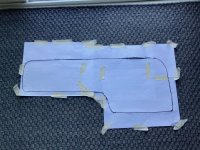
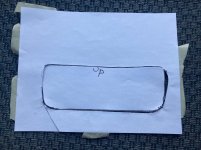
For the template, I used some paper and covered up the opening and taped the paper once the opening was covered, then traced around it for the template. I cut it out, then transferred it to the ABS plastic. I used a jig saw and cut the ABS plastic also leaving the two tabs at the bottom.

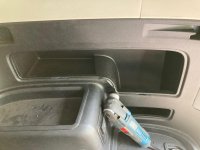
placing the cut abs plastic over the opening, I marked on the opening where the tabs would go into at the bottom. I then used a Dremel tool with a small cutter and cut into the opening in the bottom of the side panel for where the tabs would go into. That part kinda sucked knowing you are cutting into the side panel. There are some plastic mounts/ribs in there when you cut below the surface, so I just kept going until I made the slits deep enough and used a larger cutting wheel with the dremel. You could probably get away with making the tabs a little shorter.

I used a little sanding tool with the dremel and sanded around the edges of the cover, and made a slight angle on the cargo panel side of the cover.

once everything fit ok, I marked where the lock would go and drilled in the cover for the lock, and then a small slit in the cargo hole for the lock/latch to go when locked. My cover wasn't a perfect fit, but solved the annoying issue of having that opening there. You can fit the initial cover via trial and error and using the sanding tool to tweak it where you need to - error on the larger side of the initial cut for the cover as you can always trim down.

For the small bottom opening, that was my first attempt before I saw how 83mule did his and provided a much better solution - I had fiberglassed some cardboard for that cover. you can just leave that open, etc. hope that helps.
 
Last edited:
Good job on the cover, latch and instructions.
I went with a simpler approach with fixed tabs and a magnetic latch.
Unfortunately there is no quick way to crank this out. I made a cardboard template and transferred it to a sheet of 3/16 inch ABS plastic. Cut out with a jig saw then a lot of shaping and forming to get a perfect fit. It’s easy but it does take some time.
After a year of use it’s still working great.

https://www.toyota-4runner.org/3461231-post18.html
 
Good job on the cover, latch and instructions.
I went with a simpler approach with fixed tabs and a magnetic latch.
Unfortunately there is no quick way to crank this out. I made a cardboard template and transferred it to a sheet of 3/16 inch ABS plastic. Cut out with a jig saw then a lot of shaping and forming to get a perfect fit. It’s easy but it does take some time.
After a year of use it’s still working great.

https://www.toyota-4runner.org/3461231-post18.html

nice, I like the magnet idea as you don't have to carve out the slots at the bottom for tabs or the lock on top. For two grabber tabs at the bottom, did you just use your existing abs plastic, cut pieces from that and form it? what did you do for the lower opening?
 
nice, I like the magnet idea as you don't have to carve out the slots at the bottom for tabs or the lock on top. For two grabber tabs at the bottom, did you just use your existing abs plastic, cut pieces from that and form it? what did you do for the lower opening?

The two grabber pieces were just scrap ABS pieces. I had lots of excess material to experiment with. I had to heat and bend two right angles in a vice with a propane torch (careful). It gets soft rather quickly, so bend over quickly (with a board or rubber mallet) to make a sharp corner. Some experimenting with lengths, widths and angles to verify before gluing them with ABS cement to the good piece.

Try this with scraps and gluing to another scrap piece to get the hang of it. Once ABS is solvent glued (actually melted together) you cannot remove them.

To help with determining the grabber dimensions I temporarily bridged the opening, where I wanted a grabber, hand holding a 2inch wide piece of scrap set into the recess vertically. Then test fit the grabber. That way you can look behind it and see how well it will grab the edges of the opening. Then tailor your next attempt at a grabber with that in mind. If you get it right the grabbers will hold the lower edge of the cover kind of snug. After ABS gluing you can set it into place and work the cover with a hair dryer or heat gun to get the curvature perfected. Then you can install the magnets.

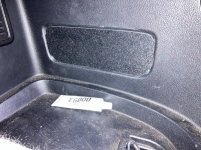
For the small lower opening I permanently glued it in place with E6000 craft cement, taped into place until cured.
 
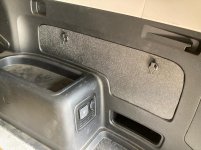
My version of the back storage covers

First and foremost i want to thank [MENTION=167491]83Mule[/MENTION] and [MENTION=4880]colo4runner[/MENTION] for the inspiration, photos, and details on how they did this project. It was a huge help.

So, if i forget to describe a step or if something needs better explanation, please let me know. I figured i would pay it forward to others who may be interested in doing this to the back of their 4runner. Mine is a 2013 SR5.

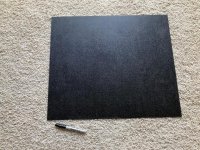
So i bought a sheet of 2' x 2' ABS plastic from a local company who uses this stuff daily in whatever they manufacture, and they had plenty of extra stuff laying around for me to buy.

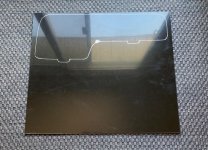
So, i taped a few sheets of white printer paper to the opening of the unusable storage cavern. I then used a sharpie marker and with my finger i lightly felt the the area i wanted to trace by feeling that "indentation" and traced it out.

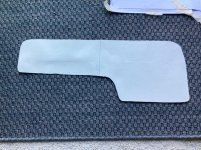
I then had a thin sheet of chipboard cardboard. I set the traced paper on the cardboard and with a exacto knife/scalpel, i cut through the paper and light scored the cardboard.

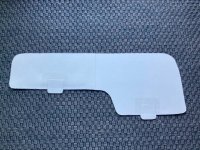
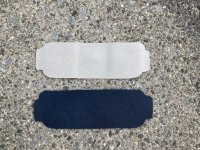
I then cut through the cardboard and made a template. I then took it out to my truck and made sure it fit exactly as i intended. I fine tuned it here and there. But once i was happy, i added bottom tabs.

 

Attachments

  • IMG_9039.jpg
    IMG_9039.jpg
    138.1 KB · Views: 906
  • IMG_9312.jpg
    IMG_9312.jpg
    140.8 KB · Views: 898
  • IMG_9313.jpg
    IMG_9313.jpg
    142.5 KB · Views: 896
  • IMG_9314.jpg
    IMG_9314.jpg
    142.9 KB · Views: 890
continued ...

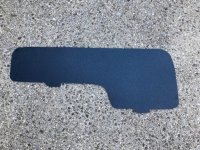
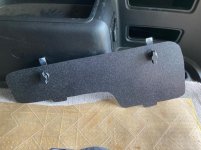
So then, knowing i want the textured side facing out, with a paint pen i traced on the smooth back of the ABS plastic, so obviously flipped the template over before tracing.

I then placed the ABS on a thin piece of plywood for added support. And with a fine small toothed blade, i used a jigsaw and carefully, slowly cut out the pattern. This took me a solid 8 -10 minutes because i really moved slowly so i didn't undercut or overcut the pattern. Once cut, i took a small hand dremel with a fine sanding wheel and smoothed out any rough edges.

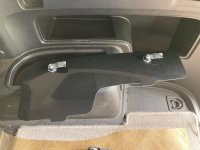
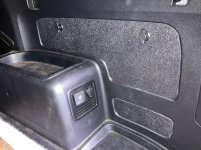
Once i was happy with that, i moved to the truck. Now this is where i got nervous. I held up the cut piece to the opening and figured out where the tabs were gonna be. I placed tape on the truck as borders to how big i wanted to cut the slots for the tabs. I used a multitool blade with fine teeth and i cut the slots in the truck. Fine tuned it until the tabs fit snuggly in the slots.

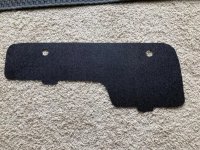
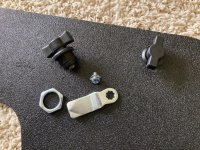
Once that was done, i decided i wanted to install swing T-handles to help secure the panel in place. Mcredy 2pcs T Handle Swing Knob Turn Cam Lock for Machine Cabinet Drawer - - Amazon.com

So, with a drill i carefully, slowly cut out holes.
 

Attachments

  • IMG_9316.jpg
    IMG_9316.jpg
    141.9 KB · Views: 256
  • IMG_9317.jpg
    IMG_9317.jpg
    133.8 KB · Views: 251
  • IMG_9318.jpg
    IMG_9318.jpg
    136.7 KB · Views: 250
  • IMG_9330.jpg
    IMG_9330.jpg
    139.8 KB · Views: 255
Last edited:
continuing ...

So then, i installed the t handles.

Once installed i placed the cover into place i figured out where the metal part of the handles would "lock" into the truck to close it all up tight.

Again, using the multitool and fine toothed blade, i cut slots into the truck to accommodate the metal swing "locks" of the handle.
 

Attachments

  • IMG_9331.jpg
    IMG_9331.jpg
    141.1 KB · Views: 246
  • IMG_9332.jpg
    IMG_9332.jpg
    136.9 KB · Views: 242
  • IMG_9333.jpg
    IMG_9333.jpg
    135.3 KB · Views: 253
  • IMG_9334.jpg
    IMG_9334.jpg
    136.6 KB · Views: 245
Last edited:
continuing ....

So then, I wanted to close up the lower opening too.

I wanted it to be more permanent. I can't imagine a time personally that i would want this open again. So following the same technique as the other cover, i traced, cut out and fine tuned the template. And then cut the pattern the same way.

I sanded it a little. I cut the slots in the truck the same way. I then decided to use E6000 glue (which is higher heat resistant) and glued the piece into place and applied pressure to the cover for 24 hours to allow glue curing. If this glue gives, i'll try another adhesive. If anyone has a better adhesive to use (in case this glue fails) let me know.

Again, i hope this helps someone. And if there is something i didn't describe well, please let me know so i can edit the posts.
 

Attachments

  • IMG_9337.jpg
    IMG_9337.jpg
    129.5 KB · Views: 244
  • IMG_9338.jpg
    IMG_9338.jpg
    138.6 KB · Views: 245
  • IMG_9365.jpg
    IMG_9365.jpg
    137.6 KB · Views: 243
  • IMG_9367.jpg
    IMG_9367.jpg
    136.9 KB · Views: 247
Last edited:
First and foremost i want to thank [MENTION=167491]83Mule[/MENTION] and [MENTION=4880]colo4runner[/MENTION] for the inspiration, photos, and details on how they did this project. It was a huge help.

So, if i forget to describe a step or if something needs better explanation, please let me know. I figured i would pay it forward to others who may be interested in doing this to the back of their 4runner. Mine is a 2013 SR5.

So i bought a sheet of 2' x 2' ABS plastic from a local company who uses this stuff daily in whatever they manufacture, and they had plenty of extra stuff laying around for me to buy.

So, i taped a few sheets of white printer paper to the opening of the unusable storage cavern. I then used a sharpie marker and with my finger i lightly felt the the area i wanted to trace by feeling that "indentation" and traced it out.

I then had a thin sheet of chipboard cardboard. I set the traced paper on the cardboard and with a exacto knife/scalpel, i cut through the paper and light scored the cardboard.

I then cut through the cardboard and made a template. I then took it out to my truck and made sure it fit exactly as i intended. I fine tuned it here and there. But once i was happy, i added bottom tabs.

Great job and photos showing where to cut into the panel. It's nice and clean, and the benefit of having that covered up. I like the T handles too - might have to looking into those.
 

Members online

Forum statistics

Threads
278,316
Messages
3,554,120
Members
248,016
Latest member
Advally Service

Trending content

Back
Top