

pjbrownva
New member
So,
I've gotten a LOT from this forum, and would like to give back.
Here's some good info for anyone who doesn't have a rear view camera, and would like to add one without breaking the bank!
I'll apologize now for the lack of specificity in my directions. I installed this in my old T4R, which SUNK, so I no longer have the truck, and I didn't take photos. So this will only count as a "partial" writeup, because I won't be giving step-by-step directions with photos to show everything.
But I *can* show you the parts (about $160 total), and give a basic description. It's not perfect, but it can help.
PLUS, I can vouch that the results were AWESOME!!!
Here's the camera that I bought:

It came from AliExpress.com. AliExpress had multiple cameras and the specific one I ordered seemed to be the best because it had a high quality CCD chip for the camera instead of a CMOS chip or some other type of hybrid technology, and it put out an image with 16x9 (or maybe 16x10) aspect ratio, which was very well suited to the monitor I ordered.

The camera is a camera and LED light. You remove the entire housing for one of the rear license plate lights, and you replace it with this part. The part includes an LED light to illuminate your license plate... so you don't lose the license plate light, but DO GET a well-hidden and properly aimed camera.

One note: After everything was installed and hooked up, I filed off a very small part of the underside of the inner lip of a piece of plastic trim on the rear tailgate. A tiny bit of the trim blocked a *small* part of the top view from the camera. I could have left it alone, but the little bit of filing gave me a complete view from the camera, and when you stand behind the truck, you cannot tell AT ALL that I had filed down a small part of the underside of the inner lip of the tailgate trim. It's your choice. You'll see what I mean if and when you do this upgrade. It's not a big deal either way.
Here's what I bought and installed to see the image:

That's Right! It's a after market rear view mirror that has a hidden video monitor built into it. It works really well, and it is truly OEM quality. No B.S.
I saw some places selling a similar (or maybe the same) replacement mirror for $300+, but the one I got I paid about $110 for, and it was AWESOME!
Now, the mirror w/ video monitor has TWO video inputs...
and you can't let that go to waste :happy:
so I also bought and installed this:

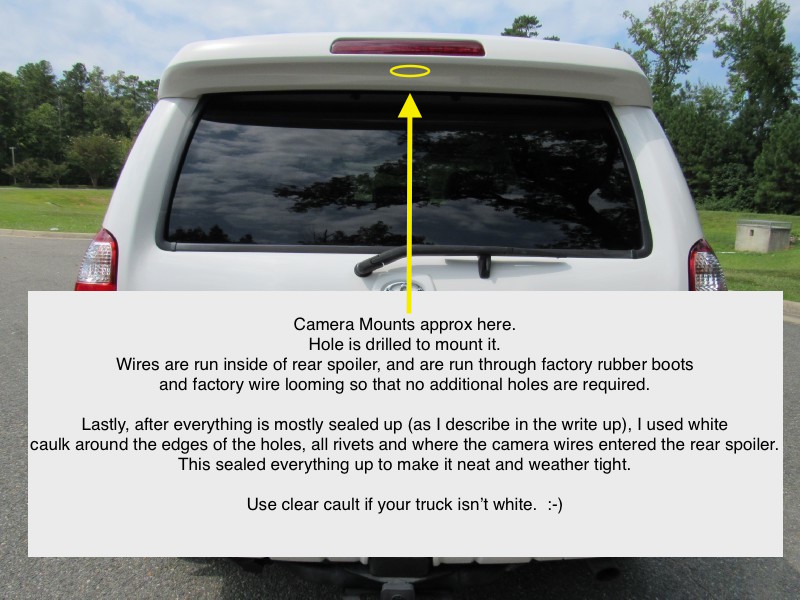
... a second camera, which I mounted in the center on the underside of my rear spoiler. It's approximate location is circled in the photo below (but the photo doesn't actually show a camera... so you're not losing your eyesight. It's the photo... not you. ).
).
Of course, with two camera's, you need to be able to select one to view....
so I also bought this:

and hooked it up so that I can manually select which camera to view.
I went with manual operation only for the cameras. The switch was installed in one of the empty switch slots in the center console (near the DAC switch), so it was easy access. There are times when you want one of the cameras on even when you aren't in reverse, so using a switch to manually activate the cameras made good sense to me.
The rest of this write up is my attempt a trying to describe how I did the install, and few tips for what works and what to look out for.
It might be boring reading without photos. :doh: (Sorry). If someone does this upgrade, maybe then can post and add a few shots to make up for my lack of pics. :hatsoff:
Good luck. I hope this helps someone. Pls post and let us know if you end up doing this upgrade!
-Phil
------------------------------------
Here are a few tips for those who might try it. If you do try it, email or PM me, and I'd be glad to consult based on my experience and recollection.
The biggest tip I can give for now, is that I used a "fish tape" to try to run all of the wires between the head liner and the roof. This was a GREAT idea, but it hit a snag. It turns out, above the roof liner, at the very edges of the roof, there are welded supports of metal to act as small trusses to brace the roof to the side of the car. Because I couldn't see (and didn't know), I ran my wires and the fish tape underneath one of those trusses, and found the wires and the fish tape stuck! I couldn't go forward, and I I couldn't go backward. I ended up using brute force to pull the wires back out so that I could start over (big mistake) because I tore off ALL of the connectors on all of the wires.... plus my fish tape was still stuck. After hours of struggle, I called it a day, and the next day I had to dis-assemble a LOT of the trim and moulding pieces, in order to expose the raw metal for the roof. That's when I saw the support trusses, and was able to get my fish tape back. As for the wires... I had to cut, splice, solder and tape connectors back onto all of the wires.... LOTS of work.
So, as a general precaution... I STILL think using a fish tape to run the wires under the head liner is a good idea.... it's fast and easy (in theory), and keeps your sensitive video feed far away from many potential sources of noise...
But if you go that route, keep your fish tape away from the far left and far right sides of the truck, otherwise you might manage to squeeze your wires through the small space created by the support truss (just as I did), and then find you you are stuck! If you do get the fish tape stuck... don't brute force it like mr stupid did (that's me by the way!!!)... if you can't use finesse, then you're better off to bite the bullet and start dis-assembling lots of the interior until you can drop enough of the head liner to see the problem and fix it.
Now that I've written a ton about the warnings.... here's a few good suggestions....
The camera replaces one of the rear license plate housings. It's a perfect fit.
You remove the factory housing for the light, and cut the wires, then solder an tape (or solder and heat shrink) or use butt-connectors with built in heat shrink, too hook up the light wires to the new piece. The new piece has build in LED lights, so you DON'T LOSE A LIGHT. Because it is an LED, polarity matters, so pay attention an test it before you make it final.
Also, the LED light is a different color temperature than the regular incandescent (or halogen?) rear license plate bulbs, so you probably want to order a an aftermarket LED replacement bulb for the OTHER rear license plate light bulb. I'd assume about 5000K kelvin would work... but I don't know and didn't measure the color temperature of the new LED... I just know that it was a whiter color and clearly a higher color temperature.
TIP...
When you put in the rear camera, you'll need to take off the cover for the rear gate so that can get proper access to run the wires inside your rear tail gate.
Route them so that the rear window can go up and down. Use zip ties where necessary.
Tip...
When you run the wires, there is a rubber boot at the top of the tail gate for the factory wires. Open up the clip holding the boot, and disconnect it from both ends of the vehicle, then you can use a metal hanger with duct tape, or a "fish tape" to run YOUR wires through the same factory boot. It was tight, and I had to do some of the bigger connectors one at at time, but I got it to fit. The result... a clean, factory look, NO LOOSE WIRES, and zero drilling or new holes.
Tip... I installed the toggle switch in the center console. It fit in one of the blanks where I didn't have a factory switch. I wired it to the cigarette lighter as a power source, and made it so that one position turned on the camera above the license plate, the other position turned on the auxiliary camera mounted just below the rear spoiler, and the middle position was off. This mean I had to manually hit the switch to turn on the camera... which was fine.
The lower camera showed my tow hitch including the tow ball... so it made hooking up a trailer a snap. The upper camera was mounted and aimed so that is showed my boat and what was above it. I could really tell what was going on. I could even see if my trailer was going over the lines for my lane of travel while I was driving. It was very useful.
LASTLY...
The mirror with the built-in monitor was AWESOME. It was true, OEM quality.
It had a slightly darker tint than the factory mirror, but that was fine. When the monitor was off, you couldn't tell that there was a monitor in the mirror unless you angled yourself just right and actually looked for it.
When the monitor was on, the image quality was fantastic... EVEN AT NIGHT!.
With that said... don't be dumb and hook up a movie or something like that to the mirror... You'll end up killing yourself our someone else if you drive while trying to watch a movie or music video.
In the front, I ran the wires to the mirror from under the headliner, and down the driver's side "A" pillar and behind under the dash to keep everything neat and out of sight.
LAST TIP...
For the "upper" camera. I drilled about 3 holes in the to bottom of the rear spoiler... each was about 1/2 inch in diameter. They were slightly off-set, as if to form an oddly shaped triangle, or somewhat reminiscent of the Olympic rings

I ran all of the wires through the factory wire looming (rubber boot)... I had to fish the wires through, and start with a regular piece of speaker wire to get everything started. There was a bit of trial and error, but once I got the first wire through, I used it as a guide line to get the "real" wires through.
I cut a piece of hard plastic about 1" wide by about 3" long, and drilled a small hole on each end to mount it. I used it as a template to drill matching holes in the underside of the spoiler itself. Lastly, I lined everything up. and drilled a small hole in the center of the piece, and cut a small channel so that I could feed the wires into that hole. (make sense?)
Then I carefully placed the piece of plastic INSIDE of the rear spoiler, and lined up one of the holes, and put a pop rivet into the underside of the rear spoiler such that it also went through the hole drilled in the piece of plastic inside the spoiler, and secured the plastic. Then, I was able to use some finesse to line up the holes on the other side, and also put in a pop-rivet. The result was that the wires were now run INSIDE the rear spoiler, the camera was hanging OUTSIDE of the spoiler on the underside, and I had closed off MOST of the holes I made by riveting a piece of plastic to the inside of the rear spoiler.
I drilled two holes to mount the upper camera to the underside of the rear spoiler and pop-riveted those in place too. Then I unscrewed the trim around the camera, and rotated the camera lens itself until the image was correct (not upside, or askew), I bent the thin metal on the camera's mounting bracket to aim the camera exactly where I wanted it, and then I screwed the camera trim down very tightly to make sure the camera didn't rotate.
Like I said, I sunk the T4R that had this upgrade, and it was totaled... so I can't get any photos to better show how it's done.
If anyone tries this and wants more info, PM or email me, and I'll do what I can to help. I'll even PM my phone number if you ask for it, so that we can chat..
The mod was very slick, and affordable.
Let me know if you try it...
Heck, if anyone does try it... take a few photos for the next guy. I wish I had!
-Phil
I've gotten a LOT from this forum, and would like to give back.
Here's some good info for anyone who doesn't have a rear view camera, and would like to add one without breaking the bank!
I'll apologize now for the lack of specificity in my directions. I installed this in my old T4R, which SUNK, so I no longer have the truck, and I didn't take photos. So this will only count as a "partial" writeup, because I won't be giving step-by-step directions with photos to show everything.
But I *can* show you the parts (about $160 total), and give a basic description. It's not perfect, but it can help.
PLUS, I can vouch that the results were AWESOME!!!
Here's the camera that I bought:
It came from AliExpress.com. AliExpress had multiple cameras and the specific one I ordered seemed to be the best because it had a high quality CCD chip for the camera instead of a CMOS chip or some other type of hybrid technology, and it put out an image with 16x9 (or maybe 16x10) aspect ratio, which was very well suited to the monitor I ordered.
The camera is a camera and LED light. You remove the entire housing for one of the rear license plate lights, and you replace it with this part. The part includes an LED light to illuminate your license plate... so you don't lose the license plate light, but DO GET a well-hidden and properly aimed camera.
One note: After everything was installed and hooked up, I filed off a very small part of the underside of the inner lip of a piece of plastic trim on the rear tailgate. A tiny bit of the trim blocked a *small* part of the top view from the camera. I could have left it alone, but the little bit of filing gave me a complete view from the camera, and when you stand behind the truck, you cannot tell AT ALL that I had filed down a small part of the underside of the inner lip of the tailgate trim. It's your choice. You'll see what I mean if and when you do this upgrade. It's not a big deal either way.
Here's what I bought and installed to see the image:
That's Right! It's a after market rear view mirror that has a hidden video monitor built into it. It works really well, and it is truly OEM quality. No B.S.
I saw some places selling a similar (or maybe the same) replacement mirror for $300+, but the one I got I paid about $110 for, and it was AWESOME!
Now, the mirror w/ video monitor has TWO video inputs...
and you can't let that go to waste :happy:
so I also bought and installed this:
... a second camera, which I mounted in the center on the underside of my rear spoiler. It's approximate location is circled in the photo below (but the photo doesn't actually show a camera... so you're not losing your eyesight. It's the photo... not you.
). Of course, with two camera's, you need to be able to select one to view....
so I also bought this:
and hooked it up so that I can manually select which camera to view.
I went with manual operation only for the cameras. The switch was installed in one of the empty switch slots in the center console (near the DAC switch), so it was easy access. There are times when you want one of the cameras on even when you aren't in reverse, so using a switch to manually activate the cameras made good sense to me.
The rest of this write up is my attempt a trying to describe how I did the install, and few tips for what works and what to look out for.
It might be boring reading without photos. :doh: (Sorry). If someone does this upgrade, maybe then can post and add a few shots to make up for my lack of pics. :hatsoff:
Good luck. I hope this helps someone. Pls post and let us know if you end up doing this upgrade!
-Phil
------------------------------------
Here are a few tips for those who might try it. If you do try it, email or PM me, and I'd be glad to consult based on my experience and recollection.
The biggest tip I can give for now, is that I used a "fish tape" to try to run all of the wires between the head liner and the roof. This was a GREAT idea, but it hit a snag. It turns out, above the roof liner, at the very edges of the roof, there are welded supports of metal to act as small trusses to brace the roof to the side of the car. Because I couldn't see (and didn't know), I ran my wires and the fish tape underneath one of those trusses, and found the wires and the fish tape stuck! I couldn't go forward, and I I couldn't go backward. I ended up using brute force to pull the wires back out so that I could start over (big mistake) because I tore off ALL of the connectors on all of the wires.... plus my fish tape was still stuck. After hours of struggle, I called it a day, and the next day I had to dis-assemble a LOT of the trim and moulding pieces, in order to expose the raw metal for the roof. That's when I saw the support trusses, and was able to get my fish tape back. As for the wires... I had to cut, splice, solder and tape connectors back onto all of the wires.... LOTS of work.
So, as a general precaution... I STILL think using a fish tape to run the wires under the head liner is a good idea.... it's fast and easy (in theory), and keeps your sensitive video feed far away from many potential sources of noise...
But if you go that route, keep your fish tape away from the far left and far right sides of the truck, otherwise you might manage to squeeze your wires through the small space created by the support truss (just as I did), and then find you you are stuck! If you do get the fish tape stuck... don't brute force it like mr stupid did (that's me by the way!!!)... if you can't use finesse, then you're better off to bite the bullet and start dis-assembling lots of the interior until you can drop enough of the head liner to see the problem and fix it.
Now that I've written a ton about the warnings.... here's a few good suggestions....
The camera replaces one of the rear license plate housings. It's a perfect fit.
You remove the factory housing for the light, and cut the wires, then solder an tape (or solder and heat shrink) or use butt-connectors with built in heat shrink, too hook up the light wires to the new piece. The new piece has build in LED lights, so you DON'T LOSE A LIGHT. Because it is an LED, polarity matters, so pay attention an test it before you make it final.
Also, the LED light is a different color temperature than the regular incandescent (or halogen?) rear license plate bulbs, so you probably want to order a an aftermarket LED replacement bulb for the OTHER rear license plate light bulb. I'd assume about 5000K kelvin would work... but I don't know and didn't measure the color temperature of the new LED... I just know that it was a whiter color and clearly a higher color temperature.
TIP...
When you put in the rear camera, you'll need to take off the cover for the rear gate so that can get proper access to run the wires inside your rear tail gate.
Route them so that the rear window can go up and down. Use zip ties where necessary.
Tip...
When you run the wires, there is a rubber boot at the top of the tail gate for the factory wires. Open up the clip holding the boot, and disconnect it from both ends of the vehicle, then you can use a metal hanger with duct tape, or a "fish tape" to run YOUR wires through the same factory boot. It was tight, and I had to do some of the bigger connectors one at at time, but I got it to fit. The result... a clean, factory look, NO LOOSE WIRES, and zero drilling or new holes.
Tip... I installed the toggle switch in the center console. It fit in one of the blanks where I didn't have a factory switch. I wired it to the cigarette lighter as a power source, and made it so that one position turned on the camera above the license plate, the other position turned on the auxiliary camera mounted just below the rear spoiler, and the middle position was off. This mean I had to manually hit the switch to turn on the camera... which was fine.
The lower camera showed my tow hitch including the tow ball... so it made hooking up a trailer a snap. The upper camera was mounted and aimed so that is showed my boat and what was above it. I could really tell what was going on. I could even see if my trailer was going over the lines for my lane of travel while I was driving. It was very useful.
LASTLY...
The mirror with the built-in monitor was AWESOME. It was true, OEM quality.
It had a slightly darker tint than the factory mirror, but that was fine. When the monitor was off, you couldn't tell that there was a monitor in the mirror unless you angled yourself just right and actually looked for it.
When the monitor was on, the image quality was fantastic... EVEN AT NIGHT!.
With that said... don't be dumb and hook up a movie or something like that to the mirror... You'll end up killing yourself our someone else if you drive while trying to watch a movie or music video.
In the front, I ran the wires to the mirror from under the headliner, and down the driver's side "A" pillar and behind under the dash to keep everything neat and out of sight.
LAST TIP...
For the "upper" camera. I drilled about 3 holes in the to bottom of the rear spoiler... each was about 1/2 inch in diameter. They were slightly off-set, as if to form an oddly shaped triangle, or somewhat reminiscent of the Olympic rings
I ran all of the wires through the factory wire looming (rubber boot)... I had to fish the wires through, and start with a regular piece of speaker wire to get everything started. There was a bit of trial and error, but once I got the first wire through, I used it as a guide line to get the "real" wires through.
I cut a piece of hard plastic about 1" wide by about 3" long, and drilled a small hole on each end to mount it. I used it as a template to drill matching holes in the underside of the spoiler itself. Lastly, I lined everything up. and drilled a small hole in the center of the piece, and cut a small channel so that I could feed the wires into that hole. (make sense?)
Then I carefully placed the piece of plastic INSIDE of the rear spoiler, and lined up one of the holes, and put a pop rivet into the underside of the rear spoiler such that it also went through the hole drilled in the piece of plastic inside the spoiler, and secured the plastic. Then, I was able to use some finesse to line up the holes on the other side, and also put in a pop-rivet. The result was that the wires were now run INSIDE the rear spoiler, the camera was hanging OUTSIDE of the spoiler on the underside, and I had closed off MOST of the holes I made by riveting a piece of plastic to the inside of the rear spoiler.
I drilled two holes to mount the upper camera to the underside of the rear spoiler and pop-riveted those in place too. Then I unscrewed the trim around the camera, and rotated the camera lens itself until the image was correct (not upside, or askew), I bent the thin metal on the camera's mounting bracket to aim the camera exactly where I wanted it, and then I screwed the camera trim down very tightly to make sure the camera didn't rotate.
Like I said, I sunk the T4R that had this upgrade, and it was totaled... so I can't get any photos to better show how it's done.
If anyone tries this and wants more info, PM or email me, and I'll do what I can to help. I'll even PM my phone number if you ask for it, so that we can chat..
The mod was very slick, and affordable.
Let me know if you try it...
Heck, if anyone does try it... take a few photos for the next guy. I wish I had!
-Phil
Attachments

Last edited:


 hoto:
hoto:


