gtgt_bangbang
New member
Just got done rebuilding a rear driveshaft, '95 automatic, non-CV style . I think most of the info here would work on any style shaft, but there be dragons in the details.
This driveshaft has a one front and one rear universal joint , plus a sliding yoke up front to let the shaft accommodate rear differential distance-from-tranny movements.
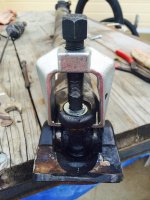
A wee pitman press came to the rescue yet again, enough umph to drive these low corrosion universal joints, making me very happy I declined to buy a $160 Tiger tool, a press purpose designed to extract u-joints. Wrong side of Rockies corrosion very possibly could defeat this pitman tool press. Actually with the outrageous quotes I was getting to replace the universal joints, the Tiger tool would have been a better-than-breakeven yet spendy proposition.
Before getting started, grind off any small rock dents & smashes (or previous owner/tr4org hammer marks) on the exposed yoke bores to ease cap passage, using a light touch on a dremel abrasive wheel.
Overall I give this job for 2.5 * on the SOFB meter because of one slight foobar either in design, or maybe just from grime, here's why-
Conceptually ujoint removal is pretty simple; chisel off the circlips inside the yoke, press the joint one direction to shove & remove the opposite cap outwardly, then press the joint back in the opposite direction to remove the second cap. Minus the two caps, the cross has wiggle enough to slip out from the yoke. Repeat 90°, and dismantlery accompli.
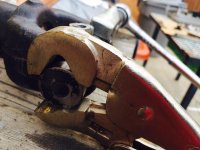
The problem on my shaft; before the first cap would fall out, the shoulder of the cross ran into the inner face of the yoke, preventing further pressing. I have some killer vice grips (pipe holder style) that grabbed the the hard & sturdy cap well enough, but I held back gripping the cap, & hammer tapping on the vice grips slid them off & left cap behind. I wasn't ready to go full hulk on it (worried about deforming the caps in the process) in case I had to press it back the other way and not wanting to ruin a yoke with a damaged cap. I'm a big fan would not dorking parts during a repair... [ed note - Toyota FSM says push a cap out enough to get a grip on it, clamp the cap in a vice and tap the shaft off. Lesson learned)
My solution, was to work it apart just enough to get a cut-off wheel /die grinder (and later a full fledged cut-off saw for certain angles) , in order to cut off one arm of the cross while still in the yoke, shortening it enough then work to joint back the opposite direction not much, to work that out. a damn PITA.
In retrospect, if I had just run on with the SuperVice grips , to sic on the exposed cap and beat it out, could probably skip the sawing, but this time it was spare the yoke and spoil the abrasives.... but next time ...
Again you really do not want to screw those bores up, they're supposed to be an excellent sliding fit, like a piston pin in a rod.
The good news is reassembly is it a easy two putt;
I first used a kind of a Scotch-Brite dremel buff to clean the bores on the yoke, allowing the new caps to slide in nice. And easy. Just like Tina Turner said.
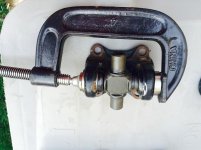
I took all four bearing caps off the central cross of the new universal, wiped the cross free of grease so it would pick up less dirt, help the cross in the yoke and started both caps from the outside, then a simple but hefty C clamp was strong enough to drive them in. C-Clamp both caps at once, one cap is bound to move further inward than the other, install it's circlip, then press the second one against that stop, to get its circlip on.
My universal fit straight from the box, but I believe the Toyota actually makes various circlip profiles to eliminate any play of the joint in the yoke, no idea if those are still available, but the part numbers exist.
A few other notes before you get started. My driveshaft has a wiper seal around the sliding yoke, and a dust boot clamped to the main shaft was originally protecting that seal. Toyota no longer offers the dust boot, and likely not the wiper seal. So go easy on those parts if you intend to clean the old grease out of the sliding shaft to start fresh. Good advice would be to simply use new grease shot into the shaft to purge the old stuff. However, it look like there was White lithium inside the slide, which may not be compatible with what ever grease you shoot in next. I cleaned mine out.
Last, if you slide the yoke off, or better yet it falls on your foot, like mine almost did, there is some good news for re-indexing the yoke to the shaft. The yoke slides on nylon covered spline. You of course should put some index marks before removing the yoke to reinstall in the same orientation, but if you're stuck with the surprise removal, it's good to know from close inspection that a couple of the splines are more shallow than the others, allowing the yoke to only install in the original orientation, or 180° off from that orientation. This is mainly to have the front and rear universal joints oriented to each other so you don't get an odd speed differential as the shaft rotates through one revolution. If your shaft does not have the orientation splines, you want to be absolutely positive the two u joints are aligned with each other.
This driveshaft has a one front and one rear universal joint , plus a sliding yoke up front to let the shaft accommodate rear differential distance-from-tranny movements.
A wee pitman press came to the rescue yet again, enough umph to drive these low corrosion universal joints, making me very happy I declined to buy a $160 Tiger tool, a press purpose designed to extract u-joints. Wrong side of Rockies corrosion very possibly could defeat this pitman tool press. Actually with the outrageous quotes I was getting to replace the universal joints, the Tiger tool would have been a better-than-breakeven yet spendy proposition.
Before getting started, grind off any small rock dents & smashes (or previous owner/tr4org hammer marks) on the exposed yoke bores to ease cap passage, using a light touch on a dremel abrasive wheel.
Overall I give this job for 2.5 * on the SOFB meter because of one slight foobar either in design, or maybe just from grime, here's why-
Conceptually ujoint removal is pretty simple; chisel off the circlips inside the yoke, press the joint one direction to shove & remove the opposite cap outwardly, then press the joint back in the opposite direction to remove the second cap. Minus the two caps, the cross has wiggle enough to slip out from the yoke. Repeat 90°, and dismantlery accompli.
The problem on my shaft; before the first cap would fall out, the shoulder of the cross ran into the inner face of the yoke, preventing further pressing. I have some killer vice grips (pipe holder style) that grabbed the the hard & sturdy cap well enough, but I held back gripping the cap, & hammer tapping on the vice grips slid them off & left cap behind. I wasn't ready to go full hulk on it (worried about deforming the caps in the process) in case I had to press it back the other way and not wanting to ruin a yoke with a damaged cap. I'm a big fan would not dorking parts during a repair... [ed note - Toyota FSM says push a cap out enough to get a grip on it, clamp the cap in a vice and tap the shaft off. Lesson learned)
My solution, was to work it apart just enough to get a cut-off wheel /die grinder (and later a full fledged cut-off saw for certain angles) , in order to cut off one arm of the cross while still in the yoke, shortening it enough then work to joint back the opposite direction not much, to work that out. a damn PITA.
In retrospect, if I had just run on with the SuperVice grips , to sic on the exposed cap and beat it out, could probably skip the sawing, but this time it was spare the yoke and spoil the abrasives.... but next time ...
Again you really do not want to screw those bores up, they're supposed to be an excellent sliding fit, like a piston pin in a rod.
The good news is reassembly is it a easy two putt;
I first used a kind of a Scotch-Brite dremel buff to clean the bores on the yoke, allowing the new caps to slide in nice. And easy. Just like Tina Turner said.
I took all four bearing caps off the central cross of the new universal, wiped the cross free of grease so it would pick up less dirt, help the cross in the yoke and started both caps from the outside, then a simple but hefty C clamp was strong enough to drive them in. C-Clamp both caps at once, one cap is bound to move further inward than the other, install it's circlip, then press the second one against that stop, to get its circlip on.
My universal fit straight from the box, but I believe the Toyota actually makes various circlip profiles to eliminate any play of the joint in the yoke, no idea if those are still available, but the part numbers exist.
A few other notes before you get started. My driveshaft has a wiper seal around the sliding yoke, and a dust boot clamped to the main shaft was originally protecting that seal. Toyota no longer offers the dust boot, and likely not the wiper seal. So go easy on those parts if you intend to clean the old grease out of the sliding shaft to start fresh. Good advice would be to simply use new grease shot into the shaft to purge the old stuff. However, it look like there was White lithium inside the slide, which may not be compatible with what ever grease you shoot in next. I cleaned mine out.
Last, if you slide the yoke off, or better yet it falls on your foot, like mine almost did, there is some good news for re-indexing the yoke to the shaft. The yoke slides on nylon covered spline. You of course should put some index marks before removing the yoke to reinstall in the same orientation, but if you're stuck with the surprise removal, it's good to know from close inspection that a couple of the splines are more shallow than the others, allowing the yoke to only install in the original orientation, or 180° off from that orientation. This is mainly to have the front and rear universal joints oriented to each other so you don't get an odd speed differential as the shaft rotates through one revolution. If your shaft does not have the orientation splines, you want to be absolutely positive the two u joints are aligned with each other.
Last edited: