Replacing alternator - 2005 V8

bergs

New member
After nearly 200,000 miles, my factory alternator decided it no longer needs bearings.

After searching the forum, I discovered that there were a few methods of removing the alternator from the V8 models but nothing about going through the wheel well.

This thread isn't intended to be a "how to". It is however a "how I would do it" thread based on the information from several other threads.

I would:

Disconnect the battery
Lift and remove passenger front tire
Remove small rubber wheel well thingy
Remove engine skid plate (12mm)
Remove three 12mm bolts that secure the coolant overflow tank and move tank aside
Remove serpintine belt (14mm on tensioner)
Remove the 12mm nut, 14mm nut and 14mm bolt that secure the alternator
Remove power steering pump pulley (17mm)(allows for more room but not entirely necessary)
Remove the three 14mm bolts for power steering pump
Hang pump out of the way
Remove alternator from the studs and out through the wheel well


I believe the mentioned tool sizes to be correct and will update if I realize differently
 
Last edited:
Register to hide this ad
I would also include step 1 as disconnecting the battery, learned that the hard way early in my days at school. :)

It should be possible, its been a while since I worked on my 2UZ-FE or another one for that matter. I suppose its an alternative to having to pull the fan and fan shroud off?
 
I would also include step 1 as disconnecting the battery, learned that the hard way early in my days at school. :)

It should be possible, its been a while since I worked on my 2UZ-FE or another one for that matter. I suppose its an alternative to having to pull the fan and fan shroud off?

Updated first post with battery instruction. Good point!

The alternator passes thru the wheel well all day so long as the PS pump is moved. Just installed it and got the truck on the ground in an hour twenty...about 3hrs total for the job

I would post some pics but my phone is not agreeing with the forum on that...
 
Man where was this when I was upgrading the big 3 last month. I realized it after I replaced my shocks last week lol.
 
It looked tight to me when I was contemplating doing it through the wheel well. I ended up going through the top removing the fan & shroud. I remember that getting the bolts off and on that hold the fan on being a pain. That reminds me that I need to buy some of those black plastic push clips that hold the plastic cover onto the core support/rad. :) Some of them were a bit dry and never made it off without breaking.
 
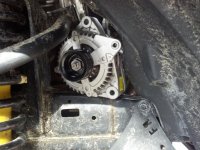
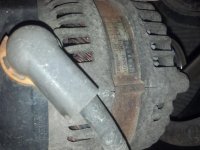
Only got a couple pics and a short vid of the noises from old alternator before the cold helped to kill the battery life on my phone.

Anyway, as you can see there is plenty of room...
 

Attachments

  • IMG_20140224_140804_344.jpg
    IMG_20140224_140804_344.jpg
    134.2 KB · Views: 17,978
Factory original
11yrs old
199,678 miles
Still charged just fine!
 

Attachments

  • IMG_20140224_094422_166.jpg
    IMG_20140224_094422_166.jpg
    125.5 KB · Views: 14,934
I replaced mine a week or two ago. I went through the fender well, it worksed great until the stud unthreaded from the block. I then had to pull the fan and rad to get thr alt out. Watch when removing thr alternator that the stud doesn't unthread from the block.
 
Replaced my old alternator on the last weekend through the wheel well, it worked great (thank you bergs), no issues taking the alternator through the well. It took me most of the weekend as I haven't done any work like this before. I hope I will never need to do this again on V8 model, it was an absolute pain, there is no much space anywhere around the alternator. Also I did not have E-Torx set to remove P/S pump from stud bolt (Ended up taking public transit to go to the nearest Canadian Tire as I have no other vehicle now). I'm not sure how people remove their alternators from the top - it must be even bigger pain, it's much easier from the passenger wheel well.
 
Last edited:
To add to this post, you can also take the V8 alternator out through the bottom. If you remove the swaybar mounts with the bushings, it will have the room to come out the bottom. Just need to push a hose out of the way. Just did it three weeks ago.
 
I've been dealing with multiple alternator issues and I have yet to succesfully get it through the wheel well. I drop it down the bottom. Only PITA is that you have to pull the skid plate off. I have to take the RCI skid off anyway.
I've never had to pull the swaybar, although I did release a clamp thats holding a trans line so I could scoot it out of the way a little.
 
I would like to thank the OP for this helpful post.

I also went thru the fender. I didn't take off the tire. My lift and body lift helped with that lol.

Mine was dying at 201,500 miles. Squeezed another 800 miles and after 5 months of not really driving it....it was finally done today. Start to finish was a hair over 3 hours, 1.5 of that was a rain delay.

Got mine on ebay for $92 shipped remanded unit. Let's hope it last another 13 years.
 
I would like to add, I was experiencing weird issue with my Bluetooth on my Kenwood dnn992.it kept resetting. After alternator swap, problem gone.
 
A successful alternator change and the steps I took to complete the repair:

I recommend buying a retainer-clip removal tool. You can purchase one on Amazon for under ten dollars. You can also purchase a retainer-clip assortment pack for under twenty-five dollars.

Spray all of the nuts and bolts with a penetrating oil the day before or more if you have the time.

1. Turn your wheels as far to the right as possible.
2. I removed the black ground-wire from the negative terminal on the battery.
3. I removed the coolant overflow-reservoir but left the hose attached to it.
4. The reservoir hose is connected under the radiator trim piece by two molded plastic clips. You just need to pull gently to remove the hose. I moved the reservoir to the drivers side of the engine.
5. I removed the serpentine belt and placed it aside.
6. I removed the top nut from the alternator.
7. Remove the two vacuum tubes from the power-steering pump.
8. I removed the nut and two bolts that fasten the power-steering pump to the block. A socket will fit through the openings in the pulley.
9. Remove the two vacuum tubes after noting which goes where.
10. When sliding the power-steering pump off of the stud, the metal reinforced tubing will have a tendency to catch on the rubber hoses in front of it so be sure to clear a path. Once you have cleared a path use a pry bar, such as the black metal ones with an orange handle to basically compress the radiator hose while you slide it completely off the stud. BE CAREFUL NOT TO DAMAGE THE THREADING OF THE STUD.
8.Once the power-steering pump is off the stud move the PSP up as high as possible and place it on top of the stud. For peace of mind you might want to slide a rubber tube over the stud to protect the threads.
9. Remove the front skid-plate.
10. Remove the four retention clips that attach the slash guard to the fender and frame in the passenger side wheel well.
11. There is one clip that is in the 3:00 position on the electrical plug to the alternator that needs to be depressed for it be removed from the socket.
12. Remove the red water-guard from the alternator. Just pry it off using some sort of hook tool as it only clips on. Remove the nut that fastens the positive cable to the alternator. There is a small hex screw that holds the ground to the alternator.
* if you lose this screw a 6Mx12mm screw with a lock washer will replace it*
13. Remove the nut and bolt that fasten the alternator from underneath the T4R.
14. Remove the alternator. I know, "easier said than done right?"
14a. Make sure that when you look through the fender well you cannot see the PSP in the perimeter of the hole covered by the splash guard.
14b. Laying on your back use your left and to push the alternator up to the top of the frame and your right hand to pull it up to the frame. Work the alternator around until it fits up on the frame without you holding it.
14c. Reach through the fender well and pull it out. This requires patience and a few breaks if needed but it will fit.
14d. If you can't make it fit use the new one to see how the old one should come out.
15. Check to see if your new alternator is the same as the old one.
16. Slide the new alternator in and set it securely on the frame.
17. Go back under and gently lower the alternator into your left hand. Be patient and slide the alternator over the stud. Once it is on the stud you are freed up to improve the position of your grip.
18. Install the new bolts. I added anti-seize to the PSP and alternator bolts and nuts.
19. I couldn't find torque settings so you will need to use your own better judgement on torquing down the nuts and bolts.
20. Reattach the nut and bottom bolt of the alternator. I used dielectric grease on the positive and negative points of attachment.
21. Reinsert the plug into the socket and make sure it is completely inserted by using mild pressure on the rear of the plug. You should not have to press hard to reinsert the plug.
22. Don't reattach the splash-guard until the job is complete. You might not have the plug completely inserted and will continue to receive the red battery icon in the dash board.
23. Before you slide the PSP back over the stud use a 10 e-torque socket and tighten the stud if it is lose. A friend of mine who is a pipe-fitter told me a few of the commercial chillers use these torque fittings and they use 12-point sockets. Once the stud is tight slide the PSP back on.
24. Make a quick alignment check with your eye to see that the PSP and alternator pulleys are lined up with the rest of the system.
25. Reattach the nut and two bolts with torque as you see fit.
26. Reattach the two vacuum lines.
27. Reattach the serpentine belt, making sure that the belt is fully seated in all pulleys and the portion on the tensioner pulley is in line with the rest of the pulleys.
28. Reconnect the coolant reservoir and be sure to secure the hose via the two molded clips. You might want to remove the retainer-clips to the trim piece instead of gently prying it up.
29. What should be torqued down:
Alternator: two bolts and one nut; as well as, the positive nut, negative screw and electrical connector.
PSP: two bolts and one nut, and the two vacuum lines.
Coolant reservoir: three bolts.
30. Double check that the serpentine belt is properly installed and nothing will become snagged, this includes climbing back under your T4R and checking the bottom too.
31. Are all tools accounted for?
32 If yes then reconnect the ground cable to the battery and start the vehicle.
33. If you still have the red battery icon check to see if the electrical plug is fully seated into the alternator.
34. If the red battery icon is gone then turn off your T4R and reattach the splash guard and the front skid plate.


I hope this helps someone!
 
Last edited:
Awesome write up

i just did my alternator today on my 03 v8 4runner it took me 2.5hrs

here is my step by step on the removal not quite as detailed just a few minor things i did different

1. Remove neg battery cable
2. Remove coolant overflow
3. Remove air intake and hoses
4. Remove upper coolant clamp and remove upper part of hose and cover you will loose about a cup of coolant
5. Loosen off serpentine belt 14mm on idler pulley (check other videos if you don't know how to do this)
6. Remove both skid plates(both because when you drop sockets they will land in the back skid plate
7. Remove completely the 2 bolts passenger side bolt off power steering pump
8. Loosen off other side power steering pump bolts do not remove
9. Remove 4 front bolts on the sway bar clamps
10. Remove a clamp that hold a wire loom or piping (can't remember) that is blocking access to lower bolt on alternator
11. Remove large clip and other wire on alternator
12. Remove 3 nuts and bolt on alternator
13. Hold powersteering up it will give clearance for the alternator to be removed
14. Remove the alternator out the bottom of engine bay
 
Mine is closely approaching 200,000 miles. Should I start thinking about replacing it or should I go the lazy " Why fix it if it ain't broke? " approach?


Also, my struts are in need of replacing soon. So I can kill two birds with one stone.

And the waterpump.... and timing belt. Blah. FML.
 
struts are a whole other job
as far as the alternator goes if its running i wouldn't but that being said if you do local driving i wouldn't but if you are concerned and have a large trip or go back country or something i would overall it depends on the condition of the unit mine was cooked.

if you are going to get the timing belt done in the near future just get it done then because you or someone will have it all opened up then and will be easy then
 
I used a very similar method as [MENTION=139591]cflipper[/MENTION] except I removed the Power Steering pulley instead of the pump itself. You can see it in this youtube video:
https://www.youtube.com/watch?v=1ezNyD2zFjU

The only issue I ran into was the AC line on my 2008 is 90% hardline and does not move, as in the video they have an 06 or 07 with an AC line that moves. You don't need to move it though.

I also replaced the serpentine belt while I was at. Mine was original and had 92k miles on it. The engine is MUCH quieter (enough so my wife even noticed).

Last thing is I went with a rebuilt alternator through Partznet/Conicelli as they are local to me and trust a Denso/Toyota rebuild much more than any other part store.
 
After nearly 200,000 miles, my factory alternator decided it no longer needs bearings.

After searching the forum, I discovered that there were a few methods of removing the alternator from the V8 models but nothing about going through the wheel well.

This thread isn't intended to be a "how to". It is however a "how I would do it" thread based on the information from several other threads.

I would:

Disconnect the battery
Lift and remove passenger front tire
Remove small rubber wheel well thingy
Remove engine skid plate (12mm)
Remove three 12mm bolts that secure the coolant overflow tank and move tank aside
Remove serpintine belt (14mm on tensioner)
Remove the 12mm nut, 14mm nut and 14mm bolt that secure the alternator
Remove power steering pump pulley (17mm)(allows for more room but not entirely necessary)
Remove the three 14mm bolts for power steering pump
Hang pump out of the way
Remove alternator from the studs and out through the wheel well


I believe the mentioned tool sizes to be correct and will update if I realize differently

I just did mine and I found an easier way that works for the V8 and makes it a breeze!

Tools: 14mm flex head combination wrench
12mm """""'
10mm""""""
17mm""""""

Ratchet straps
A friend

Method: disconnect battery, remove the sway bar mounts and slide it down, remove the skid plate(s), unbolt the alternator, undo the drive belt, hook on to the power steering pump pulley with the strap mounted to the lower control arm and ratchet it down tight. Undo the nut and slide the pulley off. Then disconnect the electronics (cordless impact advised) and remove. Reinstall in reverse order. 2.5" front lift helps a bit.

30 minutes all in.
 

Members online

Forum statistics

Threads
278,307
Messages
3,554,048
Members
248,016
Latest member
Advally Service

Trending content

Back
Top