Roof rack

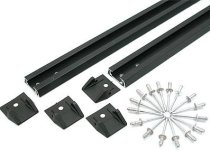
I used a Yakima track on my 1st gen.

RT20_500.jpg

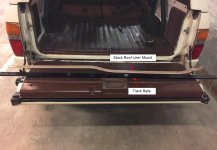
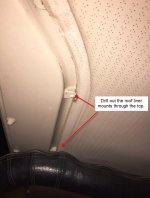
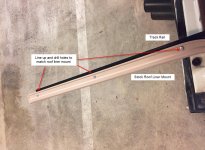
The roof liner mount is the same length and shares screw points similar to where I wanted to mount the rack on top, so I removed the liner mount, drilled out the holes that matched the rack, and re-installed with new bolts. I like this mount because it not only hides the bolt locations inside the top (stealth-like), but mostly because it is the thickest and most consistent part of the fibreglass on the top and uses the roof liner mount as additional support - a sort of sandwiching of two metal tracks between the fibreglass.
21-04-2017 8-05-38 AM.jpg

21-04-2017 8-07-24 AM.jpg

21-04-2017 8-08-38 AM.jpg

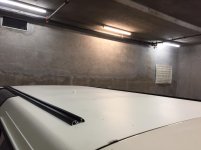
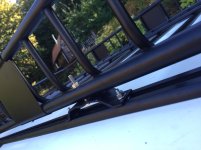
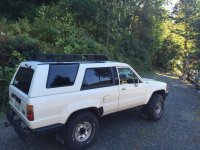
The result provided a very low profile mount system that I can swap out for rails, RTT, Basket, etc. Currently have a basket installed.

4896D292-338B-4732-A5B0-999E4C77615D.jpg

9FDB33C0-E0F4-4097-8D2E-ABEE9D63F34C.jpg

6249BFA5-FC53-48C2-9B8C-ACF6C301C37C.jpg

Recommend if you do this to take your time lining up the holes and test fit the track before drilling. I came a little closer to the window seal than I hoped. Also make sure to jam some silicone in the holes before tightening the screw to eliminate drips! Because I'm paranoid I siliconed around the track edge as well.

Regrets:
I used the Yakima rack, but in future I would use the Rhino version. The end caps on the Yakima are not easily removable, so if you have for example a large bolt that you want to slide in and out of the rail for different mounts (like I do) you have to unscrew the track to take off the end cap. I dont like this because it messes with the silicon seal.

Havent tried a RTT on this yet but I haul lots of heavy stuff up there and no issues so far. I usually travel with people in the back so the roof space is taken up by camping gear/firewood etc. and no room for a RTT brick.
 

Attachments

  • RT20_500.jpg
    RT20_500.jpg
    30.9 KB · Views: 382
  • 21-04-2017 8-05-38 AM.jpg
    21-04-2017 8-05-38 AM.jpg
    119.3 KB · Views: 364
  • 21-04-2017 8-07-24 AM.jpg
    21-04-2017 8-07-24 AM.jpg
    110.3 KB · Views: 350
  • 21-04-2017 8-08-38 AM.jpg
    21-04-2017 8-08-38 AM.jpg
    134.3 KB · Views: 460
  • 4896D292-338B-4732-A5B0-999E4C77615D.jpg
    4896D292-338B-4732-A5B0-999E4C77615D.jpg
    119 KB · Views: 347
  • 9FDB33C0-E0F4-4097-8D2E-ABEE9D63F34C.jpg
    9FDB33C0-E0F4-4097-8D2E-ABEE9D63F34C.jpg
    123 KB · Views: 364
  • 6249BFA5-FC53-48C2-9B8C-ACF6C301C37C.jpg
    6249BFA5-FC53-48C2-9B8C-ACF6C301C37C.jpg
    139.6 KB · Views: 364
I used a Yakima track on my 1st gen.

View attachment 249049

The roof liner mount is the same length and shares screw points similar to where I wanted to mount the rack on top, so I removed the liner mount, drilled out the holes that matched the rack, and re-installed with new bolts. I like this mount because it not only hides the bolt locations inside the top (stealth-like), but mostly because it is the thickest and most consistent part of the fibreglass on the top and uses the roof liner mount as additional support - a sort of sandwiching of two metal tracks between the fibreglass.
View attachment 249051

View attachment 249052

View attachment 249053

The result provided a very low profile mount system that I can swap out for rails, RTT, Basket, etc. Currently have a basket installed.
View attachment 249054

View attachment 249055

View attachment 249056

Recommend if you do this to take your time lining up the holes and test fit the track before drilling. I came a little closer to the window seal than I hoped. Also make sure to jam some silicone in the holes before tightening the screw to eliminate drips! Because I'm paranoid I siliconed around the track edge as well.

Regrets:
I used the Yakima rack, but in future I would use the Rhino version. The end caps on the Yakima are not easily removable, so if you have for example a large bolt that you want to slide in and out of the rail for different mounts (like I do) you have to unscrew the track to take off the end cap. I dont like this because it messes with the silicon seal.

Havent tried a RTT on this yet but I haul lots of heavy stuff up there and no issues so far. I usually travel with people in the back so the roof space is taken up by camping gear/firewood etc. and no room for a RTT brick.

Cool!
 
One of the cleanest, most robust implementation I've seen

I used a Yakima track on my 1st gen.
249053d1492787453-roof-rack-21-04-2017-8-08-38-am.jpg
The metal strip is curved. Care to show us the whole length of it and which holes you used? How far inboard do you think should one move the mount to make sure it clears the quarter-window seal?

if you have for example a large bolt that you want to slide in and out of the rail for different mounts (like I do) you have to unscrew the track to take off the end cap.
T-Nuts or T-bolts would work without having to remove the end-caps.
t-nuts_t-bolts-header_w734.jpg
 
I used a Yakima track on my 1st gen.

The roof liner mount is the same length and shares screw points similar to where I wanted to mount the rack on top, so I removed the liner mount, drilled out the holes that matched the rack, and re-installed with new bolts. I like this mount because it not only hides the bolt locations inside the top (stealth-like), but mostly because it is the thickest and most consistent part of the fibreglass on the top and uses the roof liner mount as additional support - a sort of sandwiching of two metal tracks between the fibreglass.

The result provided a very low profile mount system that I can swap out for rails, RTT, Basket, etc. Currently have a basket installed.
Recommend if you do this to take your time lining up the holes and test fit the track before drilling. I came a little closer to the window seal than I hoped. Also make sure to jam some silicone in the holes before tightening the screw to eliminate drips! Because I'm paranoid I siliconed around the track edge as well.

Regrets:
I used the Yakima rack, but in future I would use the Rhino version. The end caps on the Yakima are not easily removable, so if you have for example a large bolt that you want to slide in and out of the rail for different mounts (like I do) you have to unscrew the track to take off the end cap. I dont like this because it messes with the silicon seal.

Havent tried a RTT on this yet but I haul lots of heavy stuff up there and no issues so far. I usually travel with people in the back so the roof space is taken up by camping gear/firewood etc. and no room for a RTT brick.

One of the cleanest, most robust implementation I've seen


The metal strip is curved. Care to show us the whole length of it and which holes you used? How far inboard do you think should one move the mount to make sure it clears the quarter-window seal?


T-Nuts or T-bolts would work without having to remove the end-caps.


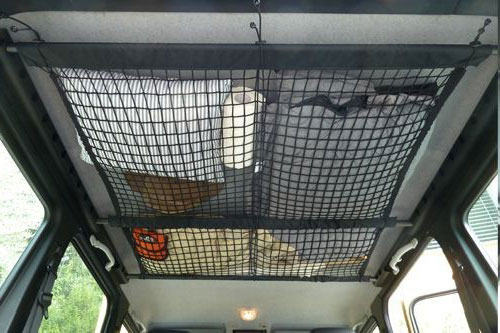
When replace the bolts for longer ones you can add something similar to these hooks:

s-l1600.jpg


and you can hang a ceiling net.

rv-ceiling-cargo-net.jpg
 
The metal strip is curved. Care to show us the whole length of it and which holes you used? How far inboard do you think should one move the mount to make sure it clears the quarter-window seal?


T-Nuts or T-bolts would work without having to remove the end-caps.
t-nuts_t-bolts-header_w734.jpg
[/QUOTE]

Thanks! I'm pretty happy with the results.

I'll take a picture of the finished interior to give an idea which holes go where. I skipped the curve portion and drilled one or two (can't recall right now) holes directly through the fiberglass and supported the backside with normal washers.

You dont need to move the rail too much inside, maybe 1/8". My rail shares a bit of space with the quarter window metal trim which makes the seal against the roof not perfect. I'll try to get a photo of that too.

I like those T-nuts! Yakima was selling something similar but it was grotesquely clunky and expensive. I was contemplating just shaving the sides of a regular bolt head enough to slide in and out.
 
wasnt following enough, Can you get these for 2nd gen? where and what is it all Called? the hooks, And net, And what not ?

I got the idea after reading mosstache thread and RAD4Runner post.

They're some generic hooks I saw in eBay, here

I think their hole's too big, we need to find something that fits better. But that's the idea. If you find something, please post it.
 
Last edited:
One of the cleanest, most robust implementation I've seen


The metal strip is curved. Care to show us the whole length of it and which holes you used? How far inboard do you think should one move the mount to make sure it clears the quarter-window seal?


T-Nuts or T-bolts would work without having to remove the end-caps.
t-nuts_t-bolts-header_w734.jpg


See photo below for bolt placement. I left them long temporarily in case I needed to re-set the track or something. Temporarily like many things became permanent.

af57c1d2df428dfd369ba0c002f56b96.jpg


The bolts are covered with a black rubber sock that came with the Yakima track.

c65f3b86f4852073c751105458e67eea.jpg


Here you can see where the track overlaps the quarter window trim. Not the end of the world, but would have been nice if I could have missed it.


Sent from my iPhone using Tapatalk
 

Members online

Forum statistics

Threads
278,311
Messages
3,554,082
Members
248,016
Latest member
Advally Service

Trending content

Back
Top