Rust beneath door handle(s)

eliask08

New member
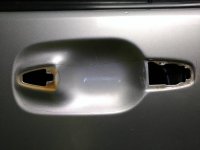
I am creating a post to help those who are having rust stains streak from beneath the door handles. Apparently, this is due to a screw that is non-galvanized/stainless, that holds the door handle in place. I attempted yesterday to pull off the rear passenger panel to identify the type of screw it is, but ran into a hassle trying to pry off the door panel with a spatula (covered in electrical tape). Below are some photos showing the rust and the loosening of the panel. I will be picking up the trim tool today and reattempt this procedure. I will also pick up a roll of butyl tape to reapply the weather wrap, as I have the vehicle sprayed by Krown annually for rust prevention and would hate to have that stuff seep into the cabin. All four handles are having this issue, and I am worried about the rust getting into chips around the handle.

A side note: I am visiting the local autowreckers later today to see if they have a shell for the rear tailgate, as I am also noticing rust start to eat at around the plastic trim. If I can get one in the same colour, I will create a post for the install. I picked up this '05 about five months ago, and there was no indication of rust (it was still being driven by the dealers manager, was not entered into their inventory yet nor was it cleaned for customers, so they did not know about the rust issue).

DSC_8718.jpg

DSC_8719.jpg

DSC_8720.jpg

DSC_8722.jpg

DSC_8723.jpg


...To Be Continued
 
Register to hide this ad
A bit further

Ok, so I managed to remove the door panel by way of a spatula and brute force (not as difficult as I assumed). A further look hints that it is not the bolt that is rusting, but the washer/nut. I tried to remove the bolt with an allen key, but I feel I should wait until I can pick up a torx set to avoid possible damage to the head. This will have to wait until next weekend, as today is a holiday. The bolt to me looks galvanized, so I don't think it contributed to the rust.

DSC_8803.jpg

<br>
DSC_8804.jpg

<br>
DSC_8809.jpg
 
This is great info. We don't get the rust out west like Ontario but this is great to know if I ever start seeing these streaks. Thx for the post.
 
This is great info. We don't get the rust out west like Ontario but this is great to know if I ever start seeing these streaks. Thx for the post.

Tell me about it. I hate the amount of salt/de-icing compound that we use here.

I have picked up a torx set, containing a T27 and T30, and will remove the nut/washer causing this issue. More pics to come.
 
Got it!

A couple of days ago, I tried to remove the bolt, with no luck. I let it sit in WD40 for a couple of hours, again, no luck. I then took my impact gun, and went at it in a non-agressive fashion. I ended up snapping the head of the bolt off, which allowed me to continue removing the assembly by way of the assistance of "drmorbius" (thanks!!). Here are the steps, continuing from my previous picture above:

Remove three screws holding the lock assembly.
DSC_8816.jpg

<br>
Puncture white-circular seal (top-left of lock assembly) to get access to secondary screw holding door handle cover.
DSC_8817.jpg
<br>
Look at that mess! I had to use Meguires X-Scratch to remove the rust stains, as nothing else would penetrate it. I cannot say for certain that there was no damage to the metal edge, as there was a bead-sized "stain" on the edge that was not coming off.
DSC_8828.jpg
<br>
The handle assembly, indicating where the rusted nut sits. Don't mind the newspaper:
DSC_8832.jpg
<br>
DSC_8859.jpg
<br>

Here is the culprit. This is a unique nut, as it fits tightly into the plastic inner moulding of the handle, yet the "round" washer-like part is thin enough to still allow it to be secure, and also allow the rubber seal to fit flush with the door panel. I have installed a stainless steel bolt in the reverse fashion until I visit the dealer for this part. I cannot find it in the catalog, so I hope I don't have to purchase four door handle assemblies.
DSC_8863.jpg
<br>
DSC_8868.jpg
<br>

By snapping off the head, the handle was easily removable. If I were not able to break the head or unscrew the bolt entirely, then there will be no possible way for it to come off. The nut is covering almost a 1/2" of screw thread (length wise), so there was too much surface contact with the rust, which made it impossible to remove (and thus broke the head of the screw).
I will provide part numbers for the nut and bolt once I obtain them.

Elias
 
Last edited:
Home Depot it is

The dealer wanted $140/door (rear), and $99/door (front) for the inner assemblies. They did not sell the nut alone. I popped into home depot on my way back, and picked up aluminum Chicago screws, and plastic 8-32 nuts that I will strip the threads from (in order to maintain the hex column). I will use a bit of locktight on the screws (weakest version), for added support. I could not get any stainless/galvanized version, and all the other screws/nuts were too big.
 
Last edited:
Finished!

Just finishing this off, I have replaced all four with a Chicago-style bolt, and things seem to be fine despite the fact that they are aluminum. I had scratched the shit out of the door from around the rusted bolt while trying to take out the last of four, though cleaned and quickly followed it up with touch-up paint. This sits behind the plastic guard, so it is not visible. I will be wet-sanding the area behind the door handle to remove nail scratch marks (fingernails from previous owner) from all four doors, so I will visit this touch-up to see if it has cured/sealed alright (before the salt season hits).

Toyota Canada nor Brimmel Toyota (in Scarborough Ontario) would even contact me regarding this (ignored me completely, but still call me for service requests - go figure), which is a real shame as I am a devout fan. All I wanted was four 50-cent bolts, that's all.
 
Toyota Part Number for replacement nuts

Just called the toyota dealer and got the part number off of technical service bulliten SB0181-12. Part number for the door handle nut is 90179-05118 one per door.
 
will put some anti-seize on the nut helping this situation?

Not really, as they would still rust. GMAN714 indicates there was a service bulletin, so clearly they were defective. This area is hit with a good amount of rain/slush/salt, so it should be galvanized or stainless.

Two years in and the Chicago screws are still holding.
 
Great post. I don't know why I didn't see this one the first time around, but am glad it was revived. I just noticed the rust stain on my rear left door, and was wondering what was going on, now I know. I guess I have another task for this summer...............:mad:
 
I dealt with the same problem but bought Toyota set:
90179-05118 nut
90386-08066 bush
69296-48010 bolt
New nuts are galvanized.

I followed https://www.youtube.com/watch?v=bFhs9b_SBz8 to remove rear panels. For fronts I suggest watching https://www.youtube.com/watch?v=yjhYKzE_yBg, she does it on Tacoma but how absorbing it is..

Part numbers are very very helpful, thanks a lot for posting these. I ordered 4 sets of each of these and plan to take this project on next weekend. I only hope that I don't have to deal with stripped bolts like the OP, fingers crossed! Will post back with an update.
 
Part numbers are very very helpful, thanks a lot for posting these. I ordered 4 sets of each of these and plan to take this project on next weekend. I only hope that I don't have to deal with stripped bolts like the OP, fingers crossed! Will post back with an update.

No worries. Stripped/broken bolts are not a problem. I stripped all 4. It's easy to knock the rusted left overs out.
 
No worries. Stripped/broken bolts are not a problem. I stripped all 4. It's easy to knock the rusted left overs out.

Reading the OP's post, doesn't a stripped bolt mean having to remove the handle from the outside of the truck? Or did you just knock them out from the inside?
 
Reading the OP's post, doesn't a stripped bolt mean having to remove the handle from the outside of the truck? Or did you just knock them out from the inside?

I punched out stripped bolts from inside out. You have to remove door handles to clean rust staines any way. But it is not a problem when inside panels are taken off.
 
OK guys, I did my rear door handles today. The actual replacement itself turned out to be straightforward, but two missteps resulted in lot of work. I want to post this here so folks looking at this in the future can avoid the issues I had. I want to thank luckyluke again for the part numbers, they turned out to be 100% accurate and it was great to have the right factory parts on hand without having to jerry rig something or go running to multiple hardware stores. Parts were cheap, about $21 total including shipping.

I took apart the panel and sure enough, here's the culprit:

KxTUDrlIe3AGX9gEd3m-DphPhZlFFAdVOe-vVcspa7iwuSFNguF75tjbP7sc3vYCW36cMTVzV_Ji54oMlOZJyCmVlih49ipAR-G14IbfrY6fKdT8qnKIie66NAsBqaJlVxzicWKNF8EzF_GopCvTY3NX37G-9YBylOE80TdVSyEAHmBgAbuOwNcDzzOl7iwuAyQda2WMMd_oXxO_rdYFquQU7oZnE4ojKj8fTwq-Ksz3NoSv3HOtNejKNEk9Adl8oayE9xVDSnoushD4D36eis27SE9sQKBznq86_85ZZOS2Rdj2-ux35uJUkuzwI8MFim-c4AXQ85BIcPRsSQvGPWblR2H6QvTGAq7fNNfzIXPPZBxN3yYs4cvroHVdjmOb_PdHOJLEV5wnbUkzQwCG1jNlJ6r4k28u0HpulrhX8rje1xvf0Y52fZieGxnXyC13uuqLeYZb-5u6MNDXy5wfg4hgZUlPFl9Ly8WPGPskEMASjD2wnpJOttbIV6pl2G6fKT4sk2SzU2etechF3q8SQm_F9GQc6CEku_6ZQAQgBujOssaX3mUS26zq85Ipqr2A8ZmRk1iFrs9hDbPqFISwoDUXRndGXWT_h1iww2vRSDIgvA6EQQ=w800-h600-no


Oh, the instructions of the OP don't mention having to unscrew the door lock mechanism to get access to the second bolt that holds the outside door handle in place. You need to do this or outside door handle will not come off and you won't be able to clean the rust before putting new hardware in.

Unplug this harness and take out the 3 bolts. You can leave the door lock mechanism hanging inside, or you can snake it out. Either works.

v_dTUUbDLlxJ3MVmraAHBYLYVsAgVx8rvlZ4ytR6QwjhDXegtRYGNhVG1hEVGRO3EomxfTvmDK5idkAb3Mkax6KKB_RVc4rxc2BP8jdC0X54ZgCc2xxBsxgwbsE437svdE7wQIXeLNsdm_iuQWQwgbsXOwZ4nHGhWnpGu_0QPBbYJVdEtv1Ghh7SRDFKtw0JTq6Llmwc3356CyV1zH4NmARNljdQHl3_GwsFckUk7phIn5QUzh83k64zkJVw1heOibVFEHZ6nCIU0PFhwYrodV9hwLwXfC3e7GYoxHcNZWpxnzLdAGQlTbwRHyxEVO1VYRkXK-Of5oVrIQloXQF8p2ZOmRohYqFy5oWYHoxMLkQt-XVzPpqP9p0FJF8AgZjc9Jg-xdwU25lTCmFrvktAJEXAIcnmPqvClI1Hw1eBgjhjwRigISKuaFq9HAAzW5IKY02XIkBJaNZC5UcahRLQf1nLeQzGjbHszRDgJukV5GM6IyjhUkDNXnhinfkyrs0iGZtqcZu0eAVTovGJcwMHI4zHqk3eIpF_oNgpHsCKtcCvJLimmjOJlYxcXnoF5PvCnyeO3OJcgdPPrQ4Z4_n8V3R1vAPGQ4WWUfxbMDWXzv77UC6aqQ=w800-h600-no


VsJ1k2Z3yBNV2HQxvD-gAxuB_d2ubYRl-G44uGsmBPuTpwJyw9_jEC-xwXmoDnoA085va3NV-mr4xSosLFEwlMcDo5AfV01fh6AzKgeLlo4kXzjNZpQZYZ-1lc1UxZBbKdwGqwPOBSwieWxW_7GE9rHv4pJoY4OPdY0JTEurty6IKoK9fRWKhwm5T3PsVBBI3v7M4KGnSl2grm3RMnnRGH-jmCZVnnlz_LVjDZ2ELgXPHIvyvfVUEhWNuSVWF0ZRXaANZE_9NBdfYl_8emBt-BaDlZQHhYjQq_W4lsXf828QGzcsYL5lXX4oX5foE06a5VTJNTEiAEcC0iDcyKvnZp8-5Tj5k93J2kYxoL7esArs3-c73R3o49X7nvtPNUoXJtuNN8eCbUC4GqmwOys_nibVht5-9NWjoiChqBwMLrIsukIwsmfZliYuvPBEcp6VEz7252w9lF7jlQWvu4E2TMCZy7NR87GXXUwPJZ2rxCHfMG_42gf_hiFUA2ennVg8CfnaQJS8k7TXOw4z2hUf4jXKD2OCyE5z6YzWXP1jiy-fY9B2JWsKr7d9WrA-scIikzvOFjOUVR7Di2X5JaZJ5mMJ6ASyrro2EDzn8leKkZHLdeiLuA=w800-h600-no


Removed the handle from the outside for a full view of the mess.

dfmxCtmTGIBaHezyoYLrMHEeP6ENfUgE57NZLYKewDCB0zqkA84NgURsAq9O6Zfx7zkmZDQCge8sqZ4_KhXk_rIzG1WGSGaT1Oze_fnkQtLLEpA1vuLCjSbYdELIGm30LLZ359_LmUNEtJSQoKZOOqqxFquqCP2OEuiQdF1FP6N_tMLZaZpeY8vcTnhZz4930SXVMN6IohkBduUxcTGGlfOqvFOhJaQ10t_HIsJdVwZVUjL6HoQ6_OlOPocbQFkjsMd55bEeo-GQUZ8UtH6rTyElt156NlolGwSHCz-CDDotjFpsRXFcBdg4TtSDz6VpPou2GxCALD2lLzdFOIOqJ4IsDcpFxSrAwRvmUvLIp68QdMSjLdLgthF1stiBnViZfwljJztb3IuJH8UgaB_A7KBRKziF15L9rYRu0RnTRdL76ELdjTdGK5vlG1wbTVKn0KUnJEES3kT6rfbfnUR5hALGtDeRclAl6ZrjbOgHkhdvzX_k6nm_7VFWifKwGsKWu0lZj0--lzsRtflW-746U2rZp40dpwA3phZS4eFq7IYTRIpF_LeHkk-AdPwxUw-QVdV1RofbUI4nL4HD8mgl4uVGseXIUEbFKau2kkHv9s-utVVgkQ=w800-h600-no


I too stripped the bolt from the inside. Didn't take much at all to strip it. New parts on the right, stock hardware on the left.

emsn_ss5v3OCKk8qi3nMaXX3TxI1w0aGvPTrWAVVGebUB2KDpPMZz4hObsDUpyrEaRU3T4OWXwyiGeyCcJghhXonudTTsrftOcF2RCTjObeFBbJ4WeAA1fkLrxoeksI3EB1Zo3gIYVJsoJvTxfCnIsEzpjkSJJSkPdGlxsTAv7MF9sbRs_VhKh6HG8KgzlNzqNo33Kp6sS1vx6hcaAzsfp61Qdhrzi7vbLbOnI38KU0q2Oiuow6_WClEY9wRgnCBg49E_1csM7WuiT4_HfsQuzH-TrTxcGZPqAoQiIenIeropgNXWe3ogCydVHLzMx4X2t1QNjjMAkKSnXughadbEvmvLSBjCaRtunSY-r7kH3DMF8Q5EU7wrtD9D-E4Awu6R9cXb7GP8tRa-YdODUYkx-JneD2rOpvDeUTmK3__WjbSoHuT4Nh8tqGKzwyIoDF1DOP_qh53JMJmls2lFEqSaQ22El6mf6brohyTJNc9pSAPReto1y3eHkFZRI6fErkgUj6CJl5w6N74XIS4hXJmToQcgngmGubRvzj-a6sHME-DvHm7bcXtrItnOQFEjnJPtpyovBtwUi-noHCI4OIgrvDcNw5OkEW7p7E5Cf_d9sxgTuWnMQ=w800-h600-no


Now, here was my first mis-step. When luckyluke said "I tapped it out from the inside" I thought he meant he drilled it out. So I spent a bit of time drilling out the bolt from the outside and inside. Turns out you don't have to. You can just move the handle and get it out completely with the stripped screw in place, then just use pliers to pop it out of the handle when out.

Here's the before and after clean up. The gentleman who posted the tip about scratch-x was a life saver. It took the rust right off.

mK3NgUbz_m1voyK1QQTIDwrihRjWV2wcKCYYhotaZJRICZGZJP4ksS_wREGwph7BkejAP992Nes8tAonTymfZTdQsJdmRQwTqeS-bRa0HWl7SSP9h2MHs4PIE6pV05d0oBihCq9LtBAoRxexynN0__y3avLl0TnA8sHXC8kG0AfhXhfJN9vOde2--vtv3El2_UNhqtwipmKM4Jxrqtpjrio8dALrS-5UUiI71NU_1NAhaLu9za4oMaB5gLYx6yoRI1Sh55z4MBsdGE9A8vU5z2g4B0A1WD_rhCHeIxDyjXc-znhor7cJ8Rs7bHQLksbRGdvi0oSAj4LMWRCigH5Wiqw2p9j6pX0d41vrh_6MZMBHixQGVh_ljN7vvwKU6TnrDYpTydEwNoIEwdb-sjnWuKLcm5wNMSGNNVJG1nYp7s55_aJV77XMay9VYQcpKFhwpDsPvrLCrMDjMVMmbuzVDOZoGxdgqXjDMUYkFxbzcjFADAXYJg2Vjy1MW4GDdd5PrknS5wDeusxxmkN7N8yt5EQNNHPi-1fZaU48cqr2Z0tSViwuwtmXfu7u4wYvdVwDHHnIXSK39fm5dGrCThPZTjWFg0-zEn8dc3Q2YnwLdfsZC4O5IA=w800-h600-no


VTmAYAmZM4X5wIErQrM6rKJxwuW0F8caxnjelEMup7lRlhDNMaD5dGRT4U-rUwrdm6DtYTxP_5Dvzkl_BpwTM4Y0m8YnkA6jMTrOyaAEpcwePMezZI_PVp7C8ulPS0yfqXnN8tiHzTELpc-ugGtfcdvomUST9cGbwABUBpWSNqwQqjWNeRGHigdY8xcS96aHki_WAb4g16PlF-fpv6X625aj6q8p9XhUYpfkuDT3_VtkUdlmSHsNL6vZJew8nQj8_4KuE7cnCFhIm5phx24AEHN9wMyStlXhGuZ1tNthYfVjs4DJgjUxVruK6jmo984zheyLwolO_TBA_qFX4UIWNKCvpUquJwvaxDVF3O907hpzZ22Uom4rB4bloj61xBNNwOCaHjl9YPuRZAwGlHTc5cwY-xjUVBcKdVKlNyW_DwsmEbUGhRd29Slewxqbr9Ilt5WavJfckNbltUCb_ieZZmOz43AVGsL6ju9KKUsxxQDUpwFU2HTsVG3QcY2AqM5clo6EtBtH0Zi87AU1mCUQsdZiVQyLFOCWZ4xmPDSeSCXKJG0_PjWHB50Ydw2bri7_0PxZNhldKOK6MRnqWajKLC640pxqrPCFkz3i5KB3NgWUmKLWtg=w800-h600-no


x0IUj_5rLsKuOybLOaOgsOfTFUIrb4khWPVMhovtJ9jEi1_U-pNe8-QUKB6RKqrIZlgAjB5VVOTWYVDVExfqBp8TJrJ1A_6gF7-vbmpEMaRMrmksqVGGsXUXESXJtpdB5E7CQ5i6CAhGS5Pvpp8t-12vUMRW40v6NR1S4hUkUoPspKbfzpzLgwx7pyDImj4sXlhUw4o6wz7DPWimUuWELjLOW_2XWMddxGmf-KBWqe8Fpnu2VQR5GuSH6r5s_qRMcHzNpOZnMjt4Vdq2i9iZTdUreUB2gbGXr-O9xO9PpHYZ3ZbGfFMk6JdM-dsXxHVIxqkTEgBKvBLqLwAdPbt192S098dkK66MDZvtmURIpnYVGMKMf4N-Gw62619ltTutP5EdKmjX0LcACkgo_Hp8tCc6P9Q-Pis1UJN7SX6b_wIzs9mkSM0Uv8vtuUT1O4MChw3xTnl-UXMnVFo2_80UYYj2NO7V25EOi4xtBtJvFECJrsjZLBUxJ7a6vEcYUnYW3hjQPZjwTNBlVC4iPdUYmJlu-IypB9EEb6bETb3w6fHHUejly8_ZmJu-ACOPic68yNopncu82Pvz6QMEzE5mKkbYECm-uvnzaCE1KiqDX-gB96YHCw=w800-h600-no


A photo of all the components. In hindsight, I would have liked to replace those black plastic trim washers, but I don't know the part numbers and ended up just cleaning and reusing them.

hdwCDIVPGg871m-B8qQqrF_bJOkWnUoH-timnu49Th0E8PCHZhuqrMApigq0nVSmNPzy6oUWxg5n9COdNRsCL-b_39Pe8o1UPo3pXiyTpJ99g5qJN9GVZLzrxe-AtUOV8NHxPX7d9LJi90m4vyyRe8ytamG9roBgp8Tam2v78kHJvyHtdj0hkb20iPRcdv6Cnz0R-Vla68Ce4bbo4INHyOyNGpF5udVdvYnsedQ5P5MDytfg2VhalNOqtoJYEQQuRqks-P_2jG19MoKzibpAUGt1d_cEQV0GJoA9VXCdusgwc_xWih3xjyySzo_SLyeqCnmrYxmH5G_9d0NtLMjWhTSxGMMGk1hDWZpkjsdw__B-_jt2VbFCkf9BLEFIFoH36pTp_zeeLkDgkz_KUqoQK1zEjY1cyxRnbyeBvjkBsUUUzlk_z59ZCr_CItny5CBMCNBM5hghblZTh8Rg-FVlRvGa95QKupbQ3Av7hQ1YZIbTMZTEN5bU29E4XT2Kb6iFjY1CB3poKy-fkS8hRcNDZ7KZBQlST9syfX0us5x-3Kez7a9U39AlDPyZTz3i_1yQ1X9qhus0GSSoxK8T_m_wAiXGX5TJUY2NgLlqYseVzzy53-UNuw=w800-h600-no


Now, issue # 2. PLEASE PAY ATTENTION WHILE REINSTALLING THE DOOR HANDLE OR YOU WILL GO THROUGH A LOT OF ANXIETY LIKE I DID!!!! See the yellow clamp at the end of the door handle? That needs to be latched against the door lock mechanism's plastic knob. Hard to explain, but you will see it when you undo the door lock mechanism. This will be done right before you screw the door lock mechanism back on the door frame. Forget this and you won't be able to unlock the door! I made that mistake and ended up having to pry out the door panel from the inside to manually release the door and got some scuffs on the interior trim like a dumbass.

I plan to do the front doors soon, will post an update if I encounter anything new there. Overall, a must do, to avoid rust build up underneath.
 
Last edited:
Ok guys, I just finished the front doors as well this morning. Drivers side was super easy, easiest of all doors. Passenger front was the worst. Absolute pain in the ass. Here's details.

If you watch the video of the girl showing how to disassemble the front door panels, for the 4th gen 4R, you don't have to pop out the power window panels. Just two screws exactly like rear doors and panel pops off.

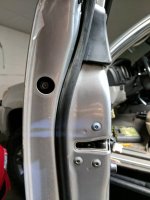
First, in the front, you don't have to remove the lock mechanism to gain access to the rear bolt of the door handle. Pop this cover and the rear handle nut is accessible, on both sides.

IMG_20161029_085909.jpg

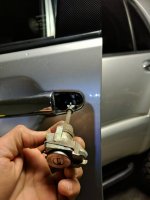
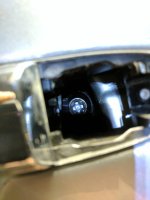
Second, on the driver's door, the lock cylinder is held on in a funky way. Just be careful when you pop it out and back in.

IMG_20161029_090208.jpg
IMG_20161029_090156.jpg

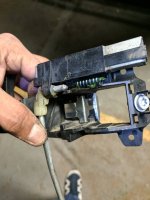
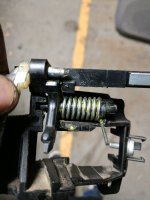
Now for the hard part. Passenger door handle. It has a lot of weird parts that are unique to it, make sure you pay attention to how they come apart. The spring you see in the photo below needs to be mounted the opposite way, took me a while to figure it out. Then the handle needs to be latched against the door lock on the inside of the panel mechanism or door won't unlock from outside. Similar to drivers rear door, somewhat. The clamp that extends from the door lock needs to 'catch' against a specific part of the door lock mechanism.

IMG_20161029_095808.jpg
IMG_20161029_100438.jpg

I'm glad I got this project done, it's been on the list for over a year. Thanks for the instructions in this thread. No way anyone could pay for a dealer or shop to do this, would be several hundred $$ just because of the tricky little bits in how the handles go together.
 

Attachments

  • IMG_20161029_085909.jpg
    IMG_20161029_085909.jpg
    71.9 KB · Views: 789
  • IMG_20161029_090208.jpg
    IMG_20161029_090208.jpg
    56.3 KB · Views: 721
  • IMG_20161029_090156.jpg
    IMG_20161029_090156.jpg
    43.8 KB · Views: 752
  • IMG_20161029_090642_1.jpg
    IMG_20161029_090642_1.jpg
    62.7 KB · Views: 740
  • IMG_20161029_095808.jpg
    IMG_20161029_095808.jpg
    75.4 KB · Views: 768
  • IMG_20161029_100438.jpg
    IMG_20161029_100438.jpg
    67.9 KB · Views: 792
Last edited:
We've had a lot of rain in my area recently and I just noticed my handles are leaking rust! Called the dealer for the parts...$44!!! Holy crap. Meanwhile my oil filter is $5... The crush washer is $1.50..Really? how do these people figure their pricing??
 

Members online

Forum statistics

Threads
278,306
Messages
3,554,045
Members
248,016
Latest member
Advally Service

Trending content

Back
Top