Screwed up :/

ILIR

New member
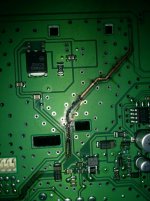
Was installing interior led's. Everything going fine, until I got to the front overhead console. One of the bulbs wouldn't come out, so long story short the bulb broke and I'm pretty sure I fried the circuit board trying to fish it out because neither the led's or regular halogens work now. Sucks. So I did a quick search online and those consoles are not cheap. The light for the home button comes on when I press it though, so I'm not sure what my options are really besides selling my left nut for a new console.
 
Register to hide this ad
+1 for removing the positive battery connection, or at the very least, the fuse for the circuit you're working on before you start.
 
All relative fuses check fine. Took it apart, definitely fried circuit.
 

Attachments

  • IMG_20150630_194447.jpg
    IMG_20150630_194447.jpg
    132.8 KB · Views: 693
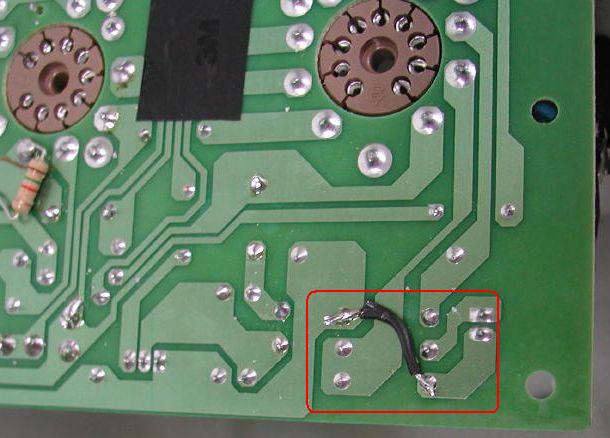
looks like a single layer PCB through hole... nothing fancy. I'm willing to bet you could cut the busted copper trace with an xacto knife and jump it with an external flying lead.
 
jumper.jpg


Then you add a dab of superglue to keep the wire from flopping around. However this assumes nothing else got fried on the board. Looks like there are a bunch of inductors that branch off in parallel off the lead that got fried. Could be ok as the forward bias voltage on those prevents current flow and hence the trace was blown and not components flying off their solder pads.
 
Ok cool, I think I could manage that. So would I start the jumper from where the copper trace originates and connect it to where it ends?
 
Picking my my Runner within the next hour, and will be doing this this week.

Any sure-fire way to avoid having this happen?
 
Picking my my Runner within the next hour, and will be doing this this week.

Any sure-fire way to avoid having this happen?

Take out the entire overhead console and take the bulbs out from the back. Pain in the ass trying to get them out from the front.
 
without actually seeing the entire circuit board and understanding what is going on. In Theory yes.

I would first start with clipping the loose copper trace with a pair of side cutters as cleanly as possible. Then take an old tooth brush, some isopropyl alcohol (perf 99% stuff), and scrub the entire area where there was a burst trace and area you will be working on.

let it sit for a few mins for the alcohol to evaporate.

Find a 20watt or so soldering iron with a fine tip. Use tweezers to hold the wire as you work with it (soldering).

Find 18 or 22ga copper stranded wire. Snip maybe 1cm or so of insulation jacketing from both ends after you figure out roughly how long you need. Route is cleanly (hopefully following the bends and such of the blown trace).

On the same side as you show in your photo (it's kinda dark on the top right corner of photo). Presolder a dab onto a through hole where the trace goes through that is blown. Add a bit of solder to the pad of surface mount inductor that is labeled 14|18| at the top leg where the strip is.

Tin your wire you just prepared (by adding a touch of solder to the exposed conductor). Do this for both ends.

Take your soldering iron and heat the thru hole presolder you did earlier, insert 1 tined end of the wire you prepared into this thru hole you are heating.

Remember don't let your iron sit continuously anywhere. You should be able to do any soldering step in less than 5 sec count. Else you will burn out wires, pcb, and/or components.

Now the tricky part is adding the wire onto the presoldered pad of the surface mount inductor 14|18... You will want to heat this presoldered pad quickly by touching the tip of your iron quickly and touching the other end of your tin'd wire to the area.

A good solder joint is shinny. If it is cloudy and matt, (looks like bird shit), the joint is shit.

Once you have this done, just use a glue gun and add some dabs of hot melt glue to secure the floppy wire to the circuit board.

If all that is broken is a blown trace than your circuit board is repaired. If more things got damaged from the short, then all bets are off. Without actually studying a schematic and or putting the board onto an oscilliscope there is nothing more to be done.

You might be able to pay off a local collage electrical engineering student say $50 bucks or a case of beer for him/her to help you fix it. I've fixed many guitar amps when I was in school for exchange of cases of beer.

 
Picking my my Runner within the next hour, and will be doing this this week.

Any sure-fire way to avoid having this happen?

Disconnecting from power for this work is wise, but the key to avoid this problem is the tape method. Take some tape (I used packing tape because that's what I had laying around) and stick it to as much of the bulb as you can, leaving some tape for you to hold. Then you just pull the tape down and out comes the bulb. You'll only need this method for the map and front console lights as I recall.
 
For future reference, if you use a small piece of duct tape and press it to the bulb, you can pull the lights out with literally no effort and you don't have to take anything else apart. That's how I did it.
 
All relative fuses check fine. Took it apart, definitely fried circuit.

2 options......

1) Fix it yourself (or pay up to have it fixed)

2) Put everything back together, act like it never happened, at your next check up/oil change/scheduled service, bring it to the dealership's attention..... IF you are lucky, they will fix it for ya.... :tape:

(bring a Starbucks gift card for the service adviser may work well too)
 

Members online

Forum statistics

Threads
278,308
Messages
3,554,057
Members
248,016
Latest member
Advally Service

Trending content

Back
Top