Shrockworks rock slider install instructions

For a '12 SR5, do you have to remove the plastic trim from below the doors for the rock slider install? I want to get rid of that plastic and it looks like the sliders come up close to flush with the bottom of the doors. Wanted to see if anyone else with an SR5 had installed these. Thanks guys
 
What the heck, I assumed this was a bolt-on installation. I thought these were the sliders for me, based on looks, but now that I read about dropping gas tanks, drilling the frame... I may have to start my slider research all over.
 
I'm new at mods in general. Got into it late in life. The gas tank strap removal is a little scary. And do you really have to drill to install these? If so, I might look for something else.

Then again, maybe I'm being stupid. LOL.

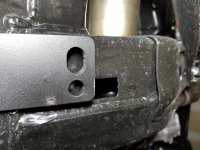
You will only need to drill one hole in the frame on the passenger side, front, bottom bracket hole. I mounted the slider with all other bolts, used the hole already in the slider to hold the location, and then just used a regular electric drill with the correct sized bit (3/8" I think). I just kept it lubed with some oil and pushed through it. Once it was drilled out, I sprayed a bunch of black spray paint to cover any exposed metal. There is a big hole in the frame there already so that's the easiest stick nut to install - stick it behind the hole and thread the bolt in. The whole process for that one with paint/drying took maybe 45 mins.

Honestly I would replace all their 1" bolts with 1.25" or possibly 1.5" bolts. Makes the whole process with the sticknuts a lot easier.
 
I installed a pair of SW "step" sliders today. They're beefy as hell and stick out quite a bit (In a good way). They bolt up nice and snug. They look almost fluch to the body looking down at them, but they maintain a small gap from the body panel. The powder coating is very nice and showed up via UPS in CA without a scratch. The packaging is this state of the art expanding spray foam inside plastic bags inside the cardboard box. It was cool and it kept the sliders nice and safe. I'm very happy with the overall quality of these things. In terms of off-road functionality, contrary to other designs, this entire slider provides the "bump out" effect. It will keep you plenty far away from rocks, etc. and give you a safe pivot point to avoid damage.

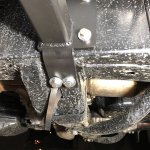
When I mounted up the passenger side, there was about a 1/2"-3/4" gap between the passenger side front lower mounting bracket and the frame cross member. With both top bolts tightened down, I used the bottle jack and pushed both corners of the bottom bracket to snug it up to the frame. I still ended up with about an 1/16" gap. I used a couple of the extra washers to make a spacer and this allowed me to tighten things down with a straight fit. This is where the 3/8" hole is drilled into the frame cross member (DONT FORGET EYE PROTECTION!). I'm glad I have the extra strength up front. I only drilled the one hole overall.

For a majority of the mounting positions, it's required that you fish a locking stick-nut through the small openings in the frame to find the bolt. The stick-nuts provided do work very good for this. I found it somewhat peculiar that the steel flat bar from the stick-nuts stays attached. These pieces seem like they could rust easily. I've more recently heard of others painting these stick-nuts before install (I did not). No biggie.

So far, I'm impressed with the quality, the apparent toughness, and the fit of these (for the most part). If you're like me and want to give the kids some help getting into the T4R and want a good step for accessing the roof rack, all while giving you top notch trail protection, these are about as good as it gets.


I was thinking about going back through in all the areas that I used stick nuts, sticking a WD40 straw back in there, and blasting the hell out of them with lube. I also though about using some of that high spray volume industrial enamel
and spraying the hell out of all areas I can get to from the holes in the frame. Just to help ensure these are covered as best as can be and wont rust.
 
it isn't bad at all, i really like the method shrockworks uses for attachment. i installed mine a few weeks ago, and they fit well

as mentioned previously, i also sprayed a short shot of paint into the drilled holes just to cover the exposed edges...i didn't bother with painting the stick nuts, doesn't seem to pose any issue even if they were to rust

i did manage to let go of one of the sticks and needed to retrieve it from inside the frame with a magnet, ha
 
Hard Lines

I just got these all bolted on. Wasn't to bad, the stick nuts get easier once you get a few on.

My question is, did anyone else have a hard time getting the hard lines (I think they are KDSS) away from the slider? Do you have to bend it or just pry really hard to get that zip tie in place? Thats the only things that has me worried at the moment.
 
I just got these all bolted on. Wasn't to bad, the stick nuts get easier once you get a few on.

My question is, did anyone else have a hard time getting the hard lines (I think they are KDSS) away from the slider? Do you have to bend it or just pry really hard to get that zip tie in place? Thats the only things that has me worried at the moment.

I don't have shrockworks, but my OPOR sliders needed to go between the frame and the KDSS lines too.

I used small wooden wedges, and tapped them between the lines and the frame once the proper bolts were removed. I pointed them downward, so when I jacked the slider up, it pushed them up and out. It worked really well. I've had the sliders off recently to sandblast and repaint, and I used the same proceedure again, but it went even smoother this time.
 
I don't have shrockworks, but my OPOR sliders needed to go between the frame and the KDSS lines too.

I used small wooden wedges, and tapped them between the lines and the frame once the proper bolts were removed. I pointed them downward, so when I jacked the slider up, it pushed them up and out. It worked really well. I've had the sliders off recently to sandblast and repaint, and I used the same proceedure again, but it went even smoother this time.
Sorry, I don't think I phrased my question right. I got the sliders on and in between the frame and the hard lines. My concern is the lines rubbing against the slider over time could cause problems. Shrockworks gives you heavy duty zip ties to help hold them away from the slider in mid air. It must be that I just have to get a little firmer with them.

Thank you for the help, that's a good idea about wood shims if I ever need to take these off.

Sent from my SM-G955U using Tapatalk
 
Last edited:
Sorry, I don't think I phrased my question write. I got the sliders on and I'm between the frame and the hard lines. My concern is the lines rubbing against the slider over time could cause problems. Shrockworks gives you heavy duty zip ties to help hold them away from the slider in mid air. It must be that I just have to get a little firmer with them.

Thank you for the help, that's a good idea about wood shims if I ever need to take these off.

Sent from my SM-G955U using Tapatalk

Apologies! I shouldn't have assumed it was a similar condition
 
I just got these all bolted on. Wasn't to bad, the stick nuts get easier once you get a few on.

My question is, did anyone else have a hard time getting the hard lines (I think they are KDSS) away from the slider? Do you have to bend it or just pry really hard to get that zip tie in place? Thats the only things that has me worried at the moment.

How many stick nuts did you use and where. Im about to install these on my pro this weekend!

Thanks
 
Passenger side is installed and I do have the gap on the bottom front mount. Undecided if I want to drill and fill the gap with washers. Great quality powdercoating though! On to the driver side!
 
Sorry, I don't think I phrased my question right. I got the sliders on and in between the frame and the hard lines. My concern is the lines rubbing against the slider over time could cause problems. Shrockworks gives you heavy duty zip ties to help hold them away from the slider in mid air. It must be that I just have to get a little firmer with them.

Thank you for the help, that's a good idea about wood shims if I ever need to take these off.

Sent from my SM-G955U using Tapatalk

I took some 1/4" fuel line, split it length-wise, and slid it over the KDSS lines to prevent any issues related to possible rubbing.
 
Passenger side is installed and I do have the gap on the bottom front mount. Undecided if I want to drill and fill the gap with washers. Great quality powdercoating though! On to the driver side!

yea same issue on my '18, even with washers to cover the gap wouldnt it just be a pressure point instead of complete support? maybe shrockworks can provide a solution??
 
That is up for debate, but as long as you have at least one of the two needed on each side, you "should" be ok.

Are you saying One of the two on the bottom? I don't have any holes on the bottom that line up
 

Attachments

  • 20180119_210221.jpg
    20180119_210221.jpg
    133.4 KB · Views: 926
I bought upgraded hardware from home depot and fat rubber shims to fill the gap after I drilled the holes. Works perfectly. I also spray painted the stick nuts, hopefully slows down the rusting.
 
So just finished up this install on a 2018 ORP. Read a few tips and tricks and wanted to quickly list / summarize the ones I found most useful:

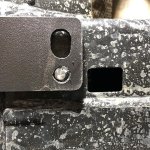
1) you’ll need to drill two holes for the passenger front bottom brace... drill both holes, versus 1. Why not? you’re already there.
2) the passenger side had zero pre-threaded options. All bolts required stick nuts. I used 7 of my 10 and started to wonder if I had enough...
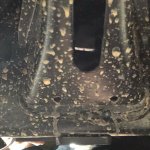
3) took me a LONG time finding a way to get the stick nuts into the rear upper two holes (sts). Turns out there’s a nice opening on the interior of the frame at a bracing point. At first I thought this was a sucker hole but turns out there is an entrance to the inside of the main frame brace. See picture.
4) you will need a table / angle grinder for one stick nut as the 2018 ORP frame doesn’t have a large enough opening for one of the passenger side mount points.
5) use a deep socket and jack to press the gas tank up. I only pressed up on the skid plate but that gave me zero room to remove / reinstall the long gas tank strap bolt.
6) you will need to drill one hole for the driver side front mount area. Total of three holes drilled.
7) I wrapped electrical tape on the KDSS lines, but not enough. You’ll need to wrap a good 4-6” of length since they touch the entire length of the skid bracket. I’d also put a rubber gasket of some sort up there but didn’t have one.
8) I did NOT need a 1/2” longer bolt for the gusset point. It just requires good lighting and turning the stick nut to face the correct direction... oh and a strong motivation to FINISH without another trip to the hardware store.
9) all my stick nuts were already rusted when they arrived. So have a de-rust plan and spray paint early.
 

Attachments

  • FF58160F-6E95-4B0D-9B8D-AD06C27381E2.jpg
    FF58160F-6E95-4B0D-9B8D-AD06C27381E2.jpg
    138.3 KB · Views: 584
  • 1599FD24-3CB1-408B-9B24-19E3B631A23E.jpg
    1599FD24-3CB1-408B-9B24-19E3B631A23E.jpg
    142.2 KB · Views: 560
  • 4282DE55-EFE3-4CCC-85C7-C7BC0EFF5E17.jpg
    4282DE55-EFE3-4CCC-85C7-C7BC0EFF5E17.jpg
    92 KB · Views: 577
Last edited:

Members online

Forum statistics

Threads
278,316
Messages
3,554,106
Members
248,016
Latest member
Advally Service

Trending content

Back
Top