Starting issues

mendozer

Member
I've noticed that my ignition (after the first of the day) is often sputtery and doesn't crank over fully. This was happening last year but I attributed it to the head gasket, fuel injectors, etc. Brand new battery in there and my scangauge shows 13.6-13.7 while driving which to me says the alternator's OK. We can rule out fuel injectors, TBI, MAF, battery, fuel filter, bc those are all new or cleaned.

A patient of mine today told me check the IAC, something on the inside of the throttle body that can gunk up. Other than that, I don't really have a good mental flow or where to go to test things.

So the first start up of the day is perfect, then let's say I go to the store and shop for 20 minutes then get back in to leave. That's when it'll sputter for a good 5 seconds before firing up, if it even does. Today leaving work it fired up fine then I stopped somewhere and got in and it sputtered for like 10 seconds, then I shut it off, then immediately cranked it again and it fired up perfectly. The battery icon on the dash does come in and out during this episode if that means anything.

May not be related...the remote start I put in 4 years ago no longer starts the car for me. It used to run perfectly for a year or two then it just won't crank over. I haven't had the care to dive into that.
 
Register to hide this ad
I've had very similar symptoms, perfect cold starts but hot starts were a struggle. Ended up being a failing fuel pump, previous owner also replaced the stock pump at some point with a cheap aftermarket one.
 
Right, as Panchro describes, the anti-flowback valve on the fuel pump may be failing at times. When it does, fuel flows back into tank, making the engine crank over longer and the pump work harder to re-pressurize the system and making starts longer at times. Maybe...only way to test for sure is to hook up a pressure guage and let it sit a while to see what it does. Luck.
 
I agree with the others pressure at the rail. Clean fuel filter and verify the pump. Aftermarket pumps mostly dont last long. :(

Sent from my SM-J337V using Tapatalk
 
So this is a new OEM filter. What kind of testing would I do for it? You mention a pressure gauge, just get some tubing and splice it in there along the line?
 
for lunch today I got in the car to start it up and it struggled a little bit got to a place about 5 minutes on the road got out got my lunch got back in and then it fired up fine. So it's not very consistent with the pattern either
 
for lunch today I got in the car to start it up and it struggled a little bit got to a place about 5 minutes on the road got out got my lunch got back in and then it fired up fine. So it's not very consistent with the pattern either

Yeah you can get away with some short trips for a while but say after 20-30 min plus drives the problem gets worse as the engine bay gets hotter.

After a 4 hour trip I stopped at a gas station to fill up, tried starting it up again but she would not turn over. Normally I could wait a few seconds between cranks and pressure would build up enough to get it running again but not this time. Used AAA to bring it to my local toyota shop where I asked them to check the fuel pressure, as suspected weak pressure. Fresh OEM pump went in and I have never seen those symptoms again.

Hope this helps, Good Luck
 
I red through these replies quickly at lunch. I realized you're talking about the fuel pump and in my mind I was reading fuel filter. So my FILTER is new. OK I'll look into the pump situation. thanks.
 
And you wouldn't consider the Denso pumps? Doesn't Denso make almost all Toyota parts?

I'm seeing 360 from the dealer, 235-250ish ebay OEM, or Denso 75 new. Even side by side photos are the same.

I'm going to test it first with an ohmmeter per the FSM first.
 
Ok resistance between terminals was 1.2. specs say .2-.3 but that's at 68 degrees F. It about 50 outside. Can I trust that reading?
 
the next thing in the FSM was to connect to the battery. Nothing happened. But also, I am uncertain of the connection made from my alligator clips to the extension cord wire i made. I could barely get a good resistance reading on the far end of the extension cord. A pump itself isn't too pricey, but it looks like removing the tank is a PITA so I really want to make sure
 
I had not checked the resistance on mine as part of the troubleshooting. Actually bought a pump with the intention of dropping the tank in my driveway but never got around to it. Pump failed on a road trip back to my hometown so I ended up having a local toyota shop take care of it. They were also able to pressure test the fuel line before the job to make sure that it was a failed pump.

It's too bad the hatch under the rear seat isn't large enough to change the pump without dropping the tank. Good Luck
 
Im also having this same issue. cold starts are not an issue but sometimes it will start for a second then die immediately almost as if something is wrong with high idle. the sputtering usually comes when the cars hot as described
 
Got it done today. What a royal PITA!! This is when I wish I had a vehicle lift. Constantly getting on the ground to shimmy underneath to reach things was irritating. Took me 5 hours to do what should have been a 1 hour job.

This was on a 02. The Great Him's writeup is on a 97, it's slightly different, outlined below:

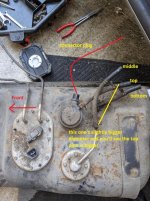
01-02 only have two lines going to the front of the tank, the third is actually on the top of the tank and hard to get to.

I had to lower it on my jack little by little to get my hand up along the driveshaft to loosen the 3 hose clamps for the evap line, vent line, and something else (return?)

There was no feasible way to get to the clamps on the tank side of the hose so I did it that way. The vent clamp is annoying and it took me a while to figure out how to remove it. the plastic flange simply slides over the plastic nipple on the evap canister, but it needs to be flared out a bit. I kept trying to pry on something else on the plug that was pointless, again you're on your back doing this craning your neck up at an angle trying to see things since it's on the top of the tank.

I honestly thought about just taking my jigsaw and making a big hole under the passenger seat haha. It would be so much easier to access all this, making it a 30 minute job.

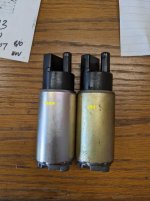
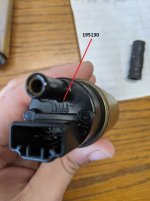
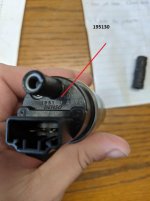
I took pictures of the Denso (950-0001)pump I got. I found photos online on how they were similar...these are the EXACT same. See the side by side sizing, and the part numbers on the black plastic part.
In fact they're so similar, I reassembled the pump with the old one by accident. Fortunately I noticed the bright silver one sitting on my bench and the goldish one and recognized my error. Those metal clips that come with it for the filter are super fragile. I crushed mine on accident holding it with pliers so I had to reuse the old one.

Looking at the tank you see there are three small lines. One thing I learned the hard way...laying on the ground here you'd think that's the order they go back once you have the tank up, not so. I struggled to get the "middle" line back on the "top" hard line. When I say top, middle, bottom I'm laying on my back from the passenger side with my chest just below the muffler and driveshaft looking up at the bottom of the truck. The hard lines are in this order. "top" is closest to the passenger side, and so on. This was the only way to get my right hand up to the lines for reassembly. The "middle" one although it's bent that way, slides too easily onto that hard line, then the "top" hose struggled to get onto the middle hard line. That's when I noticed the diameter of the hard lines, it's subtle but they're different. I swapped them and voila. the "bottom" one which is closest to the driver side is unmistakable due to hose length and such.

if you ever have to do this job, go to a self service garage and lift the vehicle so you can stand under there, because it sucked. Thankfully I have quick reflexes or I would have taken a lot of gasoline directly to my face (wasn't wearing glasses, shame shame) When disconnecting the front hard lines by the fuel filter one is a hose clamp while one has a plastic red adapter. You pry that and rotate it out of the inset holes then pull the plastic connector back...then MOVE! Thank goodness I am quick or I might be in the ER right now taking care of my eyes. For the record I DO have glasses for all the safety people out there (and ended putting them on later once enough rusty particles fell into my eyes, but I can't see well out of them).

I did this repair with the gas light on for about 20 miles. Still had a it left in the tank too.
 

Attachments

  • PXL_20201127_211423456.jpg
    PXL_20201127_211423456.jpg
    97.4 KB · Views: 441
  • PXL_20201127_211442860.jpg
    PXL_20201127_211442860.jpg
    58.7 KB · Views: 471
  • PXL_20201127_211434476.jpg
    PXL_20201127_211434476.jpg
    54 KB · Views: 479
  • PXL_20201127_214525229.jpg
    PXL_20201127_214525229.jpg
    133.3 KB · Views: 439
This has been an interesting read, and hats off to you to for doing it on the ground! I've done plenty of crap jobs due to limitations such as this. So a question: would you have done this yourself if you knew it would be such a PITA, or would you have taken it to a dealership?
 
So I gave it a couple days to work itself out and it does not seem like the warm starts have changed really at all. So now I'm out of ideas since everything else along the fuel path is new or new ish within the last year or two

The reason I did on the ground was I could have pulled into the garage but it would have been very tight to slide under the car and back out again so I decided to pull alongside the garage door that way I had more working room on the side of the car. And no I would not have taken it to the dealership I would have taken it to a mechanic that I know who has a lift.
 

Members online

Forum statistics

Threads
278,305
Messages
3,554,042
Members
248,016
Latest member
Advally Service

Trending content

Back
Top