Sunpilot's 4Runner Official Build Thread

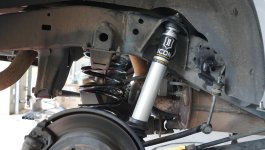
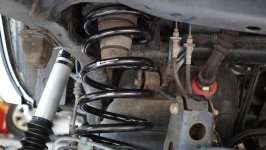
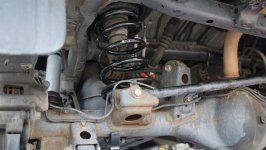
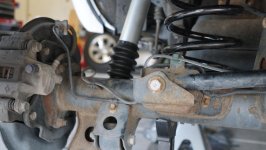
I made some progress yesterday. I removed the back half of the XREAS system, which wasn't hard...just a bit messy with some leaking oil. That allowed me to work on the rear shocks and springs installation.
Pics to follow
 

Attachments

  • DSC02560.jpg
    DSC02560.jpg
    136 KB · Views: 1,054
  • DSC02556.jpg
    DSC02556.jpg
    133.2 KB · Views: 1,129
  • DSC02554.jpg
    DSC02554.jpg
    135.8 KB · Views: 1,079
  • DSC02557.jpg
    DSC02557.jpg
    131.7 KB · Views: 1,079
It was not easy getting these lifted springs in place. After I removed the old shocks, the original springs came out easily by letting the axle droop and jacking under one side of the drooping axle, which lowered the opposite side and the spring fell out. Repeated for the opposite side. Getting the new springs in was more difficult. I released tension on the brake lines and ABS wires, to avoid problems. Then I worked on the Driver's side first. I jacked under the right side of the axle until it was up as far as I could get it. There still was not enough room to insert the new spring. I used my vehicle jack on the left side of the axle (where the new spring was being installed). I jacked between the axle and the upper rubber bump stop, which pushed the axle down even more. I was able to wrestle the spring almost into position, and then by rotating the spring itself, I was able to walk it onto the lower spring seat. Sorry I don't have pics of this procedure...was too busy concentrating on the spring to take pics. The spring finally went into position.

I then moved to the passenger side and repeated the procedure of jacking the opposite side of the axle up, and spreading the side I was working on with the vehicle jack. Since the axle locating bar runs from the right side frame to the left side of the axle, there was more flex, and I had little problem getting the new spring seated in place. Then, I lifted the whole axle under the pumpkin and installed the shocks.

It should be noted, I also disconnected the stabilizer bar at both sides of the vehicle prior to flexing the axle to extreme. I think I will be ordering some new, longer brake hoses, as the new ride height will be at their limits.

The springs weren't a piece of cake to install, but they weren't as bad as I anticipated. Today, I will be torquing the bolts, and putting the wheels back on, then moving to the front for that job!
 
Last edited:
Why are you trying to shed weight? You won't notice any change in efficiency and that tow hitch provides substantial protection from a rear end collision.
 
Why are you trying to shed weight? You won't notice any change in efficiency and that tow hitch provides substantial protection from a rear end collision.

I will be building a new rear bumper with an integral tow hitch, tire carrier, etc. It will give me the protection I need. The more weight I shed, leaves more capacity to get my Runner outfitted the way I want without causing problems. As I remove items, I weigh them so I have an idea how much my vehicle will change, one way or another, as I install new items. I'm trying to stay as close to original weight as possible to conserve load capacity to carry my overland gear.
 
I will be building a new rear bumper with an integral tow hitch, tire carrier, etc. It will give me the protection I need. The more weight I shed, leaves more capacity to get my Runner outfitted the way I want without causing problems. As I remove items, I weigh them so I have an idea how much my vehicle will change, one way or another, as I install new items. I'm trying to stay as close to original weight as possible to conserve load capacity to carry my overland gear.

It would be interesting to see how much weight you can take off these trucks. Not many people have done much in that regard. I gave up, there is no way to get back to stock weight after full skids, bumper, sliders, 33's, etc. Unless you go all aluminum (tin foil for rocks) and remove middle row seats and run without a spare, etc. It doesn't hurt to try I suppose, but personally, I'm not sacrificing any strength. Especially when aluminum is more $$$.
 
so I sold the Rubi and put the money in a box in my study. It sat in that box until last week when I came across this 4Runner... Now I'm starting all over again. LOL

put the money in a box in my study!!!! That's the funniest shit I have heard all day.

On another note, I am wondering if you are going to weight the all the XREAS parts. I remember there was a tone of bracket and bs that I took off my truck when I removed the XREAS.

Good luck with your build.
 
Welcome to the forum. I'll be keeping a close eye on the build, as I plan to do similar for my silver '07 as well.

Is it recommended to do the UCA when upgrading the suspension? I was hoping to get by on stock UCA for a while.
 
put the money in a box in my study!!!! That's the funniest shit I have heard all day.

On another note, I am wondering if you are going to weight the all the XREAS parts. I remember there was a tone of bracket and bs that I took off my truck when I removed the XREAS.

Good luck with your build.

The XREAS brackets only amount to less than 2 pounds. The shocks were the heavy items...

BTW, that's the truth... I put about 15K in a metal box and left it there until I found this 4Runner. It was hard to resist, but in some ways, I'm disciplined! LOL
 
Welcome to the forum. I'll be keeping a close eye on the build, as I plan to do similar for my silver '07 as well.

Is it recommended to do the UCA when upgrading the suspension? I was hoping to get by on stock UCA for a while.

I guess if you keep stock height in front, and your uca's and bushings are in good shape, there is no need. I went with the Icon uca's with uniballs because I am lifting the truck, and that is the best way to get the castor back in specs. The uniballs allow more suspension flex also. It depends on what you will be doing with your truck.
 
I got started on the front end yesterday. My goal was to remove the XREAS shocks and lines. Mission accomplished. Today I'll be working on the uca's...removing and replacing with the new Icons.

Old XREAS shocks

Separated the tie rod end, and the stabilizer bar (actually, I removed the front skid plate and then dropped the complete stab. bar. This made it easier to work on the front components with the stab. out of the way.


There are three shock mounting bolts on the upper shock tower. The front two are easy to get to.

The third bolt is right under the fender well seam, in the back of the shock (almost in the engine compartment, allowing little clearance to work with. I tried from under the hood, but too difficult.

I ended up using a wrench and working from the wheel well side...it took time, but I got it done. Then I loosened the lower shock bolt and removed the nut (save for later use).
I also loosened the upper ball joint nut and hit the top of the knuckle to break the joint before I removed the shock...it was easy separating the joint with the help of the shock.

Next, I was able to remove the old shock with little trouble... I had to use a pry bar to leverage the lower control arm down a tad to get the shock out of it's lower mounting saddle...it wasn't hard. Then the shock slid right out.


Now, it's on to the UCA's and inspection of the lower a-arm, ball joint and bushings. I'm thinking, since I'm in here, why not replace the bushings and ball joint? The truck has 150,000 miles on it. They are probably still in decent shape, but who knows how much life they have left, and it would make life easier for the tech that will be doing my front end alignment. We'll see.

 
Last edited:
I replaced my lower BJ due to being 320xxx miles old but that BJ was in fine shape. It was still full of grease and tight. I'm really impressed with the oem BJs.

Sent from my SM-G920V using Tapatalk
 
Last edited:
I replaced my lower BJ due to being 320xxx miles old but that BJ was in fine shape. It was still full of grease and tight. I'm really impressed with the oem BJs.

Sent from my SM-G920V using Tapatalk

I also heard about the Toyota ball joints lasting a long time. I'm still contemplating replacing them and the lower bushings. Not sure yet.
 
Next, I was able to remove the old shock with little trouble... I had to use a pry bar to leverage the lower control arm down a tad to get the shock out of it's lower mounting saddle...it wasn't hard. Then the shock slid right out.


Ugh.....not liking you right now after my 4hr ordeal of getting my seized struts out!! You guys and your "Southwest" trucks.

20161026_182327_zpsgskbu5n1.jpg~original
 
Looks good OP! Glad to hear the spring/strut install wasn't too bad, I'll be doing the same here soon.

Are you going with larger tires as well or going to stick with that's there for now?
 
Last edited:
Ugh.....not liking you right now after my 4hr ordeal of getting my seized struts out!! You guys and your "Southwest" trucks.

20161026_182327_zpsgskbu5n1.jpg~original

Damn, I feel for you. I wouldn't want to tackle that either. Good luck.
BTW, not all vehicles down here are rust free. I went and looked at a beautiful 4Runner a few months ago. I crawled underneath and there was so much rust that I could literally poke a finger through the frame. After talking to the seller, he came clean and told me the truck spent it's life in Pennsylvania. I grew up in Pa. and know about rust, so I politely rejected that truck.
 
Looks good OP! Glad to hear the spring install wasn't too bad, I'll be doing the same here soon.

At first I didn't think there was any way that oversized spring would fit, but with some patience and the help of my car jack, it went in. If I had another person to help, it would have been a lot easier. It wasn't bad at all, in fact, I am looking for another axle with a locker, so I might be doing it again! LOL

Yes, I am going to move to larger tires, that's why I did the lift first. I will be deciding my tire/wheel combination in the next few days, but it most likely will be 33" max, or something pretty close.
 
Last edited:
I installed the driver's side UCA yesterday. It went pretty smoothly, actually.
The first thing was removing the old uca. I already broke loose the ball joint at the knuckle, so that was no problem. I removed the nut from the long pivot bolt running through the uca.

The bolt slid through the bushings easily, but I ran into a bit of trouble getting it completely out. The head of the bolt made contact with the fender weld at one point, but a little tap with a hammer bent the sheet metal enough for the bolt to pass. Then, the bolt was stopped by the bottom of my battery. I guess the new battery is a bit bigger than the original, and it hangs over it's tray, so I simply removed the battery.


The uca came right out...
 

Members online

Forum statistics

Threads
278,309
Messages
3,554,065
Members
248,016
Latest member
Advally Service

Trending content

Back
Top