

theizzardking
New member
sway bar bracket install:
the purpose of this is to get your sway bars back at a stock angle (flat, like you want your corners to be on turns!) and take the weight of you puny stock end links before they explode. (mine took about 10k before that happened though)
personally I'm aiming this at the guys who can't afford disconnects or longer end links right at this moment and possibly a solution for some who doesn't mind carrying a socket to remove the stock end links before wheeling.
why you should do this or similar option, if you drive with a sway bar at all....
http://www.4crawler.com/4x4/CheapTricks/SwayBar.shtml#SwayBarOperation
credits go to:
the guys at 4crawler off road products for giving me the idea, you can purchase these from them if you like, $25 as per their website. (i am not associated in any way, they put in the work and i copied it, give them the credit or your money ,pick one)
order
4Crawler Offroad Products - Front Differential and Sway Bar Drop Kits
and to bikerjosh from t4r for pointing me in this direction to start with.
ok, here we go.
i bought the energy suspension sway bar bushings as mine had crumbled into almost nothing. i managed to find the correct ones for our truck with the grease-able zerk at my local o Reilly's so no need to place an order of any sort,
after reading about graphite impregnation into polyurethane i decided it was no big deal not to get the black ones.
(the graphite is encapsulated into the poly and acts as a quietner in failure mode, meaning the graphite only become exposed once the bushings starts to wear down and starts to essentially fail, so in that instance having the graphite in the bushing will make a difference, but i personally would rather have the bushing start to get loud when it needs to be greased and or replaced so i know the work needs to be done as opposed to it just going one day like my stockers)
what i did was scavenge the scrap bins at work to make this up with, i managed to find some good size chunks of 6064 alum already cut to the proper width so i just had to cut the lengths, i literately placed the new sway bar bracket on the piece and marked it out with a sharpie and chucked it on the mill then milled out the profile, i then headed over to the grinders for a bit of deburr and rounded out the edges just in case.
i used 1 1/4 inch alum as from the site from 4crawlers above they said your sway bar sees about half the difference in lift, so by that standard i figured 3 inches of lift should be 1.5 inch thick alum, but wasn't sure so shaved 1/4 inch of just to be safe, i do think a 1.5 inch block would have worked as well.
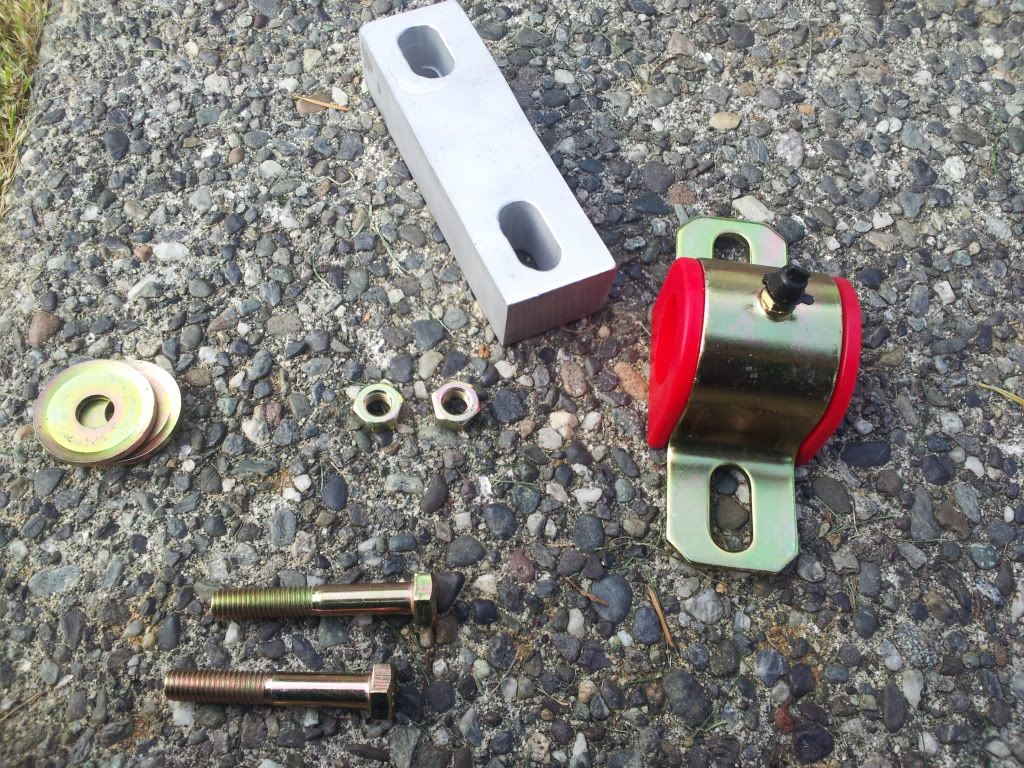
i then went to the hardware store and picked up some class 10.8 8mmx50mm hex head bolts and nuts as with the drop block your going to need longer bolts,the new bracket included washers. here is what i ended up with.
then went to the removal of the old brackets, i already had one side off when i noticed my end link had broken due to stretch, exactly what i was trying to prevent...oh well good of day as any..so back to the shop and $25 bucks later i got a master pro replacement which they happened to have in stock, awesome!
side note:my stock bushing had worn all the way through in the middle and was split, spitting the bushing out on either side of the bracket, nice!

my thoughts on the replacement end link.
the little cover is useless unless you want to spend the time trimming it down,not me, the ball joint felt nice and solid and the hardware that came with it was a step up from stock,also used the bigger puck like ES bushings as opposed to the dinky little help isle type ones used in the stock set-up, and over all the shaft was thicker, i did see a few tack welds on the shaft which worry me a bit,if not for the tack welds i do like these cheapish ones better ,but should be fine for how i wheel and how i drive until i can make some proper ones.
install
so yeah, lucky me, no rust all of the bolts came of like they were new and besides me putting the bar back-up there and bolting it in upside down the first time it was easy and fairly straight forward....it's nice not being the one uttering swear words from under the car when doing work with a friend!


and as you can see above it really did flatten my sway bar back out and wont be stretching my stocker length end-links any more, i can't comment on the ride difference as obviously my ride before was fubar'd before i fixed all of this stuff. at this point i'm not 100% confident in any handling improvements as like i said my was screwed, i'm giving a few of these out to the local guys to try out and see what their impressions are,
without a doubt though it does take stress off your end links, but how that translates into ride quality is beyond me at this point, i have no comparison to judge by and really i put it to the seattle crew how much of a difference this stupid little mod will make over all.
i am not selling these, if you want a set, make your own or order from the link above.
thoughts and opinions welcome!
p.s. that non-stock napa seki 555 tie rod end is only 5 months old and the rustiest piece on my whole truck...
the purpose of this is to get your sway bars back at a stock angle (flat, like you want your corners to be on turns!) and take the weight of you puny stock end links before they explode. (mine took about 10k before that happened though)
personally I'm aiming this at the guys who can't afford disconnects or longer end links right at this moment and possibly a solution for some who doesn't mind carrying a socket to remove the stock end links before wheeling.
why you should do this or similar option, if you drive with a sway bar at all....
http://www.4crawler.com/4x4/CheapTricks/SwayBar.shtml#SwayBarOperation
credits go to:
the guys at 4crawler off road products for giving me the idea, you can purchase these from them if you like, $25 as per their website. (i am not associated in any way, they put in the work and i copied it, give them the credit or your money ,pick one)
order
4Crawler Offroad Products - Front Differential and Sway Bar Drop Kits
and to bikerjosh from t4r for pointing me in this direction to start with.
ok, here we go.
i bought the energy suspension sway bar bushings as mine had crumbled into almost nothing. i managed to find the correct ones for our truck with the grease-able zerk at my local o Reilly's so no need to place an order of any sort,
after reading about graphite impregnation into polyurethane i decided it was no big deal not to get the black ones.
(the graphite is encapsulated into the poly and acts as a quietner in failure mode, meaning the graphite only become exposed once the bushings starts to wear down and starts to essentially fail, so in that instance having the graphite in the bushing will make a difference, but i personally would rather have the bushing start to get loud when it needs to be greased and or replaced so i know the work needs to be done as opposed to it just going one day like my stockers)
what i did was scavenge the scrap bins at work to make this up with, i managed to find some good size chunks of 6064 alum already cut to the proper width so i just had to cut the lengths, i literately placed the new sway bar bracket on the piece and marked it out with a sharpie and chucked it on the mill then milled out the profile, i then headed over to the grinders for a bit of deburr and rounded out the edges just in case.
i used 1 1/4 inch alum as from the site from 4crawlers above they said your sway bar sees about half the difference in lift, so by that standard i figured 3 inches of lift should be 1.5 inch thick alum, but wasn't sure so shaved 1/4 inch of just to be safe, i do think a 1.5 inch block would have worked as well.
i then went to the hardware store and picked up some class 10.8 8mmx50mm hex head bolts and nuts as with the drop block your going to need longer bolts,the new bracket included washers. here is what i ended up with.
then went to the removal of the old brackets, i already had one side off when i noticed my end link had broken due to stretch, exactly what i was trying to prevent...oh well good of day as any..so back to the shop and $25 bucks later i got a master pro replacement which they happened to have in stock, awesome!
side note:my stock bushing had worn all the way through in the middle and was split, spitting the bushing out on either side of the bracket, nice!
my thoughts on the replacement end link.
the little cover is useless unless you want to spend the time trimming it down,not me, the ball joint felt nice and solid and the hardware that came with it was a step up from stock,also used the bigger puck like ES bushings as opposed to the dinky little help isle type ones used in the stock set-up, and over all the shaft was thicker, i did see a few tack welds on the shaft which worry me a bit,if not for the tack welds i do like these cheapish ones better ,but should be fine for how i wheel and how i drive until i can make some proper ones.
install
so yeah, lucky me, no rust all of the bolts came of like they were new and besides me putting the bar back-up there and bolting it in upside down the first time it was easy and fairly straight forward....it's nice not being the one uttering swear words from under the car when doing work with a friend!
and as you can see above it really did flatten my sway bar back out and wont be stretching my stocker length end-links any more, i can't comment on the ride difference as obviously my ride before was fubar'd before i fixed all of this stuff. at this point i'm not 100% confident in any handling improvements as like i said my was screwed, i'm giving a few of these out to the local guys to try out and see what their impressions are,
without a doubt though it does take stress off your end links, but how that translates into ride quality is beyond me at this point, i have no comparison to judge by and really i put it to the seattle crew how much of a difference this stupid little mod will make over all.
i am not selling these, if you want a set, make your own or order from the link above.
thoughts and opinions welcome!
p.s. that non-stock napa seki 555 tie rod end is only 5 months old and the rustiest piece on my whole truck...
Last edited:


