
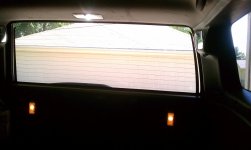
I put two courtesy lights in my tailgate. This makes everything better. They are on a switch so they function like dome lights: on-off-door.
Here are some parts you'll need
2 courtesy lights (from underneath your door arm rests)
4 scotchlock connectors
7 female connectors
15' of red and green awg wire (or any colors you want)
coat hangar
1 SPDT or DPDT switch (I used DPDT b/c I had an extra)
And miscellaneous tools (crimpers, cutters, dremel...)
Leds (I used v-leds HP LED 6K WHITE MULTI SOCKET 158 168 194 906 921 3175 211 1895 57 1156 but in 5k color.)
A big shout out to JA from the forums and Top4runners for this. He did all the hard stuff and I just built on it.
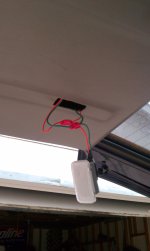
1) I tapped into the dome light for power and ile. The ile is how your lights come on when your doors open. The ile also serves as the negative for your leds. I used scotchlock connectors to tap into them. I used green for the ile and red for constant power. The middle wire of the ribbon is the ile and one of the outside wires is constant 12+. I think it is the left one. Check before you connect and let me know and I'll edit.
2) Run the red wire 12+ with enough wire to go under the ceiling to the exterior boot and down into the tailgate and then all the way across. But don't run it yet!
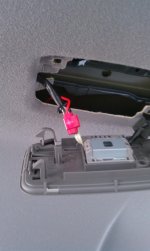
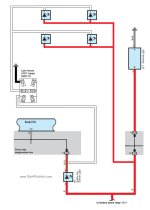
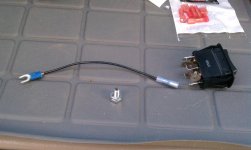
3) Run the green ile to the driver's side rear back-up mirror. This is where I put the switch. You will also ground the switch here. You can easily pry off the mirror and there is tons of room. I attached a schematic JA wrote up that shows you how. I cut in just below the mirror to place the switch. This location is awesome b/c it's out of the way and stuff won't bump into it. There is also a threaded hole that you can connect your ground to.
4) To wire the switch: top ground, middle to tailgate lights, bottom green wire from dome light ile
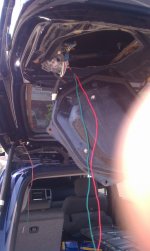
5) Run green and red wires from the tailgate up the side and up the boot into the ceiling. It is much easier to do this than down from the ceiling first. You will need a coat hangar to run it thru the boot. You will need to pry off the tailgate cover and the motor cover to run the wires. Make sure you have enough wire to run it to both sides of the tailgate and up into the ceiling. Also tape the wires together about every 6". This will help keep them together or they will snag on the window.
6) Connect green wire to middle connector on switch.
7) Red wire to constant on wire in ribbon.
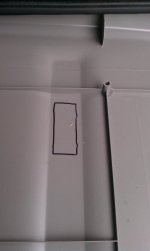
8) Cut holes in tailgate for the lights. Trace first and then cut. Put the lights on the raised portion of the tailgate or they will not have enough room. As it is the driver's side one doesn't have enough room anyway. It sticks out just a little but no one has noticed in the month I've had this up.
9) Make sure of the fit before you put it back on.
10) Wire the driver's side light by using red/ green wires and then scotchlocking onto the longer wires. Then end the long wires with the female connectors to the passenger light.
11) TEST before assembling. Leds are polarity sensitive so if it's wired wrong one could light up and the other will not.
12) When assembling pull the wire tight inside the tailgate next to the window. The window snagged on my wires and wouldn't go down all the way.
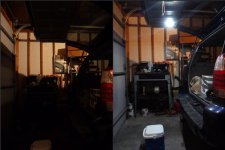
Please leave comments. I did this really fast and I'm sure I left out lots of stuff. This took me 8 hours but that's with running to the store for new parts b/c I'm a knucklehead kept forgetting things lol. The picture of before and after doesn't do it justice.
Here are some parts you'll need
2 courtesy lights (from underneath your door arm rests)
4 scotchlock connectors
7 female connectors
15' of red and green awg wire (or any colors you want)
coat hangar
1 SPDT or DPDT switch (I used DPDT b/c I had an extra)
And miscellaneous tools (crimpers, cutters, dremel...)
Leds (I used v-leds HP LED 6K WHITE MULTI SOCKET 158 168 194 906 921 3175 211 1895 57 1156 but in 5k color.)
A big shout out to JA from the forums and Top4runners for this. He did all the hard stuff and I just built on it.
1) I tapped into the dome light for power and ile. The ile is how your lights come on when your doors open. The ile also serves as the negative for your leds. I used scotchlock connectors to tap into them. I used green for the ile and red for constant power. The middle wire of the ribbon is the ile and one of the outside wires is constant 12+. I think it is the left one. Check before you connect and let me know and I'll edit.
2) Run the red wire 12+ with enough wire to go under the ceiling to the exterior boot and down into the tailgate and then all the way across. But don't run it yet!
3) Run the green ile to the driver's side rear back-up mirror. This is where I put the switch. You will also ground the switch here. You can easily pry off the mirror and there is tons of room. I attached a schematic JA wrote up that shows you how. I cut in just below the mirror to place the switch. This location is awesome b/c it's out of the way and stuff won't bump into it. There is also a threaded hole that you can connect your ground to.
4) To wire the switch: top ground, middle to tailgate lights, bottom green wire from dome light ile
5) Run green and red wires from the tailgate up the side and up the boot into the ceiling. It is much easier to do this than down from the ceiling first. You will need a coat hangar to run it thru the boot. You will need to pry off the tailgate cover and the motor cover to run the wires. Make sure you have enough wire to run it to both sides of the tailgate and up into the ceiling. Also tape the wires together about every 6". This will help keep them together or they will snag on the window.
6) Connect green wire to middle connector on switch.
7) Red wire to constant on wire in ribbon.
8) Cut holes in tailgate for the lights. Trace first and then cut. Put the lights on the raised portion of the tailgate or they will not have enough room. As it is the driver's side one doesn't have enough room anyway. It sticks out just a little but no one has noticed in the month I've had this up.
9) Make sure of the fit before you put it back on.
10) Wire the driver's side light by using red/ green wires and then scotchlocking onto the longer wires. Then end the long wires with the female connectors to the passenger light.
11) TEST before assembling. Leds are polarity sensitive so if it's wired wrong one could light up and the other will not.
12) When assembling pull the wire tight inside the tailgate next to the window. The window snagged on my wires and wouldn't go down all the way.
Please leave comments. I did this really fast and I'm sure I left out lots of stuff. This took me 8 hours but that's with running to the store for new parts b/c I'm a knucklehead kept forgetting things lol. The picture of before and after doesn't do it justice.
Attachments
Last edited:


