Teotwaki's 2018 TRD Off Road Premium Build Thread

teotwaki

Senior Member
I still have my 2005 but it is now up for sale after a long and very reliable performance as my primary vehicle for daily driving and "overlanding".

Lots of pictures at my blog but here is one of the 4Runner while towing my offroad trailer
IMG_4506-1.jpg


This thread will be to share the upgrades to the 2018 platform. I actually started by removing all of the gear that I wanted to transfer from the '05 to the '18

The short list is as follows:

I have dropped off the Overland Warehouse suspension at Rad Flo for a rebuild before the install on the '18.

For the roof rack I have the aluminum mounting channels out for clean up and new anodizing. The rack mounting feet need some paint touch up.

I need to install my ARB CKMA-12 compressor under the hood.

New offroad worthy tires will be purchased.

Second battery system will be installed

Will have to run wiring to the back to run the fridge.

Cig lighter outlet constant power mod.

Interior incandescent bulb replacement with LEDs

Two-way radio and antennas install

(list to be updated)
 
Register to hide this ad
Sub'd...let the modding begin...good luck on the new ride!


Don't forget matching rims for the trailer...10 extra Overlanding points...:wave:
 
Sub'd...let the modding begin...good luck on the new ride!


Don't forget matching rims for the trailer...10 extra Overlanding points...:wave:

I have been trolling through Craigslist for a good deal on matching rims but.....

In a pinch I can easily swap a trailer tire over to the 4Runner since the actual outside diameters are the same despite the difference in rim diameter.
 
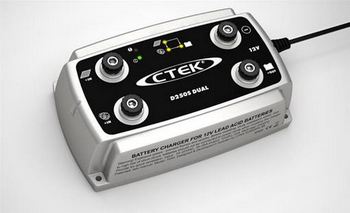
As part of the second battery system I will use the '05 4Runner's components that I removed. One of them is the CTEK-250S Dual

CTEK%20D250S%20DUAL1450315018_1.JPG


d250s_dual_solar_charge_controller_4.jpg


Factory Blurb: The D250S DUAL is a fully automatic 5-stage charger that supplies 20A to 12V batteries of 40–300Ah. It obtains its energy from DC sources (alternator, solar panels) and optimizes this power to meet the charging requirements of different battery banks. The D250S DUAL automatically selects the best connected DC energy source (of 2) for the purpose and switches between them to achieve high efficiency multi-stage charging. It is suitable for all types of lead-acid batteries (Wet, MF, Gel, AGM). Acts as a battery separator that eliminates diodes and VSR relays. Solar panel regulator with Maximum Power Point Tracking.

At some point the solar power input of my CTEK stopped working, displaying some odd flashing light patterns . My 250 is out of warranty so I opened it myself. The circuit board is pretty complex with numerous discrete parts as well as what appears to be two processors and the circuitry for the DC to DC conversion.

I found that the unit has three replaceable blade type 30 amp fuses in line with each 12 volt connector: alternator, solar panel and the "service" battery. The fuse for the solar input was blown and the battery fuse looked suspect so I replaced them both.

141103_0__TN600F.jpg


The unit's lights appeared to be sequencing normally but battery charging by solar panel seemed slow. It turns out less than an amp of current was flowing from the panel through the CTEK even though the panel could source 3 Amps in bright sun. For those interested the solar input cuts in around 12 volts - this is not specified in the literature for the unit which only mentions the cut in for the Alternator input and the maximum limit of 22V for the inputs.

There are high power diodes in series with all three DC connectors and those tested good. Across the service battery positive output and ground is a reverse polarity protection diode Schottky diode (MBR1035 10A 35V) that would short and blow out the inline fuse.

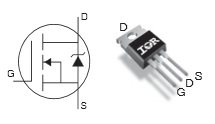
The four power MOSFETs in the DC-DC converter seemed okay. For the solar and service battery connections there appears to be two in-line power MOSEFETs (IRFB3004) that act as switches to select those ports depending on the charging sequence at play.

irf2204-pinout.jpg


Both of those FETs appear to be damaged which may explain the low charging current. I found replacements through Mouser Electronics for about $6 each including shipping.

After installing the new MOSFETs I tested the CTEK with two car batteries and a solar panel and saw up to 2 Amps flowing out of the 50W panel with late afternoon sun. The secondary battery was charged at 14.55 Volts for a while even when the solar panel dipped to 13 volts. That's the DC-DC converters benefits in action.

The two MOSFETs I replaced are from International Rectifier, Part No. IRFB3004. $4 each. They function as switches for selecting either the alternator input or the solar panel input.
There is temp sensor glued to the aluminum plate that serves as a heat sink for protecting the six MOSFETs; four FETs are for the DC-DC converter and two act as input switches.

In the '05 4Runner I mounted the CTEK on the cover of the engine bay fusebox and may do the same in the '18
 
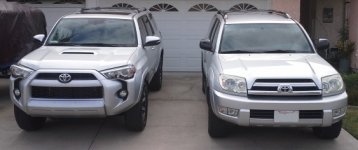
Old and new side-by-side. The 2005 is no longer lifted. I reinstalled the factory suspension which was hardly used. It rides pretty well for a 13 year old 4Runner. Hope to have it sold soon....
 

Attachments

  • 20180210_115113-1.jpg
    20180210_115113-1.jpg
    54.9 KB · Views: 3,951
Hey Jim,
Glad to see another 4th Gen to 5th Gen convert! Loved your thread on 120 and glad to see you on here.

Will keep an eye on this for updates and looking forward to seeing the transformation.

Hope to see you out there on the trails!

Doug
 
Hey Jim,
Glad to see another 4th Gen to 5th Gen convert! Loved your thread on 120 and glad to see you on here.

Will keep an eye on this for updates and looking forward to seeing the transformation.

Hope to see you out there on the trails!

Doug

Thanks for dropping in!!

Maybe you can share some wisdom on your LED conversions now that you have had them for a while. I definitely want to go with the interior LEDs, then backups and maybe headlights too.
 
Thanks for dropping in!!

Maybe you can share some wisdom on your LED conversions now that you have had them for a while. I definitely want to go with the interior LEDs, then backups and maybe headlights too.

I haven't done any interior LED swaps other than the lights that are at the bottom of the doors that light up when the doors are opened. Super easy install but make sure to get quality bulbs. I wanted to test it out so I purchased some junk ones and the light was awful. Once I got quality lights they really help light up the area when climbing in the rig.

LED headlights (both highs and lows) are amazing! I love the pure white look and they have great output. I recently did the DRL disable mod and so I'm strictly using them as High Beams only but they are crisp and clear lights.

I have seen some HIDs in the low beams and they really do have slightly better output but for my needs, these are great and I love the instant on.

LEDs in the fogs is almost a must. They are so much better than the halogens and really help provide some great light.

The reverse LED light has been nice but the gains are pretty minimal. I think if you really wanted to get more light back there, doing the Tail as Turn Mod I've thought about it but just haven't moved forward on it.

I did temporarily have LED switchbacks in my turn signals but ended up ditching them. They were nice and all but just a bit too much for me - wasn't the look I was going for.

All that said, I love every LED swap I've done and wouldn't change anything (other than the switchbacks).

Let me know if you have any other questions :cheers:
 
What brand(s) of LEDs did you choose that you liked?

I started with DDM. Good price and light was good but it ended up breaking on its own.

I went with [MENTION=12905]XenonDepot[/MENTION] for all of my lights and haven't looked back. They are seriously built with quality and have amazing output. They even used a shot of my rig on their homepage :dancin:

For the Low (H11) and High Beams (9005), I went with the XTreme LED Pro Kit. For the smaller bulbs I went with their Xtreme bulbs if available but if not went with the Philips from their site.
 
[MENTION=32177]A10MileHusker[/MENTION] - That pic you took is amazing :) Thank you so much for your kind words!!

Not sure if you're already done your interior map or license plate lights, but these Xtreme T10 LED bulbs are amazing! (I'm biased, but it's true).

Steve
 
The 2005 4Runner sold on Saturday for 50% more than what CarMax offered me. I spent all day Sunday cleaning up the steel and paint of some of the mods I pulled off of the 2005.

IMG_5590-1.JPG


Sliders look like they will fit with just a slight 3/4 cut off of the front of the main bar with a reweld to close the end up again.

Rear control arms will fit and need only fresh paint

Longer end links for the rear sway bar will fit. I bought replacement stainless nuts and bolts.

The RadFlo suspension was rebuilt with new seals, new rubber shock bushings, new Heim joints and new springs on the coilovers.

IMG_5596-1.JPG


I also made a bracket to hold the Tekonsha Prodigy 2 brake controller. It is a little short of the mark so I will have to add a small aluminum plate to extend the mounting lip for the controller's bracket.

The re-flashed ScanGuage only needs new Velcro on it before remounting on the steering wheel column

The lower front A arm skids might fit but I need to verify the mounting hole placement.
 
Last edited:
I spent some more time cleaning up and repainting hardware that I pulled off of the '05 Runner.

In order to fit, the sliders needed a small chop where they were hitting the plastic body trim behind the front mud flaps.

So out came the hacksaw, Sawzall and files last night for an easy cutting session. I'll have some 2" square tabs welded over the resulting holes.

IMG_5605-1.jpg


IMG_5602-1.jpg


IMG_5600-1.jpg


I also cleaned and repainted the sliders' big frame U-Bolts, rear springs and the beefy lower control arms.

IMG_5611-1.jpg


IMG_5609-1.jpg


IMG_5608-1.jpg


The sliders will need cleaning and repainting after the welding happens. I hope to install the suspension on Saturday.
 
Some good progress was made over the weekend. The fronts of the modified sliders have been welded. They both need a bit more wire brushing and some new paint.

IMG_5614-1.JPG


Suspension install is almost complete. The "old" swaybar relocation brackets will not work on the new 4Runner so I ordered a new set. Otherwise the front coilovers, rear coil springs, rear shocks, bumpstop spacers and heavy duty lower control arms are all installed.

IMG_5615-1.JPG


IMG_5618-1.JPG
 
Sliders all cleaned up and painted
IMG_5633-1.JPG


Installed!
IMG_5639-1.JPG


This pix sort of exaggerates how far they stick out
IMG_5642-1.JPG


IMG_5643-1.JPG


Looking down from the open driver's door
IMG_5646-1.JPG
 
Last edited:

Members online

Forum statistics

Threads
278,312
Messages
3,554,085
Members
248,016
Latest member
Advally Service

Trending content

Back
Top