The 2016 ROAM 4Runner Build

Would love to see details on material sizes and plans on the rack if you have time. Just so clean. Hell I would buy one off you if you feel like making another one? :cowboy:
I really like your rack build too, was looking for off the shelf aluminum bar and rail at Home Depot, can you advise what guage you used?
 
Adding a Samsung Tablet on the Cheap

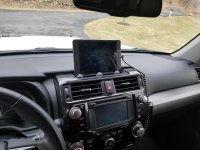
OooDone a ton of stuff to the truck...so I really need an update bad. This is just one thing I've really been itching to do because I just hate the stock NAV so bad, and I wanted to make use of my 8"Samsung tablet.

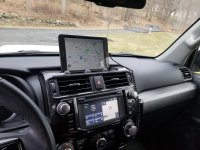
I went through about 16 different mounting configurations in my mind....but they kept getting further and further away from simple. I get the Ram mounting stuff....but it's huge, expensive....and as far as I'm concerned butt ugly. This method is NOT Overland approved, so do so it your own risk. Im sure it'll go flying in any rough road situation....so securing with a tie down will be needed at some point.

It doesn't block the clock or any of the read out functions for the overhead terrain select, etc. when the tablet isn't there.

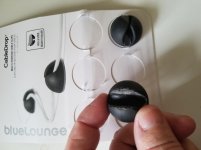
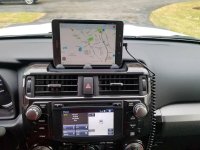
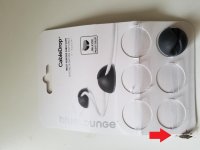
The rubber dots were cut with a Rotozip, and I was in hurry, and could have been a little more accurate, but they fit fine. They have white double sided tape, so the edge showing had to be blacked out with a magic marker. I taped the 3 rubber dots to the pad, with small strips of blue tape. Once I had a clean alignment and nice test fit, I pulled the facing off, and set the pad and dots in place, carefully peeling the blue tape away and leaving the dots glued in position. I also wiped it with an alcohol pad prior to setting. The spiraled cord is nice fit, and is just fed down along the right hand stack.

I'll report back with some pros and cons in the middle of the week, if it doesn't fly through the windshield first. The rubber dots were available at Home Depot in the computer peripherals section.

I see the pictures are F'ed up...I'll fix them at work tommorw...nothing is ever easy
 

Attachments

  • 20180128_145540.jpg
    20180128_145540.jpg
    107.4 KB · Views: 726
  • 20180128_145609.jpg
    20180128_145609.jpg
    106 KB · Views: 711
  • 20180128_224400.jpg
    20180128_224400.jpg
    127.7 KB · Views: 697
  • 20180128_224052.jpg
    20180128_224052.jpg
    129.2 KB · Views: 707
  • tablet install1.jpg
    tablet install1.jpg
    132.2 KB · Views: 683
Last edited:
Done a ton of stuff to the truck...so I really need an update bad. This is just one thing I've really been itching to do because I just hate the stock NAV so bad, and I wanted to make use of my 8"Samsung tablet.

I went through about 16 different mounting configurations in my mind....but they kept getting further and further away from simple. I get the Ram mounting stuff....but it's huge, expensive....and as far as I'm concerned butt ugly. This method is NOT Overland approved, so do so it your own risk. Im sure it'll go flying in any rough road situation....so securing with a tie down will be needed at some point.

It doesn't block the clock or any of the read out functions for the overhead terrain select, etc. when the tablet isn't there.

The rubber dots were cut with a Rotozip, and I was in hurry, and could have been a little more accurate, but they fit fine. They have white double sided tape, so the edge showing had to be blacked out with a magic marker. I taped the 3 rubber dots to the pad, with small strips of blue tape. Once I had a clean alignment and nice test fit, I pulled the facing off, and set the pad and dots in place, carefully peeling the blue tape away and leaving the dots glued in position. I also wiped it with an alcohol pad prior to setting. The spiraled cord is nice fit, and is just fed down along the right hand stack.

I'll report back with some pros and cons in the middle of the week, if it doesn't fly through the windshield first.

I see the pictures are F'ed up...I'll fix them at work tommorw...nothing is ever easy

damn- those fuggers hold tight with the truck upside down like that.

niiiiiice.:whipping2:thumb3::cheers:
 
Sorry to dig up an old thread but this build is really inspiring and great place to find out the best way to do the electricals without going down the dual battery set up route. . Could you share how your experience has been charging the main battery with solar? Do you just leave the charge controller connected to the starter battery even when the engine is running? I'm just a bit nervous running two potential sources of power (alternator + solar panels) to the battery concurrently.
 

Members online

Forum statistics

Threads
278,310
Messages
3,554,079
Members
248,016
Latest member
Advally Service

Trending content

Back
Top