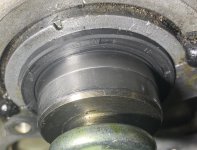
Timing belt job: I really buggered my camshaft getting seals out! JB -Weld time?

No, replacing the entire camshaft is not the only right way to repair it. Speedi sleeves were designed for heavy industrial applications and it's commonly used all the time as an inexpensive and acceptable form of repair for rotating shafts.

For sealing the shaft and the sleeve you can use RTV if it did not come with glue.

As I mentioned before, there is a certain roughness that is required on the shaft that the oil seal rides on (see Parker Seal Design Handbook). When you sand the shaft now you've just changed the designed roughness. Too rough, the oil seal gets chewed up. Too smooth, the surface doesn't retain lubricant and once again you risk ruining the seal.
 
Last edited:
If the sleeve is shorter than an axial gouge then yes a filler would be needed. JB weld is a good idea since it will be a more rigid support for the sleeve than RTV which is important if the gouge is wide too. The point is the seal should run on a properly installed repair sleeve to seal correctly again.
 
Sucks that happened. But I like this thread. I personally think you’re on the right track. JB is full of amazement. It’s a gift when sucky things happen.

Whether or not you use the sleeve also, I personally think you’ll be fixed up. You’ll know whether you need the sleeve.

You’re putting a lot of care and thought into what you’re doing. Keep sharing your path. Sneaky suspicion this will be one of those threads that pop up occasionally in the future with “xx,000 miles and still not leaking”.

Surprised there are no camshafts available? WTH... how many of these motors are out there? Suppose that says something about the longevity.

Always guys that loaf their pants when you do something out of the fairway. Keep going. Easy on those fancy Vietnamese martinis tho... this job is more Hamms style.
 
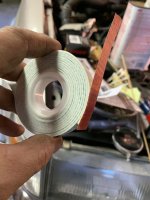
OK I picked up the sleeve kit, National brand but the website takes one to Timken?National website, so the RockAuto kits are different boxes with the same part, $1 difference. However I got mine next day at )'Reilly's, not my favorite store but the closest and they could get it. Oh and it says "Redi-Sleeve".

The directions say to fill large damaged areas with metal epoxy filler and apply sleeve immediately "or you will never get past it". I beg to differ if you sand it, and too late for me as I have filled and started sanding. Anyway it also says to use a "none hardening sealant" however they do not include any, nor do they recommend a brand etc. BUT, this alleviates any concern I had about oil seeping out between the sleeve and shaft. So I now agree with Nobb that a sleeve kit is the way to go.

My brother is a tool and die maker/machinist (I held off consulting him as I did not want to show him what a screwup I had made of the camshaft). He said either Permatex blue gasket or, if the gouges have all been filled/faired he would use Locktite Red which is very viscous, and oil resistant. He felt that filling and fairing the gouges first would better support the sleeve and was a good thing to do. He had never really used JB Weld so had no opinion on just the JB Weld alone.

THE PROBLEM: the box says for 1.490-1.496" shafts. It is the correct part number on several websites for the '97 4Runner Limited 3.4.

My shaft measured three places many times is a consistent 1.597"
50/1000th is a huge difference, it will not fit.I also measured the inside of the sleeve in case the box was labelled wrong. Also held it against the end of the camshaft, however that has a chamfered edge and I cannot tell if the sleeve is hung up at the beginning or at the shoulder and almost on the shaft. I need to wait until Monday when I can call Timken and get the number for a sleeve that will fit but have the same dimensions otherwise.
 
Last edited:
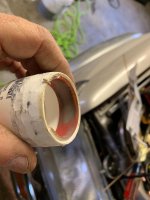
So as far as the sanding goes, I have started with 320 and using. PVC cap turned down crudely on a bench grinder so wit will fit. I place strips of sandpaper onto 3m foam tape within and extending from, the leading edge of the pvc cup.

This allows me to concentrate sanding pressure at the Jab Weld high spots and I can angle the cup and move in or out so it is simple to address inner or outer areas. By lightly grahing the side of an O ring probe overnthe sanded area I can easily tell if there is a high spot or valley, or whether the area is faird as well as can be expected.

Still a work in progress, but the actual time spent has been minimal, other than waitin for the JB Weld to cure. As the sleev kit will not fit and I have to wait until Monday to order the right sleeve, I have plenty of time to fill any valleys missed on the first round, better this way than having a lot of filler to sand away.
 

Attachments

  • 9C255760-B585-4E18-920C-0FA5FE3FCD3A.jpg
    9C255760-B585-4E18-920C-0FA5FE3FCD3A.jpg
    123.3 KB · Views: 941
  • 3B4B8654-FA2F-4473-86BE-48A67A75494D.jpg
    3B4B8654-FA2F-4473-86BE-48A67A75494D.jpg
    119 KB · Views: 931
  • FB55C06A-49E5-4007-9CE7-CA9DF28F4E34.jpg
    FB55C06A-49E5-4007-9CE7-CA9DF28F4E34.jpg
    129.4 KB · Views: 1,118
  • FFB8198A-9398-4195-96BB-9A02F3CD8DC4.jpg
    FFB8198A-9398-4195-96BB-9A02F3CD8DC4.jpg
    130.3 KB · Views: 1,050
^^ That's a very clever and slick way to get sandpaper in there to do the job. I never thought of doing something like that.

Sucks that the sleeve you bought won't work.
 
Actually I was just now playing with the sleeve and micrometer....I was earlier having a senior moment the first time I read it, no Vietnamese Martinis either. So I set the micrometer properly at the outside tolerance listed on the sleeve box, and it does fit, just barely.
So tomorrow after the sanding of the second application of JB Weld I will get the sleeve on.

BUT...I have questions. The inside of the camshaft housing has the outside wall of a bearing journal. So, the wall/shoulder of the skeeve should not be flush up against that as the sleeve will be rotating a zillion rpms. So in a like fashion, the seal should
not be pushed flush up against the outside of the sleeve wall/shoulder, the friction will melt or wear the side of the seal. So the seal may stick out proud of the block slightly, there will be no interference. I will have to mark on the sleeve wear surface hiw far I want to shove the seal and no more. So if I degrease the outer surface if the metal well I suppose I could smear a tiny bit of locktite red to hold the seal. But that is just the kind of hillbilly engineering I try to shy away from. Oh, wait a minute, how did I damage the camshaft in the first place? Never mind...

Actually the sleeve has a “tear line” circumferentially and one can snip the wall down to the tear line, grab an edge with need,e nose pliers, and twirl it off like a can of sardines. Unfortunately, it would be extremely difficult to do so with the sleeve installed.

So the seal may stand proud as the wall/shoulder of the sleeve should not butt up against the bearing or the inside wall of the seal.

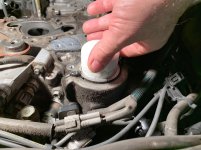
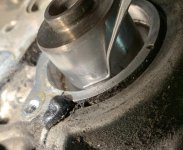
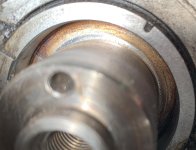
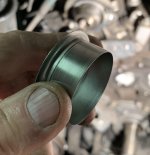
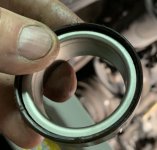
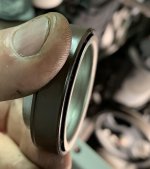
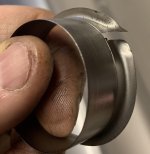
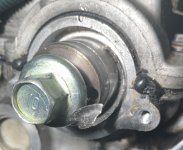
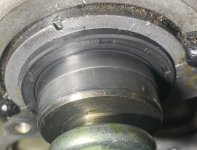
The photos may be explanatory:

-bearing journal

-sleeve and wall/shoulder, tear off line visible

-seal flush against the sleeve wall

-seal with gap so it will not rub against the shoulder of the sleeve.

Obviously the lips f the sleeve are designed to mount on the shaft, I just am not certain the wall of the seal should rub and wear againt the vertical wall of the sleeve wall/shoulder.

But I would like opinions.
 

Attachments

  • B6B98814-0FEA-4B62-81D5-DDBCFE38E877.jpg
    B6B98814-0FEA-4B62-81D5-DDBCFE38E877.jpg
    127.2 KB · Views: 965
  • 249E58C7-EA46-488F-8648-6694D06B3F63.jpg
    249E58C7-EA46-488F-8648-6694D06B3F63.jpg
    120.2 KB · Views: 946
  • BDC542D7-92BF-486C-BCB8-619914426CD1.jpg
    BDC542D7-92BF-486C-BCB8-619914426CD1.jpg
    115.3 KB · Views: 955
  • AFB7AB68-4CD3-45F2-8603-AA6701ED191D.jpg
    AFB7AB68-4CD3-45F2-8603-AA6701ED191D.jpg
    117.6 KB · Views: 894
I've never done a procedure like that, and if I were attempting it, I would be guessing and asking the same questions. I can only offer some thoughts and observations, some of which might be quite obvious to some people (and it is past midnight here and my old brain is tired), but just some things to keep in mind:

I agree that it would be next to impossible to shorten the sleeve, once it is installed. With that considered, I am pretty sure that the outermost end of the repair sleeve would have to be inside where the cam pulley slides over the shaft. Measure the depth of the ID of the cam pulley, where it slips over the camshaft, and mark that same distance inward from the end of the camshaft. Make sure the repair sleeve does not stick out past that mark. And if you missed that, you would need to bore out the ID of the cam pulley to get it to fit over the sleeve.

I agree that you don't want the inner face of the repair sleeve rubbing on anything that will be spinning.

I think that once you install the repair sleeve, if you use red Loctite, it will be next to impossible to ever remove it, without damaging the camshaft again. Even without red Loctite, I imagine it would be a tight fit over the camshaft, and still very difficult to remove. In other words - probably no turning back, once you install it.

I think that as long as you have enough of the OD of the oil seal inside the journal to grip and hold, it won't matter if the seal stands out a tiny bit proud of the face of the journal. I don't think anything would rub the outer face of the oil seal, at that distance.

I hope all of that makes sense, and hopefully someone can add to it, or correct it, or answer some of the questions raised.
 
What a mess. I'll add a few things.

When we do shaft seals on our equipment in the plant the kits come with sleeves. Most of the time the sleeves have to be heated up to around 180-190F then they slide right on. But you have to do this relatively quick and we have a much larger margin of error for where the sleeve rests. Your issue is that you have to get the sleeve on at an almost perfect depth. I guess you could do some precise measuring and mark the shaft and be careful not to go any deeper. Then do the same for the seal. In the perfect world it would be nice to remove the journal cap to be able to see the behind the seal.

Also, there is stuff specifically made for sleeve rentension. It also has sealing qualities and will fill slight imperfections.

https://shop.advanceautoparts.com/p...IHlU313Y_GQIzyBoZ2BoClCYQAvD_BwE&gclsrc=aw.ds


Lastly, IMHO I think it would have been easier and slightly cheaper (understanding that your time is worth something) to just replace the camshaft and shims. Plus the piece of mind of knowing you don't have a jerry rig waiting to explode (tongue and cheek) is priceless.
 
I think I may be confused by the confusion... the lip on the cam seal saver is used as a block to drive the saver on then is removed before you put the seal on...the seal depth should be back to designed position...use a seal driver to install the saver...dont really need sealer but I have used some thread locker just to make me feel better...cut off the driver end and you're done...this is a 20 minute repair tops.

Sent from my SM-G955U using Tapatalk
 
I think I may be confused by the confusion... the lip on the cam seal saver is used as a block to drive the saver on then is removed before you put the seal on...the seal depth should be back to designed position...use a seal driver to install the saver...dont really need sealer but I have used some thread locker just to make me feel better...cut off the driver end and you're done...this is a 20 minute repair tops.

Sent from my SM-G955U using Tapatalk

Aha (I think). Interesting. I never thought of it that way. If that is the case, how would you remove the lip after installation? Just grab it with pliers and twist things until it snaps off? I wonder if the instructions for the repair sleeve mention that, and maybe it appears to be something else.
 
Well I tried to find a camshaft and failed, and have never done that before although could probably figure it with the manual etc.

The kit says you can leave the lip/wall on the sleeve kit or peel it off. Peeling it off would of course be preferable as I could insert it flush with the bearing journal and nsert the seall fully.. But you cannot just pull it off according to the intructions or you will deform the sleeve, you must “twirl” it off like a sardine can (the old school pre-pull tab can). And I am thinking there is not space in there to do so though I may try, it’s just that I do not see getting the sleeve off easily if it gets screwed up, without damaging the camshaft surface further.

Anyway I locked the front wheel of my motorcycle this AM and spilled, bike needs a new turn signal and right crash bar, pretty minor, but I have already stiffened up and can barely walk, much less bend over the T4r to install the sleeve, so it may be a couple days. Getting out of bed tomorrow AM is not going to be fun. I have found 60 is not the same as being 20 yo. Ice and Aleve....
 
What a mess. I'll add a few things.

When we do shaft seals on our equipment in the plant the kits come with sleeves. Most of the time the sleeves have to be heated up to around 180-190F then they slide right on. But you have to do this relatively quick and we have a much larger margin of error for where the sleeve rests. Your issue is that you have to get the sleeve on at an almost perfect depth. I guess you could do some precise measuring and mark the shaft and be careful not to go any deeper. Then do the same for the seal. In the perfect world it would be nice to remove the journal cap to be able to see the behind the seal.

Also, there is stuff specifically made for sleeve rentension. It also has sealing qualities and will fill slight imperfections.

https://shop.advanceautoparts.com/p...IHlU313Y_GQIzyBoZ2BoClCYQAvD_BwE&gclsrc=aw.ds


Lastly, IMHO I think it would have been easier and slightly cheaper (understanding that your time is worth something) to just replace the camshaft and shims. Plus the piece of mind of knowing you don't have a jerry rig waiting to explode (tongue and cheek) is priceless.

As far as getting the sleeve in without hitting the bearing one can check between tapping and insert an o-ring pick to judge the gap between the sleeve wall and
bearing journal, and maring the sleeve with the old seal on it befire installation is simple.

I may make the cut to the tear line before installation and hope I can hook it with an O-ring pick and peel the wall off with angled needle nose pliers...
 
Aha (I think). Interesting. I never thought of it that way. If that is the case, how would you remove the lip after installation? Just grab it with pliers and twist things until it snaps off? I wonder if the instructions for the repair sleeve mention that, and maybe it appears to be something else.


The instructions mention it and if you search Redi-Sleeve (I think) there is a Youtube video on an open shaft repair that shows it.
 
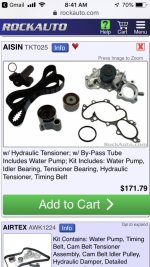
Timing Belt/Water Pump Question

Hello,

New to 4Runner Ownership and New to forum. Have to replace water pump and timing belt - wanted to make sure the set I was considering from RockAuto included everything I needed - and wanted to ask you folks since I am not sure myself.

Thanks for any help!!
 

Attachments

  • B353B1AB-FEA0-42A5-82F1-FDCC7BBFF6A2.jpg
    B353B1AB-FEA0-42A5-82F1-FDCC7BBFF6A2.jpg
    102.3 KB · Views: 741
What no seals? You not gonna change your seals��

Just kidding. Got my set on eBay too.

So, I tapped in the sleeve kit. Decided to try to do it properly, so I made a cut in the rear wall of the sleeve to the tear line, and then straightened out the metal before using the insertion cup.

I inserted the sleeve, pulled the end of the cut part with an o-ring pick and then used my longest skinniest screwdrive after filing the end smooth of any burrs or edges, prying straight up bit by bit. I used cardboard from the box to protect the surface of the sleeve and slowly worked my way around, making sure not to let the pried off metal hit the outside surface of the seal well. The skeeve looked good, not deformed, but the tear off edge is sharp.

Photos are explanatory. The last one of the seal, needs a whack on the left to even up. The cup/driver that came with the skeeve kit was not deep enough to drive the sleeve quite all the way in, however the PVC cup I made for sanding the JB Weld was perfect and also used on the seal.

My question is, the rear edge if the remaining sleeve is quite sharp, a bit of a burr from the wall being torn off in places. With the seal standing proud of the block 1mm, I am certain the rear lip of the seal will not be back far enough to ride on that sharp edge. So I think the seal is fine sticking out slightly.

Anyone disagree?

Or does it matter if the rear seal lip gets chewed (possibly) by the sharp rear edge of the sleeve where the wall was removed? is only the front seal lip necessary?
 

Attachments

  • C1F939EC-82FE-4502-9A76-F07AD4CE5E88.jpg
    C1F939EC-82FE-4502-9A76-F07AD4CE5E88.jpg
    122.3 KB · Views: 705
  • 1CA6AB52-9BA2-4CE1-A1A8-F6F97A04127A.jpg
    1CA6AB52-9BA2-4CE1-A1A8-F6F97A04127A.jpg
    122.2 KB · Views: 760
  • AAEE58EF-128E-4771-895E-AF7C6A242ACC.jpg
    AAEE58EF-128E-4771-895E-AF7C6A242ACC.jpg
    131.7 KB · Views: 734
  • 0DB8E7D8-6249-4840-9C5E-E9DACB4B68B8.jpg
    0DB8E7D8-6249-4840-9C5E-E9DACB4B68B8.jpg
    131.7 KB · Views: 679
Last edited:
How firm was the seal fit when you pushed it in? If it took a decent amount of force to get it in that far, it will probably be fine. If you were able to push the seal in that far by hand, I wouldn't trust it as it might pop out over time.

When I replaced my rear main seal (OEM seal), I was able to push it all the way in by hand. I'm not sure why it was so easy to push in but it was. And guess what, the damn thing leaks even though I used a OEM seal. Thankfully it doesn't leak too bad and there is no way in hell I'm pulling the tranny out to replace it again. I should have left the original seal in place in hindsight.

If the seal is firmly in place, it should be good to go.
 

Members online

Forum statistics

Threads
278,315
Messages
3,554,130
Members
248,016
Latest member
Advally Service

Trending content

Back
Top