
I admit, I do a lot of TB jobs on a variety of cars so I have picked up a few tricks along the way. The other day I got a 98 4Runner in my garage for a new TB and WP. Just over an hour and a half and he was out of there. I'll pass on a few tips and findings to help you DIY TB changers out there. Required wrenching skill level for this job on this car: 3/10. Not hard.
1. Grab that WD40 can and hose down the PS and ALT tensioner bolts tensioner hold-down bolts/nuts, and any other bolt/nut you see in that general area that you think might need to come off
2. Remove skid plate
3. Drain radiator
4. Remove grill. It's really easy... if you know how, 30 seconds. If you don't, you'll spend and hour and break all the plastic tabs. Start with the bottom one on the far left or right side to get the hang of it. Take a long flat screw driver and look closely at the plastic tab, from the front. You'll see a small flat black tab sticking out. Push down on it with the screwdriver while at the same time gently pulling on the grill. Do it right and it will release with no effort at all. Practice that a few times on those 2 tabs before doing any of the others. Reason I have you do those 2 first is because they are easiest to see and get to. Bottom center one is a little harder, minimal room between the bumper and the grill. You need a very long and thin screwdriver. Do not apply force or yank hard on the grille. It's all about finesse. The ones on the top is what people struggle with, because you can't see the flat tabs. Yet they are identical to the ones on the bottom. Start on the left side and work towards the right side. Use a shorter flat screw driver and push down on the tab by placing the screwdriver on the tab from the side. The tab is hiding behind the grill. Unlike the bottom where you can see the tabs and push on them head on, the top ones you push down from the side and you're doing it blind. Just image the top tabs to be positioned exactly the same as the bottom ones that you could see. Keep pulling on the grille with your other hand to prevent the tabs from clicking back in, or wedge a second screw driver between the grill and the rad support after you've released each tab.
5. Remove top and bottom hose from radiator and engine. Insert a flat blunt screw driver between the hose and the pipe it's on and move it around a bit to release the stiction if you can't get the hose off. Inspect the hoses and replace them if necessary.
6. For cars with AT. Find 2 old bolts about 8mm diameter. Pinch the AT cooler hose with a pair of flat vice grips, about 2” from the end. Now slide the hose clamp off towards the vice grips, pull the hose off the radiator, insert one of the bolts and move the clamp forward again so it clamps the hose on the bolt. Release/remove the vice grips. Minimal oil loss and mess. It will drip a bit out of the radiator. NBD. Do the same on the other side.
7. Remove the 4 bolts for the radiator shroud. Do the passenger side bottom one from underneath the car; the other 3 are easy from the top. Push the shroud towards the back of the car.
8. Remove the 4 bolts holding the radiator. For the bottom bolts, use a long ¼” wobble extension and go through the hole in the bumper. It’s not a straight shot so don’t use a regular extension, or you’ll round off the bolt heads. Spray some WD40 on these bolts from the inside, you’ll see the threads of these bolts sticking out after you move the shroud out of the way and they’ll be rusty. To prevent your bolts from falling into lala land after you get them loose, fill your socket with Vaseline or grease before you start wrenching. Vaseline works best, it’s sticky and thick. This is an awesome trick anytime you need to loosen or tighten a bolt or nut you can get a socket on but not your fingers. Some of the nuts on the intake fall into that category. To put those back on, fill your socket with Vaseline, stick the nut in the socket, put your extension on and voila, you can just move it on your stud or bolt and it won’t drop out of your socket. You’ll thank me one day for this trick.
9. Pull out the radiator. Remove the shroud
10. Loosen the ALT and PS tensioner hold-down bolts and the tensioner bolts themselves so you can get the belts off. ALT is easy, PS a little harder. You can’t see it and you’ll fight with the fan. A ratcheting 14mm box wrench with movable box end works best. I don’t recommend removing the fan before loosening the belt tension first. Loosen the AC belt tensioner, too.
11. Take the fan off, 4 ea 12mm nuts. Lots of people struggle with that. How do you loosen these nuts if the whole thing moves when you do that? Use two 12mm wrenches with long handles. Put one on the left most nut (with the box end of the wrench) and turn the fan counter clockwise slightly so the side of that wrench hits the axle of the fan. This is your hold-down wrench. Now simple loosen the nut that’s 180 degrees opposite from the hold-down wrench with your other hand and the other wrench. Just work your way around all 4 nuts that way. Don’t remove the nuts, just loosen them. This is so that you have a nut to put your hold-down wrench on as you work your way around. Once you got all 4 loose. lose the wrenches and just take the nuts off with your fingers. A long thick screwdriver wedged between the fan axle and one of the studs works too, 2 wrenches works better.
12. Remove belts and pulleys.
13. Take out oil dip stick bolt (10 mm), move the dipstick aside a bit and thread that little bolt right back in the hole it came out of so you don’t lose it. No need to remove the dipstick
14. Disconnect the camshaft position sensor and work it out of the connector holder on the upper TB cover. Try not to break that thing.
15. Remove upper TB cover. Put Vaseline in your 10mm socket so the TB cover bolts stick to your socket after you get them out, especially on the lower ones. Nothing more irritating than a bolt dropping out of your socket and landing somewhere on the engine and you can’t find it or you can’t get to it. A royal waste of time.
16. Remove the fan holder bracket, 1 bolt (top), 2 nuts (sides). Top and right one will come right out, left one has the PS pump tensioner in the way. Sometimes the studs will come out, no worries. Take off the PS tensioner hold-down nut and worm that tensioner contraption to the left. No need to take it out and no need to take the entire PS pump off. You just want to free that PS tensioner off of the left pulley holder stud so you can remove the pulley holder
17. Remove the crankshaft pulley bolt. How? If you have an impact wrench, go for it. If you don’t, get a ½” ratchet at Harbor Freight with telescoping handle. Set it to “loosen”, put your 19 mm socket on, fill it with vaseline and put it on the CS pulley bolt. The Vaseline helps keep the socket on the bolt. Yes, l through a lot of Vaseline. And I have a lot of sticky sockets. Extend the ratchet handle and lay it on driver side frame rail. There’s some wire running on top of that frame rail, be sure not to pinch that. Make sure it’s as flat and stable as possible and the socket is good on the bolt. Remove all kids and pets, get in the car and turn the key. Just click the starter, don’t crank it for any amount of time. Done! Remove the pulley. If it won’t slide off, whack it with a rubber hammer. Still won’t come off? Get a puller.
18. Remove the two 10mm bolts for the starter cable guide/support. You will not be able to get the bottom bolt for the lower TB belt
cover out without doing that. Really dumb.
19. Remove the bottom TB cover
20. Put the CS pulley bolt back in the CS and turn the engine so that it points to TDC. There’s a dot mark on the TB pulley and a pimple on the oil pump housing. Line them up. Your camshaft pulleys should now line up with the marks on the backplate. Remove the bolt. It may have gotten tight again from turning the engine. Get a long breaker bar and whack it hard while trying not to move the engine
21. Here comes the biggest time saver by far. Unless you have a tool to depress the hydraulic TB tensioner and stick a pin in it to hold it down, you’ll do what I do and that’s loosening the tensioner bolts. Do not take them out if you are not planning to replace the tensioner. The front bolt is easy, a 12mm box wrench and easy access. You can’t see the back one. Seen a few posts from people complaining that you need to remove the AC and AC bracket to get to that back bolt. You don’t! Crawl under the car and look between the oil pan and the AC bracket. Move the starter cable guide towards the driver side a bit to get a better view. You’ll see that back tensioner bolt. You can get it loose with a ¼” 12 mm socket on a long wobble extension. Don’t use a straight extension, it’s not a straight shot. But a wobble extension works great. Just make sure the socket itself is on that bolt well and just loosen it. Go back and forth between the front bolt and the back bolt. Do not loosen the front bolt a lot and then start on the back bolt, do a couple turns on the front one, then the back one, then the front one and so on. This makes the tensioner come down straight. Gauge how much you back the bolts out without removing them by looking at the threads of the front bolt. You definitely do not want to take that back bolt out or you will be removing the AC compressor and bracket to get it back in.
22. Slide the CS timing belt pulley off of the CS a bit with the belt still around it. You’re not trying to slide the pulley off of the CS, just forward a bit. There’s still too much tension on the belt to slide the belt off. You may find the CS TB pulley stuck on the CS. Whatever you do now, do not break any of the teeth off of the back of that pulley, or you will be making a trip to the dealer for a new one which will set you back $50. Those teeth are critical to the CS position sensor and any missing teeth will cause misfires or no-start conditions. Gently tap the pulley with a hammer on the face (not on the belt teeth!) to scare it loose. Try prying and wedging a flat screw driver behind it. Be careful of the teeth and the CS oil seal. Just work it loose patiently. Apply some WD40 or whatever. You really do not need to move that CS belt pulley, I just find it easier to get the belt off that way. If the thing is stuck, leave it alone and work the belt off over the waterpump or tensioner pulleys. Another quick way to get the old belt off is just cut it.
23. Once you get it moving, slide it about ½” forward and slide the belt forward a bit over the tensioner roller and waterpump roller. It is still unlikely you can remove the entire belt at this point, it is stiff and we didn’t get a great amount of slack from just loosening the tensioner bolts a bit. Now loosen BUT NOT REMOVE the bolt for the top idler pulley, the one between the camshaft sprockets. Turn the driver side cam shaft sprocket clockwise a few degrees. Your center idler roller will tilt up a bit. Don’t crank the snot out of it, just crank it gently to move the slack you created in the belt by loosening the top idler pulley from the top towards the waterpump. It’s not much, but between it and the slack you created by loosening the tensioner bolts, it’s enough to easily slide the belt off the waterpump now. Either work all the slack towards the WP and slide the belt off of it, or work it all towards the tensioner pulley and slide it off there. You want to slide it off on a roller that doesn't have teeth.
24. Remove and replace the WP if you feel any kind of play in it or see any signs of leaks. Clean the engine mating surface well, remove all rust and dry it well. Coolant will be gushing out when you remove it
25. Inevitably you’ll have rust on your waterpump mating surface on your block. The waterpump gasket alone is not going to deal with that. Get waterpump/thermostat RTV. It’s thicker and better than your run of the mill black or blue RTV. Apply a thin coat on the pump, lay the gasket on it and rub it into the RTV. Wipe off any excess RTV that oozed out on the inside of the pump. Now coat the outside of the WP gasket with RTV, thin, and spread it around. Again, wipe any excess off the inside of the pump. Nobody cares about goop on the outside but you don’t want globs of goop inside your pump. Put it on, try not to move it too much and definitely don’t take it off again. Put the bolts in and toque them to spec, see FSM for torque setting and sequence. Be patient with this step and keep things clean. Line the bolt holes in the gasket up with the holes in the pump as best you can before you put it on. Tighten the bolts lightly at first, then let the goop sit and get hard(er) for a bit, then torque them to spec. Replace your thermostat, it’s cheap insurance.
26. Replace idler rollers. You can also replace the tensioner roller. I usually replace tensioners every other TB change. Rollers take more of a beating than the hydraulic part of the tensioner itself.
27. Check that both cam sprockets and CS sprocket still line up perfectly with their marks. If you put a new center idler pulley in, leave the bolt lose so the roller can tilt up, just like you had when we took the belt off. Slide the new belt back on. If you are fighting it at any point, you’re doing it wrong. The belt is very stiff and hard to maneuver but with the right technique it goes on easy with no effort at all. Follow these steps to the letter and it will be a breeze. First put it around the CS pulley. Not the entire width of the belt, about half of it. We’ll push the rest on later. Then loop it around the water pump and leave minimal slack between the CS pulley and WP section. Next loop it around the driver side cam pulley, again with minimal slack between the WP and cam pulley. You can clamp the belt to the driver side cam pulley with vise grips if you want. Now loop it around the center idler roller, which should be tilted up a bit. Loop it around the passenger side cam sprocket, again leaving minimal slack. Pay very close attention now. You will notice that there is a little bit of slack in the belt now between the camshaft sprockets and the center roller. That’s because we have the bolt from the top idler loose and that roller can wobble around. We need that slack. Take a 17mm socket and turn the passenger side camsprocket counter clockwise. You’ll be moving it off the timing mark and that’s OK. Don’t crank the snot out of it, just turn it so the slack between the cam sprockets and the top idler is removed. This action will tilt the top idler roller up a bit. Now I know what you are thinking. Didn’t I just screw up the timing by doing that? No you didn’t. As long as you do not reposition the belt teeth on the cam and crank sprockets, you’re good. All we’re doing here is just moving the slack around to where we want it. You basically want to take the slack with you as you work the belt around the various rollers and pulleys. You should end up with all the slack when you get to the tensioner roller, which you do last. It should easily slide on the tensioner roller now, at least half of the belt width (because the belt is only with half its width on the CS pulley, remember?). Did that to make it easier to slide that stiff belt over the tensioner roller. Push the rest of the belt onto the tensioner roller and the CS pulley at the same time. If you do this right. You’ll have the belt on in less than a minute.
Now tighten the center idler roller bolt. This should pull the passenger side cam pulley back onto its mark. Tighten the 2 tensioner bolts. Remember, go back and forth between front and back bolts, do not tighten the front bolt all the way just because it’s the easiest to get to and then start on the back bolt. You want to move that tensioner back into its bracket straight.
28. Double check the timing marks. I like to put the lower TB cover on first, then the crank pulley and its bolt and then crank the engine around by the CS bolt. This is because I’m cocky and I know I got the timing right and therefor never have to take that stuff off again. But mostly because the act of cranking the engine around by the CS bolt tends to tighten that bolt somewhat and it can be hard to get it out again. Which you would have to do to put the crank pulley on after you finish testing. Yet cocky as I may be, I never skip the testing step. Now that you have the crank pulley and lower TB cover back on, you can’t see the dot mark on the crank TB pulley. No worries, there’s a notch in the crank pulley and it should line up with the "0" on the lower TB cover. You’ll be turning the engine clockwise to test it, or else all you’re doing is loosening the pulley bolt again. BTW, you’re supposed to replace that bolt with a new one. They stretch from the enormous torque they are tightened with. Rotate the engine around once or twice and line up the cam pulleys with the backplate marks. Never rotate the engine by cranking the cams around. You may find that the CS pulley mark is slightly below (past) the “0” mark when you get the cams lined up. This may lead you to believe you are off a tooth. You’re not. That’s an artifact caused by where the slack in the belt is. Crank the CS slightly counter-clockwise to line the groove up with the “0”, but not so far that you are moving the cams. If you can get the “0” lined up with the groove on the CS pulley and both cams lined up with their backplate marks, you’re good. If you are off a tooth, you will not be able to do that no matter which way or how you crank the engine around.
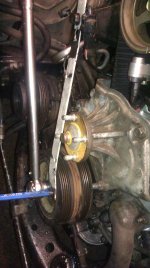
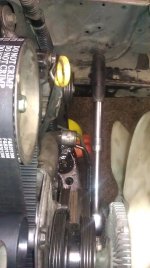
29. Torque the CS pulley bolt to a whopping 214 ft lbs. How do you do that without spinning the engine around? I use a metal strip. I made mine from a shelf support but you can also make one from a piece of flat stock, ¾” wide or so and about 2 feet long, you can pick up at Lowes for a few bucks. Mine is riddled with holes because I use the thing on all sorts of cars, but you only need 2 holes. It’s easy to make with a saw and a drill. One end of it I attach to the PS pump bracket, the other end to the crank pulley. You can use a bolt in the CS pulley but I’m lazy and just stick a round punch in it. I’ll see if I can attach a picture of my handy dandy contraption. It works fantastic, both for tightening as well as loosening crank bolts. It costs next to nothing, it takes minutes to make with simple tools, no welding required and no SST’s required.
30. The rest of the process is simple. Put it all back together by reversing all the steps above. These steps provide you with all the little details books and manuals don’t tell you. Good luck, you can do it, it’s really not that hard.
One last thing, Be careful not to get the camshaft position sensor wires trapped behind the fan pulley bracket when you put it back on. It's easy to do and you'll pinch the wires.
One more thing. Most likely all the black plastic clips from the grille stayed on the car when you took the grill off. Take them out by turning them 1/4 turn and put them back on the grille. Then simply snap the grill back in place
1. Grab that WD40 can and hose down the PS and ALT tensioner bolts tensioner hold-down bolts/nuts, and any other bolt/nut you see in that general area that you think might need to come off
2. Remove skid plate
3. Drain radiator
4. Remove grill. It's really easy... if you know how, 30 seconds. If you don't, you'll spend and hour and break all the plastic tabs. Start with the bottom one on the far left or right side to get the hang of it. Take a long flat screw driver and look closely at the plastic tab, from the front. You'll see a small flat black tab sticking out. Push down on it with the screwdriver while at the same time gently pulling on the grill. Do it right and it will release with no effort at all. Practice that a few times on those 2 tabs before doing any of the others. Reason I have you do those 2 first is because they are easiest to see and get to. Bottom center one is a little harder, minimal room between the bumper and the grill. You need a very long and thin screwdriver. Do not apply force or yank hard on the grille. It's all about finesse. The ones on the top is what people struggle with, because you can't see the flat tabs. Yet they are identical to the ones on the bottom. Start on the left side and work towards the right side. Use a shorter flat screw driver and push down on the tab by placing the screwdriver on the tab from the side. The tab is hiding behind the grill. Unlike the bottom where you can see the tabs and push on them head on, the top ones you push down from the side and you're doing it blind. Just image the top tabs to be positioned exactly the same as the bottom ones that you could see. Keep pulling on the grille with your other hand to prevent the tabs from clicking back in, or wedge a second screw driver between the grill and the rad support after you've released each tab.
5. Remove top and bottom hose from radiator and engine. Insert a flat blunt screw driver between the hose and the pipe it's on and move it around a bit to release the stiction if you can't get the hose off. Inspect the hoses and replace them if necessary.
6. For cars with AT. Find 2 old bolts about 8mm diameter. Pinch the AT cooler hose with a pair of flat vice grips, about 2” from the end. Now slide the hose clamp off towards the vice grips, pull the hose off the radiator, insert one of the bolts and move the clamp forward again so it clamps the hose on the bolt. Release/remove the vice grips. Minimal oil loss and mess. It will drip a bit out of the radiator. NBD. Do the same on the other side.
7. Remove the 4 bolts for the radiator shroud. Do the passenger side bottom one from underneath the car; the other 3 are easy from the top. Push the shroud towards the back of the car.
8. Remove the 4 bolts holding the radiator. For the bottom bolts, use a long ¼” wobble extension and go through the hole in the bumper. It’s not a straight shot so don’t use a regular extension, or you’ll round off the bolt heads. Spray some WD40 on these bolts from the inside, you’ll see the threads of these bolts sticking out after you move the shroud out of the way and they’ll be rusty. To prevent your bolts from falling into lala land after you get them loose, fill your socket with Vaseline or grease before you start wrenching. Vaseline works best, it’s sticky and thick. This is an awesome trick anytime you need to loosen or tighten a bolt or nut you can get a socket on but not your fingers. Some of the nuts on the intake fall into that category. To put those back on, fill your socket with Vaseline, stick the nut in the socket, put your extension on and voila, you can just move it on your stud or bolt and it won’t drop out of your socket. You’ll thank me one day for this trick.
9. Pull out the radiator. Remove the shroud
10. Loosen the ALT and PS tensioner hold-down bolts and the tensioner bolts themselves so you can get the belts off. ALT is easy, PS a little harder. You can’t see it and you’ll fight with the fan. A ratcheting 14mm box wrench with movable box end works best. I don’t recommend removing the fan before loosening the belt tension first. Loosen the AC belt tensioner, too.
11. Take the fan off, 4 ea 12mm nuts. Lots of people struggle with that. How do you loosen these nuts if the whole thing moves when you do that? Use two 12mm wrenches with long handles. Put one on the left most nut (with the box end of the wrench) and turn the fan counter clockwise slightly so the side of that wrench hits the axle of the fan. This is your hold-down wrench. Now simple loosen the nut that’s 180 degrees opposite from the hold-down wrench with your other hand and the other wrench. Just work your way around all 4 nuts that way. Don’t remove the nuts, just loosen them. This is so that you have a nut to put your hold-down wrench on as you work your way around. Once you got all 4 loose. lose the wrenches and just take the nuts off with your fingers. A long thick screwdriver wedged between the fan axle and one of the studs works too, 2 wrenches works better.
12. Remove belts and pulleys.
13. Take out oil dip stick bolt (10 mm), move the dipstick aside a bit and thread that little bolt right back in the hole it came out of so you don’t lose it. No need to remove the dipstick
14. Disconnect the camshaft position sensor and work it out of the connector holder on the upper TB cover. Try not to break that thing.
15. Remove upper TB cover. Put Vaseline in your 10mm socket so the TB cover bolts stick to your socket after you get them out, especially on the lower ones. Nothing more irritating than a bolt dropping out of your socket and landing somewhere on the engine and you can’t find it or you can’t get to it. A royal waste of time.
16. Remove the fan holder bracket, 1 bolt (top), 2 nuts (sides). Top and right one will come right out, left one has the PS pump tensioner in the way. Sometimes the studs will come out, no worries. Take off the PS tensioner hold-down nut and worm that tensioner contraption to the left. No need to take it out and no need to take the entire PS pump off. You just want to free that PS tensioner off of the left pulley holder stud so you can remove the pulley holder
17. Remove the crankshaft pulley bolt. How? If you have an impact wrench, go for it. If you don’t, get a ½” ratchet at Harbor Freight with telescoping handle. Set it to “loosen”, put your 19 mm socket on, fill it with vaseline and put it on the CS pulley bolt. The Vaseline helps keep the socket on the bolt. Yes, l through a lot of Vaseline. And I have a lot of sticky sockets. Extend the ratchet handle and lay it on driver side frame rail. There’s some wire running on top of that frame rail, be sure not to pinch that. Make sure it’s as flat and stable as possible and the socket is good on the bolt. Remove all kids and pets, get in the car and turn the key. Just click the starter, don’t crank it for any amount of time. Done! Remove the pulley. If it won’t slide off, whack it with a rubber hammer. Still won’t come off? Get a puller.
18. Remove the two 10mm bolts for the starter cable guide/support. You will not be able to get the bottom bolt for the lower TB belt
cover out without doing that. Really dumb.
19. Remove the bottom TB cover
20. Put the CS pulley bolt back in the CS and turn the engine so that it points to TDC. There’s a dot mark on the TB pulley and a pimple on the oil pump housing. Line them up. Your camshaft pulleys should now line up with the marks on the backplate. Remove the bolt. It may have gotten tight again from turning the engine. Get a long breaker bar and whack it hard while trying not to move the engine
21. Here comes the biggest time saver by far. Unless you have a tool to depress the hydraulic TB tensioner and stick a pin in it to hold it down, you’ll do what I do and that’s loosening the tensioner bolts. Do not take them out if you are not planning to replace the tensioner. The front bolt is easy, a 12mm box wrench and easy access. You can’t see the back one. Seen a few posts from people complaining that you need to remove the AC and AC bracket to get to that back bolt. You don’t! Crawl under the car and look between the oil pan and the AC bracket. Move the starter cable guide towards the driver side a bit to get a better view. You’ll see that back tensioner bolt. You can get it loose with a ¼” 12 mm socket on a long wobble extension. Don’t use a straight extension, it’s not a straight shot. But a wobble extension works great. Just make sure the socket itself is on that bolt well and just loosen it. Go back and forth between the front bolt and the back bolt. Do not loosen the front bolt a lot and then start on the back bolt, do a couple turns on the front one, then the back one, then the front one and so on. This makes the tensioner come down straight. Gauge how much you back the bolts out without removing them by looking at the threads of the front bolt. You definitely do not want to take that back bolt out or you will be removing the AC compressor and bracket to get it back in.
22. Slide the CS timing belt pulley off of the CS a bit with the belt still around it. You’re not trying to slide the pulley off of the CS, just forward a bit. There’s still too much tension on the belt to slide the belt off. You may find the CS TB pulley stuck on the CS. Whatever you do now, do not break any of the teeth off of the back of that pulley, or you will be making a trip to the dealer for a new one which will set you back $50. Those teeth are critical to the CS position sensor and any missing teeth will cause misfires or no-start conditions. Gently tap the pulley with a hammer on the face (not on the belt teeth!) to scare it loose. Try prying and wedging a flat screw driver behind it. Be careful of the teeth and the CS oil seal. Just work it loose patiently. Apply some WD40 or whatever. You really do not need to move that CS belt pulley, I just find it easier to get the belt off that way. If the thing is stuck, leave it alone and work the belt off over the waterpump or tensioner pulleys. Another quick way to get the old belt off is just cut it.
23. Once you get it moving, slide it about ½” forward and slide the belt forward a bit over the tensioner roller and waterpump roller. It is still unlikely you can remove the entire belt at this point, it is stiff and we didn’t get a great amount of slack from just loosening the tensioner bolts a bit. Now loosen BUT NOT REMOVE the bolt for the top idler pulley, the one between the camshaft sprockets. Turn the driver side cam shaft sprocket clockwise a few degrees. Your center idler roller will tilt up a bit. Don’t crank the snot out of it, just crank it gently to move the slack you created in the belt by loosening the top idler pulley from the top towards the waterpump. It’s not much, but between it and the slack you created by loosening the tensioner bolts, it’s enough to easily slide the belt off the waterpump now. Either work all the slack towards the WP and slide the belt off of it, or work it all towards the tensioner pulley and slide it off there. You want to slide it off on a roller that doesn't have teeth.
24. Remove and replace the WP if you feel any kind of play in it or see any signs of leaks. Clean the engine mating surface well, remove all rust and dry it well. Coolant will be gushing out when you remove it
25. Inevitably you’ll have rust on your waterpump mating surface on your block. The waterpump gasket alone is not going to deal with that. Get waterpump/thermostat RTV. It’s thicker and better than your run of the mill black or blue RTV. Apply a thin coat on the pump, lay the gasket on it and rub it into the RTV. Wipe off any excess RTV that oozed out on the inside of the pump. Now coat the outside of the WP gasket with RTV, thin, and spread it around. Again, wipe any excess off the inside of the pump. Nobody cares about goop on the outside but you don’t want globs of goop inside your pump. Put it on, try not to move it too much and definitely don’t take it off again. Put the bolts in and toque them to spec, see FSM for torque setting and sequence. Be patient with this step and keep things clean. Line the bolt holes in the gasket up with the holes in the pump as best you can before you put it on. Tighten the bolts lightly at first, then let the goop sit and get hard(er) for a bit, then torque them to spec. Replace your thermostat, it’s cheap insurance.
26. Replace idler rollers. You can also replace the tensioner roller. I usually replace tensioners every other TB change. Rollers take more of a beating than the hydraulic part of the tensioner itself.
27. Check that both cam sprockets and CS sprocket still line up perfectly with their marks. If you put a new center idler pulley in, leave the bolt lose so the roller can tilt up, just like you had when we took the belt off. Slide the new belt back on. If you are fighting it at any point, you’re doing it wrong. The belt is very stiff and hard to maneuver but with the right technique it goes on easy with no effort at all. Follow these steps to the letter and it will be a breeze. First put it around the CS pulley. Not the entire width of the belt, about half of it. We’ll push the rest on later. Then loop it around the water pump and leave minimal slack between the CS pulley and WP section. Next loop it around the driver side cam pulley, again with minimal slack between the WP and cam pulley. You can clamp the belt to the driver side cam pulley with vise grips if you want. Now loop it around the center idler roller, which should be tilted up a bit. Loop it around the passenger side cam sprocket, again leaving minimal slack. Pay very close attention now. You will notice that there is a little bit of slack in the belt now between the camshaft sprockets and the center roller. That’s because we have the bolt from the top idler loose and that roller can wobble around. We need that slack. Take a 17mm socket and turn the passenger side camsprocket counter clockwise. You’ll be moving it off the timing mark and that’s OK. Don’t crank the snot out of it, just turn it so the slack between the cam sprockets and the top idler is removed. This action will tilt the top idler roller up a bit. Now I know what you are thinking. Didn’t I just screw up the timing by doing that? No you didn’t. As long as you do not reposition the belt teeth on the cam and crank sprockets, you’re good. All we’re doing here is just moving the slack around to where we want it. You basically want to take the slack with you as you work the belt around the various rollers and pulleys. You should end up with all the slack when you get to the tensioner roller, which you do last. It should easily slide on the tensioner roller now, at least half of the belt width (because the belt is only with half its width on the CS pulley, remember?). Did that to make it easier to slide that stiff belt over the tensioner roller. Push the rest of the belt onto the tensioner roller and the CS pulley at the same time. If you do this right. You’ll have the belt on in less than a minute.
Now tighten the center idler roller bolt. This should pull the passenger side cam pulley back onto its mark. Tighten the 2 tensioner bolts. Remember, go back and forth between front and back bolts, do not tighten the front bolt all the way just because it’s the easiest to get to and then start on the back bolt. You want to move that tensioner back into its bracket straight.
28. Double check the timing marks. I like to put the lower TB cover on first, then the crank pulley and its bolt and then crank the engine around by the CS bolt. This is because I’m cocky and I know I got the timing right and therefor never have to take that stuff off again. But mostly because the act of cranking the engine around by the CS bolt tends to tighten that bolt somewhat and it can be hard to get it out again. Which you would have to do to put the crank pulley on after you finish testing. Yet cocky as I may be, I never skip the testing step. Now that you have the crank pulley and lower TB cover back on, you can’t see the dot mark on the crank TB pulley. No worries, there’s a notch in the crank pulley and it should line up with the "0" on the lower TB cover. You’ll be turning the engine clockwise to test it, or else all you’re doing is loosening the pulley bolt again. BTW, you’re supposed to replace that bolt with a new one. They stretch from the enormous torque they are tightened with. Rotate the engine around once or twice and line up the cam pulleys with the backplate marks. Never rotate the engine by cranking the cams around. You may find that the CS pulley mark is slightly below (past) the “0” mark when you get the cams lined up. This may lead you to believe you are off a tooth. You’re not. That’s an artifact caused by where the slack in the belt is. Crank the CS slightly counter-clockwise to line the groove up with the “0”, but not so far that you are moving the cams. If you can get the “0” lined up with the groove on the CS pulley and both cams lined up with their backplate marks, you’re good. If you are off a tooth, you will not be able to do that no matter which way or how you crank the engine around.
29. Torque the CS pulley bolt to a whopping 214 ft lbs. How do you do that without spinning the engine around? I use a metal strip. I made mine from a shelf support but you can also make one from a piece of flat stock, ¾” wide or so and about 2 feet long, you can pick up at Lowes for a few bucks. Mine is riddled with holes because I use the thing on all sorts of cars, but you only need 2 holes. It’s easy to make with a saw and a drill. One end of it I attach to the PS pump bracket, the other end to the crank pulley. You can use a bolt in the CS pulley but I’m lazy and just stick a round punch in it. I’ll see if I can attach a picture of my handy dandy contraption. It works fantastic, both for tightening as well as loosening crank bolts. It costs next to nothing, it takes minutes to make with simple tools, no welding required and no SST’s required.
30. The rest of the process is simple. Put it all back together by reversing all the steps above. These steps provide you with all the little details books and manuals don’t tell you. Good luck, you can do it, it’s really not that hard.
One last thing, Be careful not to get the camshaft position sensor wires trapped behind the fan pulley bracket when you put it back on. It's easy to do and you'll pinch the wires.
One more thing. Most likely all the black plastic clips from the grille stayed on the car when you took the grill off. Take them out by turning them 1/4 turn and put them back on the grille. Then simply snap the grill back in place
Attachments
Last edited:


