
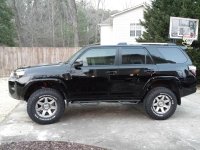
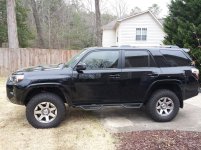
Installed my lift and UCAs myself about a month ago in the driveway. It was kind of a ***** and a brutal day but I'm glad I did it versus spending the $500-$600 my local 4x4 shop wanted(including alignment). I will also say that this is the largest automotive project I have ever taken on--I'm no mechanic.
Here are a couple random thoughts/observations from my experience:
-The video on youtube from Total Chaos on the UCA/coilover install on a slightly older Taco is spot-on for a 4runner. Exactly the same and incredibly helpful. I followed it exactly for the fronts.
-I have a 2014 Trail with KDSS. This made the install much more difficult as you have to remove the KDSS sway bars on the front and rear and the front are VERY difficult to get back on. After having a go without reading up, I had to breakout the laptop and I read to do the passenger side first but nonetheless I literally had to use my foot to force the bar back into place, then you have to try and line it upwith the bracket(which took 5 attempts) then hook the bottom, start the bottom bolt, then battle the top bolt into place--mine were ultra tight and literally took all my strength to turn. Not really sure why.
Of note on the rear is the fact that it is much easier to remove the KDSS sway bars where they connect further back from the axle(not where they meet the axle). You cannot get the lift spring in place without doing this. I made the mistake of disconnecting the passenger side at the axle at first and it almost cost me my ABS line as the system pulls the bar up and towards the wiring on the axle after you disconnect it and it pinched these a bit. Disconnect it further back and use the floor jack to force the rear back in place. Also, I did have to have my wife stand on the hubs to get them down far enough to get the new springs in which were 3 inches longer than stock easily. This process wasn't easy.
-Afterwords, I installed 285/70/17 BFG AT KO2 and I firmly believe that I could be running 34s without major rubbing issues. The 285 33s do not come close to rubbing(no trimming) and I wish I'd gone larger.
-One thing that I am a little surprised by is the fact that the limiting factor in the front droop seems to be the Camburg uniballs-I figured it would be the shocks, but it isnt. They are a very compact design which may help with rubbing and the geometry helps with alignment but they basically prevent the setup from lowering any further as they max out downward just before the arm contacts the coil and it really doesnt provide much more droop than stock, if any as best I can tell.
-The ride post-lift takes some getting used to(I like the firmness) and the mileage is definitely decreased(-2), but the look is fantastic and I'm glad I did it. If I had to do it again, the only thing I may have done differently is given the stock UCAs a shot before upgrading as the Camburgs were very expensive and they wouldn't be very difficult to install after the fact. I really didn't want to have to do multiple alignments etc so I did it at once.
If you were just swapping the pre-assembled coilovers, it would probably only take an hour per side. The UCAs took a bit longer, especially since the passenger side didint fit right and I had to muscle it in place with a large pry bar(it wasnt wide enough by a couple millimeters). This kind of pissed me off, but Camburg swears it is Toyota and not their fabrication which is off.
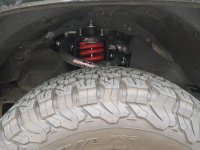
-The setup with the red Toytec coilovers and red accents on the Camburg UCAs does look pretty killer.
-Also, I was concerned about uniball squeeks, but so far, no issues. I did lube them up with a Dupont teflon dry lube(oil based would just collect dirt)
-One last thing--I installed the Toytec front Diff drop and I dont think it's really needed. Even with the 3 inches, the angles on the front CV axles are not severe at all. I may remove it later.
Here are a couple random thoughts/observations from my experience:
-The video on youtube from Total Chaos on the UCA/coilover install on a slightly older Taco is spot-on for a 4runner. Exactly the same and incredibly helpful. I followed it exactly for the fronts.
-I have a 2014 Trail with KDSS. This made the install much more difficult as you have to remove the KDSS sway bars on the front and rear and the front are VERY difficult to get back on. After having a go without reading up, I had to breakout the laptop and I read to do the passenger side first but nonetheless I literally had to use my foot to force the bar back into place, then you have to try and line it upwith the bracket(which took 5 attempts) then hook the bottom, start the bottom bolt, then battle the top bolt into place--mine were ultra tight and literally took all my strength to turn. Not really sure why.
Of note on the rear is the fact that it is much easier to remove the KDSS sway bars where they connect further back from the axle(not where they meet the axle). You cannot get the lift spring in place without doing this. I made the mistake of disconnecting the passenger side at the axle at first and it almost cost me my ABS line as the system pulls the bar up and towards the wiring on the axle after you disconnect it and it pinched these a bit. Disconnect it further back and use the floor jack to force the rear back in place. Also, I did have to have my wife stand on the hubs to get them down far enough to get the new springs in which were 3 inches longer than stock easily. This process wasn't easy.
-Afterwords, I installed 285/70/17 BFG AT KO2 and I firmly believe that I could be running 34s without major rubbing issues. The 285 33s do not come close to rubbing(no trimming) and I wish I'd gone larger.
-One thing that I am a little surprised by is the fact that the limiting factor in the front droop seems to be the Camburg uniballs-I figured it would be the shocks, but it isnt. They are a very compact design which may help with rubbing and the geometry helps with alignment but they basically prevent the setup from lowering any further as they max out downward just before the arm contacts the coil and it really doesnt provide much more droop than stock, if any as best I can tell.
-The ride post-lift takes some getting used to(I like the firmness) and the mileage is definitely decreased(-2), but the look is fantastic and I'm glad I did it. If I had to do it again, the only thing I may have done differently is given the stock UCAs a shot before upgrading as the Camburgs were very expensive and they wouldn't be very difficult to install after the fact. I really didn't want to have to do multiple alignments etc so I did it at once.
If you were just swapping the pre-assembled coilovers, it would probably only take an hour per side. The UCAs took a bit longer, especially since the passenger side didint fit right and I had to muscle it in place with a large pry bar(it wasnt wide enough by a couple millimeters). This kind of pissed me off, but Camburg swears it is Toyota and not their fabrication which is off.
-The setup with the red Toytec coilovers and red accents on the Camburg UCAs does look pretty killer.
-Also, I was concerned about uniball squeeks, but so far, no issues. I did lube them up with a Dupont teflon dry lube(oil based would just collect dirt)
-One last thing--I installed the Toytec front Diff drop and I dont think it's really needed. Even with the 3 inches, the angles on the front CV axles are not severe at all. I may remove it later.
Attachments
Last edited:


