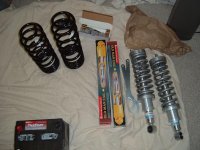
Toytec ultimate 3" front adjustable lift, any tips, tricks or hints?

Lignum

New member
Just as the title says, I am going to install the toytec 3" ultimate adjustable front lift this weekend. Does anyone who has installed this have any tips, tricks or hints on installation? The kit did not come with instructions for the front, only the back. Is this because it is so easy? Just replace the old with the new?

Also what is the procedure for adjustment? It would appear to be easiest to install if I adjusted the spring to the least amount of lift right?
 
Register to hide this ad
I did mine myself, a friend would definitely be help full. Especially when you have to pry the UCA down. As for adjusting it take two people, one to hold and one to turn. Make sure your threats are clean and well lubricated before adjusting the height. The spanner wrench works but an extension makes it easier.
Which spring rates did you get?

The rear shock ( top nut) is a pita. Disconnect the sway bar and install one side first ( rear spring) then jack that side up to drop the other. I found that the back was easier than the front.

At some time consider brake-line extension, and extend the metal piece that holds the parking brake line in place.
 
The Front are pretty easy and straight forward. Make sure to have some type of lubricant when you go to adjust them, it does make it easier. Main thing is take before and after measurements to make sure you dont crank them up over 3" or you will end up tearing boots all the time. You do not need to thread them to lowest setting when installing.
 
Thanks for all the good info guys! I am in the Navy so I have access to what they call an "auto hobby shop". They have lifts and you can check out any tools you need. I am hoping that makes is easier.

Just a couple more questions:

What is a pita nut?

So when measuring, do I just measure to the fender well when it is stock and then measure after the lift, then adjust up to 3"?

Can I put just the front on and adjust it down to 0" if I run out of time?
 
The fronts go on a lot smoother if you remove the 4 bolts that hold the lower ball joint on. Just remove those on each side of the truck and unbolt the sway bar from the links and the hub assembly will fall down enough to easily get the old strut out and the new one in. It also makes it much easier to remove the lower shock bolt without having the CV axle in your way (these bolts should have the threads facing toward the front of the truck to avoid tearing the CV boots). You don't have to press the ball joint in or out and this way is a lot easier than trying to push your control arm down with a bottle jack.
 
Thanks for all the good info guys! I am in the Navy so I have access to what they call an "auto hobby shop". They have lifts and you can check out any tools you need. I am hoping that makes is easier.

Just a couple more questions:

What is a pita nut?

So when measuring, do I just measure to the fender well when it is stock and then measure after the lift, then adjust up to 3"?

Can I put just the front on and adjust it down to 0" if I run out of time?

If you do it at the auto hobby shop you are golden. When I was in the USAF I used it all the time and the mechanics working there had a good knowledge of everything.
 
You can set the height at whatever you choose. Yes measure ground to top of wheel opening before and after and make sure it is not greater then a 3" difference. Just remember everytime you adjust it you will need to get an alignment. To answer one of your other questions a" pita nut" PITA= Pain In The A**. Advice is to start spraying all the nuts and bolts a few days before with breakfree or PB Blaster type product.
 
That's some great advice! If you want a tip on removing that rear shock and that you don't care since you're putting on new ones anyway...

First step is unbolt the lower shock mount, support axle first. Now, you'll need some muscle for this, bend the shock front and rear until that nut and stud at the top breaks off. Yes, breaks off. That way, you don't have to mess with trying to wrench off that nut. Make sure your new shocks have all the hardware before replacing the shocks.

You're welcome.
 
Awesome, Thanks for all the advice guys. I will be doing this on Saturday. I will let you know how it goes and take some pictures.
 
My front coils seem different height adjusted, under the where the lower spanner wrench would go, they are two different heights, the one is around the bilistein sticker and the other is above it, what the reason for that?
DSCF1798 edit.JPG
 

Attachments

  • DSCF1798 edit.JPG
    DSCF1798 edit.JPG
    124 KB · Views: 5,067
somebody correct me if im wrong but i think thats to correct for the different weight on all four corners, i know the rear springs are typically a little different in height to make up for the weight of the gas tank and fuel
 
My front coils seem different height adjusted, under the where the lower spanner wrench would go, they are two different heights, the one is around the bilistein sticker and the other is above it, what the reason for that?
View attachment 35737

I don't think that is right! They should be the same. Call ToyTec.

Measure from the center of the wheel hubs to the wheel well lip. Write these measurements down in your owners manual.

As said before, a little spray lube will ease the adjustment.

You will end up mounting them, drive around, re-adjust, and repeat until you reach the proper height.

Write the new measurements down in your manual.

The coils will settle after a while. You will be able to adjust back to the set height.

*** Yes you don't have to remove the tires to adjust the coils***
Crank you wheels to the side and you can adjust the coilovers.
 
Adjusting Coilovers

I've had my Toytec Ultimate on for about a hundred miles. I'm thinking the shop that did the install, slapped on the Coilovers at max height. Well the front is about an inch higher than in the back, if I adjust the coilover by an inch, that should level my rig, correct? Also, will that improve ride quality? seems a little stiff> Will I need to realign?
 
You can lock out the shocks by cranking the coils too high. This will cause a harsh ride.

Yes you should re-align if you lower them.
 
Yup..plus isn't The Ultimate lift kit 3.5" up front and 3" back? so instead of 1" it should be 1/2" negative rake...has the rears settled after 100 miles? maybe..bout do your measurements on level ground and adjust accordingly.
I agree with re-alignment as the suspension geometry changes with each adjustment.
suspension.jpg~original

Figure 2. This illustration depicts an exaggerated IFS lift in which only the coil assembly is changed.

The picture on the left shows the condition that places the most leverage on the coils -- the A-arms are straight out and the lever arm X is at it's maximum. At this position it takes less force to compress the suspension than at any other position. The picture on the right shows what happens when the suspension is lifted and the lever arm Y is reduced. Since the lever arm is reduced when the A-arms are at this position the suspension feels stiffer. Of course there are more things going on than what is described here; for instance, the coil assembly angles change, the tires scrub on the road, the location of the attachment point of the shock, etc.
 
Last edited:
Also to lower your front by an inch you probably will not need to move the collars down an inch. It isn't a direct relationship like you would think since the spring rate is variable and also the pivot and leverage angles.
 

Members online

Forum statistics

Threads
278,312
Messages
3,554,085
Members
248,016
Latest member
Advally Service

Trending content

Back
Top