Disclaimer:
I am not a mechanic by any means so take this tutorial as some advice and lessons learned. I did a lot of researching YT videos, forums, and Haynes manual before attempting myself. There’s a few methods to checking temperature when checking the fluid level and I’ve included some info comparing the IR thermometer method and the OBD2 readings (I tried to figure out how close they were before performing since I could not get the jumper cable method to work for whatever reason). This is for the V6 models. I believe the V8 models will need an additional step to move an exhaust pipe out of the way to drop the pan from what I’ve seen online.
Side note, I’ve collected a sample to send to BlackStone Oil Analysis to get a rough idea on how mine compares to others. When I get the results, I’ll update the thread. But I’m curious what your opinions are on the condition of the oil and the amount of metal in the pan/magnets.
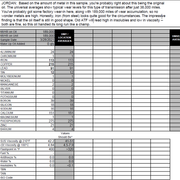
Edit: Results are here on 189k miles for those curious:
Read the instructions thoroughly. Sorry, I forgot to take pictures at a few steps and was racing the daylight.
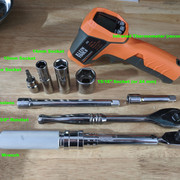
Tools Needed:
• 3/8” Ratchet
• 3/8” Extensions (I got by with just a 3” extension)
• 5mm Hex Bit
• 10mm Socket
• 14mm Socket
• 15/16” Socket (I think 24mm will work, but 15/16 might fit better)
• Fluid Transfer Hand Pump (I didn’t use one but wish I had one during this)
• Infrared Thermometer (option 1)
• ODB2 Scanner and Torque app with PID codes for fluid temp (option 2)
• Jumper cable for temp check mode (option 3, I could not get to engage)
Parts Needed:
• 6 quarts of Toyota ATF WS fluid or equivalent (Yes usually 5 will do but I was glad I had 6… you’ll see why)
• Transmission Pan Gasket (PN: 3516860010)
• Transmission Filter (PN: 3533060050)
• (2) Drain Plug and Check Plug Gasket (PN: 3517830010)
• O-Ring for Filter (PN: 9030131014)
• Parts Cleaner (Brakleen, etc)
Torque Specs (Haynes Manual):
• Transmission Pan Bolts: 39 in-lbs
• Transmission Filter Bolts: 84 in-lbs
• Drain Plug: 21 ft-lbs (2004 and earlier) or 15 ft-lbs (2005-2009)
• Check Plug: 15 ft-lbs
• Fill Plug: 29 ft-lbs
Temperature Procedure:
The Toyota procedure is to check the fluid level between 97° F and 115° F (36.1° C and 45.1°C). The fluid expands and contracts depending on temperature, so this is necessary to get the proper level. Please read all three options and use your own judgement on what you prefer.
1. Option 1: Infrared Thermometer: Use an infrared thermometer to measure the bottom of the pan.
2. Option 2: ODB2 Scanner with Torque phone app: You will need a Bluetooth ODB2 adapter and the Torque app. There are already several tutorials on the forums on how to enter custom PIDs into the app to obtain the temperature.
3. Option 3: Use a jumper cable on the ODB2 port and enter temperature check mode: There are more tutorials on how to do this on the forums. Your 4Runner will basically let you know when it’s within the tolerance to check the transmission fluid temperature. I could not get this to work and gave up after trying the magic shift sequence about 20 times.
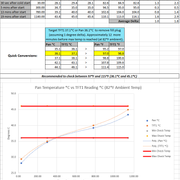
Here is some data I collected while trying to gain confidence in the difference between the ODB2 measurement and the infrared thermometer technique. I’d recommend from a cold start, waiting until either the fluid reads 37.1° C on the Torque app or 36.1° C on the IR thermometer. From there, you have almost 12 minutes to check your fluid level before reaching maximum temp. This was performed at 82°F so if you’re in a colder climate, it may be slower.
Fluid and Filter Procedure:
1. Lift 4Runner and make sure it’s level (as simple as putting a level on the frame).
2. Break the Fill Plug and Check Plug slightly loose then tighten back down to make sure you can get them loose. If you drain your fluid and can’t get the other plugs loose, you’re gonna have a bad time.
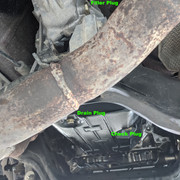
3. Remove the 14mm Drain Plug and drain the transmission fluid. After draining, reinstall the bolt with the new crush washer and torque to 21 ft-lbs (2004 and earlier) or 15 ft-lbs (2005-2009). I got somewhere between 3-4 quarts here. Here’s what mine looked like after 189k miles (I’m assuming it was never changed). It looked more like engine oil than transmission fluid, but did not really smell burnt.:
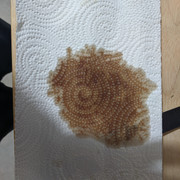
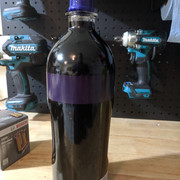
Ughh... Straight black! Is Toyota sure about the "lifetime" fluid in these transmissions? The silver lining though: I filtered everything I drained through a 190 micron filter and saw no metal, so I feel a little bit better about it. Everything on the filter must be very microscopic.
4. Remove the 10mm perimeter bolts around the fluid pan and remove.
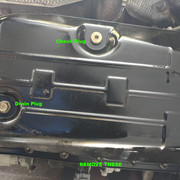
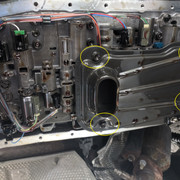
5. Remove the (4) 10mm bolts from the filter and remove. IMPORTANT: the original O-ring may be stuck in the valve body. Remove if you plan on replacing with a new one. Otherwise, it may come out with the filter. Mine still was in good shape, but I replaced anyway since it’s so cheap. Also a warning: the filter will drop quite a bit of fluid, so have your catch pan ready.
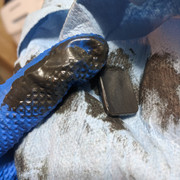
A little more metal than I'd like to see... what do you think?
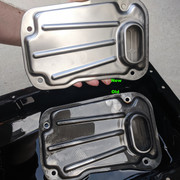
6. Put new O-ring on the new filter with a small dab of fresh ATF.
7. Place new filter back in place and torque the 4 bolts to 84 in-lbs. Note: Wipe clean before installing. Don't want dirty gloves all over it with other oils or dirt from setting it down on the concrete.
8. Remove old gasket from transmission fluid pan.
9. Remove magnets from pan and wipe clean.
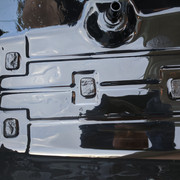
10. Thoroughly clean the pan with brake cleaner or something similar. Be sure the mating surface of the gasket is completely clean. May need to scrape off if it’s bad enough, but mine popped right off.
11. Place new gasket on pan. May need gasket adhesive to hold in place. I just let mine sit out in the hot sun to lay flat.
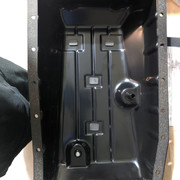
12. Bolt the pan/gasket back onto the valve body using the 10mm bolts. Get them all finger tight then torque them down to 39 in-lbs, starting from the center of the pan working outward.
13. Remove the 15/16” Filler Plug (this one has an O-ring that can be reused).
14. Refill almost a quart more than what drained out. Use a fluid transfer hand pump (preferably). I didn’t have one and drilled a hole in a cap and used some tubing. From there I squeezed in the fluid.
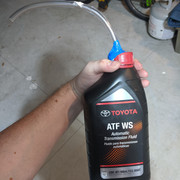
Note: I drained about 4.5 quarts according to the catch pan reading. I refilled with 5 but it wasn’t enough. I ended up having to restart the fill and check sequence after adding a 6th quart. This is probably in part due to a small mess I made filling with my bottle/tube contraption and the fact I spent several hours doing this (dinner break, dogs, etc) and more kept dripping out of the valve body onto the concrete. 5 may be enough, but it’s better to slightly overfill than not have enough.
15. Tighten the 15/16” bolt back down and torque to 29 ft-lbs.
16. Make sure your catch pan is ready to go underneath the check plug.
17. Start your engine and verify the temperature is in range with your chosen method (here I made sure the IR thermometer and ODB2 reading were both in spec). Once in spec, remove the check plug and let the fluid pour out until it starts to trickle, then quickly tighten back down the bolt with the new crush washer to 15 ft-lbs. I forgot to order two of these, so I gave it a little extra quarter turn since I reused the washer on this one.Watch your arms on the hot exhaust. Note: If nothing came out on this first pass like for me, you haven’t put enough fluid in. Wait for the engine to cool down, add at least ½ a quart, torque the fill plug, and repeat the check sequence.
18. Once the check plug is back in and the fluid is at the proper level, lower your vehicle, and you’re good to go.
Lookin' good. All fluid services are finally completed. I'll probably still do the full exchange through the transmission lines though.
I am not a mechanic by any means so take this tutorial as some advice and lessons learned. I did a lot of researching YT videos, forums, and Haynes manual before attempting myself. There’s a few methods to checking temperature when checking the fluid level and I’ve included some info comparing the IR thermometer method and the OBD2 readings (I tried to figure out how close they were before performing since I could not get the jumper cable method to work for whatever reason). This is for the V6 models. I believe the V8 models will need an additional step to move an exhaust pipe out of the way to drop the pan from what I’ve seen online.
Side note, I’ve collected a sample to send to BlackStone Oil Analysis to get a rough idea on how mine compares to others. When I get the results, I’ll update the thread. But I’m curious what your opinions are on the condition of the oil and the amount of metal in the pan/magnets.
Edit: Results are here on 189k miles for those curious:
Read the instructions thoroughly. Sorry, I forgot to take pictures at a few steps and was racing the daylight.
Tools Needed:
• 3/8” Ratchet
• 3/8” Extensions (I got by with just a 3” extension)
• 5mm Hex Bit
• 10mm Socket
• 14mm Socket
• 15/16” Socket (I think 24mm will work, but 15/16 might fit better)
• Fluid Transfer Hand Pump (I didn’t use one but wish I had one during this)
• Infrared Thermometer (option 1)
• ODB2 Scanner and Torque app with PID codes for fluid temp (option 2)
• Jumper cable for temp check mode (option 3, I could not get to engage)
Parts Needed:
• 6 quarts of Toyota ATF WS fluid or equivalent (Yes usually 5 will do but I was glad I had 6… you’ll see why)
• Transmission Pan Gasket (PN: 3516860010)
• Transmission Filter (PN: 3533060050)
• (2) Drain Plug and Check Plug Gasket (PN: 3517830010)
• O-Ring for Filter (PN: 9030131014)
• Parts Cleaner (Brakleen, etc)
Torque Specs (Haynes Manual):
• Transmission Pan Bolts: 39 in-lbs
• Transmission Filter Bolts: 84 in-lbs
• Drain Plug: 21 ft-lbs (2004 and earlier) or 15 ft-lbs (2005-2009)
• Check Plug: 15 ft-lbs
• Fill Plug: 29 ft-lbs
Temperature Procedure:
The Toyota procedure is to check the fluid level between 97° F and 115° F (36.1° C and 45.1°C). The fluid expands and contracts depending on temperature, so this is necessary to get the proper level. Please read all three options and use your own judgement on what you prefer.
1. Option 1: Infrared Thermometer: Use an infrared thermometer to measure the bottom of the pan.
2. Option 2: ODB2 Scanner with Torque phone app: You will need a Bluetooth ODB2 adapter and the Torque app. There are already several tutorials on the forums on how to enter custom PIDs into the app to obtain the temperature.
3. Option 3: Use a jumper cable on the ODB2 port and enter temperature check mode: There are more tutorials on how to do this on the forums. Your 4Runner will basically let you know when it’s within the tolerance to check the transmission fluid temperature. I could not get this to work and gave up after trying the magic shift sequence about 20 times.
Here is some data I collected while trying to gain confidence in the difference between the ODB2 measurement and the infrared thermometer technique. I’d recommend from a cold start, waiting until either the fluid reads 37.1° C on the Torque app or 36.1° C on the IR thermometer. From there, you have almost 12 minutes to check your fluid level before reaching maximum temp. This was performed at 82°F so if you’re in a colder climate, it may be slower.
Fluid and Filter Procedure:
1. Lift 4Runner and make sure it’s level (as simple as putting a level on the frame).
2. Break the Fill Plug and Check Plug slightly loose then tighten back down to make sure you can get them loose. If you drain your fluid and can’t get the other plugs loose, you’re gonna have a bad time.
3. Remove the 14mm Drain Plug and drain the transmission fluid. After draining, reinstall the bolt with the new crush washer and torque to 21 ft-lbs (2004 and earlier) or 15 ft-lbs (2005-2009). I got somewhere between 3-4 quarts here. Here’s what mine looked like after 189k miles (I’m assuming it was never changed). It looked more like engine oil than transmission fluid, but did not really smell burnt.:
Ughh... Straight black! Is Toyota sure about the "lifetime" fluid in these transmissions? The silver lining though: I filtered everything I drained through a 190 micron filter and saw no metal, so I feel a little bit better about it. Everything on the filter must be very microscopic.
4. Remove the 10mm perimeter bolts around the fluid pan and remove.
5. Remove the (4) 10mm bolts from the filter and remove. IMPORTANT: the original O-ring may be stuck in the valve body. Remove if you plan on replacing with a new one. Otherwise, it may come out with the filter. Mine still was in good shape, but I replaced anyway since it’s so cheap. Also a warning: the filter will drop quite a bit of fluid, so have your catch pan ready.
A little more metal than I'd like to see... what do you think?
6. Put new O-ring on the new filter with a small dab of fresh ATF.
7. Place new filter back in place and torque the 4 bolts to 84 in-lbs. Note: Wipe clean before installing. Don't want dirty gloves all over it with other oils or dirt from setting it down on the concrete.
8. Remove old gasket from transmission fluid pan.
9. Remove magnets from pan and wipe clean.
10. Thoroughly clean the pan with brake cleaner or something similar. Be sure the mating surface of the gasket is completely clean. May need to scrape off if it’s bad enough, but mine popped right off.
11. Place new gasket on pan. May need gasket adhesive to hold in place. I just let mine sit out in the hot sun to lay flat.
12. Bolt the pan/gasket back onto the valve body using the 10mm bolts. Get them all finger tight then torque them down to 39 in-lbs, starting from the center of the pan working outward.
13. Remove the 15/16” Filler Plug (this one has an O-ring that can be reused).
14. Refill almost a quart more than what drained out. Use a fluid transfer hand pump (preferably). I didn’t have one and drilled a hole in a cap and used some tubing. From there I squeezed in the fluid.
Note: I drained about 4.5 quarts according to the catch pan reading. I refilled with 5 but it wasn’t enough. I ended up having to restart the fill and check sequence after adding a 6th quart. This is probably in part due to a small mess I made filling with my bottle/tube contraption and the fact I spent several hours doing this (dinner break, dogs, etc) and more kept dripping out of the valve body onto the concrete. 5 may be enough, but it’s better to slightly overfill than not have enough.
15. Tighten the 15/16” bolt back down and torque to 29 ft-lbs.
16. Make sure your catch pan is ready to go underneath the check plug.
17. Start your engine and verify the temperature is in range with your chosen method (here I made sure the IR thermometer and ODB2 reading were both in spec). Once in spec, remove the check plug and let the fluid pour out until it starts to trickle, then quickly tighten back down the bolt with the new crush washer to 15 ft-lbs. I forgot to order two of these, so I gave it a little extra quarter turn since I reused the washer on this one.Watch your arms on the hot exhaust. Note: If nothing came out on this first pass like for me, you haven’t put enough fluid in. Wait for the engine to cool down, add at least ½ a quart, torque the fill plug, and repeat the check sequence.
18. Once the check plug is back in and the fluid is at the proper level, lower your vehicle, and you’re good to go.
Lookin' good. All fluid services are finally completed. I'll probably still do the full exchange through the transmission lines though.
Last edited: