Wavesport's Build

Wavesport

New member
Wavesport's Build / Restoration (11 years in Northern Canada)

How she sits at present: September 14, 2015:
TEbV981JCI2MPRjTByYdCogGphw236VVWnSd3Tfe2aBrY5Yl5Xk=w1091-h818-no


2004 SR5 Sport 4x4
QWO-yLcuM7-CDOkjgKKkcBf2xOQSRZ9MMMX4SPccLt0=w1236-h818-no


I picked her up in northern British Columbia in 2011 - she was in good shape with only 113k on the clock, and oil still clear and clean after 5000km.
ICbhxIpKDfZ3DCQNJ-cguWUukqDikUI2Y7GXU4H9u9A=w1226-h818-no


I've not done a tonne with her over the last few years, mostly because I was busy in school. I've just finished, and finally have the time, space, and money to fully build... or at least get her back on the road again... more on that in a bit.

I just joined up with the local auto hobby club as I don't have my own garage - and acutely needed a place to work on my vehicles. Both of my trucks are off the road at the moment, and I'm driving a rental. Full points to anyone who can guess what I'm driving. The shop occupies a retired hangar on a Canadian Forces Base, and as such, much of the operating costs are covered. Thankfully they extend membership to civilians, 6 months for 55 dollars, and a full bay for 75 a month. I am in awe of this place. 100 thousand square feet, with every tool and toy you could reasonably ask for.
u5wX7ckdY4ztcMow9nO7pvhR55BfgVGFKo5J03lEPzo=w1440-h334-no
 
Last edited:
Register to hide this ad
Update #1

I had noticed a hum in one of my wheel bearings a while back, and ordered the kit to replace the wheel bearings from one of the members on this forum: njn36 and had agreed to do a write up on the install - but have just not had a chance to get around to it. Karma must have felt I deserved punishment for not doing something I promised in a timely fashion, and on the way back from a visit to a community somewhere north of my current residence... one of my wheel bearings exploded.

I managed to avoid the serious consequences, and kept it together. In spite of the obvious shaken nerves, I was kinda pumped in a way, as it let me consider what I wanted to do with the project, and forced me to make a plan for the next few weeks if I wanted to have her back on the road.

With some for sure needed parts on the way, I towed the runner up to the shop and started taking the front end apart, partially to inspect for other damage, and partially to get ready for some good ol' fashioned rust removal, which meant I needed access to the metal.

It was sitting pretty low in the corner that blew...
leHyIpYjc-eg55c1uFO6XkLzGOWn-3I8UNk8EM-6u8g=w614-h818-no


Likely the cause of my problem, was a long neglected cv axle boot, with a subsequent compromise of the spindle seal, and corrosion of the bearing surface...
5kfvO7XMGKrOi73z33Qt7cLBO2BWci5DPVFg0bfdtwo=w1091-h818-no

Don't leave these to get this bad unless you want to replace them and many other pieces :)

kCGQr2SVhRLgRUPugy4MpXWMenz5jwvMzRV_9S-sfAM=w614-h818-no

This was a bit later in the teardown, but anyways shows some of the corrosion on the spindle.

All in all, things were looking not too bad, but corrosion had welded some of my pieces.
UNg2yABoZkurDepO_ggtndeox5vo7hMI6sLcGgp_ep0=w614-h818-no

At the start.

0pN858puB8m1W_Z1DmFwfvsk5HmNf-yaJXoFrbIaBpQ=w614-h818-no

After the caliper was off, and held in place with a bungee.

qpXLf66OjXvVUo6L4_5nrXZpBqcoyCGjh5ii6cbHtOA=w614-h818-no

This isn't really the best way to do this...

LhkCfNjuT4pG6DIP_NJ11kAJVQyHxOoUlphn6l7DzcE=w614-h818-no

This was solidly difficult to free up.

Lo and behold...
UTFqFoz3H78ypM4b8ILLI1sFOt2kLTAzVxU4HLaS7Vc=w614-h818-no


The bearings are supposed to be arranged cylindrically, and not turned to dust... and they should probably have grease on them...
QTPUHLD0dupapPuabF7y-XJx47qLBatGdRHUwPpN5fY=w614-h818-no


I took some opportunity to free up the spindle, and wire brush it down, then I varsol dipped it, and hit it with some rust converter. The final result:
rypC9EZhV-1hL9PXXW3MEVG-upfWZp9Iud45oQvt3MU=w614-h818-no

I'm going to do the por15 prep and paint as soon as it arrives in the post.

The front end is basically all out, I still have yet to pull the steering rack, and the stub, but the majority of the surface rust was in the creases anyhow. I have a bit more cleaning to do, but here is a before, and in progress. I'll post up an after as soon as I get the rest done.

C1zGysmbv2oLmWw2Qmg5jABdXlOC0XeVzAwFA3jU0A4=w1091-h818-no

Some before cleaning.

LU5RIBeao4wF2Vvs_NCXXqj9vOVFBwhUjNks9jsM1nc=w614-h818-no

Some during cleaning.

At the moment, I'm still waiting for parts, paint, wheels and tires. I had a big visa bill this week... So all I'm really able to do at the moment is clean, and prep. In the interim, I thought I'd give a shot to cleaning up a spare that blew out on me a while back. The side wall had a bubble in it, and blew up at a reasonable clip. Managed to slide into some sand, and save the wheel from being overtly damaged. The shop has a complete wheel and tire service centre, so I was able to verify that there is no damage significant enough to cause an imbalance, however, microstress is another matter that I cannot reasonably exclude. Therefore, I felt pretty free to make mistakes with this one:

NJ7Ght9JQr1cK7pDKRdq86Jr095jKEtiaR1hLlapwD8=w614-h818-no

This stuff smells pretty nice, but its best not to hover for too long...

arT_ZUe6fObM2UeTfsspC6wyROVVK_iHGf9yieTAG6M=w614-h818-no

It bubbles up as it works. Not really sure the best way to clean it off. Varsol didn't do much, and it is still a bit tacky. Any suggestions?
 
Last edited:
Waiting for parts is a slow process, cleaning is even slower

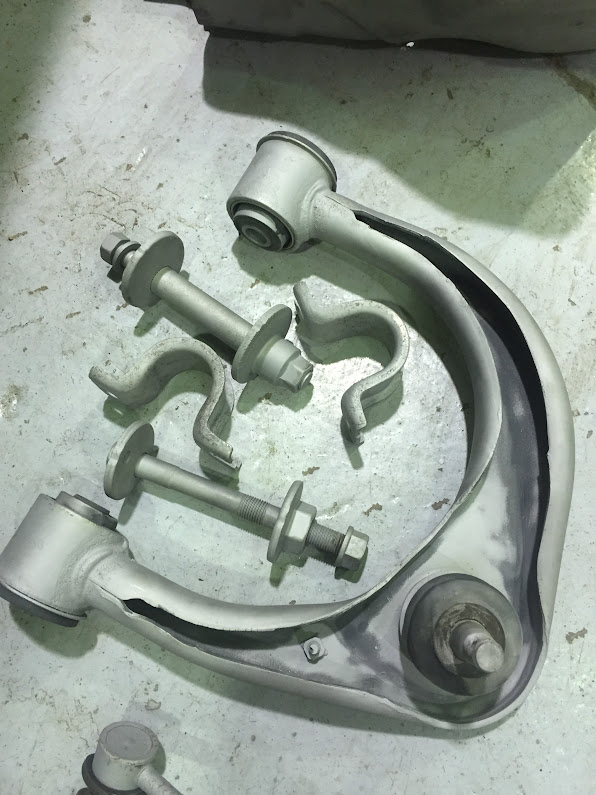
Well, I'm still waiting on a bunch of stuff, so thought I'd just get to cleaning some parts. Worked on cleaning the rust and old paint off of the driver's upper control arm, as well as the sway bar. The sway bar turned out pretty good, but the upper control arm has a few areas that are hard to get to. I might just replace them with new UCA's at some point. Can't wait to see how the por15 makes these parts look.

1f6aON4_oERNazfV69kWef1N_qarbnAS4w-3pf2ZUZA=w597-h795-no

The sway bar turned out like new.

AVo3cCnABX1-0zUnOMWJLUu0sJC3iE14DRAWRGDD9Ts=w1060-h795-no

A few parts are there, but can't do much with them until I get paint on.
 
More parts - sandblasting

Had a chance to do a few more things. Figured I try sandblasting a few parts, since I have some pretty nice sand around here:

Dj-luVC0eUZRm54cw9gl0lIIy-9-dArcSdR1x8hU18E=w1060-h795-no

This is only about a minute or so from my front door.

A2UkweptWtB63Wxq0toQnlwC1w2EIHdhbTuRfbLM-JI=w597-h795-no

The dog loves this place :) I sifted the larger chunks out of the sand with a simple mesh screen made for a camper / truck cap, but there weren't too many big chunks to begin with. In any case, I didn't want the sand blasting nozzle to seize. The sand is very very fine, I picked the stuff that seemed to be most powder like on the leeward side of small rises around shrubbery. It was noticeably more powdery (with finer particle sizes) on the leeward side than on the windward side.

65pg3f-rndV9pUugrdcKphyzPmv2o1o-uqhFnYoZOr4=w597-h795-no

Before sandblasting the front skid. There were a few tiny spots that have rusted clean through, so I'll need to patch those. These will likely get replaced in the future with armour - as they are quite thin (1.3mm I think) vs. 1/4" plate from most of the manufacturers.

f5hAZSoV2_kV-VPzx8x3ydVhSwD1FjGjBcZOkl-e7Ww=w597-h795-no

After sandblasting a few parts.

oZGF_yf_4eTvGAMagWt8XjbDys2AdV-F9M9josggFBo=w597-h795-no

These turned out pretty good, but I have replacements for them anyhow. I was mostly interested in seeing how the steel cams held up to sandblasting, as they were pretty rusty appearing on first glance. The UCA's will be replaced in the future as well, but for now, since my lift is going to be fairly sedate, I'll keep them. I might go camburg's with moog balls, (as I live in a pretty corrosive place, with tonnes of sand.... everywhere...) as armstrongs might not cut the mustard.

4UWgVMnoE22t_9XhbcV_ZhGAkRT7DtmNJHiD1gEnR18=w597-h795-no

Speaking of replacements. I'm not sure if I'm going to leave the LCA's black or not. I was more thinking of doing the spindles and control arms in silver, and accent pieces / line plates in another color. Alternatively I guess I could leave them black, and do the accent pieces in silver. Haven't decided just yet. These are direct from Toyota parts with bushings and ball joints. Just as thick as the originals. Surprisingly, there are already small spots of rust bleeding through the weld seems. The old ones aren't too bad, so I'll strip them, and throw in a set of energy bushings just to see how they compare.


idStrFZMlyAA20BUZWmimOVNKdJ5zIQM3S8oS0R_L5E=w597-h795-no

These are a few items that I thought I might try out with the paint (POR15), since I don't have access to the shop tonight. They were sandblasted, and then lightly sanded with 180 grit paper. This is them after the cleaning compound was washed off (part of the por15 process).

IlPBn7faS1yqw9MImvzfG3E9-dIucpreFwJNC4A8t7E=w1060-h795-no

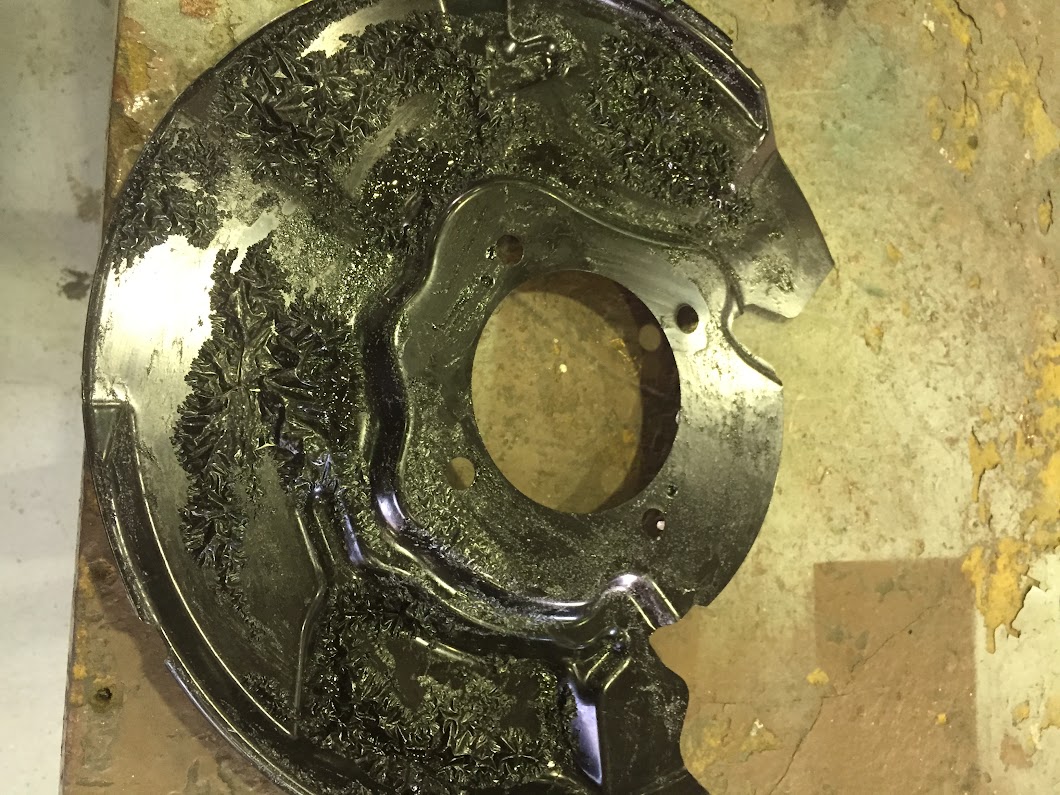
Even though POR says that metal etching isn't really necessary with a sandblasted bare metal, I decided to go ahead and do it anyhow, to see what happened. The phosphoric acid etches the metal a bit, and leaves a kind of a ferned pattern on some of the metal. It turns any rust to a black very hard material, basically swapping the iron oxide for iron phosphate (if I have this wrong, I am happy to be corrected. I did a biochem degree not chemistry and it's been a while since I gave a shit).
I talked on the phone with the guy from POR for quite a while - I think he knows more about this process and the pitfalls / benefits than anyone else on earth. He gave me a bunch of good tips.

5oELGYye_ySfN8ffbWQO5SBz9yijn1WynioAlHv5QI8=w597-h795-no

Tip example: Use a metal siding screw with a rubberized washer to seal the can. POR notoriously seals the lid if even a drop is left on the rim. This screw has threads all the way to the edge, and can go to wicked torque pressures before it fails. Caveat: the threads may be strong... but the can isn't.

6wFyK4j6OyvmzJ7Kmza3NSK2mxaLRnrsrqAFxx7lT7g=w597-h795-no

Case in point, make sure you don't strip the can :) I thought rather than waste the can, I could salvage it by sealing up the screws with some POR, and it seemed to work ok. The second coat went on later with no trouble. Other people have suggested using duct tape. Maybe I'll go that route in the future.

sikr1MaVO_8rbSSpw8iy7C51HSlXXzl4r77SL71CAY8=w1060-h795-no

It really is amazing stuff - brush strokes disappear in about 2 minutes, the bubbles come out, and you are left with a perfect, smooth, shiny coat of paint, that you brushed on... Bizarre actually.

I'll post a bit more once I have some more of the process complete. I am hoping tomorrow to get into the shop, and stab at sandblasting some of the frame in a little homemade booth of drop cloth and plastic sheeting - adapted to the frame to help protect some of the internals and engine bay from too much overspray. Not sure if it will work very well... I can't actually roll the chassis outside at the moment, and I'm not quite ready to take the body off. If it gets to be too much hassle, I might clean as much as I can, and postpone the frame restoration until I can get the body off. (which won't be until winter, as I still have to do the cab off on my f-350 to replace a bunch of shit that sits right under the needlessly massive firewall).
 
Last edited:
Nice posting. Thanks for all of the detailed pictures.

I never thought of procuring my own sand. Blasting media is something I buy in bags off of a shelf.

The shop is awesome. Being able to add on bay space for a project and have access to a lift would make a lot more thing feasible. I'd be happy to find something like that here.

I usually bend up wire clothes hangars to keep things our of my way. Your bungee use looks pretty good.
 
I totally tried to find blasting media in town, but nobody was able to provide it for me. Getting it myself was more of a "I need to get this done or it won't get done" kind of gig. And yeah, the shop is super awesome. There is a great group of guys that work in the shop and have projects on the go - which makes it a pretty fun place to hang out. If ever I have questions about anything - there are a lot of different angles to hear about it. The bungees were an idea I saw somewhere else on this forum - but thanks for the feedback!

Was back at the shop this week a bit, and spent some time further cleaning up the frame. I ended up successful with the makeshift sandblasting booth:

LSHmnMTNQr-vvXDYmgmAhBOpbF6VeYetQeKaMC2Nok4=w1060-h795-no

I used a very strong 3m tape to keep the blast shield in place - which was just a heavy duty painting drop cloth. I could spray nearby and not perforate the plastic which was handy. The cloth drop sheet in the top of the engine bay did a great job of keeping the overspray out of that area.

Q96w1UinwQubymEP2r7q6Fc3EfY-czeNS_SoipsLke0=w1060-h795-no

After Blasting.

The only thing I think I might do a little differently is grab a shop vac and use that to hopefully sop up some of the dust that gets produced with the blast. The sand is perfectly contained, but the dust is another matter entirely. The entire area around my truck (and on to my neighbor's 72 VW west) was coated in a thin layer of dust. I cleaned it up pretty easily with an air spray and a broom - but hopefully I can avoid this on my next attempt. It would be a lot easier if I could just do this outside, but I don't currently have access to a dolly big enough to wheel the truck around.

Here are a few more parts blasted up. These are mostly little hanger's for the brake and abs sensor lines:
rnnXYyox5oSQxtPPvdzBBh81vEggHLJX2_tVQ-ZYnXU=w597-h795-no

These pieces I think will be painted an accent colour different than the spindle and control arms.

Lhow35fznfpvQ7A1o3EzEKNA3doKCWwqUEHLMKmu8uM=w597-h795-no

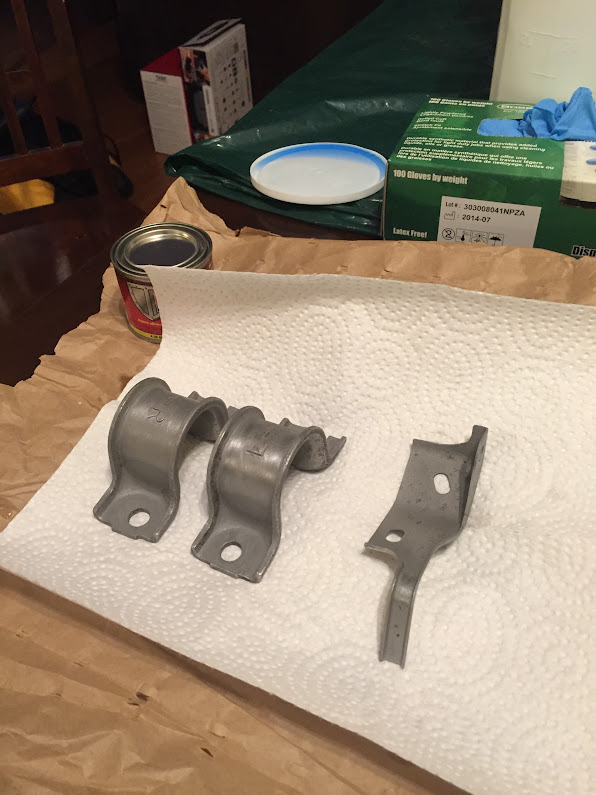
This is a test fit of the energy urethane bushings in the repainted bushing hangars. I'm not sure I'll keep this bracket black like this - it might change depending on the colour I use on the swaybar. The por15 is super nice to work with, if you want to repaint it, just scuff it up with a pad, and throw on another coat.

I'm working on the other side at the moment. The other front wheel bearing was in state as well, but hadn't completely gone yet. Not really sure why these went so horribly wrong at only 130k... I will put up a shot once I have that side blasted down, and some paint on the frame. There are a few other little things I need to tie up before I get paint down, but should be able to start building up the front end again in fairly short order. Then I'll start on the rear, and have new tires up soon. I am on the fence about tires still.

BFG AT KO2's or Duratrac's or Nitto Terra Grappler G2's? Can't decide.
 
Update #3 or 4

I had a chance to get back into the shop a few nights this last week. Work has been pretty busy lately, and most of the progress I hoped to have made the week prior fell away. In any case, I got a few more parts in the mail, as well as a bunch more por15 - with different colors and shades of grey that I can use for the different accent pieces. I didn't really want to make it gaudy looking - and paint everything red, but there are a few that I had a thought to paint red. I'll have to see how they turn out, and if I don't end up liking the setup - I'll likely swap it out.

I got the other side of the truck all pulled apart, and built another sandblasting booth, but learned my lesson from the last attempt. I found a shop vac and placed it in the top of the wheel well, then covered up the whole mess with a second plastic drop cloth to really seal in any overspray / dust.

F_4lp_Kbzt44sFOVk_8mrRKSNXwrQHNN_Z86Dyf_JiE=w1060-h795-no

The second thing I did differently, was to strip the paint before blasting - as some of the paint is pretty thick, and takes a lot more sand to get through. I'm working with really fine stuff, and it doesn't eat very hard - which is a good thing because I don't actually want to diminish the integrity of anything I'm blasting.

Zxgh7ZUB3R_48QH_jENPur-NzHeI6Kc6C2bid7j_6tQ=w1060-h795-no

This side went quite a bit quicker. It's nice that noone else was in the shop today, because in spite of my attempts to keep the dust down, I still ended up having to sweep up the entire shop... which takes a while in 100,000sf.

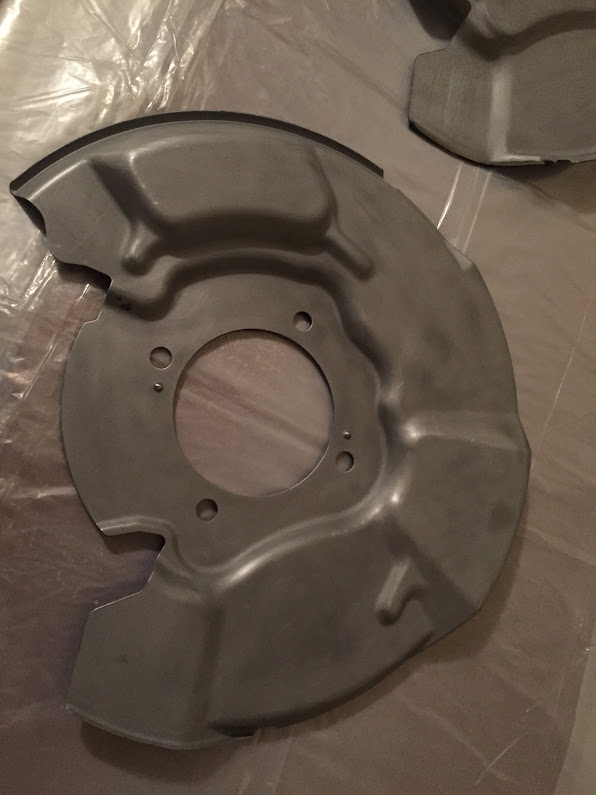
I ended up getting a new set of dust shields for the front brakes.
ZGUcmwQmo-trZoKz0BXuvte974bkn7rPS_ffru6Yoss=w597-h795-no

They were painted black, but I wanted to change them to a different color, so I stripped them.

P-EjtFaQ108IoJHIaZ3WMuWaXzy7OWFPaB0FsFrPrDA=w1060-h795-no

And then sand blasted them, and did a light sanding with 150 grit (as per the POR15 master - sanding after sandblasting, with a swipe or two of 120-180 grit knocks off the peaks which might be high enough to be taller than the POR15 layer - which in turn leads to a communication with the elements which leads to corrosion - the same principle as an air bubbles but in the opposite direction. Incidentally - to minimize air bubbles - you have to lay down the POR in very thin layers. But as air bubbles are inevitable in some ways when using a brush, you always lay down 2 layers of the POR base paint.)

nPAkPKIt0icX4Al_Fo7QuKgOXFn_hWkzKjubo7DLVoo=w597-h795-no

As soon as I have 6 hours to rub together, I'm going to be painting a few pieces their hopefully final colors. Six hours are necessary because the POR paint needs to be laid down in layers as they dry - with a slight drag to the paint without leaving anything on the finger - which takes 2-3 hours depending on the humidity per layer). I plan on doing 2 layers of the POR gloss black, and then the topcoat - or flex coat in the older terminology. Interestingly - and this doesn't have much bearing on parts that are under the vehicle - POR paint color degrades with exposure to UV light (I've heard varying reports on the paint itself degrading vs. just the color of the paint in UV light). In any case - the best results for pieces that will be out in the sun require the use of a topcoat that is not UV sensitive.
 
I'm in Goose Bay at the moment! Most of that corrosion i think is from time spent in northern bc, as they use a lot of salt in that area. Out here I don't think they ever use salt on the roads. One of the old guys at the shop says, Goose Bay is the only place on earth you could throw a bolt into a field and still use it ten years later. He might have a touch of dementia.
 
Update #6

Had a chance to do a few more small things around the house after being on call all night. Still working a lot right now, so fairly minimal progress. My new tires came in :) - but I'll send up a shot tomorrow. Waiting on the wheels and a few other goodies. :guitar3:

Laid down a few coats of chassis black POR15 on the dust covers, they look like polished paint with a clear coat after 2 coats.
IhSQXHd5YHc2ZHdbHwgz-v0TnFIFBoLvJmjKFZTCh1w=w1091-h818-no

Things I've learned using the POR so far:
1. It works almost like a stain on clean prepared / sandblasted metal. The first coat goes on very thin if you like, and dries / cures much quicker than a thicker layer (of course). If you get to it early - like the instructions say, for the next coat while there is a bit of drag still to the paint, the next layer will hold to it much better than if you wait until it is no longer tacky. The directions say this should be about 3-6 hours, but in my experience with a very light first coat, this is usually less than 2 hours. I came back at 3 hours on a few pieces, and needed to sand before the POR would hold very well.

2. The top coats are very different paints than the rust protection coats. I'm sure they are similar materials, but the beneficial: hardness / bonding / self levelling characteristics of the rust protection paint - are not present in the top coat paints. Case in point - the metal mask top coat paint - acts much like any other paint. Brush strokes appear early and stay late. It doesn't self level well, and the metallic flake present in the paint separates and is very difficult to achieve a uniform color / finish. I'm not sure I like this product very much, and might not use it in the future - unless I can find a way to spray it. It is very heavy paint, and very unfriendly. Plus, it doesn't get very hard even after about a week, but it is very very flexible. It would work well on flexible surfaces like a coil I suspect. Here is an example from last week with one of the dust covers:

QYxPg3VGLeuHhOx5OKTfqC8W8VW_VcPh38rFjlLR07o=w1091-h818-no

TLDR: very uneven finish with a top coat of the METAL MASK over the POR15. You have to treat these paints very differently than the rust protection paint.

Another little piece I've been working on is the front skid plate. It was in pretty rough shape:
r2H8dKWrR_QsLlM4883XzqKAJAZMKUywmOOFXOMOp08=w614-h818-no

After sandblasting - there were a few spots that had rusted through, and the rotten metal gave way.

I wasn't about to spent time cutting out and welding in new metal on a piece that I'll replace in the future... so I found a shortcut that isn't very pretty, but actually works very very well:
MAOrPbTawhyYpZYkgE-X_apjo8UCAEXfIUGc_aXemio=w614-h818-no

This is an epoxy putty, that sets up in about 1 hour, and then hardens similar to JB weld. I'm not a POR salesman, they just had some on their website, and thought it would work for my purpose. You just mix equal parts, and stick your gum to the bottom of the desk :)
vhni1EdS_YZrf9IxsoARlM1j0vvYV8Uz5XaHsUKBW-8=w614-h818-no

Its about the consistency of nicorette gum.

TshY3uBa4ewGCisnay3Bcp1OlNI7_YqnS6p_qLZoA-g=w614-h818-no

Then you just work it in to the spots you want to reinforce. It becomes rock hard in about an hour. And... this stuff is for real. You can take a sander to it, but it is way harder than bondo. It's the hardest plastic I've ever seen. Not sure about the brittleness / flexibility of this stuff yet. But luckily this piece won't flex very much. I'm not too worried about the cosmetics of this part, as again, these will be replaced when I do the bumpers.

Also worked a bit at the spindles with the POR. These turned out super nice. POR is pretty interesting when it dries - hard to understand unless you have a chance to play with it. It is super super hard, and slick. If you can avoid dust falling on it while it cures, it leaves a mirror finish.
DCH4-1kETuegWSnyGLGKx5j-4dz-BhBRGe70gsCBH64=w1091-h818-no

I'm on the fence about trying the metal mask, or aluminium coloured top coats on these pieces. I might just leave them black.
 
Update # 7

Too big?

szCbWJFMKM6sjyJMsxP3jf6DM1KVoRWBTyyhrARRrxw=w1091-h818-no

Not sure how much lift I'm going to need, but chances are good I'll end up at 2.5-4.5 inches. I have a few things on the way, and I'm changing my mind on a few others.
 
285/70r17's They give me about a 1in lift compared to the stock tire size, but really fill out the tire well. I am thinking about chopping the body mount, and doing also a body lift.

Not sure if I'll need new upper control arms. I don't have a good tool to extract the upper control arm bushings in the ones I've got now, and they are a huge pain in the ass to work with. I really hate to give up on stuff, but I'm thinking I might save myself some trouble and get some light racing UCA's (and also get myself a few more degrees to work with). I may end up going the total chaos route - but again, I'm not totally set. I was thinking about the camburg's as well, but not sure I can find a good line on them.
 
Im still on the fence about a body lift but everything is good so far. If i were in your shoes i would go ahead and get the UCAs, some people done mind not having then but it made my truck not very fun on the freeway. I siukd my light racing ones for the Camburgs....they are nice. Wheelers Offroad has some nice prices on their products.
 
Just a quick question if you don't mind LC2013 - why did you switch out to the camburgs? Were the light racing ones no good?
 
Just a quick question if you don't mind LC2013 - why did you switch out to the camburgs? Were the light racing ones no good?
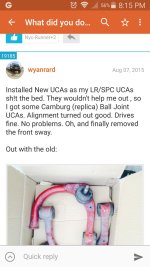
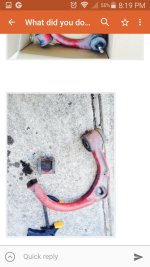
Well i went back and forth with the reviews some say they work great some nit....seeing this pic by wyanrard kind of sealed the deal for me....
 

Attachments

  • uploadfromtaptalk1439428647534.jpg
    uploadfromtaptalk1439428647534.jpg
    125 KB · Views: 817
yoikes. I'll see what I have available to me here, though I might be a bit limited for selection. I'm trying to keep this build under 10grand - but the Canadian dollar what it is... ;)
 
yoikes. I'll see what I have available to me here, though I might be a bit limited for selection. I'm trying to keep this build under 10grand - but the Canadian dollar what it is... ;)
I hear ya......i think Im about tapped out on 4runner funds atm haha
 

Members online

Forum statistics

Threads
278,307
Messages
3,554,054
Members
248,016
Latest member
Advally Service

Trending content

Back
Top