
You are using an out of date browser. It may not display this or other websites correctly.
You should upgrade or use an alternative browser.
You should upgrade or use an alternative browser.
Wavesport's Build
- Thread starter Wavesport
- Start date
Thanks for the kind words DonNico. The work is made easier if you have a nice place to do it, and enjoy the process.
I got some new stuff in the mail this morning:

These are the FN Wheels f(x) Pro 17x8 in gunmetal. Center caps are the TRD embossed version. Props to Dustin at FN for finding me a Canadian dealer, and the boys over at TacomaTown at Cochrane Toyota in Alberta.
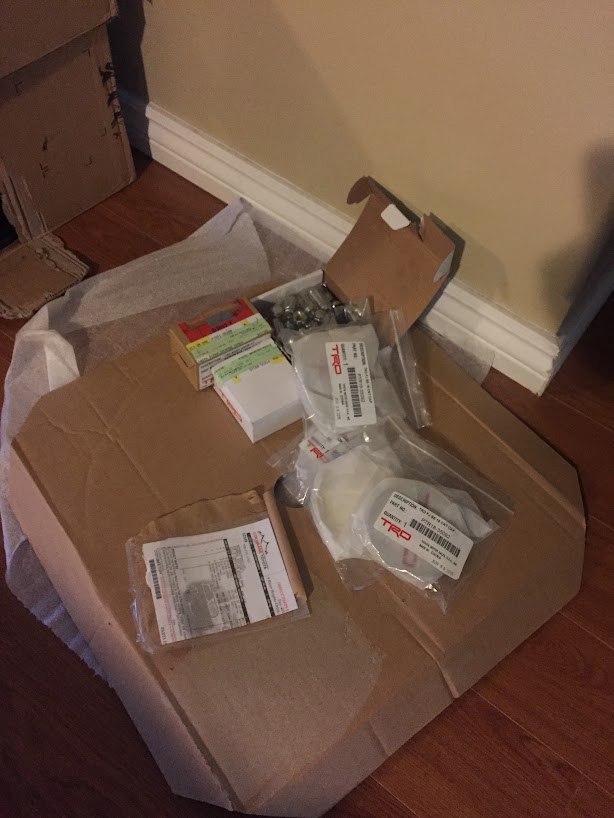
And a bunch of other little goodies.
Looks like I might be going with the light racing UCA's, and might pull the trigger on the toytec boss 2.5's, if the setup is right. If not, I'll likely end up with the bilstein 6112 / 5160 / 5100 combo? I have a line on both. The setup I have now (which I'm a bit ashamed of) I'm probably going to send back to the dealer.
I got some new stuff in the mail this morning:
These are the FN Wheels f(x) Pro 17x8 in gunmetal. Center caps are the TRD embossed version. Props to Dustin at FN for finding me a Canadian dealer, and the boys over at TacomaTown at Cochrane Toyota in Alberta.
And a bunch of other little goodies.
Looks like I might be going with the light racing UCA's, and might pull the trigger on the toytec boss 2.5's, if the setup is right. If not, I'll likely end up with the bilstein 6112 / 5160 / 5100 combo? I have a line on both. The setup I have now (which I'm a bit ashamed of) I'm probably going to send back to the dealer.
Last edited:
Looks like the toytec boss 2.5 series will be about 3k Canadian with the total chaos uppers, a 1" body lift, and a few other little goodies. The setup I have now was worth about 1200 - so I'm almost ready to pull the trigger as long as the other guys I was dealing with take the other kit back.
The only other option for me is the icon stage 2 or 3... soooo I'm getting a quote on those too
The only other option for me is the icon stage 2 or 3... soooo I'm getting a quote on those too
Update #8
Tires and wheels were here, and I had a few hours to myself. I went up to the shop and thought I'd try my hand at mounting them up.
Didn't have plastic teeth for the mounting hardware, so ended up putting a few little nicks in the paint... - but I'll clean that up.

Tires were super easy to fit over the rim - and seated with about 13 pounds of pressure.

They look a lot better in person for some reason than I can make out in the pictures. It might be something to do with the sense of dimension. A shallow DOF from a wide angle might do this justice, so maybe I'll grab my dslr on sunday and bring it in for a few shots.

I'll put the other ones together and see if I can't rig something up to prevent the wheels from scuffing up. Not too bummed about it as they will get beaten up anyway, but, sorta wanted to have it in tip top shape to start with.
Tires and wheels were here, and I had a few hours to myself. I went up to the shop and thought I'd try my hand at mounting them up.
Didn't have plastic teeth for the mounting hardware, so ended up putting a few little nicks in the paint...
- but I'll clean that up.
Tires were super easy to fit over the rim - and seated with about 13 pounds of pressure.
They look a lot better in person for some reason than I can make out in the pictures. It might be something to do with the sense of dimension. A shallow DOF from a wide angle might do this justice, so maybe I'll grab my dslr on sunday and bring it in for a few shots.
I'll put the other ones together and see if I can't rig something up to prevent the wheels from scuffing up. Not too bummed about it as they will get beaten up anyway, but, sorta wanted to have it in tip top shape to start with.

LC2013
New member
They look fantastic!...now Im jealous haha.Tires and wheels were here, and I had a few hours to myself. I went up to the shop and thought I'd try my hand at mounting them up.
Didn't have plastic teeth for the mounting hardware, so ended up putting a few little nicks in the paint...
Tires were super easy to fit over the rim - and seated with about 13 pounds of pressure.
They look a lot better in person for some reason than I can make out in the pictures. It might be something to do with the sense of dimension. A shallow DOF from a wide angle might do this justice, so maybe I'll grab my dslr on sunday and bring it in for a few shots.
I'll put the other ones together and see if I can't rig something up to prevent the wheels from scuffing up. Not too bummed about it as they will get beaten up anyway, but, sorta wanted to have it in tip top shape to start with.
Thanks guys! Appreciate the feedback. Quick note about the ko2's for anyone that is interested. They don't have the little kickout/lip around the rim called the "rim protector" - which may be important for some. Most people who wheel didn't really like the rim protector since it always gets jammed up with stuff and can possibly contribute to slow leaks, but does of course offer some extra protection from scratching or scuffing the rim lip. I'm not sure if it is that big of a deal, just something a friend pointed out in comparing his ko's to my ko2's.

HOJeepster
New member
Nice build, looking forward to seeing the progress. Kudos for doing your own work.
Update #9
Thanks HOJeepster, high praise indeed!
Had the entire day off, well, I gotta work tonight, but in any case, spent the day in the shop. I wanted to at least get the parts this I've prepared on the chassis ready for paint today. That meant cleaning everything thoroughly, then washing everything down. Next up I did the soap clean prep that POR suggests, then washed, then applied the Phosphoric acid etch, for 15 minutes, then washed again. Bit of a process, and mightn't be necessary with sandblasted metal, but I had a few spots that didn't get a good blast that I wanted to prep in any case.
After all the washing - there was a nice coat of rust on the pieces I'd worked so hard to clean

I think the POR paint really likes rust - else I can't really imagine why they would suggest I intentionally rust the frame prior to paint. I will say that when laying down the paint - there is a much better subjective feeling of adhesion over overtly rusty areas versus those that didn't rust as much during the prep. I bears out in the halfway process:

After the first coat - you can see that the paint is a bit like a stain for the areas the didn't get as much rust, and seems to penetrate / adhere better to the areas that rusted more during the prep.

Not to worry - the second coat clears it up perfectly. Interestingly, with a very bright light shining on the paint, there are areas where the paint is a bit thinner which show some of the surface beneath. A third very light coat with the light in hand helped to clear up any areas that seemed thin.

Looks brand new down there
I also spent some time working with the tire mounting machine. I managed to find the little plastic tongs that hold the wheel. Note to the uninitiated... steel wheels get held in place on the tire mounting machine by an eccentric press, that has teeth that push out into the inner surface of the wheel. Alloy wheels get held by the same tongs but in the reverse direction. The alloy clamp is concentric and holds the wheel from the outside like your hand squeezing a peanut butter jar's lid. I learned a bit while doing this, and though I might pass it along:

This is the valve stem that allows you to fill and deflate the tires. On an OEM application, this would be connected to the TPMS module - but for these wheels I decided to forgo that option. You need a special tool to get this thing pulled through the spot on the wheel designed for it:

It's basically the valve stem cap made out of aluminium, and attached to a pole.

This lets you pull it through the wheel,

And seat in the well designed for it. It doesn't need any adhesive, or grease as far as I'm aware. Seems to hold up well to pressure in spite of neither of the above being applied.

I didn't take any pictures of it, but seating the tire is super easy. Just throw it over the top of the wheel, put the little arm in place, and make sure that you leave enough room above / beside the rim lip to allow for flex in the machine arm, or you will score your wheel. Luckily I avoided this, but only just. Once both beads are over the lip, you can inflate the tire, and when seating the bead - it gives off a satisfying noise when it pops into place.
I ended up ditching the sheet metal screw on the can of POR this time, and used a sealing mason jar to temporarily hold the paint. I made it through an entire half pint of the POR15 Chassis black doing both sides as shown. I laid down a pretty thick second and third coat, and wasn't super judicious about it, so I'm sure you could go further with it if you were interested in saving paint. I'm not entirely sure why I ended up putting on thicker layers. I know that the thicker the layer the more bubbles it produces and the greater chance of corrosion. I just couldn't help it / didn't think about it. Not sure.
In any case, there are lots of tiny bubbles in the surface. I'm not too bummed about it though. I really like this truck, and kinda dig the little blemishes here and there. Truthfully this is my wife's ride (sorta how I justify going to work on her car, and spending dough on it). When it comes time, I'll likely pick up another 4th gen (there is a 2008 with 23000km in Hamilton....) and build it up as well. Time will tell.
For now, next step is getting the suspension part in, prepping the wheel bearings, spindles, swaybar, rotors, brackets, brake lines, callipers, and control arms. Some of these have already been done, but I need a day or two to prep and finish painting. Luckily, the suspension won't be here for a week or two, so I have a bit of time
Thanks HOJeepster, high praise indeed!
Had the entire day off, well, I gotta work tonight, but in any case, spent the day in the shop. I wanted to at least get the parts this I've prepared on the chassis ready for paint today. That meant cleaning everything thoroughly, then washing everything down. Next up I did the soap clean prep that POR suggests, then washed, then applied the Phosphoric acid etch, for 15 minutes, then washed again. Bit of a process, and mightn't be necessary with sandblasted metal, but I had a few spots that didn't get a good blast that I wanted to prep in any case.
After all the washing - there was a nice coat of rust on the pieces I'd worked so hard to clean
I think the POR paint really likes rust - else I can't really imagine why they would suggest I intentionally rust the frame prior to paint. I will say that when laying down the paint - there is a much better subjective feeling of adhesion over overtly rusty areas versus those that didn't rust as much during the prep. I bears out in the halfway process:
After the first coat - you can see that the paint is a bit like a stain for the areas the didn't get as much rust, and seems to penetrate / adhere better to the areas that rusted more during the prep.
Not to worry - the second coat clears it up perfectly. Interestingly, with a very bright light shining on the paint, there are areas where the paint is a bit thinner which show some of the surface beneath. A third very light coat with the light in hand helped to clear up any areas that seemed thin.
Looks brand new down there
I also spent some time working with the tire mounting machine. I managed to find the little plastic tongs that hold the wheel. Note to the uninitiated... steel wheels get held in place on the tire mounting machine by an eccentric press, that has teeth that push out into the inner surface of the wheel. Alloy wheels get held by the same tongs but in the reverse direction. The alloy clamp is concentric and holds the wheel from the outside like your hand squeezing a peanut butter jar's lid. I learned a bit while doing this, and though I might pass it along:
This is the valve stem that allows you to fill and deflate the tires. On an OEM application, this would be connected to the TPMS module - but for these wheels I decided to forgo that option. You need a special tool to get this thing pulled through the spot on the wheel designed for it:
It's basically the valve stem cap made out of aluminium, and attached to a pole.
This lets you pull it through the wheel,
And seat in the well designed for it. It doesn't need any adhesive, or grease as far as I'm aware. Seems to hold up well to pressure in spite of neither of the above being applied.
I didn't take any pictures of it, but seating the tire is super easy. Just throw it over the top of the wheel, put the little arm in place, and make sure that you leave enough room above / beside the rim lip to allow for flex in the machine arm, or you will score your wheel. Luckily I avoided this, but only just. Once both beads are over the lip, you can inflate the tire, and when seating the bead - it gives off a satisfying noise when it pops into place.
I ended up ditching the sheet metal screw on the can of POR this time, and used a sealing mason jar to temporarily hold the paint. I made it through an entire half pint of the POR15 Chassis black doing both sides as shown. I laid down a pretty thick second and third coat, and wasn't super judicious about it, so I'm sure you could go further with it if you were interested in saving paint. I'm not entirely sure why I ended up putting on thicker layers. I know that the thicker the layer the more bubbles it produces and the greater chance of corrosion. I just couldn't help it / didn't think about it. Not sure.
In any case, there are lots of tiny bubbles in the surface. I'm not too bummed about it though. I really like this truck, and kinda dig the little blemishes here and there. Truthfully this is my wife's ride (sorta how I justify going to work on her car, and spending dough on it). When it comes time, I'll likely pick up another 4th gen (there is a 2008 with 23000km in Hamilton....) and build it up as well. Time will tell.
For now, next step is getting the suspension part in, prepping the wheel bearings, spindles, swaybar, rotors, brackets, brake lines, callipers, and control arms. Some of these have already been done, but I need a day or two to prep and finish painting. Luckily, the suspension won't be here for a week or two, so I have a bit of time
Update #10
I had to bring the f350 up to the shop, and start getting it ready to replace basically the entire exhaust system from the manifolds, through the turbo piping, and then back to the pipe. There is a tiny little hole somewhere in the pre-turbo system that is making a squeeling sound, and dumping all over the rear main seal. I had originally thought it was a bad seal until I saw all the soot. I'll post a pick up here in the next week or so with the truck cab off the chassis.
The 4runner hasn't had much attention in the last few days as a result. I have been painting a few pieces here and there.
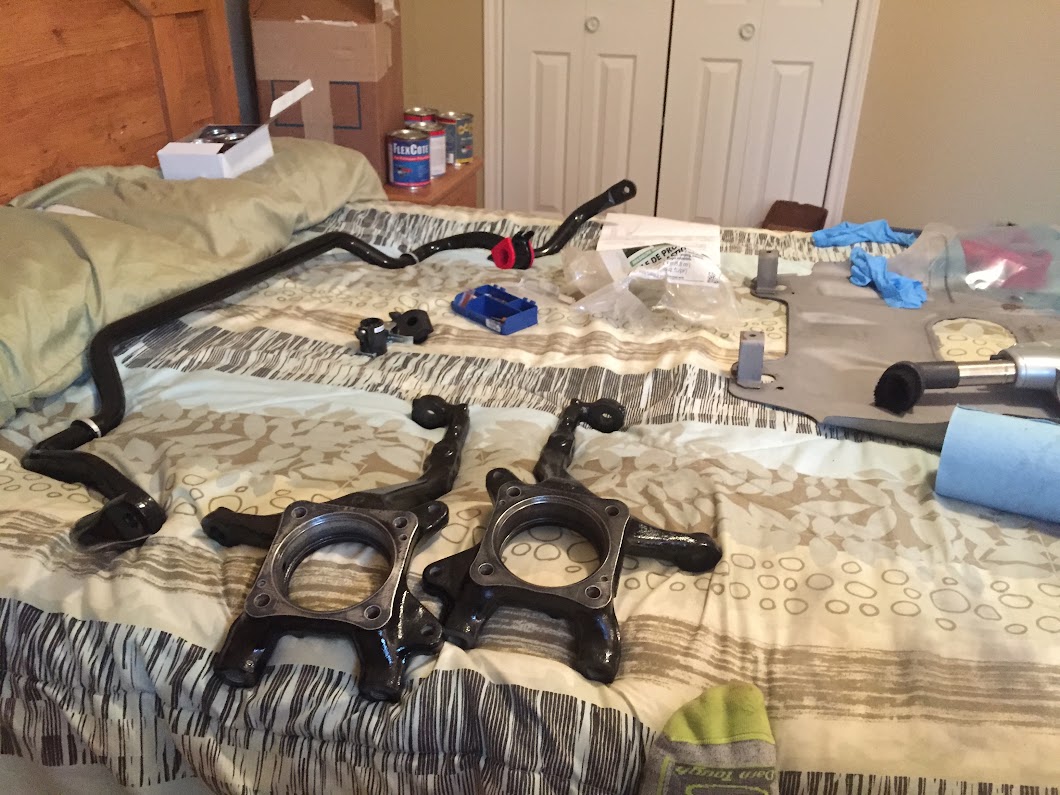
My wife walked in and said: "I think you need a shop".

I used some of the POR15 aluminium on some pieces, and actually like it a lot better than the metal mask. Much easier to work with, but again, not as nice as the rust protection paint.

Cleaned and painted a few of the rough surfaces on the wheel bearing assemblies. Because these are consumables I wasn't that worried about them.
I had thought to do a little write-up on derusting / and dressing bolts / nuts / hardware - but I ran into a little snag.

That's the axle hub nut - for torque at 235ft/lb's. Minor rust, easily removed with an acid bath / zinc phosphate dressing bath.

Toxic slurry.
Some of the pieces I left in the overnight bath actually deposited some of the salt in solution onto the metal. I guess because I hadn't been judicious and had dissimilar metals in the same bath.... (dissimilar meaning more vs. less noble) and ended up with galvanic corrosion / salt deposition as would happen in a battery. Unfortunately I had a few hard to get parts in the bath, and now I've gotta find a supplier to replace them.
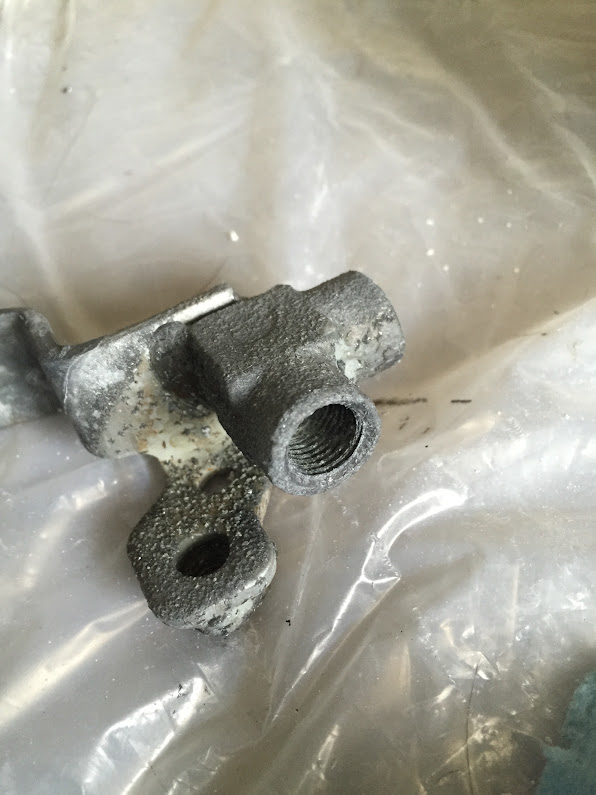
The salt is basically impossible to get off the female threads, so these pieces (brake line elbow female female) are now unusable.
TLDR: don't put dissimilar metals into an acid bath with sufficient salts in solution as would allow autocatalytic (not sure if that is the correct term here) salt deposition.
I also got some other pieces that rather than being in any way functional are just fun.

Faster shift nob.

I figured I would while waiting for suspension parts - clean up a little in the engine bay. There are lots of extra little holes in and around that either made manufacture a bit easier, or more generalized for different hardware in different markets. It might not be that necessary to cover them up - because dust etc, will make it's way in all over the place, but at least some of the overspray might not get up and drain into places where it might otherwise make it dirty inside. Aluminum tape might not be the best idea either give the characteristics of dissimilar metal on metal action - but hopefully the aluminum could be the sacrificial donor here? I'm sure it will end up working the other way... In any case it looks a lot better here than it did before, and when I'm ready to reroute stuff for relays / etc. - it should be a little easier to keep tidy. And for anyone wondering if the tacoma TRD pro oil cap fits our v6's - well yes it does. I might actually retrofit the the oil filler tower, and clean up some of the other pieces that show rust in the area.
The Boss 2.5 series apparently shipped out of toytec last thursday, will make it to my dealer this week, and should hit me next week. Not sure it will be installed by the time I leave town in early September (won't be back until November sometime), so fingers crossed. I still have the other setup sitting here, but think I might have missed the window to send it back. Maybe I should just run that stuff during the winter, and save the boss setup for summer fun.
I had to bring the f350 up to the shop, and start getting it ready to replace basically the entire exhaust system from the manifolds, through the turbo piping, and then back to the pipe. There is a tiny little hole somewhere in the pre-turbo system that is making a squeeling sound, and dumping all over the rear main seal. I had originally thought it was a bad seal until I saw all the soot. I'll post a pick up here in the next week or so with the truck cab off the chassis.
The 4runner hasn't had much attention in the last few days as a result. I have been painting a few pieces here and there.
My wife walked in and said: "I think you need a shop".
I used some of the POR15 aluminium on some pieces, and actually like it a lot better than the metal mask. Much easier to work with, but again, not as nice as the rust protection paint.
Cleaned and painted a few of the rough surfaces on the wheel bearing assemblies. Because these are consumables I wasn't that worried about them.
I had thought to do a little write-up on derusting / and dressing bolts / nuts / hardware - but I ran into a little snag.
That's the axle hub nut - for torque at 235ft/lb's. Minor rust, easily removed with an acid bath / zinc phosphate dressing bath.
Toxic slurry.
Some of the pieces I left in the overnight bath actually deposited some of the salt in solution onto the metal. I guess because I hadn't been judicious and had dissimilar metals in the same bath.... (dissimilar meaning more vs. less noble) and ended up with galvanic corrosion / salt deposition as would happen in a battery. Unfortunately I had a few hard to get parts in the bath, and now I've gotta find a supplier to replace them.
The salt is basically impossible to get off the female threads, so these pieces (brake line elbow female female) are now unusable.
TLDR: don't put dissimilar metals into an acid bath with sufficient salts in solution as would allow autocatalytic (not sure if that is the correct term here) salt deposition.
I also got some other pieces that rather than being in any way functional are just fun.
Faster shift nob.
I figured I would while waiting for suspension parts - clean up a little in the engine bay. There are lots of extra little holes in and around that either made manufacture a bit easier, or more generalized for different hardware in different markets. It might not be that necessary to cover them up - because dust etc, will make it's way in all over the place, but at least some of the overspray might not get up and drain into places where it might otherwise make it dirty inside. Aluminum tape might not be the best idea either give the characteristics of dissimilar metal on metal action - but hopefully the aluminum could be the sacrificial donor here? I'm sure it will end up working the other way... In any case it looks a lot better here than it did before, and when I'm ready to reroute stuff for relays / etc. - it should be a little easier to keep tidy. And for anyone wondering if the tacoma TRD pro oil cap fits our v6's - well yes it does. I might actually retrofit the the oil filler tower, and clean up some of the other pieces that show rust in the area.
The Boss 2.5 series apparently shipped out of toytec last thursday, will make it to my dealer this week, and should hit me next week. Not sure it will be installed by the time I leave town in early September (won't be back until November sometime), so fingers crossed. I still have the other setup sitting here, but think I might have missed the window to send it back. Maybe I should just run that stuff during the winter, and save the boss setup for summer fun.
I just got word from my dealer: Toytec Boss 2.5 series with total chaos uca's, 1" body lift, diff drop, and extended brake lines inbound. Should be here late next week. I have only a few days to get it installed before I have to roll out for a few months... But I'm pumped.
Winter will be for bumpers and armour if we end up keeping this rig. I really like the addicted off-road stuff, and want to either use those or fab up something similar in the shop. I don't really have much experience with big welding projects, but I'm up to learn. I have the tools and the space, and a few guys handy if I need to make up some jigs. I may end up trading the f350 in on a new truck / suv, which could include a bunch of different options.
I really like working on the Toyota, and really dislike working on the ford. Cab off tomorrow. Hasn't been done in our hobby shop yet so kinda looking forward to it
Winter will be for bumpers and armour if we end up keeping this rig. I really like the addicted off-road stuff, and want to either use those or fab up something similar in the shop. I don't really have much experience with big welding projects, but I'm up to learn. I have the tools and the space, and a few guys handy if I need to make up some jigs. I may end up trading the f350 in on a new truck / suv, which could include a bunch of different options.
I really like working on the Toyota, and really dislike working on the ford. Cab off tomorrow. Hasn't been done in our hobby shop yet so kinda looking forward to it
In spite of the off topic nature - because I said I would post a few pics of the cab off the f350 - here they are.

Felt pretty cool to actually get to this point.

Lots of exhaust gases going in lots of different directions on this thing.

There is about a foot before the safety tripline on the top of the lift. I still hit my head on the lift arms a few times today.

All this work to put 2 relatively small boxes of parts on the truck. They pack everything so tight - there is no room to do anything without lifting off the cab. Luckily they made it pretty straight forward. I should be able to get the cab off in about 3 - 4 hours at the next go.
Thursday next week, I have the new lift for the toyota coming, so I should have a chance to install that and get it running. It's been off the road for a while, and it will feel good to get a few miles back on the odometer
Felt pretty cool to actually get to this point.
Lots of exhaust gases going in lots of different directions on this thing.
There is about a foot before the safety tripline on the top of the lift. I still hit my head on the lift arms a few times today.
All this work to put 2 relatively small boxes of parts on the truck. They pack everything so tight - there is no room to do anything without lifting off the cab. Luckily they made it pretty straight forward. I should be able to get the cab off in about 3 - 4 hours at the next go.
Thursday next week, I have the new lift for the toyota coming, so I should have a chance to install that and get it running. It's been off the road for a while, and it will feel good to get a few miles back on the odometer
A close look at some of the pieces on the ford: Both turbos need to be replaced, and the exhaust headers have a sheared off bolt from the previous owner. At the very least need to remove the headers, and tap out the bolt. Means I gotta raise the engine, and get at it from below. New turbos are about 3k - and another week or so before they get here. Headers, gaskets, taps, drill bits, easy outs, oil for an oil change, bolts, body bolts, some other seals for the power steering lines, oil filters, antifreeze, and a few other odds and ends places the repair bill on the bloody thing (doing the work myself) - at $8850. I may not have a chance to get everything done until I get back in November, so it will likely sit limping in the shop.
I just checked on a few other pieces for the 4runner, and one absolutely critical junction line, might not get here in time before I go. Truthfully I should have ordered it a few weeks ago - but - somehow I forgot and got busy. The 4runner may also sit, limped in the shop until november. Bunk.
I just checked on a few other pieces for the 4runner, and one absolutely critical junction line, might not get here in time before I go. Truthfully I should have ordered it a few weeks ago - but - somehow I forgot and got busy. The 4runner may also sit, limped in the shop until november. Bunk.
Update #11
In total, 3 of the header bolts sheared off in their receptacles. 1 had been sheared off for likely as long as I've owned the truck, b/c the previous owner put 2 exhaust manifold gaskets behind it

In any case, I think this is the spot that experiences the most heat, and therefore stresses the bolts the most. I sheared one bolt on the other side in the same spot.

It took about 3 hours to get to this point. One sheared off bolt from the motor, with no damage to the head. I actually broke off a titanium 1/16" drill bit inside which made it ridiculously harder than it could have been. Then I broke off a stone from a dremel, and finally, broke off a 5 sided easy out. When this finally came free... it was worth it.
I've been painting the toyota pieces in the off time; which admittedly isn't much. Still - making some progress.

Here is the brake covers, and the hangers for the brake lines and ABS sensor lines. I ended up going with the aluminium grey, which although being a bit more difficult to work with seems to hold its consistency much better than the metal mask. I didn't paint the contact surfaces of the dust covers - because the aluminium engine paint is nowhere near as hard as as the rust protection paint. Anything that is under a higher compression load - I either left without paint (as for ball joints and castle nuts) - or with a very light stain with the rust protection paint.

Mock-up fitting on the spindles - they fit very snug I need obviously to put the dust covers in place. I'll leave the final torquing until I've got everything installed on the vehicle. You can also see the first coat on the skid plates beneath.
I was feeling a bit defeated by the ford this week. I think once I get the other bolts out (fairly common with exhaust headers I'm taken to understand) - I'll be ready to go with the new turbos, and install all of the exhaust, and then hopefully put the body back down and fire it up. If everything works - I'll be stunned.
In total, 3 of the header bolts sheared off in their receptacles. 1 had been sheared off for likely as long as I've owned the truck, b/c the previous owner put 2 exhaust manifold gaskets behind it
In any case, I think this is the spot that experiences the most heat, and therefore stresses the bolts the most. I sheared one bolt on the other side in the same spot.
It took about 3 hours to get to this point. One sheared off bolt from the motor, with no damage to the head. I actually broke off a titanium 1/16" drill bit inside which made it ridiculously harder than it could have been. Then I broke off a stone from a dremel, and finally, broke off a 5 sided easy out. When this finally came free... it was worth it.
I've been painting the toyota pieces in the off time; which admittedly isn't much. Still - making some progress.
Here is the brake covers, and the hangers for the brake lines and ABS sensor lines. I ended up going with the aluminium grey, which although being a bit more difficult to work with seems to hold its consistency much better than the metal mask. I didn't paint the contact surfaces of the dust covers - because the aluminium engine paint is nowhere near as hard as as the rust protection paint. Anything that is under a higher compression load - I either left without paint (as for ball joints and castle nuts) - or with a very light stain with the rust protection paint.
Mock-up fitting on the spindles - they fit very snug
I need obviously to put the dust covers in place. I'll leave the final torquing until I've got everything installed on the vehicle. You can also see the first coat on the skid plates beneath.I was feeling a bit defeated by the ford this week. I think once I get the other bolts out (fairly common with exhaust headers I'm taken to understand) - I'll be ready to go with the new turbos, and install all of the exhaust, and then hopefully put the body back down and fire it up. If everything works - I'll be stunned.
$8850 is quite the surprise repair bill, ouch!
Great thread. Very thorough work and some education for the uninformed - like me.
Can you share what products you use to de-rust and clean up your bolts?
You mention an acid bath and a zinc something or other...
Sorry to see the galvanic action. To avoid that I'll probably do one little bolt at a time, or several small baths unless you have other ideas.
Great thread. Very thorough work and some education for the uninformed - like me.
Can you share what products you use to de-rust and clean up your bolts?
You mention an acid bath and a zinc something or other...
Sorry to see the galvanic action. To avoid that I'll probably do one little bolt at a time, or several small baths unless you have other ideas.
Hey there [MENTION=115474]eviele[/MENTION],
I've been using a combination of straight phosphoric acid, and zinc phosphate. I think you're right in doing the pieces separately which will be on my practice the next go when I tackle the rear end restoration. I'll Kiley pull and rebuild the rear
Axle, as I have a few pieces broken there and the emergency brake is kaput.
I've been toying with the idea of electro plating and may set something up in November. It's a pretty simple process, I just need a decent power supply that I can dial in.
The repair bill is mental. It takes seriously 2-5x as much money to own a diesel ford than any other vehicle. An oil change takes 15 litres, oil filters are 90 dollars, fuel filters are even more. It holds 25 litres of coolant and that stuff is almost 30 dollars a jug (takes 6). I'm kinda sick of it, but I'll never make this thing financially reasonable. Selling it at a huuuuge loss is cheaper than keeping and maintaining it.
I've been using a combination of straight phosphoric acid, and zinc phosphate. I think you're right in doing the pieces separately which will be on my practice the next go when I tackle the rear end restoration. I'll Kiley pull and rebuild the rear
Axle, as I have a few pieces broken there and the emergency brake is kaput.
I've been toying with the idea of electro plating and may set something up in November. It's a pretty simple process, I just need a decent power supply that I can dial in.
The repair bill is mental. It takes seriously 2-5x as much money to own a diesel ford than any other vehicle. An oil change takes 15 litres, oil filters are 90 dollars, fuel filters are even more. It holds 25 litres of coolant and that stuff is almost 30 dollars a jug (takes 6). I'm kinda sick of it, but I'll never make this thing financially reasonable. Selling it at a huuuuge loss is cheaper than keeping and maintaining it.
Last edited:
Update #12
Eventful past few days. Got all of the sheared off exhaust manifold bolts out. Needed to tap the left rear most bolt up to 3/8" from 8mm, but otherwise went pretty well.
Had a huge run around with the local ford shop - was lied to on many occasions about where parts were (ex: me "hey did those parts show up? them "no they are on the truck as we speak", me "oh ok, I just talked to the supplier and they said that they put in on the plane yesterday" - them "oh, yeah, yeah it's on the plane as we speak" me "oh, ok, I just talked to the shipping company, and they said they have the parts up at the airport and they've been there since they were unloaded last night" them "oh, yeah, yep, we are sending a guy up to get them right now" me "oh, ok, could you call me before you guys go home for the long weekend, so that I have a chance to instal them this weekend? I paid extra to have them here so I could do that" them "yep, sure I'll call you myself before I go home" me "cool". I showed up at the shop at 4:30pm, and nobody was there...
I don't honestly understand how a business can run like this, and I'll be sitting down with either the owner or senior manager next week to discuss this. I don't really care if anything happens as a result, but if it was my business I would sure like to hear if this is the way my customers are being treated.
In any case, still waiting for parts, but had a few fun moments last night. I was pulling the turbos off the top of the motor, and the locating pins that centre the turbos onto the top plate were totally seized. I had like 3-400 psi on the plate and it wouldn't budge. I grabbed the engine hoist, and was unloading the shocks I was pulling on the damn things so hard. I then grabbed a breaker bar and gave it a quick nudge while it was under pressure on the hoist.... lesson learned. The turbos (weighing upwards of 200 pounds for the set, basically exploded off of the top of the motor. One hit the underside of the raised cab and put a dent in the firewall, the other landed square on top of the motor after it bobbed straight up and damaged a bunch of the high pressure fuel system, and then rolled over and took out the transmission speed sensor. Thankfully nobody was hurt.

One of the turbos came to rest here.

Sheared off transmission speed sensor.

Some of the damaged high pressure lines. Notice also the soot all over the place. The turbos have a junction that wasn't bolted together for some reason...

No bolts? Not sure why these aren't intact, but the consequence was that exhaust gases escaped through the junction and spilled all over the top of the motor, leaving a thick black residue that tracked all over the place, even to the rear main seal. It looks as though there was more going on here than I originally thought.

The oil seals on the low pressure turbo must have blown... this is the low pressure air entry port u-pipe. there shouldn't be any oil anywhere near here, as there is only clean air coming from the airbox (i.e.: no recirculated exhaust gas at this point in the intake system). New turbos on the way will fix this.
In news that is back on topic.... my Toytec Boss Series 2.5 system has arrived.

I think they could have gotten away with a bit less robust packaging, there are still pieces of cardboard in one piece?
Tomorrow... will be a very fine day indeed.
Eventful past few days. Got all of the sheared off exhaust manifold bolts out. Needed to tap the left rear most bolt up to 3/8" from 8mm, but otherwise went pretty well.
Had a huge run around with the local ford shop - was lied to on many occasions about where parts were (ex: me "hey did those parts show up? them "no they are on the truck as we speak", me "oh ok, I just talked to the supplier and they said that they put in on the plane yesterday" - them "oh, yeah, yeah it's on the plane as we speak" me "oh, ok, I just talked to the shipping company, and they said they have the parts up at the airport and they've been there since they were unloaded last night" them "oh, yeah, yep, we are sending a guy up to get them right now" me "oh, ok, could you call me before you guys go home for the long weekend, so that I have a chance to instal them this weekend? I paid extra to have them here so I could do that" them "yep, sure I'll call you myself before I go home" me "cool". I showed up at the shop at 4:30pm, and nobody was there...
I don't honestly understand how a business can run like this, and I'll be sitting down with either the owner or senior manager next week to discuss this. I don't really care if anything happens as a result, but if it was my business I would sure like to hear if this is the way my customers are being treated.
In any case, still waiting for parts, but had a few fun moments last night. I was pulling the turbos off the top of the motor, and the locating pins that centre the turbos onto the top plate were totally seized. I had like 3-400 psi on the plate and it wouldn't budge. I grabbed the engine hoist, and was unloading the shocks I was pulling on the damn things so hard. I then grabbed a breaker bar and gave it a quick nudge while it was under pressure on the hoist.... lesson learned. The turbos (weighing upwards of 200 pounds for the set, basically exploded off of the top of the motor. One hit the underside of the raised cab and put a dent in the firewall, the other landed square on top of the motor after it bobbed straight up and damaged a bunch of the high pressure fuel system, and then rolled over and took out the transmission speed sensor. Thankfully nobody was hurt.
One of the turbos came to rest here.
Sheared off transmission speed sensor.
Some of the damaged high pressure lines. Notice also the soot all over the place. The turbos have a junction that wasn't bolted together for some reason...
No bolts? Not sure why these aren't intact, but the consequence was that exhaust gases escaped through the junction and spilled all over the top of the motor, leaving a thick black residue that tracked all over the place, even to the rear main seal. It looks as though there was more going on here than I originally thought.
The oil seals on the low pressure turbo must have blown... this is the low pressure air entry port u-pipe. there shouldn't be any oil anywhere near here, as there is only clean air coming from the airbox (i.e.: no recirculated exhaust gas at this point in the intake system). New turbos on the way will fix this.
In news that is back on topic.... my Toytec Boss Series 2.5 system has arrived.
I think they could have gotten away with a bit less robust packaging, there are still pieces of cardboard in one piece?
Tomorrow... will be a very fine day indeed.
Last edited:

wyanrard
New member
Where are the replica arms made? China? Pay shit, get shit. Period.
Actually, the company is located in California, about 30 minutes from Camburg themselves. So I'll take my chances for now, on a college budget. If you're interested, theres pictures of them and install info in my build thread.
Update #13
Ok, the Ford is off the hook for the next 2 months. I spent all that time getting the manifold bolts out, and one of the holes had just a few threads left. I thought it might be ok, so I gave it a shot with the manifold in place, and the bolt spun.
Sooooo, I tapped it out to the next size, as I did on the other side - to a 3/8 inch on 16 pitch, (with a nominal drill size of 5/16). Things were going well. Then I snapped off the tap in the hole. Shit. So I hit it with a drift a few times (to shatter the tap - as tap's are hard but brittle), and had this feeling in the back of my head, like "maybe I shouldn't hit it too hard in case it runs through the back side of the bolt hole, and into the water jacket.... (lots of those on the 6.4l heads) - and wouldn't you know it - did that very thing on the next tap with the hammer. Ruined the head, and send metal bits into the cooling system. I'll need to completely tear down and rebuild the motor the make sure all the gunk is out... I guess the alternative is to use a captured helicoil and flush the coolant like crazy and hope for the best. Ugh. I was so bummed about it earlier today that I had to call my dad. :/
By the time I had made the decision to put the Ford on hold for the next few months, lower the cab back onto the frame and clean up my workspace, it was already 9pm. An entire day wasted, and potentially, another huge, huuuuge expenditure. If I am going to rebuild this motor, I'm not going to leave any parts with 300k on them. If that's the case, I might as well buy a new long block. Then, I'm spending 20k on a truck that is only worth 15. If I just part it and walk away - I'm out about the same, so the value is better if I just keep it forever.
To make myself feel a bit better, I did this;

There are a few extra parts (Rancho) here for comparison, but they don't really hold up to the toytec (sway-away) stuff. There are more parts, (many more) waiting to go on the 4runner, but these are just the few I had time to put out for the few minutes before I had to pick my wife up from work.

The shock bodies are massive on these things, and the coils are slightly narrower than on a stock setup. The billet aluminium is quite nice to look at.

That's the Rancho quick lift setup on the left, and the Toytec Boss 2.5 series on the right. They are different lengths at present - Toytec suggested they were setup with 2.5" lift from the box, so they must have vastly different spring rates. The shock bodies are also quite obviously different diameters here. The ranchos have bushings on top and bottom, while the Toytec kit has heim joints top and bottom with no bushings. The rancho does have an adjustment for valving with 9 different positions, but there is no ride height adjustability. The Toltec's have an air bleeder to increase or decrease (damping vs. rebound?), and obviously the threaded body to allow height adjustability. Another obvious difference, the shock body is on the top of the shock on the Toytec, vs. the bottom of the Rancho.

It says Toytec Boss here...

And Swayaway on the spring. Also - 650b spring rate.

The quality is quite apparent in comparison close-up. There isn't really a fair fight comparing well machined / cast anodized aluminium with spray painted rancho, but I have never installed the rancho - so won't be able to comment on ride.

Another look at the shock body diameter difference between the two.

A shot at the upper mounts. The difference in the diameter of the coil is apparent here as well.

Here is a comparison of the shock bodies for the rear shocks. Interestingly the rancho 9000xl's are the same diameter as the Toytec Shocks.

Thought I'd throw a last little shot of the Total Chaos UCA's here. I had thought to go light racing at first, but in the end got a reasonable deal on the Total Chaos Arms, and will give them a try for the time being. I hear a lot of complaints about the squeaking, and wear on the uniballs, but I'm not really sure what to make of that. I'll have to just find out I guess.
Ok, the Ford is off the hook for the next 2 months. I spent all that time getting the manifold bolts out, and one of the holes had just a few threads left. I thought it might be ok, so I gave it a shot with the manifold in place, and the bolt spun.
Sooooo, I tapped it out to the next size, as I did on the other side - to a 3/8 inch on 16 pitch, (with a nominal drill size of 5/16). Things were going well. Then I snapped off the tap in the hole. Shit. So I hit it with a drift a few times (to shatter the tap - as tap's are hard but brittle), and had this feeling in the back of my head, like "maybe I shouldn't hit it too hard in case it runs through the back side of the bolt hole, and into the water jacket.... (lots of those on the 6.4l heads) - and wouldn't you know it - did that very thing on the next tap with the hammer. Ruined the head, and send metal bits into the cooling system. I'll need to completely tear down and rebuild the motor the make sure all the gunk is out... I guess the alternative is to use a captured helicoil and flush the coolant like crazy and hope for the best. Ugh. I was so bummed about it earlier today that I had to call my dad. :/
By the time I had made the decision to put the Ford on hold for the next few months, lower the cab back onto the frame and clean up my workspace, it was already 9pm. An entire day wasted, and potentially, another huge, huuuuge expenditure. If I am going to rebuild this motor, I'm not going to leave any parts with 300k on them. If that's the case, I might as well buy a new long block. Then, I'm spending 20k on a truck that is only worth 15. If I just part it and walk away - I'm out about the same, so the value is better if I just keep it forever.
To make myself feel a bit better, I did this;
There are a few extra parts (Rancho) here for comparison, but they don't really hold up to the toytec (sway-away) stuff. There are more parts, (many more) waiting to go on the 4runner, but these are just the few I had time to put out for the few minutes before I had to pick my wife up from work.
The shock bodies are massive on these things, and the coils are slightly narrower than on a stock setup. The billet aluminium is quite nice to look at.
That's the Rancho quick lift setup on the left, and the Toytec Boss 2.5 series on the right. They are different lengths at present - Toytec suggested they were setup with 2.5" lift from the box, so they must have vastly different spring rates. The shock bodies are also quite obviously different diameters here. The ranchos have bushings on top and bottom, while the Toytec kit has heim joints top and bottom with no bushings. The rancho does have an adjustment for valving with 9 different positions, but there is no ride height adjustability. The Toltec's have an air bleeder to increase or decrease (damping vs. rebound?), and obviously the threaded body to allow height adjustability. Another obvious difference, the shock body is on the top of the shock on the Toytec, vs. the bottom of the Rancho.
It says Toytec Boss here...
And Swayaway on the spring. Also - 650b spring rate.
The quality is quite apparent in comparison close-up. There isn't really a fair fight comparing well machined / cast anodized aluminium with spray painted rancho, but I have never installed the rancho - so won't be able to comment on ride.
Another look at the shock body diameter difference between the two.
A shot at the upper mounts. The difference in the diameter of the coil is apparent here as well.
Here is a comparison of the shock bodies for the rear shocks. Interestingly the rancho 9000xl's are the same diameter as the Toytec Shocks.
Thought I'd throw a last little shot of the Total Chaos UCA's here. I had thought to go light racing at first, but in the end got a reasonable deal on the Total Chaos Arms, and will give them a try for the time being. I hear a lot of complaints about the squeaking, and wear on the uniballs, but I'm not really sure what to make of that. I'll have to just find out I guess.
Last edited:
Similar threads

- Replies
- 3
- Views
- 2K


