What goes wrong with license plate lights?

JamieG

New member
What goes wrong with license plate lights?

1. I can't register my 4Runner until I pass the California DMV Brake & Lamp Inspection
2. I failed due to a few things, one of which was license plate lights
3. What normally goes wrong with the license plate lights & how did you debug?

a. I already replaced both bulbs with brand new Sylvania T194 bulbs
b. All fuses are good in the engine bay & under the driver side left dash
c. All outside lights work, including the tail lamps

The license plate light almost certainly is wired to the tail lamp wires so it's not surprising that the fuses are good.
Either the license plate light ground is bad or the license plate light power is bad.

But when I checked power from each lead to the license plate screw, there was nothing.
Likewise when I checked the resistance between the license plate screw and the two leads, there was 700Kohms (which makes no sense unless it's just a terrible ground point.)
It's really hard to find a good ground within the three feet of the leads of a DMM though.

(It's parked around the block so in the morning I'll wire a ground from the battery to test again because those results are strange.)

I need to debug from the point that the license plate light wires branch off the tail lamp wires to the bulbs (which are in parallel) and then to ground.

Have you ever had to debug the license plate lights?
Do you have any idea WHERE the wires meet the tail lamp wires?

In the door perhaps?
Do I access that junction of the tail lamp wires to the license plate wires from the outside or by removing the door inside trim?

Or is that junction of the tail lamp wires and license plate wires NOT in the door but in the interior of the 4Runner somehow?

Any hints to focus my debugging efforts would be appreciated as these little bulbs are holding up my registration.
 
Last edited:
Register to hide this ad
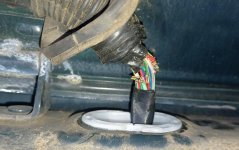
Check the wiring inside the rubber boot at the top of the hatch? After flexing so many times for so many years, it is not uncommon for breakage there...
Does the rear window & wiper work? Can you roll the rear window down with the key in the hatch? In other words, do other electrical things to do with the hatch work?
The plastic interior panel comes off pretty easily and then remove the large metal panel held on with several 10's. All the hatch wiring connectors and a "black box" are clipped to the inside of that metal panel. Should be a breeze from there to trace power/ground for the license plate lights.
 
Check the wiring inside the rubber boot at the top of the hatch?

Good catch. Thanks. You were right.
Almost half of the (20 gauge?) wires were broken!

The removal process was just as you said it would be.
1. With the key out of the ignition (so as to not short anything out)
2. I pried up the bottom half of the rubber boot and saw the frayed wires
3. With a small flathead I pried up the white plastic escutcheon
4. I did the same on the top half boot & white escutcheon for more room
5. I sliced the loom in half lengthwise (also for more room)
6. With a small screwdriver I pried off the rear lamp clear plate
7. Under that was four phillips head screws which I removed
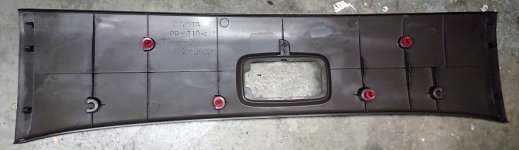
8. Only then could I pry off the interior foot-wide crosswise cover panel
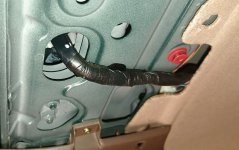
9. I think the harness stops near there at two large connector blocks
10. Although I don't know yet how the harness loops through the hatch

Is it worth it to just buy the rear hatch harness loom or would you splice half the wires?
 

Attachments

  • loom.jpg
    loom.jpg
    107.7 KB · Views: 2,347
  • cover.jpg
    cover.jpg
    46 KB · Views: 2,359
  • harness.jpg
    harness.jpg
    117.9 KB · Views: 2,438
Is it worth it to just buy the rear hatch harness loom or would you splice half the wires?

I think you're going to find that if you go the splice route, you'll actually have to make at least two splices per wire. That's because if you attempt to splice where the wires are currently broken, you'll end up with a wad of butt connectors right were the harness needs to flex. As you might guess, that's not going to end well.

Staying on the splice theme, that would mean you need to (somehow) have a virgin length of wire at the flex point for each broken wire. That would require an upstream splice to a new section of wire, followed by a downstream splice. That's an awful lot of work that will add a decent amount of resistance. Oh, and you really should replace the unbroken wires too since they're probably not far behind on breaking.

One other thought. Are you sure that friction really caused the breakages? It almost looks like something got in there and was nibbling on them. Mice can get in some really weird and cramped spots. Just a thought.

I'd recommend either attempting to source a harness from a junkyard or biting the bullet and getting a new one.
 
I think you're going to find that if you go the splice route, you'll actually have to make at least two splices per wire. That's because if you attempt to splice where the wires are currently broken, you'll end up with a wad of butt connectors right were the harness needs to flex. As you might guess, that's not going to end well.

Staying on the splice theme, that would mean you need to (somehow) have a virgin length of wire at the flex point for each broken wire. That would require an upstream splice to a new section of wire, followed by a downstream splice. That's an awful lot of work that will add a decent amount of resistance. Oh, and you really should replace the unbroken wires too since they're probably not far behind on breaking.

One other thought. Are you sure that friction really caused the breakages? It almost looks like something got in there and was nibbling on them. Mice can get in some really weird and cramped spots. Just a thought.

I'd recommend either attempting to source a harness from a junkyard or biting the bullet and getting a new one.
This is a very common issue for 3rd gens. Even a 2002 has 20 years of flexing every time you open and close the rear hatch.
 
This is a very common issue for 3rd gens. Even a 2002 has 20 years of flexing every time you open and close the rear hatch.

Thank you for letting me know it's a common issue with 27 years of flexing at the same spot each time the hatch is opened and closed breaks the (20 gauge?) wires.

I also realize splicing can't be in the same spot as the break as the splice points have to be staggered given there's not much room in the rubber snorkel. And I realize that even the old wires need to be spliced as they've been flexing too (and some that aren't yet broken have cracked insulation so if it isn't broken there, it will be soon).

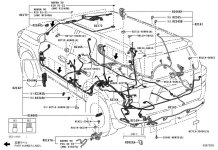
I don't have much time so I'll definitely do the splicing but longer term, I can't seem to find a part number (and price) for the wiring harness in the Toyota parts diagrams.

I don't even know if it's worth it to replace the wiring harness and snorkel since it would involve even more taking of things apart inside the door (and it may be hundreds of dollars for all I know).

Is the harness connection right there at the back of the vehicle under the roof liner (I think I see two moly type connectors there but I'm not sure as I didn't remove the entire roof panel).

(This phantom wiring isn't the right year but it's the best I could find on Google.)
 

Attachments

  • a1_826728G.jpg
    a1_826728G.jpg
    123.2 KB · Views: 2,370
Thank you for letting me know it's a common issue with 27 years of flexing at the same spot each time the hatch is opened and closed breaks the (20 gauge?) wires.

I also realize splicing can't be in the same spot as the break as the splice points have to be staggered given there's not much room in the rubber snorkel. And I realize that even the old wires need to be spliced as they've been flexing too (and some that aren't yet broken have cracked insulation so if it isn't broken there, it will be soon).

I don't have much time so I'll definitely do the splicing but longer term, I can't seem to find a part number (and price) for the wiring harness in the Toyota parts diagrams.

I don't even know if it's worth it to replace the wiring harness and snorkel since it would involve even more taking of things apart inside the door (and it may be hundreds of dollars for all I know).

Is the harness connection right there at the back of the vehicle under the roof liner (I think I see two moly type connectors there but I'm not sure as I didn't remove the entire roof panel).

(This phantom wiring isn't the right year but it's the best I could find on Google.)
I've never had to do this repair (my wiring was fine) so I have no idea where the connectors are or what harness would have that section of wires. I would guess that it's part of the hatch wiring harness, but that's just a guess. Take a look at the video in this post when you have time: Rear Hatch Wiring Fix It might have the answers to all your questions.
 
This is the harness for an '02. $273 at McGeorge.
A1_826727_82184.png


I can't find anywhere you said what year you have. A "27 year old" vehicle
would be a 2nd gen 4Runner...
 
It isn't too bad to unplug it from the vehicle up in the roof area and get enough slack to do a good repair on the harness. I keep a big box of Toyota wiring harnesses in the garage for just this purpose. I can generally match the color and gauge for each broken wire. I choose to solder and heat shrink - just make sure the soldering is in an area of the harness that doesn't flex regulary.

This also happens on the door harnesses (especially driver's door) on many cars.

-Charlie
 
I replaced mine with a new one. I’ve spliced several harnesses in the past. It’s doable, but a bit of a pain.

Harnesses always suck when they age out unfortunately.
 
Hello,

Sorry for coming in late on this. I am experiencing the same thing with my license plate lights on a 5th Gen 2017 4runner. I just replaced the bulbs with the VLEDs and they do not come on. Even replacing the stock ones are not working. Is the fix the same or could it be something else? Thanks.
 
Hello,

Sorry for coming in late on this. I am experiencing the same thing with my license plate lights on a 5th Gen 2017 4runner. I just replaced the bulbs with the VLEDs and they do not come on. Even replacing the stock ones are not working. Is the fix the same or could it be something else? Thanks.

While not as likely on a 5 year old vehicle it is still possible, it's all about how many times they have been bent cycling the hatch up and down. Material fatigue in copper happens no matter what year a vehicle is. Work hardening will get the best of basically any metal. Do you use your hatch on a more than once a day basis? I'd imagine the average driver proper uses a hatch a few times every 2-3 days or so just getting groceries. If you are opening and closing your hatch 4x more than the average user of a 20 year old vehicle than you have introduced the same amount of fatigue on the wires as is present on the 20 year old vehicle. I personally don't use my hatch THAT often and I would guess neither did any of the POs because my 98 is still perfectly running on all hatch components (that said I wouldn't be shocked if something broke tomorrow, I haven't pulled my boot to actually check the condition of the wires).
 
Last edited:

Members online

Forum statistics

Threads
278,312
Messages
3,554,089
Members
248,016
Latest member
Advally Service

Trending content

Back
Top