Kryptoroxx
New member
This was the most in depth maintenance I have done to the front end besides a water pump on my old toyota pickup. I learned a lot but if you have done a water pump you can do this also as easily. I wanted to do this maintenance but also show what's involved better than the other threads (who were very helpful BTW) I found in my quest across the forums.
Tools needed:
Hose clamps X2 (upper and lower rad hoses)
Crankshaft holder $65 bucks on amazon
Rubber bands
A plastic shopping bag or zip lock bags
An impact screwdriver
General metric sockets and wrenches
Torque wrench
A covered drip pan (if you save your coolant)
Hammer 2 lbs sledge works nicely
Parts and supplies needed:
Lc Engineering Allen head screw set for oil pump cover
Shaft seal
Oil pump cover seal
Toyota FIPG
Grease
Prep the area by dropping the skids, and getting your tools and supplies out. Some of this is going to take coordination if you work by yourself like I do.
First you're going to want to clamp and remove the upper and lower radiator hoses. Open the drain cock and drain radiator. Disconnect hoses and plug holes with rags. Remove radiator. Don't forget to set aside bolts with parts. There's a lot of them in this one. You can pull the fan shroud with it. Just remember to remove the lower part of the fan shroud or else you could break that part. There's a bracket that secures to the top of the fan shroud as well so disconnect that and flip it back over the engine. It's easier to just remove the bracket. Also run the lower radiator hose up to the top of the engine and zip tie it to something. This will keep the rest of the coolant from leaking if it's leaking.


Second take the fan out. 4 12mm nuts. Use a box wrench to brace so that you can break the nuts loose.
Next remove the rest of the belts. I snipped mine as they needed replacing anyway.
Take off the leading pulleys from the crank. It's 4 12mm bolts.
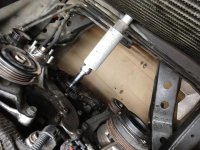
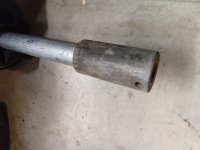
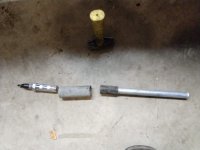
Easy so far right? Now it's time for that special tool. You will need a 1/2 inch breaker and well....make that 2. One for the tool and one for the crank bolt. I have a 31" breaker bar and I still had to put some effort into it. It is torqued to 210 lbs after all.

Remove the bolt and pulley. It should just slide out. Do not mar the backside surfaces as that is what the seal slides on. Mess it up and you need a new pulley.
Now that was easy. Now drink a beer if you're of age. Otherwise it's a coke. This is arguably the hardest part and I would beat some Japanese engineer senseless for making the oil pan over secure with Phillips head screws. You can try a cordless drill.....but about half mike stripped so attempt at your own risk.

To use a impact screwdriver you need clearence for a hammer and if you strip the heads then this will be your key to bleed rhe a/c system and remove the condenser. It will take 1 large can and 1 smaller can to recharge fully. Pretty easy to do though. More on this later.
To bleed the system slowly undo one of the 10mm bolts on the dryer. It will hiss and smell bad. Its r134 and not freon. Don't rush the bleed. Just back off. You can also rent the tools from vatozone but I didn't know this at the time. After you get done bleeding cover all of the connections to the ac system quickly with a plastic bag and rubber band it to keep dirt and moisture out of it. This is the coordination part.
Ok now use the impact on the stripped heads. Watch your knuckles. It hurts if you mess up


After that carefully pop the cover off using a seal separator or a flat head screwdriver

Replace the oil pump if you like or leave it. I replaced mine since it had 260 plus on the odo.
When replacing the shaft seal there are some very important things to remember. First is not to mar the outside of the housing. This will cause you to need a new oil pump cover. Second is to use a firm flat item to gently tap the seal in as evenly as possible. Flush with the rim is fine for this seal. Just make sure it's even. Last thing is to add some grease (a tiny bit, not even enough to cover your finger) to both the shaft and the backside of the crank pulley. This insures that the seal is not damaged when it starts rotating.

Now what I don't have pics of is putting the little ribbon seal or fipg on. My hands were filthy and you don't want to dilly dally with that stuff. Once it sets it's good but you want it to set when everything is secured. I added fipg on the core all the way around for security. I also added fipg to the ribbon seal so it would stick in the channel more easily.
When tightening your Allen head bolts stitch the pressure meaning bounce from side to side instead of one after another. Thus ensures uniform pressure and that the cover seats properly.
Now do everything in reverse order and you're done. Amazingly everything went together easily and correctly.
I refilled the coolant and added the missing oil but left the truck to sit after that over night so everything could set up. Last thing I want to do is this seal again.
Tools needed:
Hose clamps X2 (upper and lower rad hoses)
Crankshaft holder $65 bucks on amazon
Rubber bands
A plastic shopping bag or zip lock bags
An impact screwdriver
General metric sockets and wrenches
Torque wrench
A covered drip pan (if you save your coolant)
Hammer 2 lbs sledge works nicely
Parts and supplies needed:
Lc Engineering Allen head screw set for oil pump cover
Shaft seal
Oil pump cover seal
Toyota FIPG
Grease
Prep the area by dropping the skids, and getting your tools and supplies out. Some of this is going to take coordination if you work by yourself like I do.
First you're going to want to clamp and remove the upper and lower radiator hoses. Open the drain cock and drain radiator. Disconnect hoses and plug holes with rags. Remove radiator. Don't forget to set aside bolts with parts. There's a lot of them in this one. You can pull the fan shroud with it. Just remember to remove the lower part of the fan shroud or else you could break that part. There's a bracket that secures to the top of the fan shroud as well so disconnect that and flip it back over the engine. It's easier to just remove the bracket. Also run the lower radiator hose up to the top of the engine and zip tie it to something. This will keep the rest of the coolant from leaking if it's leaking.
Second take the fan out. 4 12mm nuts. Use a box wrench to brace so that you can break the nuts loose.
Next remove the rest of the belts. I snipped mine as they needed replacing anyway.
Take off the leading pulleys from the crank. It's 4 12mm bolts.
Easy so far right? Now it's time for that special tool. You will need a 1/2 inch breaker and well....make that 2. One for the tool and one for the crank bolt. I have a 31" breaker bar and I still had to put some effort into it. It is torqued to 210 lbs after all.
Remove the bolt and pulley. It should just slide out. Do not mar the backside surfaces as that is what the seal slides on. Mess it up and you need a new pulley.
Now that was easy. Now drink a beer if you're of age. Otherwise it's a coke. This is arguably the hardest part and I would beat some Japanese engineer senseless for making the oil pan over secure with Phillips head screws. You can try a cordless drill.....but about half mike stripped so attempt at your own risk.
To use a impact screwdriver you need clearence for a hammer and if you strip the heads then this will be your key to bleed rhe a/c system and remove the condenser. It will take 1 large can and 1 smaller can to recharge fully. Pretty easy to do though. More on this later.
To bleed the system slowly undo one of the 10mm bolts on the dryer. It will hiss and smell bad. Its r134 and not freon. Don't rush the bleed. Just back off. You can also rent the tools from vatozone but I didn't know this at the time. After you get done bleeding cover all of the connections to the ac system quickly with a plastic bag and rubber band it to keep dirt and moisture out of it. This is the coordination part.
Ok now use the impact on the stripped heads. Watch your knuckles. It hurts if you mess up
After that carefully pop the cover off using a seal separator or a flat head screwdriver
Replace the oil pump if you like or leave it. I replaced mine since it had 260 plus on the odo.
When replacing the shaft seal there are some very important things to remember. First is not to mar the outside of the housing. This will cause you to need a new oil pump cover. Second is to use a firm flat item to gently tap the seal in as evenly as possible. Flush with the rim is fine for this seal. Just make sure it's even. Last thing is to add some grease (a tiny bit, not even enough to cover your finger) to both the shaft and the backside of the crank pulley. This insures that the seal is not damaged when it starts rotating.
Now what I don't have pics of is putting the little ribbon seal or fipg on. My hands were filthy and you don't want to dilly dally with that stuff. Once it sets it's good but you want it to set when everything is secured. I added fipg on the core all the way around for security. I also added fipg to the ribbon seal so it would stick in the channel more easily.
When tightening your Allen head bolts stitch the pressure meaning bounce from side to side instead of one after another. Thus ensures uniform pressure and that the cover seats properly.
Now do everything in reverse order and you're done. Amazingly everything went together easily and correctly.
I refilled the coolant and added the missing oil but left the truck to sit after that over night so everything could set up. Last thing I want to do is this seal again.