fihnguy
New member
Now that I am done with this post, I see that it turned out to be much longer than I was planning on, lol. Tl/dr, just another breather mod thread.
After some deliberating, I decided to take my breather out some place up high, accessible, and clean. Performance and whatever was not my concern. The main reason was simply because every time I would need to check on it, which, now that I am aware, would have been every year or so, I need to drop the spare down, get under the vehicle, etc. Plus, it is just not the best spot for a breather because of where I live: all the mud and snow and other potentially unpleasant things for the vehicle. Thus, the decision was made to bring it up and forget about it.
After looking at a few threads, I knew I was not going to pull it all the way out to the front, which seemed to be more work than I was willing to do. I also knew I don't want it in my gas cap space because that space is fairly limited and I don't really want to see anything there but my gas cap every time I fill up. So I went ahead and started poking around the back. Jack compartment was eliminated as an option because it is still a space with a fair amount of use (I always use my original lug wrench when I take a wheel off) and I don't really need any hoses and whatnot being on the way there. I finally settled on the tail light "compartment": easily accessible, clean (don't mind the dust in the photos), yet never really used for anything:
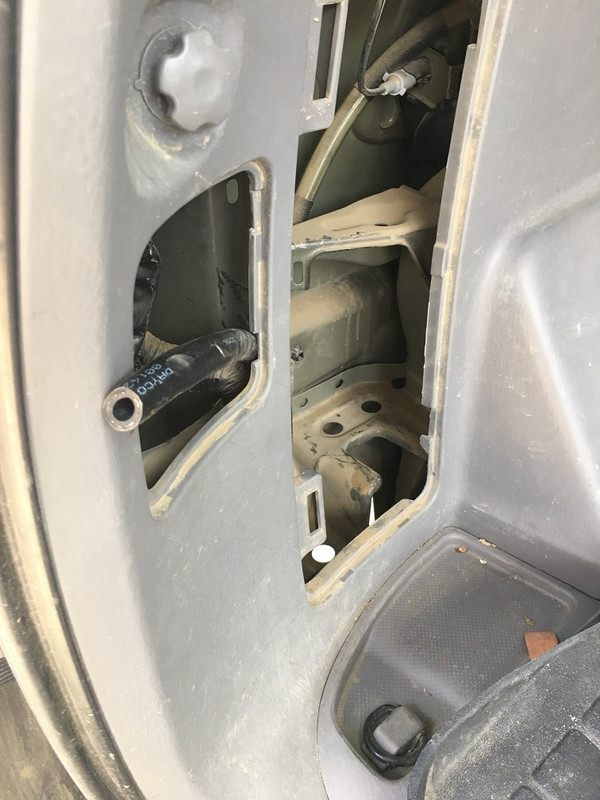
Here it is shown with a hose already in place.
I guess I should begin with parts I had to get for the job.
First of all, I have previously decided not to bother myself with this mod and just get a new breather, so I had already purchased an original Toyota rear differential breather and had it for a few weeks now (something like 20 CAD at the dealer). I see others use the same breather as used for the front differential. I don't really know what is better or worse, but I already had this one in hands with no chance of returning it (the dealership is a couple hundred kilometers away), so I just used what I already had. Also, I am sure it does not matter what you use, as long as it works. I am sure Dorman that Rockauto sells for 6 or whatever USD will work just fine. I would go ahead and get that one, actually, if I planned ahead a little better. Maybe even just some filter instead. Or even my old breather that I cleaned up and it seemed to work as intended. All I am saying is that there are cheaper options. Anyway...
Even though there many options, I chose the original Toyota union, part number 90404-51319 (16 CAD at the dealer). There is a thread here somewhere that shows you a bunch of different unions from a variety of vehicles (here, found the post). In fact, I was going to use a brass "union" from a hardware store, which is only a couple bucks, but I could not find one with the right thread (can say I tried hard enough). Pretty sure the one for Nissan is cheaper as well. I think there is also another one for Nissan that is quite a bit wider in diameter than the one shown in the post linked above.
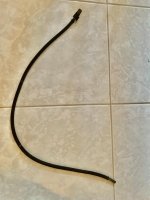
The next thing was the hose. I took the union with me and headed to a bunch of hardware stores. Ended up buying a 5/16" or 7.9 mm fuel line:
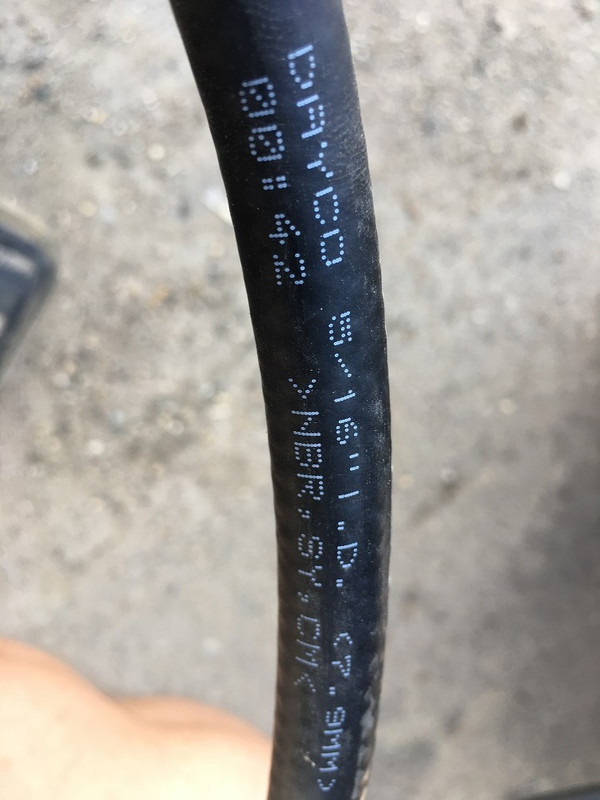
I estimated to need about 7 feet of the line. Luckily for me, I hit the end of the roll at the store and the dude gave me the remaining couple or so feet. So I ended up with about 9 feet of fuel line (cost of 9 CAD). And that is how much you should get if doing the same. You can surely cut the excess off if you have any. I did not cut any off.
I also got a couple of stainless hose clamps, which took forever for me to find. No one seemed to have stainless clamps this small. I wanted stainless for the union part of it, so I was persistent (cost of under 3 CAD).
Finally, I could not find any thread seal tape at home, so bought yet another roll (about a buck CAD).
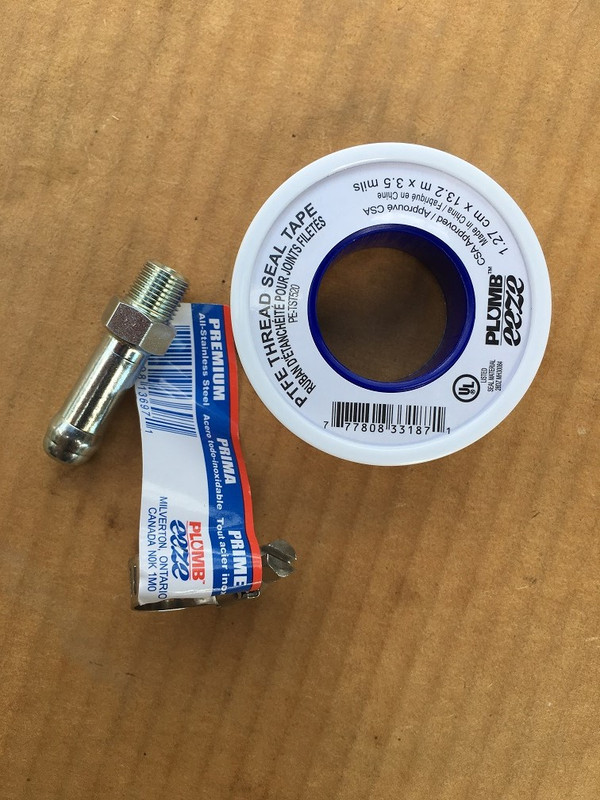
I think this is about all you need in terms of parts.
Now to what I have done.
Edit: First thing, I dropped the spare tire and took it out of the way, lol.
First thing, after finding the right spot for the breather, I took the rear bumper cover off. I did not take it off completely, but from the rear driver's side wheel to the passenger's side tail light. To do that, you need to take the mud guard off; there are quite a few bolts holding it in place. I did not take any photos of that because it really is not a rocket science. Once you are done with that part, you will see a "hiding" bolt holding the bumper:
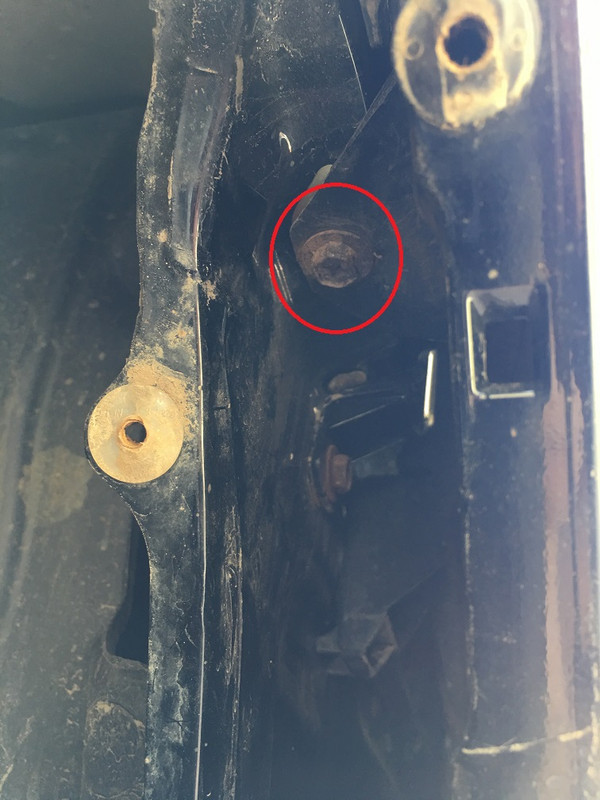
The other holes in the photo are where the mud guard was bolted on with the most right one being on the bumper cover.
There is another bolt that I did not take a photo of that is located at the bottom of the cover. You will see it once you look under the bumper: there is only one aside from the one holding the mud guard.
Additional thing that the side of the bumper cover is held in place with are three (I think) locks at the top of it. So once all the bolts are out (more bolts below), you can "bravely" pull the cover off.
Then there are bolts at the back that are visible when you open the tailgate:
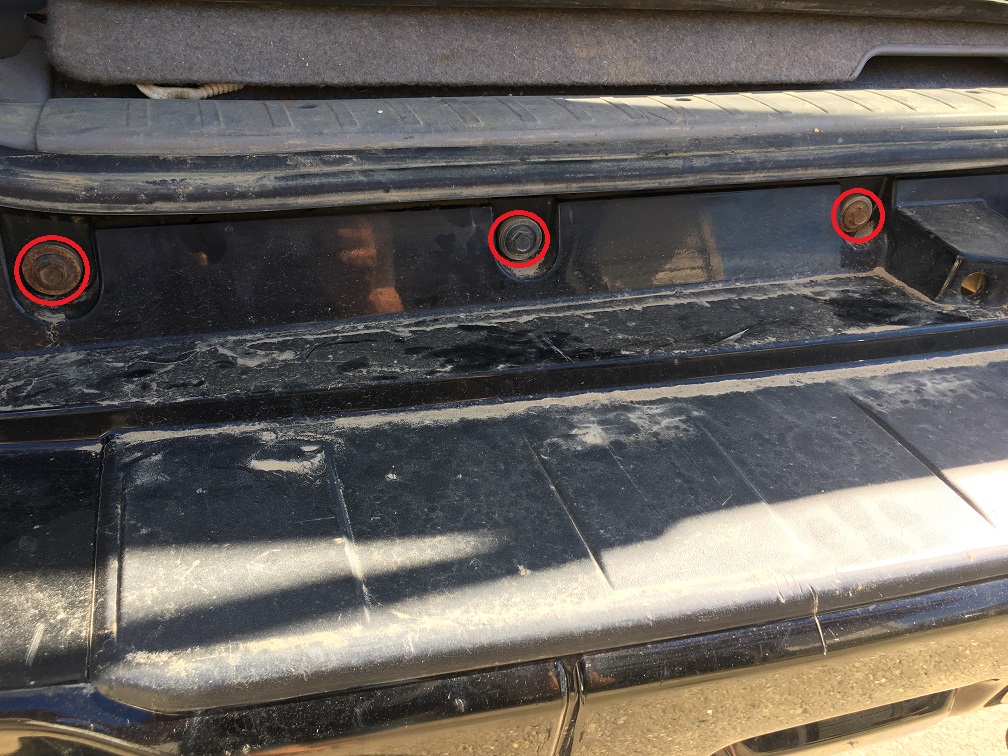
Plus three more on the other side of the latch.
There is also one of these guys on each side of the cover next to the tail lights:
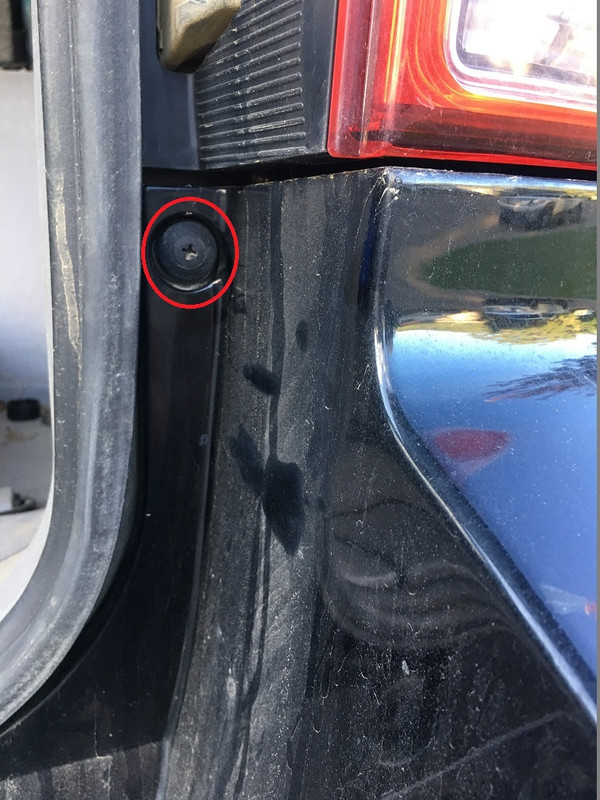
Finally, there are a couple of bolts holding the cover at the bottom, one on each side of the hitch (or where it would be if you don't have one):
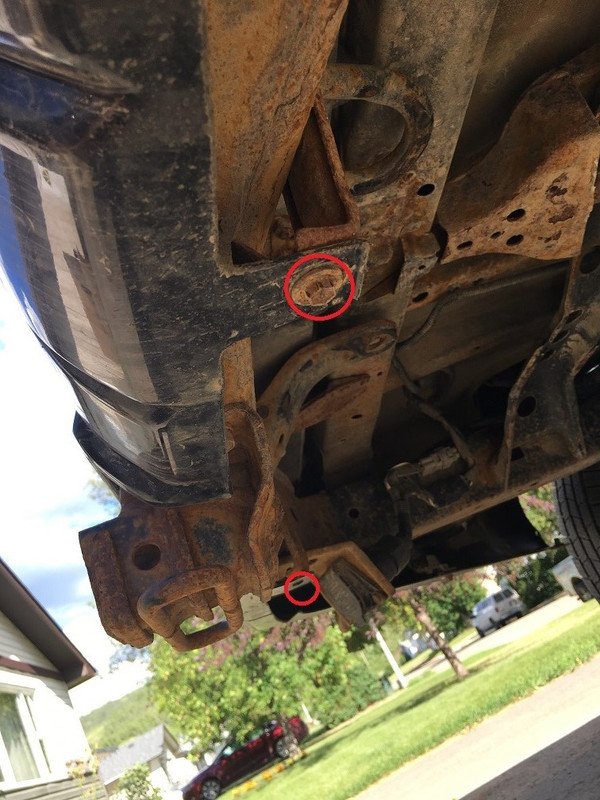
Yes, the bolt on the driver's side is apparently missing. And yes, there is LOTS of rust (and it really sucks).
Up to this point, all you needed for tools is a ratchet and a 10 mm socket.; maybe a short extension as well. I guess a Philips screwdriver for those useless plastic plugs.
Now you can pull the side of the bumper off those locks and push it a little backwards and out of the way. You don't need to go nuts and break things on the other side. You will see, you don't really need that much space. Also, you really have to push a lot to break things on the other side, so don't be scared.
Next thing is pull this guy out (quarter vent):
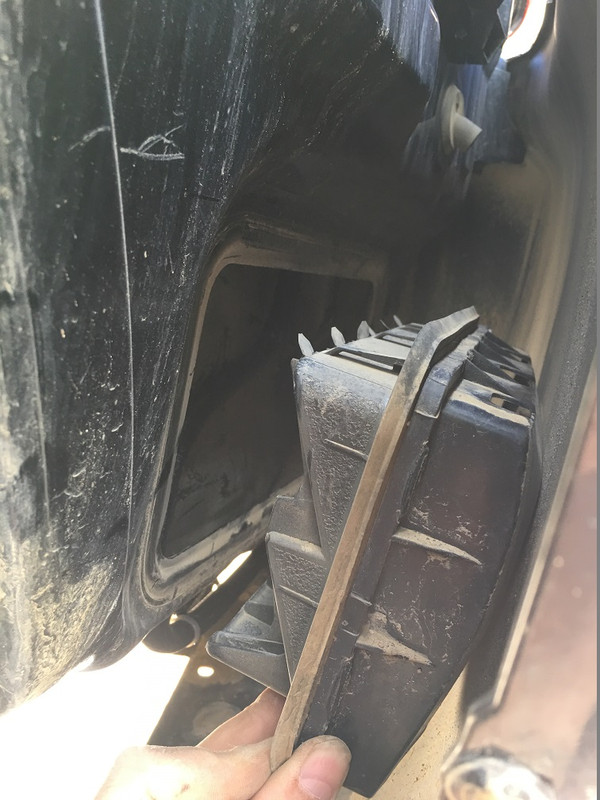
It is located on the side of the vehicle under the bumper cover (driver's side, obviously, lol). It just locks into place, no bolts or screws to turn. Might as well shake the garbage and whatever else you got there out of it. I had a few rocks and whatnot.
Almost home. The next thing is to pull the hose. I started from the top, as seen in the very first photo in this thread. It is definitely better to pull from the top because you can just leave how much you think you need and then decide how much to chop off if any at the bottom. So here is how I pulled it:
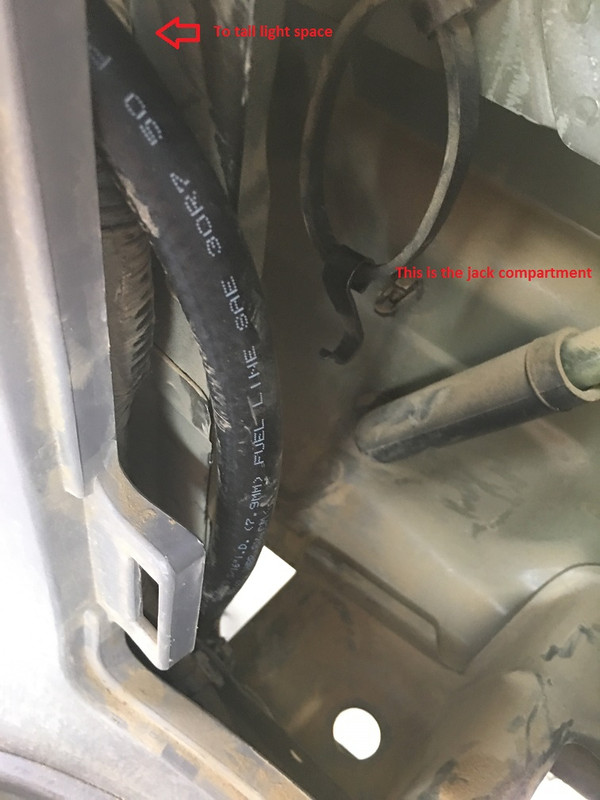

That "square hole" is where the quarter vent used to be. What I circled in that last photo and where the hose goes is the hole that was plugged with the following rubber piece:

I am actually not really sure what that plug is and what it does. I could not think of anything better than a plug to drain water if there is ever any. I figured I am safe to take it out and pull the hose through that hole; it was working way too well to do something else. Moreover, I cut off the part of that plug I am holding to:
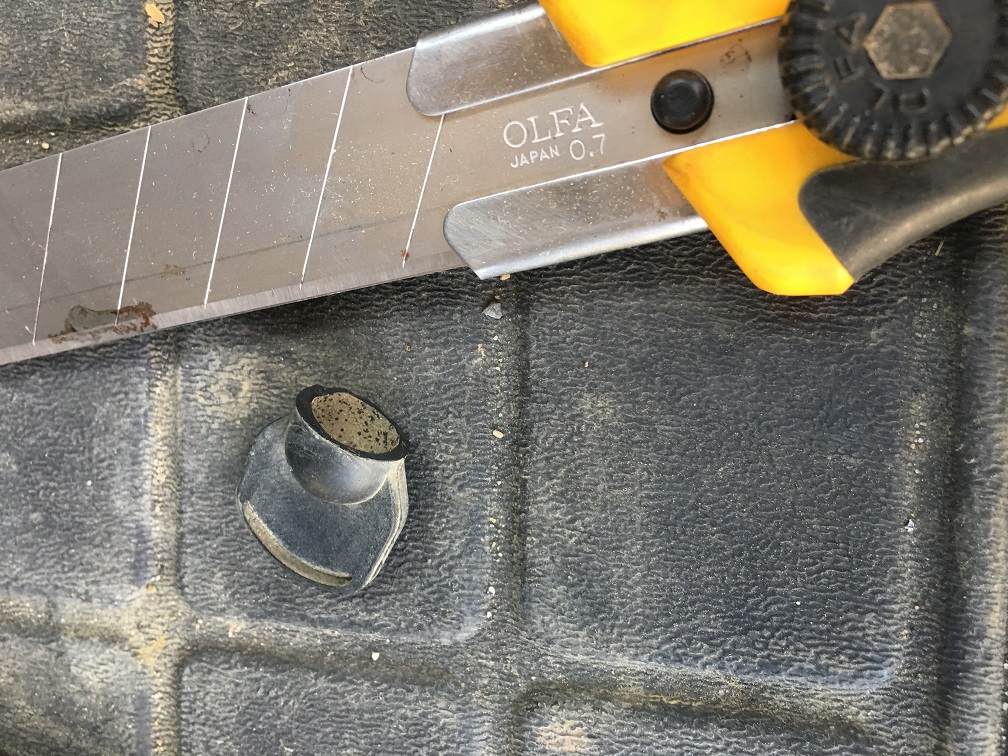
In other words, I made a seal out of that plug (did not realize I don't have a pic of it) that nicely snug onto the hose and back into the hole to make it nice and sealed again. Actually, snugging onto the hose and back to the hole was not overly difficult, but definitely not easy. Here are views from both sides once I got it done:
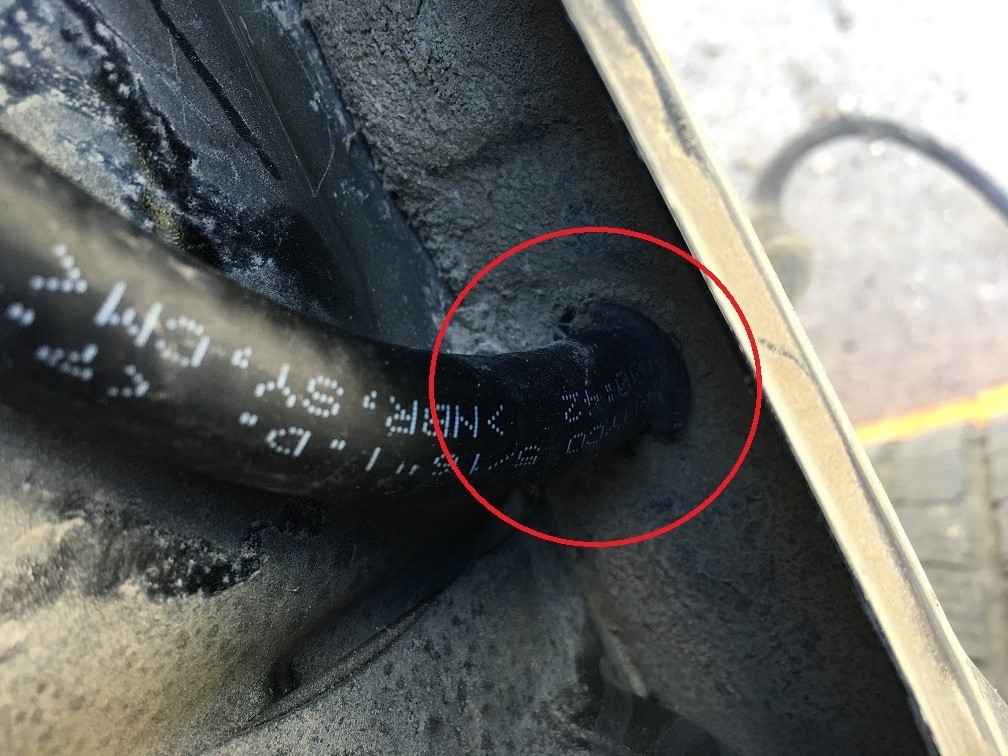
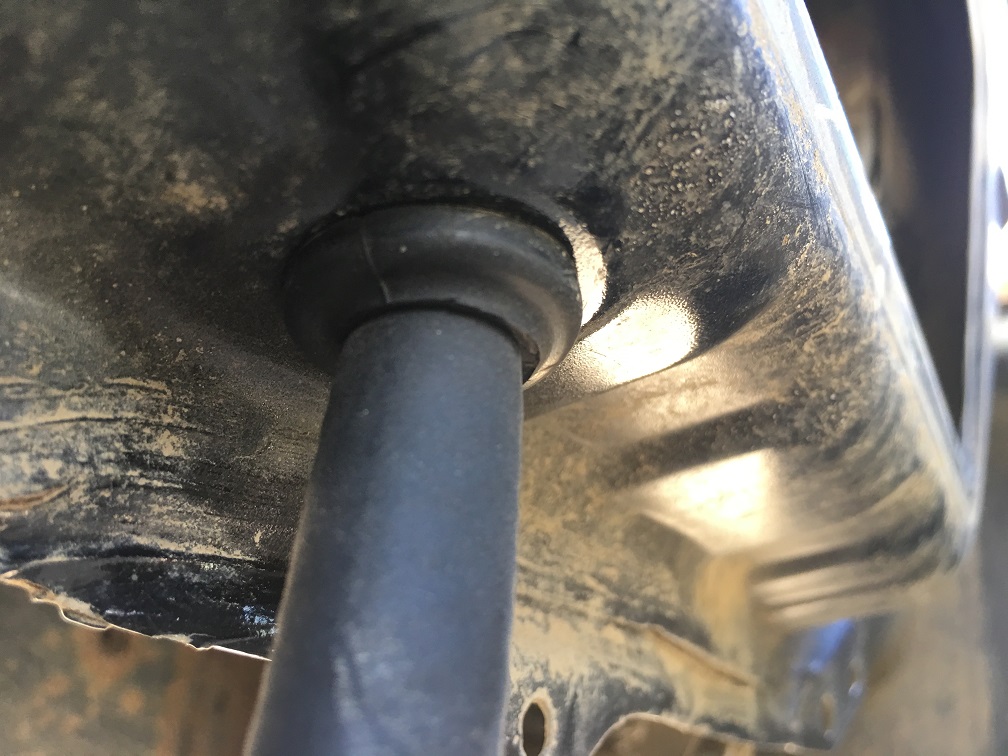
Now on with how I pulled the line:
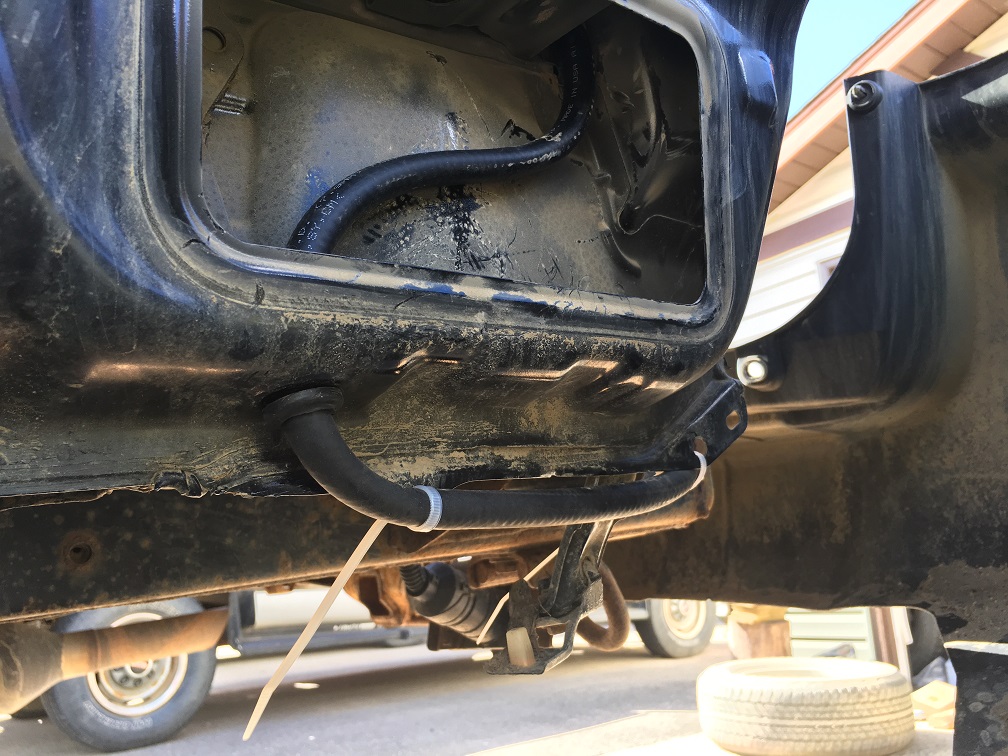
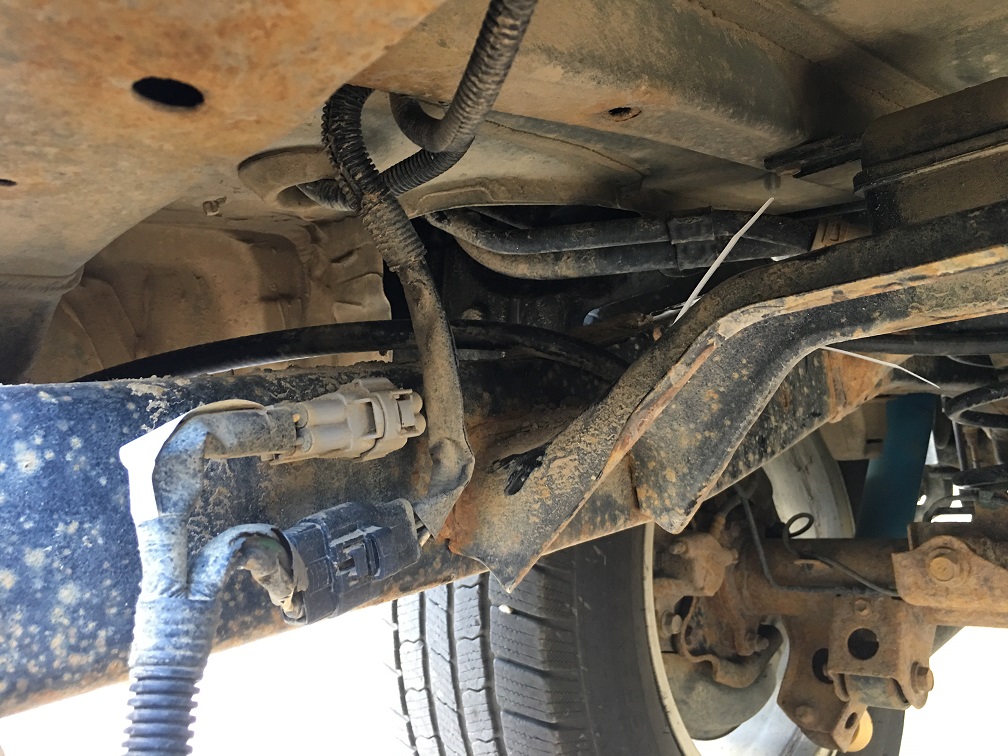
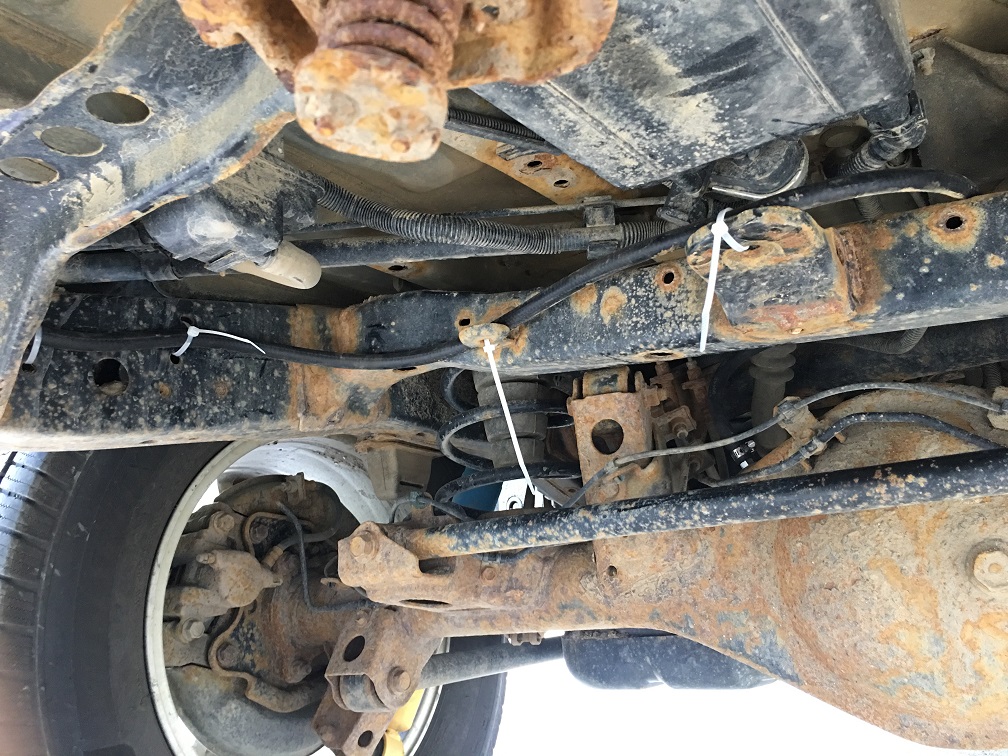
I did not use any zip ties at this point in spite of them being in the photos.
Once the hose is pulled all the way to the breather, put some thread sealing tape on the new union (take the excess out, so that it does not cover the hole) and take the old breather out (wrench or socket size 14). Put the new union in its place (wrench or deep socket size 12, I used a ratcheting wrench):
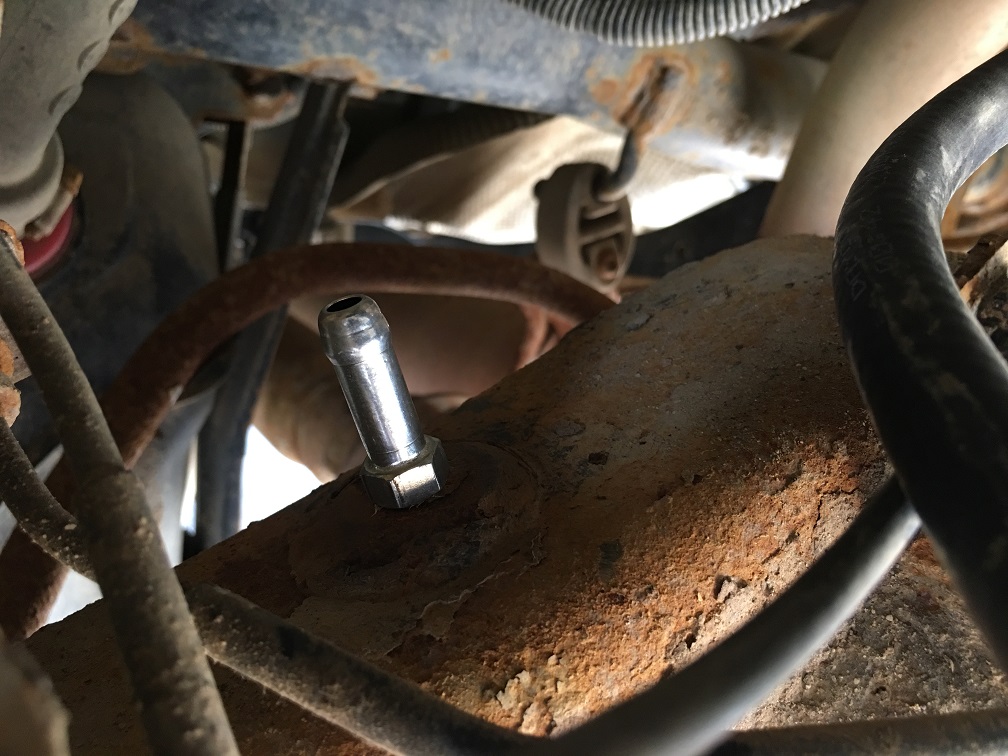
Before taking old breather out, I cleaned the dirt and loose rust around it with a wire brush.
Now make sure you have enough but not too much (just so that it is not hanging anywhere, etc) hose at the union side and cut off excess if necessary. Make sure there is nothing inside the hose and pull it onto the union. Tie it up with one of the clamps:
Ok, I guess I did not take a photo of that, but you get the idea (also see the last photo).
Attach the new breather to the other end of the hose. Put the clamp in place:
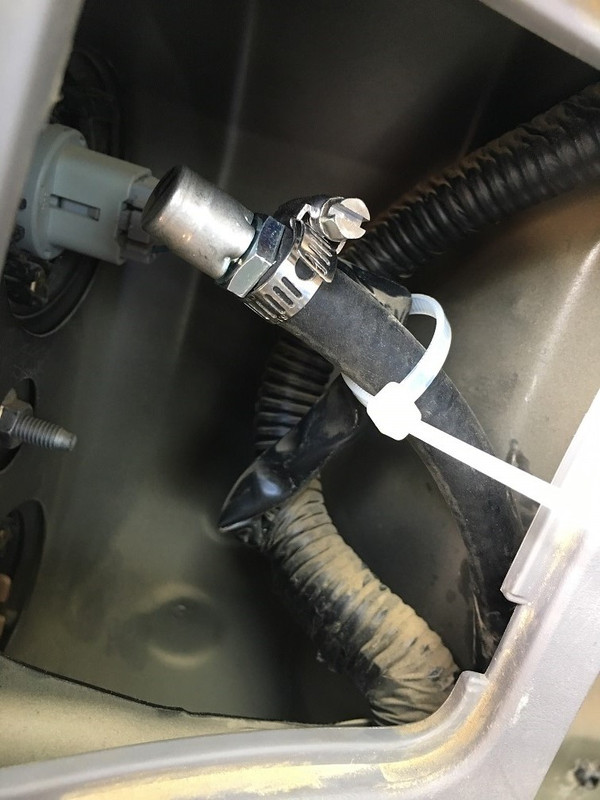
Do one or two more checks and tie the hose up in place with sip ties. All of my zip ties were fairly tight except for the last two before the union:
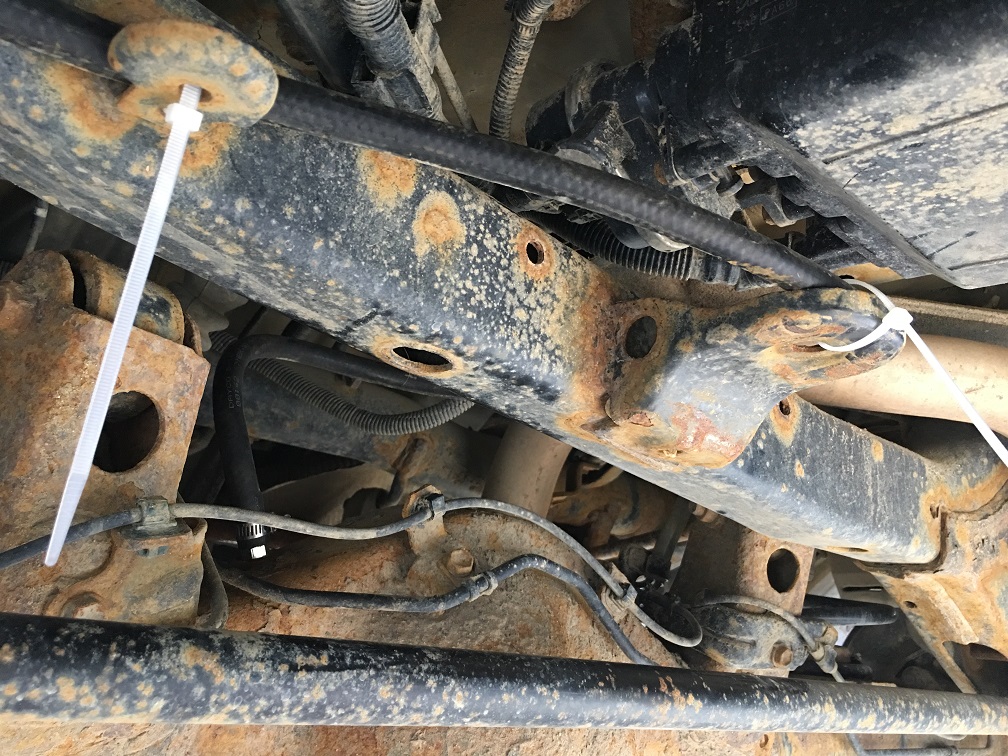
Now just put everything back together and you are done, likely forever in terms of the rear differential breather.
Do not forget to put the quarter vent back in place. I only remembered about mine after I put the bumper back together and found it next to the mud guard. Not a big deal, but there is no need for extra work.
Conclusion: It is a very simple job to do. Especially if you have dealt with the rear bumper before. Took me under an hour from start to finish and I was not rushing at all. The total cost excluding my time was under 50 CAD, but it really could have been done for about 20 bucks or less. Is it worth it? To me the answer is clear: yes. Just so that I do not have to worry about it ever again, sort of.
Good luck and hope it helps a guy/gal or two!
After some deliberating, I decided to take my breather out some place up high, accessible, and clean. Performance and whatever was not my concern. The main reason was simply because every time I would need to check on it, which, now that I am aware, would have been every year or so, I need to drop the spare down, get under the vehicle, etc. Plus, it is just not the best spot for a breather because of where I live: all the mud and snow and other potentially unpleasant things for the vehicle. Thus, the decision was made to bring it up and forget about it.
After looking at a few threads, I knew I was not going to pull it all the way out to the front, which seemed to be more work than I was willing to do. I also knew I don't want it in my gas cap space because that space is fairly limited and I don't really want to see anything there but my gas cap every time I fill up. So I went ahead and started poking around the back. Jack compartment was eliminated as an option because it is still a space with a fair amount of use (I always use my original lug wrench when I take a wheel off) and I don't really need any hoses and whatnot being on the way there. I finally settled on the tail light "compartment": easily accessible, clean (don't mind the dust in the photos), yet never really used for anything:
Here it is shown with a hose already in place.
I guess I should begin with parts I had to get for the job.
First of all, I have previously decided not to bother myself with this mod and just get a new breather, so I had already purchased an original Toyota rear differential breather and had it for a few weeks now (something like 20 CAD at the dealer). I see others use the same breather as used for the front differential. I don't really know what is better or worse, but I already had this one in hands with no chance of returning it (the dealership is a couple hundred kilometers away), so I just used what I already had. Also, I am sure it does not matter what you use, as long as it works. I am sure Dorman that Rockauto sells for 6 or whatever USD will work just fine. I would go ahead and get that one, actually, if I planned ahead a little better. Maybe even just some filter instead. Or even my old breather that I cleaned up and it seemed to work as intended. All I am saying is that there are cheaper options. Anyway...
Even though there many options, I chose the original Toyota union, part number 90404-51319 (16 CAD at the dealer). There is a thread here somewhere that shows you a bunch of different unions from a variety of vehicles (here, found the post). In fact, I was going to use a brass "union" from a hardware store, which is only a couple bucks, but I could not find one with the right thread (can say I tried hard enough). Pretty sure the one for Nissan is cheaper as well. I think there is also another one for Nissan that is quite a bit wider in diameter than the one shown in the post linked above.
The next thing was the hose. I took the union with me and headed to a bunch of hardware stores. Ended up buying a 5/16" or 7.9 mm fuel line:
I estimated to need about 7 feet of the line. Luckily for me, I hit the end of the roll at the store and the dude gave me the remaining couple or so feet. So I ended up with about 9 feet of fuel line (cost of 9 CAD). And that is how much you should get if doing the same. You can surely cut the excess off if you have any. I did not cut any off.
I also got a couple of stainless hose clamps, which took forever for me to find. No one seemed to have stainless clamps this small. I wanted stainless for the union part of it, so I was persistent (cost of under 3 CAD).
Finally, I could not find any thread seal tape at home, so bought yet another roll (about a buck CAD).
I think this is about all you need in terms of parts.
Now to what I have done.
Edit: First thing, I dropped the spare tire and took it out of the way, lol.
First thing, after finding the right spot for the breather, I took the rear bumper cover off. I did not take it off completely, but from the rear driver's side wheel to the passenger's side tail light. To do that, you need to take the mud guard off; there are quite a few bolts holding it in place. I did not take any photos of that because it really is not a rocket science. Once you are done with that part, you will see a "hiding" bolt holding the bumper:
The other holes in the photo are where the mud guard was bolted on with the most right one being on the bumper cover.
There is another bolt that I did not take a photo of that is located at the bottom of the cover. You will see it once you look under the bumper: there is only one aside from the one holding the mud guard.
Additional thing that the side of the bumper cover is held in place with are three (I think) locks at the top of it. So once all the bolts are out (more bolts below), you can "bravely" pull the cover off.
Then there are bolts at the back that are visible when you open the tailgate:
Plus three more on the other side of the latch.
There is also one of these guys on each side of the cover next to the tail lights:
Finally, there are a couple of bolts holding the cover at the bottom, one on each side of the hitch (or where it would be if you don't have one):
Yes, the bolt on the driver's side is apparently missing. And yes, there is LOTS of rust (and it really sucks).
Up to this point, all you needed for tools is a ratchet and a 10 mm socket.; maybe a short extension as well. I guess a Philips screwdriver for those useless plastic plugs.
Now you can pull the side of the bumper off those locks and push it a little backwards and out of the way. You don't need to go nuts and break things on the other side. You will see, you don't really need that much space. Also, you really have to push a lot to break things on the other side, so don't be scared.
Next thing is pull this guy out (quarter vent):
It is located on the side of the vehicle under the bumper cover (driver's side, obviously, lol). It just locks into place, no bolts or screws to turn. Might as well shake the garbage and whatever else you got there out of it. I had a few rocks and whatnot.
Almost home. The next thing is to pull the hose. I started from the top, as seen in the very first photo in this thread. It is definitely better to pull from the top because you can just leave how much you think you need and then decide how much to chop off if any at the bottom. So here is how I pulled it:
That "square hole" is where the quarter vent used to be. What I circled in that last photo and where the hose goes is the hole that was plugged with the following rubber piece:
I am actually not really sure what that plug is and what it does. I could not think of anything better than a plug to drain water if there is ever any. I figured I am safe to take it out and pull the hose through that hole; it was working way too well to do something else. Moreover, I cut off the part of that plug I am holding to:
In other words, I made a seal out of that plug (did not realize I don't have a pic of it) that nicely snug onto the hose and back into the hole to make it nice and sealed again. Actually, snugging onto the hose and back to the hole was not overly difficult, but definitely not easy. Here are views from both sides once I got it done:
Now on with how I pulled the line:
I did not use any zip ties at this point in spite of them being in the photos.
Once the hose is pulled all the way to the breather, put some thread sealing tape on the new union (take the excess out, so that it does not cover the hole) and take the old breather out (wrench or socket size 14). Put the new union in its place (wrench or deep socket size 12, I used a ratcheting wrench):
Before taking old breather out, I cleaned the dirt and loose rust around it with a wire brush.
Now make sure you have enough but not too much (just so that it is not hanging anywhere, etc) hose at the union side and cut off excess if necessary. Make sure there is nothing inside the hose and pull it onto the union. Tie it up with one of the clamps:
Ok, I guess I did not take a photo of that, but you get the idea (also see the last photo).
Attach the new breather to the other end of the hose. Put the clamp in place:
Do one or two more checks and tie the hose up in place with sip ties. All of my zip ties were fairly tight except for the last two before the union:
Now just put everything back together and you are done, likely forever in terms of the rear differential breather.
Do not forget to put the quarter vent back in place. I only remembered about mine after I put the bumper back together and found it next to the mud guard. Not a big deal, but there is no need for extra work.
Conclusion: It is a very simple job to do. Especially if you have dealt with the rear bumper before. Took me under an hour from start to finish and I was not rushing at all. The total cost excluding my time was under 50 CAD, but it really could have been done for about 20 bucks or less. Is it worth it? To me the answer is clear: yes. Just so that I do not have to worry about it ever again, sort of.
Good luck and hope it helps a guy/gal or two!
Last edited: