Yogi's Build & Adventure Thread

Quad Air-up System

There have been some ideas out there for airing up/down quicker. SponsoredByWifey on Instagram has a cool system as well as TrailRecon on Youtube. I kinda merged the two and put my own spin on it.

Here's a brief list of what you'll need to get started. As for the specialized equipment, the part numbers included are from Zoro.com:
50 ft of 3/8" hose
3 Tee Fitting
10 Hose Barb fitting
4 90° Hose Barb fitting
20 Hose Clamps
3 Quick Disconnect Plugs (Male)
2 Quick Disconnect Sockets (Female)
1 Ball Valve G3007751
4 Schrader Valves
4 Anchor Coupling G0639204
8 Air Chuck G4016166

I started with the hard (driver) side first because I'm a glutton for punishment... :tsk:
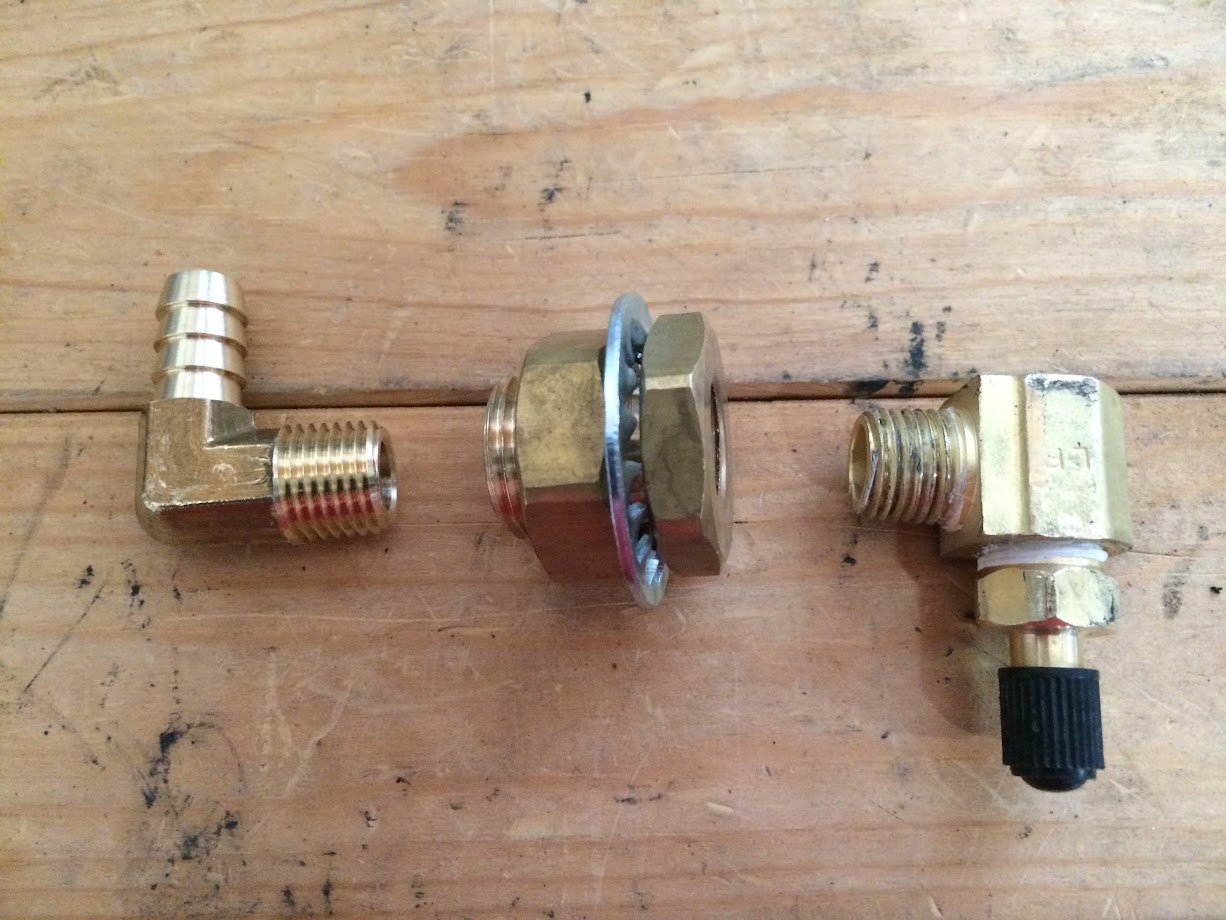
Because of where I mounted the couplings/schrader valve in the engine bay on the driver side, I needed an elbow for the hose barb. A straight barb fitting would not fit. Plus, using an elbow for all the frame mounted hose connections removes the hard bends. Here's how the fittings fit together.
Front:
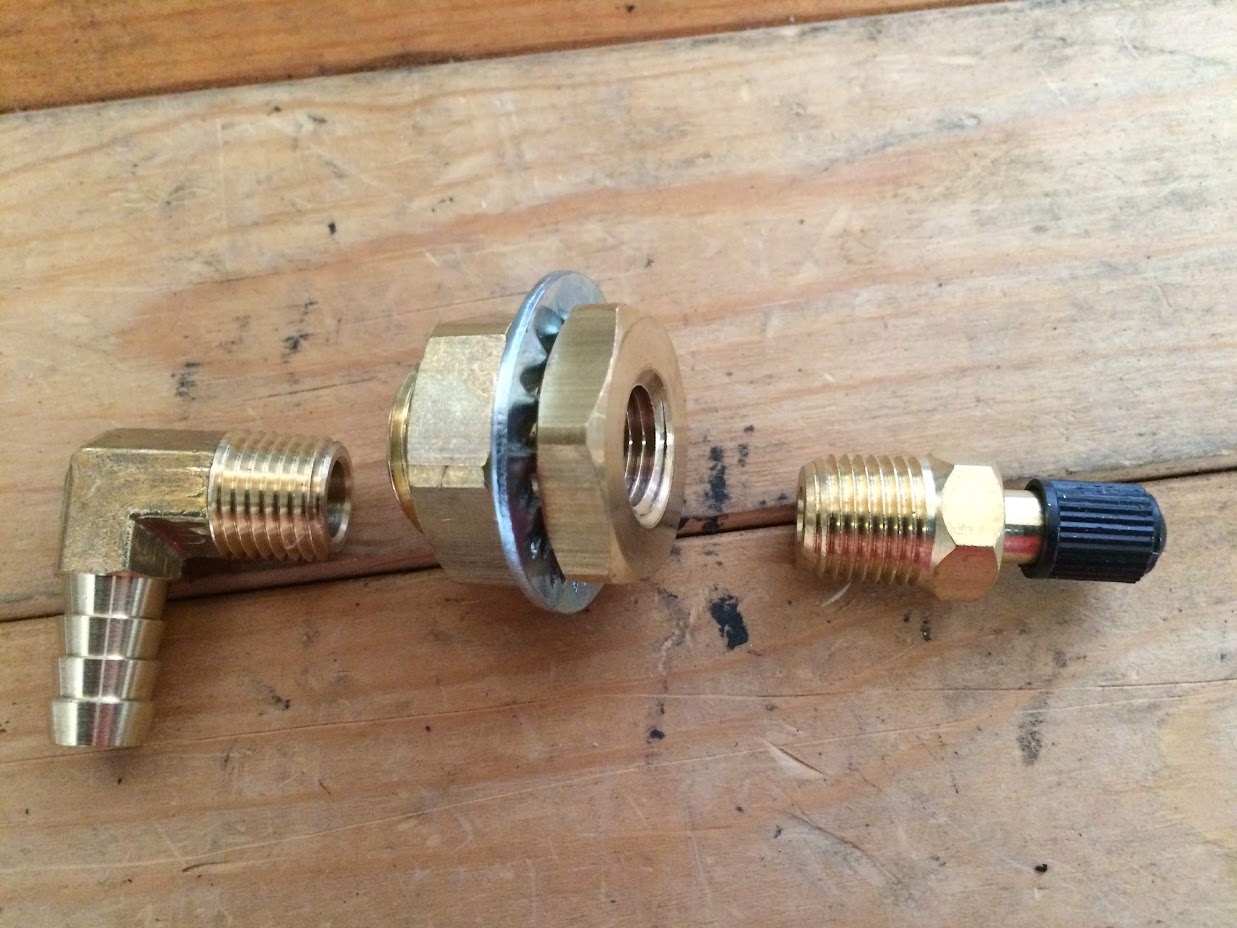
UeJ7KK


Rear:
y87fcwca


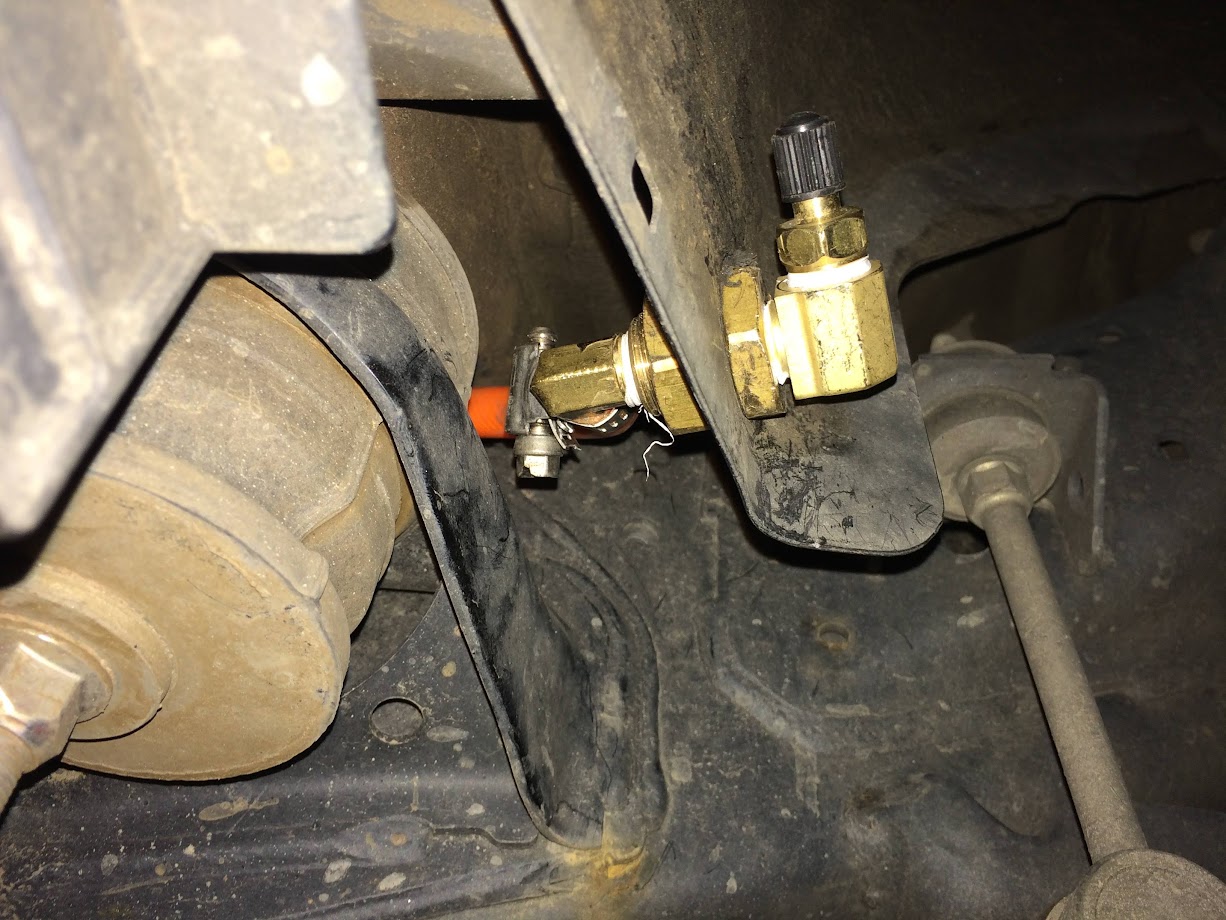
The anchor coupling requires a 3/4" hole for mounting. Here's how they look installed in the wheel wells:
Front Driver
y9fuetwv

yasydvdw


Rear Driver
y8do2cgl


Front Passenger
y9skwvdr

yaajcc9o


Rear Passenger
y8p8usuv


Because my air compressor is located in the bottle jack storage compartment, I ran the hoses from the rear wheel to the compressor. I had an extra tee fitting I mounted the ball valve to. My plan is to remove the middle Quick Disconnect Socket and add another Schrader valve. This way, I can still use my Staun deflators and my tire pressure gauge to check pressure as I air up and down.
y7xs4yox


UPDATE:
I've since upgraded the hose routing and added a manifold.
Ran the tubing from the rear driver connection point through a factory grommet into the jack compartment.
The blue manifold has a shutoff valve, gauge, and relief valve. I haven't set the relief valve yet, but the idea is to have it pop and then reseat at my desired PSI, ~36PSI. Then it will be "fully hands-free".
AP1GczMoiVif_4b4Msva_aJkYogoyRXrss5ZWpst7K8Xvj99I0p9y8h5tDVCC_U9q3RULppWgnCJX6UZqBUXKqf04Ym1B9nQR4jswsiEyfRVO0CVQl6R0qnP-jhPmz0nEBcQXxkXoW59mk-seaMo4JlQJ5BYkg=w1653-h1241-s-no-gm
 
Last edited:
Finally Doesn't "Look" Stock

Made some changes: Gamiviti Roof Rack and General Tires ATX
I ordered the C ratings, but Discount ordered the E rating, so I got a free upgrade!
y9zh76at


Here some detail shots of the Gamiviti Rack. Tim's a member of my local wheeling club and a great guy to work with. His specialty is Land Cruisers, but he supports other Toyotas. This is a great rack, and the customization is limitless! I like how the light bar is behind the fairing. Can't Q-Beam bad drivers, but the wind noise is absent!
y87wd4tu

y9yw756v

ybp4o9ms

yalgk4mu


I trimmed the fairing to follow the curve of the roof a little better. Here's a close up shot of the edge trim I bought off Amazon to help make the cut look better and prevent the fairing from rubbing the paint.
y9g8e9u5


Next up: Wire up and aim the light in time for next weekend's night run...
 
Last edited:
New Bracket for ARB CKMA12

Mounted an ARB CKMA12 in the bottle jack compartment.
...
UPDATE!!
The OEM bracket that holds the jack tools started to crack, so I made a new bracket.

After hearing too much creaking going over any bump in the road, I found out the OEM bracket was cracking. Not really designed to hold the weight of a compressor. So, worked with a buddy to bend and cut some metal into an amazingly designed shape...
ybn56f7o


Mounted up with the plastic trim removed. It is tight in there!
ybxv6ovk

y9jazz98

The best part of this mod - the door still fits and hides everything!
Yup!! Door still closes.
y9bz4t5f
 
Last edited:
Rising Sun 4x4 Club Spooky Night Run

Got to go on my first night run and use my light bar properly!
yakzs9hl

Love how my light bar sits hidden behind the fairing. Wired it up in a pinch with a Y splitter off the headlights. Tried to use the fog lights, but the OEM plugs don't match. Maybe next year I'll have it on it's own switch.

Pot luck dinner before sun down.
y7tzsqjs


Kinda eerie being out in the middle of nowhere and pitch black. Good thing for the LED bar!
ya3edrvp
 
Last edited:
Well, went back through and fixed all the links for the photos. I think I now understand how to properly share photos from Google Photos. Not as straight forward as you would think...
Rising Sun Snow Run
yapxbbfo


Moab Weekend
y7jwumf3


Cruise Moab
ybw8fn25


Rising Sun Ghost Town Run
ybzys8r3
 
Last edited:
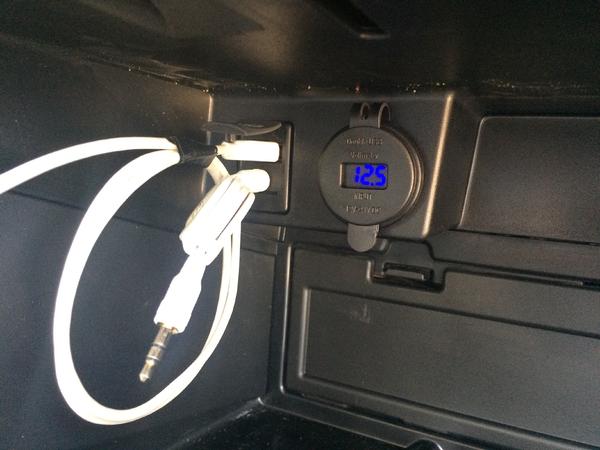
Moving the USB and AUX port into the glove compartment was one of the first things I changed. Being able to leave my iPod plugged and not worrying every time I parked was great. I've since added a BlueFire 4.2A Dual USB Charger to the blank next to it. This one was a little more complicated...

I had to remove the glove compartment to be able to remove the circular blank. The blank has a key slot to prevent it from rotating, so the width of the present hole was nearly identical to the hole needed for the USB charger.
sigepbiker-albums-champ+updates-picture47232-hidden-usb-aux-port-well-always-hot-dual-usb-port.jpg


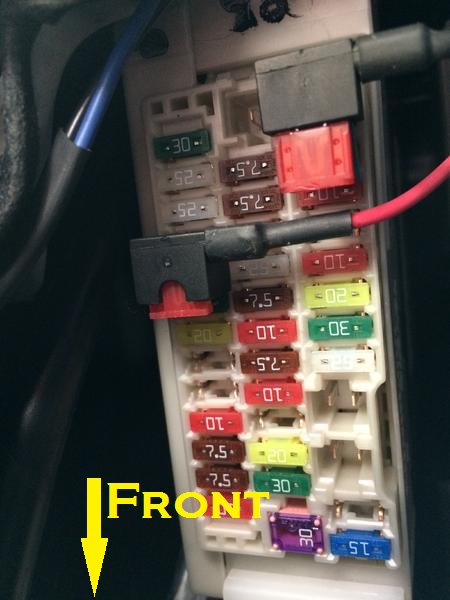
I ran the wiring across the dash board to the interior fuse panel. The spot four down from the top left is blank, so using a Add-A-Tap worked out perfectly. The other tap is only hot with the ignition on.
sigepbiker-albums-champ+updates-picture47236-fuse-taps.png


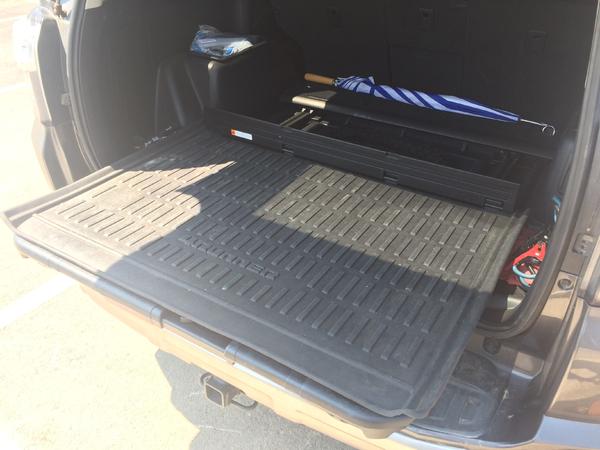
Picked up an OEM Sliding Rear Cargo Deck from a guy off Craigslist. I really wanted this when I bought my 4Runner from the dealership, so I was excited when I read through [MENTION=112865]alpinecowboy[/MENTION] 's thread: pure gold! Had I not found his thread, I probably would have given up on having this.
sigepbiker-albums-champ+updates-picture47233-oem-sliding-rear-cargo-deck-self-installed.jpg


The guy didn't, however, have the Cargo Organizer that prevents your stuff from falling off the slider when it's pulled out, so I picked one up. Here's the Toyota P/N: PT924-89100-20


Is the blank you but the add a circuit in, 4th one down on the left, is that an ignition hot? Looking to add some Baja Designs LP6s and want the backlight amber to come on when the ignition is on.

Thanks
Mike
 
I ran the wiring across the dash board to the interior fuse panel. The spot four down from the top left is blank, so using a Add-A-Tap worked out perfectly. The other tap is only hot with the ignition on.
sigepbiker-albums-champ+updates-picture47236-fuse-taps.png

Is the blank you but the add a circuit in, 4th one down on the left, is that an ignition hot? Looking to add some Baja Designs LP6s and want the backlight amber to come on when the ignition is on.

Thanks
Mike

The tap shown on the top right is the one you want. It's hot only with the ignition turned on.

But if this is just for the switch backlight, you could also tap into the wires of the other switches on your dash. Then they would dim appropriately.
 
The tap shown on the top right is the one you want. It's hot only with the ignition turned on.

But if this is just for the switch backlight, you could also tap into the wires of the other switches on your dash. Then they would dim appropriately.

Think that is the one I used. Actually the ignition fuse. Does what I want. I actually got off my butt and got a circuit tester to make quick work of it. Thanks though.
 
Moving the USB and AUX port into the glove compartment was one of the first things I changed. Being able to leave my iPod plugged and not worrying every time I parked was great. I've since added a BlueFire 4.2A Dual USB Charger to the blank next to it. This one was a little more complicated...

I had to remove the glove compartment to be able to remove the circular blank. The blank has a key slot to prevent it from rotating, so the width of the present hole was nearly identical to the hole needed for the USB charger.
sigepbiker-albums-champ+updates-picture47232-hidden-usb-aux-port-well-always-hot-dual-usb-port.jpg


I ran the wiring across the dash board to the interior fuse panel. The spot four down from the top left is blank, so using a Add-A-Tap worked out perfectly. The other tap is only hot with the ignition on.
sigepbiker-albums-champ+updates-picture47236-fuse-taps.png

[MENTION=537906]CO4Rexplorer[/MENTION] - the photo of the fuse box should make clear where to pull your power from.
 
Auxiliary PowerTray Wiring

Well, time for some updates. Made some more modifications since the last post.

Auxiliary PowerTray Wiring
Made a custom electrical panel using a PowerTray and parts from DelCity. Had two immediate circuits I wanted to make:
Be able to power my HAM radio by ignition triggered power or constant power: [used a 5 pin and a 4 pin relay]
Power my LED bar that's behind my roof rack fairing [typical 4 pin relay]​

Found a relay holder that accepted the Toyota relays so less spare parts. There is no "ignition-on" power in the engine electrical box, so I used one of the wires in my switch wire harness I pulled through the fire wall.
AP1GczNVmyfFKF-UuKdtge-JS14NhILCDZwF2idtvPK370jFoVqluR212k4d7xG_iVNTsM_X0rLbsbPagxmBW8BaezQ3Gk-d-932gJ8DJg_YgjGBubW-RD7fO_xUp-7Me-dn5xfBlHA2IVU9sLVvTQsPo6OG6w=w1658-h1244-s-no-gm

AP1GczOqutsShP7o-oG8V2FSiLHoQSutzuHQ8II7xr20GSI9LkaPeSarTt-gezKjA59dyY7BBUbC-7GvyfP_zxsNjHv3MqgsaN3WU3H_on80ARjmOQ_u5OoGyIHwHXgXmE9qSy-a9ii6V_Pqj9m37noKIuPKtA=w1658-h1244-s-no-gm

AP1GczNnFDjvk9wXX74FbuSODOJ9x9sW2hrw__TYvXVQhKd_9ancnkBjrUipGlT7ZGyEJlaHkgQa0bBajFjM6RP4AKEahOmeWEiZH_JwDlYsjzUM4zp5dUFbWNXhfClBok4zfKrHz2P8BfYWnXJtb1DliZ5bMQ=w1658-h1244-s-no-gm

AP1GczNloT3ObRvPOHeBvKqowDL8RDN5gc3E0Arc10KDjlpNk-S3hyfjPbJe2wbVaP-hPkpYm0KTrht6Vq6biZOgJD5jDB1xB94dB4Rqb9wx06KHbl_qabdf21D_cNug9_1Kz8YhndqR-zdwquTVoLA1ucscKA=w1113-h836-s-no-gm

AP1GczO5O--05LTLMtKkutXOQ-FfhMBtsoseuf3Tsyl45v-gPLt8xVVbjtLBJlBU2Hawdq5IfMFGepLmI5aKbc6_fw2o2YVYI0oyGBJy8fezMQvHZnQNUZBAu5V21xtzRcBnPLYRRNkslawzVO1RyUajvcm_Mw=w1113-h836-s-no-gm

I ran the power for my light bar up the A pillar of the windshield and zip tied both ends after pull the wiring taught. The blue heat shield makes it look a little better and it wedges in nicely in the channel next to the window. I've thought about getting some Permatex black silicone, but the wire has stayed in place well without it.
AP1GczNJea9-nA14ipzHYcOFIeMaQDU6wsp_YAeAYEAKjEOjCRMkg8RgIi2zfZf7YnzUUzhANdc0gY-hvgw5a20Hro4YGjuM54-Jxj1JaZyK8a-LpgEAV1Kizm5cmnF2YKt1_ctMrUNzAqv7Pz2n47Di7yi_9g=w992-h1322-s-no-gm

AP1GczOT2q8Oad4aMUQj1dWsCfmT8-dH3pmPJZOHN8Q0avs-f2QAxTOYhda8kNZH8oa0TK9X8Ool5CH7uszJXyh7b4pi2pZD3K5SnbTmhujtamnH2CPcp83mc5_N3l2cwUSDaYVXsIBSYEnk7hM1J8d3cB1KmA=w1653-h1239-s-no-gm

Bought switches off CH4x4 to add some style and flair. You can see in there I also installed the Anytime Backup Camera with the optional front camera. Cool mod for helping parallel parking, cresting over a hill while offroading, or letting the kids in the back seat see the road.:dance:
 
Entune 3.0 Upgrade

Entune 3.0 Swap
Read a lot of threads about upgrading to Entune 3.0.
Having CarPlay has been really nice. Not too concerned that it isn’t wireless. I was able to retain the factory navigation too. I like having that as an option when in the mountains without cell service. I’ve heard of taking screenshots or saving maps for offline use, but I haven’t tried that out yet.
AP1GczNp1cMp3RK8DO1pSEr2DTLMTjonNzmNnk17faesOCnzDncUuRvftK39EPPNBgPQcaQIvLe-tVqRbLtRMNFYoDagVCEaXICWK3mX4xqArXmiRj5cVHxKMFYmqQ-6rbZWH4eIXeuMmBbimK_vs8zgAudgCg=w1658-h1244-s-no-gm

I went with an OEM radio because I wanted a flush mounted radio and not one of the “floating” screens. Going with a standard double din radio would be smaller than the OEM. My Nav Override Switch still works, but has its short comings...


Still trying to troubleshoot these items:
I’ve lost, or haven’t found it yet, the ability to enter coordinates on Toyota’s navigation maps. You can see your current coordinates, but you can’t navigate to coordinates. Anyone have any suggestions?

Album art and contact photos won’t display when the car’s moving or out of park. They’ll show up when stopped with the e-brake on or in park. Anyone know if there’s a quick fix?
 
Finn Fab Rear Window Molle Panels

Finn Fab Rear Window Molle Panels
Installed Fin Fab rear window molle panels. I like the power accessory panel option and a rivnut mounting option.
AP1GczMoiVif_4b4Msva_aJkYogoyRXrss5ZWpst7K8Xvj99I0p9y8h5tDVCC_U9q3RULppWgnCJX6UZqBUXKqf04Ym1B9nQR4jswsiEyfRVO0CVQl6R0qnP-jhPmz0nEBcQXxkXoW59mk-seaMo4JlQJ5BYkg=w1653-h1241-s-no-gm
AP1GczMXqCXf8OuNO-tiotICK3HYK2mv043jyVtAQtprCdDOVDv2C5qm_WALaUgZH3AvLB169gxLunAKEnfu7H_oROwVq1TiyuyZODa_9s6iwTDlzDhNRz2uM6aqUZBns0HpbovXGePnRBozXYGBvv9CyiIY2g=w1653-h1241-s-no-gm


Ran 10 gauge wire to the back to power the panel. I also replaced the OEM 12v socket with another Blue Sea outlet. With another 5-pin relay, it’s either powered from the ignition (OEM) or powered with the panel. Wiring is hidden under the rear cubby area. A little messy, but it's hidden...
AP1GczMIj6Z_tEJk910IseuuOTvYNCSFGpMAg_KD5T90j_1W3tgCQNIa2SFLeVLXNnAmeZjrJcb98jZw7FUANSjDjVvMWfKuQEr4R3Rvlaj4IsMoAzQrTGTMWhV6htyOJdZykfFmSSEuXpipinTy7zjjLKb9ag=w992-h1322-s-no-gm
 
Hatch and Cargo Lighting

Hatch and Cargo Lighting
I wanted a rather simple way to run white and red lights in the back for camping: helps with night vision and attract less bugs. Stumbled across these LED lights that cycle from white to red simply by turning it off and back on quickly (10 seconds?). They look stock and default to white, so they're pretty subtle. Doesn't get much simpler than that.

I also wanted to put some additional lights in the truck. I never liked how the lights were behind you as you reached for items in the trunk. I found these trailer lights that switch between white and red for the reverse and tail/brake lights respectively. I have these lights wired to a SPDT switch: White-OFF-Red.

I read through Snooperstyle's thread and was about to pull wire through the hatch like his thread. But then I came up with the idea of using a magnetic contact switch. It's mounted behind the body panel marked by the blue painter's tape in the post above. I glued a magnet to the hatch plastic panel, so it cuts power when the hatch is closed. Since I had already pulled power for the power accessory panel for my molle panels, I just used that to power the lights.
I bent the lights' brackets to angle the lights out towards the middle and mounted them using M6 rivnuts to the Finn Fab panels.
AP1GczPpUQsf3nmXlyOEM9M6nh-SqLN0ogh57v48PUeG9ZHJ0qa29yolLLoLWdCAbf_CANuvGVcH9j0Zox51aXh6-s2aJ84I00MLe98SuaWjOjj8cvNflgTdTLjUL9RrYvYH8oSs8qzvW4NGsR_mqvPm7MAEag=w1658-h1244-s-no-gm

AP1GczPXhUsI64E6BaWCagcQJLJjlJmrApUVO41_9JUHtHzrHWPaFxeRjBKtsFlpBM9sJ6op7JKXrkEl-o434ybIJQDGXlqxwNU-TpZEV73YI26Msi25yU3h7UwEPFZKSeTrTfSrDjZkxxnPeTdHQTVm05HXzQ=w1658-h1244-s-no-gm
 

Members online

Forum statistics

Threads
278,309
Messages
3,554,075
Members
248,016
Latest member
Advally Service

Trending content

Back
Top