Slowgoat
New member
JBA Ball Joint Upper Control Arm UCA Install - Write Up
I hope this is helpful. So many have done nice write ups before. I didn't see any detailed UCA install threads anywhere and would like to contribute to the site.
Living in the rust belt, there are basically two choices for aftermarket Upper Control Arms in 2017:
I pulled the trigger on JBA HIGH CASTER UCAs because they are cheaper than Camburg's ($449 vs $599), and have a bolt on rebuildable ball joint.
Uniball UCAs are extremely popular, but there are countless threads describing squeaking and rusting of all brands of uniball UCAs if you live in a salty environment. They are more expensive, but also have a higher bling factor. Also, you have to replace both hardware and uniballs occasionally/routinely, and the proprietary parts can get expensive.
If I lived in a less extreme area, I would consider the beautiful UCAs from Icon, Camburg, Total Chaos, or many others uniballs. But I just don't want to screw with it.
I didn't want to take a chance on Light Racing/SPC because of all the failures and redesigns.
I decided against eBay UCAs because I wanted to support a product that is Made in the USA and also because of the shady dealings of the main seller (she has multiple eBay accounts under multiple names, and offers no aftermarket support. Her actual name and telephone number is in post #45 here: Post #45 Ebay Uniball UCA Warning With Pics).
There are both Camburg uniball and Camburg balljoint knockoffs as well as others for sale on eBay. YMMV. Some have had great success.
Check out this thread for the reason why I put up $120 extra bucks for a name brand that is well respected: Ebay Uniball UCA Warning With Pics
Long story short: failure due to cheap hardware; someone could have been killed.
This video of a Total Chaos UCA install on a Tacoma is an excellent reference:
Another good UCA Video:
Here are JBA's instructions:
Jeepin By Al Tacoma/FJ/4runner Install Instructions
Tools Used:
19mm Wrench
19mm Wrench
17mm Wrench
10mm Wrench
Large Crescent Wrench
10mm Socket
Socket Wrench (12V Miluaukee Impact socket, optional)
Torque Wrench up to 170 Ft-lbs
Breaker Bar
Metric Allen Key 6mm
Kroil (what I used), P B B'laster, or other thread penetrating lubricant, etc.
Jack Stands (2)
Floor Jack
Wheel Chock
Needle Nose Pliers or Lineman Dikes
Balpeen Hammer
Vice Grips
Screwdriver or Clip Removal Tool
Starting about a week ahead of time, spray Kroil or some other penetrating fluid on all of the nuts/bolts you will be removing during this process. Your life will be much easier because of this.
1. Place vehicle in PARK, and chock the back wheels. Loosen lug nuts with vehicle on the ground.
2. Jack up your 4runner, place jack stands under the frame rails. Remove lug nuts and wheel.
3. Use screwdriver or clip remover to free your splash guards.
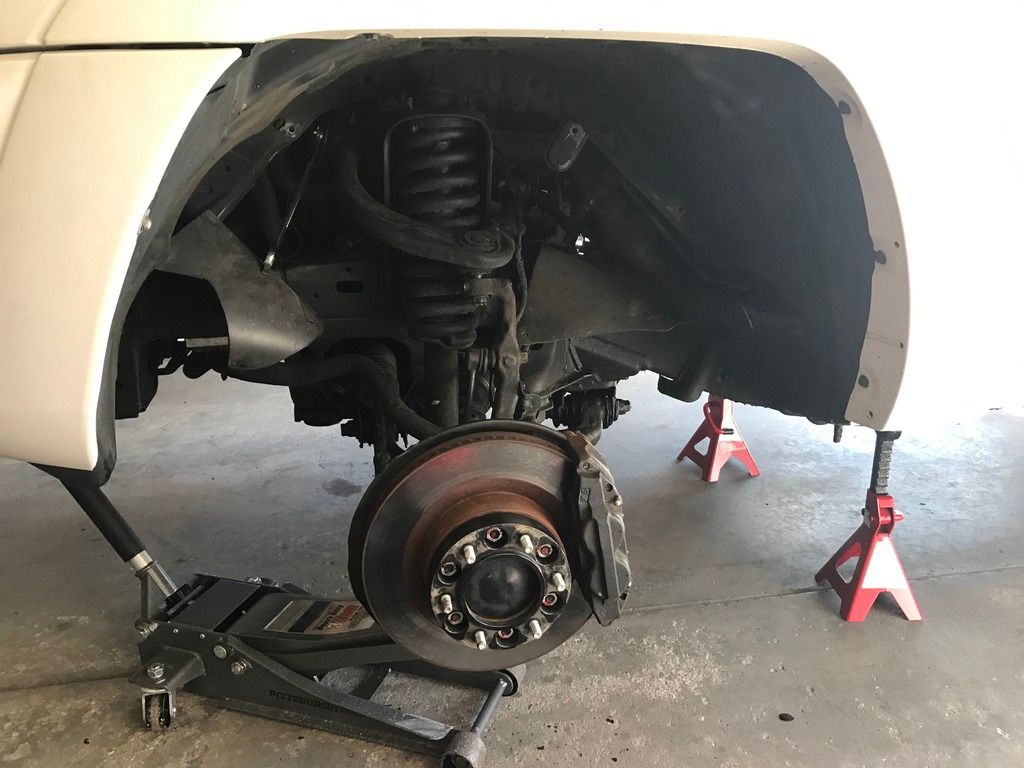
4. Place a jack under the Lower Control Arm (LCA) to give support to the steering knuckle.

5. Using Pliers, remove the Cotter Pin from the factory ball joint stud.

6. Using a 19mm wrench, loosen the UCA ball joint stud nut, but don't remove it completely.
Then strike the knuckle in this exact spot really hard to release the ball joint stud from the knuckle. There is a flat area made for this. Don't be afraid to really lay into it. It took a bunch of heavy hits to release mine.

7. Remove the nut and release the knuckle from the UCA.

8. Using a 17 mm socket to loosen the nut securing the front stabilizer link assembly that connects the stabilizer bar to the knuckle (or use a 6mm Hex key and 17mm wrench if the link spins with the nut).


9. ***Be careful not to stretch the ABS wire or brake line here*** Remove the knuckle from the UCA ball joint stud. Using a bungee cord, secure the knuckle in firmly in place.

10. Using 2 19mm wrenches, loosen the UCA through bolt.

10. Using Vice Grips, bend the inner fender of the wheel well slightly to allow the UCA through bolt to be removed.

11. On Driver's side, use a 10mm socket to:
Remove the bracket attaching the main wire loom to the frame, and then loosen the harness that holds the battery in place. Remove the Negative terminal first, then the Positive terminal. Then remove the battery and battery tray. This will allow the UCA bolt to be removed.


12. Using Pliers, open the 2 metal clips from the ABS Speed Sensor Wire, and release the Wire from the ABS wire bracket. Then, using a 10mm socket, remove the bolt securing the ABS wire bracket in place.


13. Remove the UCA from the vehicle.

***You can use this write up for UCAs with our 4th Gens. May work for 5th Gens too. Always follow the manufacturer's instructions and torque to spec. Use at your own risk! Use common sense, jack stands, safety glasses, and never use regular sockets on an impact!!***I hope this is helpful. So many have done nice write ups before. I didn't see any detailed UCA install threads anywhere and would like to contribute to the site.
Living in the rust belt, there are basically two choices for aftermarket Upper Control Arms in 2017:
Camburg is one of the best brands of UCAs. There is nothing wrong with them except for the MOOG ball joint haters.
But the thing that bugged me was that the top of the uniball was open. So crud and salt could build up in there, and you have to buy a plastic cover (another $40) that seemed like it could easily pop off (and you'd never know it). One guy stuck a glob of RTV in there :roll:. That's a pretty funny solution!
These ball joints press in, which is a pain to me if they need to be replaced (have to take them off??).
These are $599 for a pair of arms and all the hardware with the covers, and $529 without the cover. (Their uniballs are only $699 :shocked
Camburgs are beautiful, but they weren't for me.
But the thing that bugged me was that the top of the uniball was open. So crud and salt could build up in there, and you have to buy a plastic cover (another $40) that seemed like it could easily pop off (and you'd never know it). One guy stuck a glob of RTV in there :roll:. That's a pretty funny solution!
These ball joints press in, which is a pain to me if they need to be replaced (have to take them off??).
These are $599 for a pair of arms and all the hardware with the covers, and $529 without the cover. (Their uniballs are only $699 :shocked
Camburgs are beautiful, but they weren't for me.
JBA
is a new player in the Toyota world, but their UCAs are extremely well respected in the Jeep world. Also, Tacoma guys have been running JBAs for a couple of years and they get excellent reviews over on Tacomaworld.
There are three kinds:
STOCK REPLACEMENT - $449 If you have no lift
HIGH CASTER - $449 If you are lifted 2-4" (INSTALLED)
HD HIGH CASTER - $699 If you're lifted and abuse your rig jumping, etc.
These have easily replaceable bolt on ball joints from a 3/4 ton GM truck, and have slightly more articulation than some uniballs at the joint.
There are three kinds:
STOCK REPLACEMENT - $449 If you have no lift
HIGH CASTER - $449 If you are lifted 2-4" (INSTALLED)
HD HIGH CASTER - $699 If you're lifted and abuse your rig jumping, etc.
These have easily replaceable bolt on ball joints from a 3/4 ton GM truck, and have slightly more articulation than some uniballs at the joint.
I pulled the trigger on JBA HIGH CASTER UCAs because they are cheaper than Camburg's ($449 vs $599), and have a bolt on rebuildable ball joint.
Uniball UCAs are extremely popular, but there are countless threads describing squeaking and rusting of all brands of uniball UCAs if you live in a salty environment. They are more expensive, but also have a higher bling factor. Also, you have to replace both hardware and uniballs occasionally/routinely, and the proprietary parts can get expensive.
If I lived in a less extreme area, I would consider the beautiful UCAs from Icon, Camburg, Total Chaos, or many others uniballs. But I just don't want to screw with it.
I didn't want to take a chance on Light Racing/SPC because of all the failures and redesigns.
I decided against eBay UCAs because I wanted to support a product that is Made in the USA and also because of the shady dealings of the main seller (she has multiple eBay accounts under multiple names, and offers no aftermarket support. Her actual name and telephone number is in post #45 here: Post #45 Ebay Uniball UCA Warning With Pics).
There are both Camburg uniball and Camburg balljoint knockoffs as well as others for sale on eBay. YMMV. Some have had great success.
Check out this thread for the reason why I put up $120 extra bucks for a name brand that is well respected: Ebay Uniball UCA Warning With Pics
Long story short: failure due to cheap hardware; someone could have been killed.
UCA Install Instructions:
This video of a Total Chaos UCA install on a Tacoma is an excellent reference:
Another good UCA Video:
Here are JBA's instructions:
Jeepin By Al Tacoma/FJ/4runner Install Instructions
Tools Used:
19mm Wrench
19mm Wrench
17mm Wrench
10mm Wrench
Large Crescent Wrench
10mm Socket
Socket Wrench (12V Miluaukee Impact socket, optional)
Torque Wrench up to 170 Ft-lbs
Breaker Bar
Metric Allen Key 6mm
Kroil (what I used), P B B'laster, or other thread penetrating lubricant, etc.
Jack Stands (2)
Floor Jack
Wheel Chock
Needle Nose Pliers or Lineman Dikes
Balpeen Hammer
Vice Grips
Screwdriver or Clip Removal Tool
Starting about a week ahead of time, spray Kroil or some other penetrating fluid on all of the nuts/bolts you will be removing during this process. Your life will be much easier because of this.
1. Place vehicle in PARK, and chock the back wheels. Loosen lug nuts with vehicle on the ground.
2. Jack up your 4runner, place jack stands under the frame rails. Remove lug nuts and wheel.
3. Use screwdriver or clip remover to free your splash guards.

4. Place a jack under the Lower Control Arm (LCA) to give support to the steering knuckle.

5. Using Pliers, remove the Cotter Pin from the factory ball joint stud.

6. Using a 19mm wrench, loosen the UCA ball joint stud nut, but don't remove it completely.
Then strike the knuckle in this exact spot really hard to release the ball joint stud from the knuckle. There is a flat area made for this. Don't be afraid to really lay into it. It took a bunch of heavy hits to release mine.

7. Remove the nut and release the knuckle from the UCA.

8. Using a 17 mm socket to loosen the nut securing the front stabilizer link assembly that connects the stabilizer bar to the knuckle (or use a 6mm Hex key and 17mm wrench if the link spins with the nut).


9. ***Be careful not to stretch the ABS wire or brake line here*** Remove the knuckle from the UCA ball joint stud. Using a bungee cord, secure the knuckle in firmly in place.

10. Using 2 19mm wrenches, loosen the UCA through bolt.

10. Using Vice Grips, bend the inner fender of the wheel well slightly to allow the UCA through bolt to be removed.

11. On Driver's side, use a 10mm socket to:
Remove the bracket attaching the main wire loom to the frame, and then loosen the harness that holds the battery in place. Remove the Negative terminal first, then the Positive terminal. Then remove the battery and battery tray. This will allow the UCA bolt to be removed.


12. Using Pliers, open the 2 metal clips from the ABS Speed Sensor Wire, and release the Wire from the ABS wire bracket. Then, using a 10mm socket, remove the bolt securing the ABS wire bracket in place.


13. Remove the UCA from the vehicle.

Last edited: