
3rd Gen T4R DIY Maintenance, Repair and Modification Videos

Brand new to the forums and I just bought my first 2000 4Runner 2WD. I’m trying to learn how to repair my own cars and I’m starting with my new 4Runner.

The the airbag/seatbelt/SRS light is flashing on the dash. I’ve read the codes and it’s reading B0131 and B0136. I’ve scoured the internet for advise and everything keeps saying to check the pretensioner but all the videos and posts online show a yellow connector below the seats but there’s only one main white connector that I’ve reseated and hasn’t done anything.

Can anyone point me in the direction of where the pretensioner connector is because I highly believe that both left and right pretensioner issues are related.

Thanks!
 
Brand new to the forums and I just bought my first 2000 4Runner 2WD. I’m trying to learn how to repair my own cars and I’m starting with my new 4Runner.

The the airbag/seatbelt/SRS light is flashing on the dash. I’ve read the codes and it’s reading B0131 and B0136. I’ve scoured the internet for advise and everything keeps saying to check the pretensioner but all the videos and posts online show a yellow connector below the seats but there’s only one main white connector that I’ve reseated and hasn’t done anything.

Can anyone point me in the direction of where the pretensioner connector is because I highly believe that both left and right pretensioner issues are related.

Thanks!
Have you pulled the plastic trim pieces off the B-pillars to investigate? The seatbelt tensioners will be in the B-pillar right under the area where the seatbelt spools out from. The trim pieces will pull right off. In the video below, go to play time 21:15 and you can see how we first get the plastic trim piece off near the rear door and then we pry off the B-pillar plastic trim. You would also want to first remove the trim piece near the driver side door entry as well before removing the B-pillar piece.

<iframe width="560" height="315" src="https://www.youtube.com/embed/B9tD2iRlF7Y" frameborder="0" allow="accelerometer; autoplay; encrypted-media; gyroscope; picture-in-picture" allowfullscreen></iframe>
 
How exactly do I go about investigating and troubleshooting? To my knowledge, the car has never been in an accident and there has been no reason for the pretensioner to fire off.

I just removed the b pillar to look at seatbelt and tensioner. Everything appears to be in order from what I can tell.

Edit: I’m also wondering that since I’m getting the same code for both sides, if it’s an issue with the airbag assembly module. The previous owner did have a deck installed and I’m wondering if maybe some connectors weren’t reconnected after installing.
 
Last edited:
How exactly do I go about investigating and troubleshooting? To my knowledge, the car has never been in an accident and there has been no reason for the pretensioner to fire off.

I just removed the b pillar to look at seatbelt and tensioner. Everything appears to be in order from what I can tell.

Edit: I’m also wondering that since I’m getting the same code for both sides, if it’s an issue with the airbag assembly module. The previous owner did have a deck installed and I’m wondering if maybe some connectors weren’t reconnected after installing.

The fact that both pretensioner codes are going off at the same time is weird. I've never tested out a pretensioner before so I don't know the steps to see if module is fine. I don't think the installation of a stereo would mess with wiring for the air bag. The air bag connector is under the steering wheel column behind a plastic trim piece. In the video below, you'll see it at play time 21:45.
I did some research on this problem and there seems to be minimal information on how you can diagnose what's wrong.

I took some pictures from my factory service manual regarding the steps to test the pre-tensioners. Fair warning it's a little hard to understand exactly what you need to do. Send me an email, and I'll send you the photos: [email protected]

<iframe width="560" height="315" src="https://www.youtube.com/embed/xsOptgpfshg" frameborder="0" allow="accelerometer; autoplay; encrypted-media; gyroscope; picture-in-picture" allowfullscreen></iframe>
 
Last edited:
Pulled off steering wheel attachments. Didn’t appear that anyone had ever worked on the steering wheel before. I’ve reseated all the connectors.
 
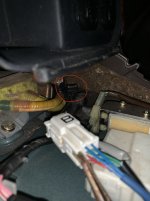
Pulled off the trim and was looking at the airbag assembly module and saw that this was not connected to anything. Does anyone know what this is and where it connects to? I didn't see anywhere to connect it to.
 

Attachments

  • fullsizeoutput_b50.jpg
    fullsizeoutput_b50.jpg
    120.6 KB · Views: 2,020
Pinion Seal Replacement

If you found your pinion seal is leaking gear oil, this video will show you how to swap it out.

<iframe width="560" height="315" src="https://www.youtube.com/embed/iUPMf3y-o9A" frameborder="0" allow="accelerometer; autoplay; encrypted-media; gyroscope; picture-in-picture" allowfullscreen></iframe>
 
tim, i just wanted to say thank you. i was able to get my LCA bushings out yesterday because if your bottle jack trick video. i know i will be utilizing your videos in the future as well, so i will be back to thank you some more!

one thing i think that really helped (you may have mentioned in your vid, i didnt see it), is once you get the bottle jack under some pressure you really need to start pumping fast to 'shock' the bushings to get them out ASAP as you really are starting to stretch the LCA pickup 'ears'. i took measurements of them before and after, and it looks like one 'grew' by about a 1/16" of an inch. i can see how you can really screw up a control arm if you arent careful enough or if the bushings are seized in there.
 
Frame Rot

I don't get. I live in Michigan. I bought my T-100 new in Savannah. My frame collapsed 2 years ago. I have been holding onto it since. I have been looking for a clean 4Runner that I could transfer my very young (100K) engine into to. Found this 4Runner not far from where I live; Detroit area. When the seller showed up, I was ready with a large piece of cardboard to look underneath at the frame. I was expecting to see chaos. To my amazement, I was looking at an immaculate, rust free frame. I don't think this truck was covered under the frame replacement agreement by Toyota. I asked him if the frame was replaced. He firmly stated no. He owned it for eight years. I don't get it. Am I hallucinating?
 
tim, i just wanted to say thank you. i was able to get my LCA bushings out yesterday because if your bottle jack trick video. i know i will be utilizing your videos in the future as well, so i will be back to thank you some more!

one thing i think that really helped (you may have mentioned in your vid, i didnt see it), is once you get the bottle jack under some pressure you really need to start pumping fast to 'shock' the bushings to get them out ASAP as you really are starting to stretch the LCA pickup 'ears'. i took measurements of them before and after, and it looks like one 'grew' by about a 1/16" of an inch. i can see how you can really screw up a control arm if you arent careful enough or if the bushings are seized in there.

You're welcome. I'm not so sure if you need to shock the bushing as you described. With enough heat, the bushing should come out without too much of a fight. But, glad to hear your technique worked out for you.

People do need to be careful of the amount of force they apply with the bottle jack and you have to use your best judgement. I always start out with a mild amount of force and then give a couple extra pumps once I heat up the arm really well. If the bushing doesn't move after a couple extra pumps, I use more heat. You don't want to bend your LCAs. That would be a bad thing.
 
I don't get. I live in Michigan. I bought my T-100 new in Savannah. My frame collapsed 2 years ago. I have been holding onto it since. I have been looking for a clean 4Runner that I could transfer my very young (100K) engine into to. Found this 4Runner not far from where I live; Detroit area. When the seller showed up, I was ready with a large piece of cardboard to look underneath at the frame. I was expecting to see chaos. To my amazement, I was looking at an immaculate, rust free frame. I don't think this truck was covered under the frame replacement agreement by Toyota. I asked him if the frame was replaced. He firmly stated no. He owned it for eight years. I don't get it. Am I hallucinating?

It sounds like the guy never drove it in the winter to avoid the road salts. Or, he was just very good about washing the rig undercarriage really well after every outing on the icy roads.
 
You're welcome. I'm not so sure if you need to shock the bushing as you described. With enough heat, the bushing should come out without too much of a fight. But, glad to hear your technique worked out for you.

People do need to be careful of the amount of force they apply with the bottle jack and you have to use your best judgement. I always start out with a mild amount of force and then give a couple extra pumps once I heat up the arm really well. If the bushing doesn't move after a couple extra pumps, I use more heat. You don't want to bend your LCAs. That would be a bad thing.

i bought spare LCAs to minimize downtime. they both came from separate cars. one LCA was clean and one bushing even popped out without heat or shocking it.

the other arm looks like it led a harder life. the bushings were in there good. even with as much heat as i could give it, they werent budging. without doing my 'shock' technique on the salty arm, i would hit a wall when pumping the bottle jack and wouldnt be able to pump anymore. i reheated everything up as hot as i could get it again and started pumping more rapidly and that helped me get an extra pump past that 'wall'. that extra pump was all i needed to get it out. that was my final go at it per-se as i could tell the arm was already starting to expand. i figured doing it faster/more rapid would be easier on the steel and allow it to have a better chance to return to its original shape.

while i am down there i am going to do the rack bushings because your rack video convinced me that is not hard with that c clamp tool from o rileys. i do have two questions:

-why do you need to lock the steering wheel/rack?

-wouldnt it be easier if you trimmed the flange off the two locator bushings to allow the rubber not to bind so much as you are shoving it through the hole while removing? i did this technique on a IS300 i used to own and i feel like it really helped. granted, i was using a punch and a big ass hammer to remove the bushings on the IS, when i should have been using the clamp tool.
 
Last edited:
i bought spare LCAs to minimize downtime. they both came from separate cars. one LCA was clean and one bushing even popped out without heat or shocking it.

the other arm looks like it led a harder life. the bushings were in there good. even with as much heat as i could give it, they werent budging. without doing my 'shock' technique on the salty arm, i would hit a wall when pumping the bottle jack and wouldnt be able to pump anymore. i reheated everything up as hot as i could get it again and started pumping more rapidly and that helped me get an extra pump past that 'wall'. that extra pump was all i needed to get it out. that was my final go at it per-se as i could tell the arm was already starting to expand. i figured doing it faster/more rapid would be easier on the steel and allow it to have a better chance to return to its original shape.

while i am down there i am going to do the rack bushings because your rack video convinced me that is not hard with that c clamp tool from o rileys. i do have two questions:

-why do you need to lock the steering wheel/rack?

-wouldnt it be easier if you trimmed the flange off the two locator bushings to allow the rubber not to bind so much as you are shoving it through the hole while removing? i did this technique on a IS300 i used to own and i feel like it really helped. granted, i was using a punch and a big ass hammer to remove the bushings on the IS, when i should have been using the clamp tool.

The bushing instructions said to lock the steering wheel but maybe that's not technically necessary because the steering rag joint is still connected to the steering rack so you couldn't throw the steering wheel centering off. At the time I didn't spend that much time analyzing this step. I just followed the instructions.

Now that I think about it more, maybe they say that step since you're completely unbolting the steering rack from the cross member and if the steering wheel starts to turn while you're working on replacing the bushings, you'll have to turn the wheel back where it was for the bolts to line back up. Also, in the video, we only disconnect the driver side tie rod and leave the passenger side one connected. If the passenger wheel turned a bit while working on the steering rack, it may pull the steering rack one way or the other without actually pulling or pushing the steering rack shaft out or in because the rack isn't bolted to the cross member. I hope that makes sense. With the steering wheel locked, you can guarantee the position of the rack hasn't changed and it will bolt back up no problem.

You could cut the bushing flange off first if you wanted and then use a punch or drift to knock it out. There was a guy that made a video of this same job that used that technique. I don't know if it's any easier though because you have to spend time cutting the bushing flange off. The c-press is sort of awkward and big so I can see how people would prefer the method you described. There's always more than one way to accomplish something and lots of times it comes down to personal preference based off the tools you own and also the technique you could come up with at the time you did the job.
 
I hope that makes sense. With the steering wheel locked, you can guarantee the position of the rack hasn't changed and it will bolt back up no problem.

You could cut the bushing flange off first if you wanted and then use a punch or drift to knock it out. There was a guy that made a video of this same job that used that technique. I don't know if it's any easier though because you have to spend time cutting the bushing flange off. The c-press is sort of awkward and big so I can see how people would prefer the method you described. There's always more than one way to accomplish something and lots of times it comes down to personal preference based off the tools you own and also the technique you could come up with at the time you did the job.

kind of, but i will definitely lock the steering wheel. if the manual says to do it, i will do it. i was more or less wondering why.

as for the rack bushings. i dont want to use a punch and a hammer. it sucks swinging a hammer underneath a car like that. i more or less was asking about cutting off the flange so you its one less thing to bind and fight you when you are trying to press it out on the opposite side. although im sure if your bushings are toast, it wont really matter anyways.

thanks again!
 
kind of, but i will definitely lock the steering wheel. if the manual says to do it, i will do it. i was more or less wondering why.

as for the rack bushings. i dont want to use a punch and a hammer. it sucks swinging a hammer underneath a car like that. i more or less was asking about cutting off the flange so you its one less thing to bind and fight you when you are trying to press it out on the opposite side. although im sure if your bushings are toast, it wont really matter anyways.

thanks again!

The bushings aren't so stiff that it makes them hard to push out with the c-press so taking the extra step to cut the bushing flange off isn't necessary. You'll see what I mean when you do the job.
 
The bushings aren't so stiff that it makes them hard to push out with the c-press so taking the extra step to cut the bushing flange off isn't necessary. You'll see what I mean when you do the job.
ah okay, well that is one less thing to do while im down there so thats good.

i went back and watched a bunch of your videos and wrote down big socket sizes and tq values. last time i worked on my runner i wish i had done this before hand. you are the best and inspire confidence that i can do the LBJs, rack bushings, cv shafts, and swap out control arms in the span of 3 days (i work slow as its just myself).

oh and while im thinking about it. i got an alignment not too long ago after i raised my 3rd gen. if im doing all of the above and mark the cam adjuster bolts, do you think it would be wise to get another alignment? if so, i will probably just end up getting tie rod ends as well.

thanks again!
 
ah okay, well that is one less thing to do while im down there so thats good.

i went back and watched a bunch of your videos and wrote down big socket sizes and tq values. last time i worked on my runner i wish i had done this before hand. you are the best and inspire confidence that i can do the LBJs, rack bushings, cv shafts, and swap out control arms in the span of 3 days (i work slow as its just myself).

oh and while im thinking about it. i got an alignment not too long ago after i raised my 3rd gen. if im doing all of the above and mark the cam adjuster bolts, do you think it would be wise to get another alignment? if so, i will probably just end up getting tie rod ends as well.

thanks again!

You absolutely can do this all this yourself. It is best practice to get an alignment after all this, because even though you mark the cam adjusters, only an alignment machine will tell you if your camber and caster are still good after swapping out the LCAs. So, you may as well do the outer tie rods at the same time. Good luck with the work. Hopefully you won't have any frozen cam adjusters to deal with. If you do, watch Part 2 for the LCA bushing replacement because I cover cutting out the cam adjusters with a reciprocating saw. If that ends up being the case, Diablo Demon Carbide Tipped Blades will be your friend.
 
thank you!! that is what i figured. i will get an alignment after.

my car is from nevada and has very little rust (in CA now). i am really hoping nothing is seized. i am just glad im getting to all of this before the snow hits in my area.
 
New to Forum - Clicking noise after regear?

Good Afternoon everyone,
just joined the forum and frankly not sure if i am posting in the appropriate section.

Anyhow, i recently re geared my 4runner to 4.88. Everything runs beautifully, however, we are experiencing a well defined clicking noise while making hard turns.

I have double checked to make sure it was not a CV axle.

What is strange is after re-lubricating my driveshaft the clicking noise briefly went away, but after sitting in the driveway for another week it seems to be back in full force.

I would love to hear what everyone has to say, could it be broken spider gears?

Thanks ALl
 

Members online

Forum statistics

Threads
278,310
Messages
3,554,080
Members
248,016
Latest member
Advally Service

Trending content

Back
Top