Home Menu

Site Navigation


User Tag List

Reply
 
Thread Tools Rate Thread Display Modes
Old 05-09-2011, 07:55 PM #1
rickashay's Avatar
rickashay rickashay is offline
Senior Member
 
Join Date: Dec 2010
Location: Nelson, BC
Posts: 2,552
Real Name: Addison
rickashay is a splendid one to behold rickashay is a splendid one to behold rickashay is a splendid one to behold rickashay is a splendid one to behold rickashay is a splendid one to behold rickashay is a splendid one to behold rickashay is a splendid one to behold
rickashay rickashay is offline
Senior Member
rickashay's Avatar
 
Join Date: Dec 2010
Location: Nelson, BC
Posts: 2,552
Real Name: Addison
rickashay is a splendid one to behold rickashay is a splendid one to behold rickashay is a splendid one to behold rickashay is a splendid one to behold rickashay is a splendid one to behold rickashay is a splendid one to behold rickashay is a splendid one to behold
How "pre-wired" am I?? (E-Locker Wiring Help Needed)

So I have been reading and searching until my eyes pop out, on the e-locker wiring. There are a couple ways to do this, some being easier than others - the dual relay 12V method seems to be the quick and easy method.

As shown here: Outdoor Recreation Network - Off-Highway, Jeep, & 4x4 Fun

I however, have a complete e-locked 96 4Runner sitting at my disposal (wrecked). I have already pulled the entire rear axle out from under it and in the process of cleaning up the housing and re-painting it/replacing seals etc. I would like to use all of the factory wiring for the e-locker and use the factory e-locker switch on the dash and the light in the cluster to indicate when the rear end is "locked."

I know from reading this article (Retrofit Electric Locker) that some 4Runners came kind of "pre-wired" for the e-locker even if they were not equiped with one, and I'm hoping this is what I have!! I pulled apart my dash today to look by the factory fuse block behind the kick panel and see if I could find any stashed connectors like in the article mentioned above. I found nothing. I thought all hope was lost until I pulled the area below my cluster (where the e-locker switch is supposed to go) and found these:
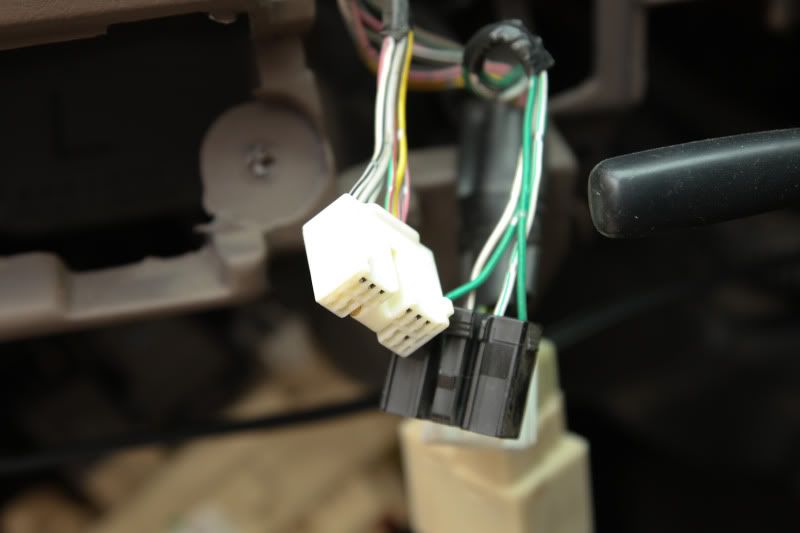
(the e-locker switch plug is kind of out of site here)

Now my question is this: is the black plug pictured above the same plug that is supposed to plug into the "4WD Control Computer" that is needed to run the e-locker?

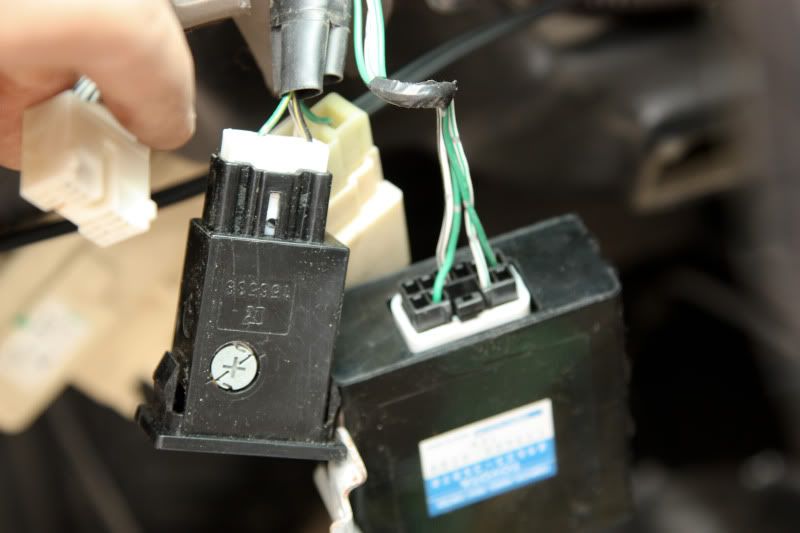
The black plug fits perfectly into the 4WD control computer:


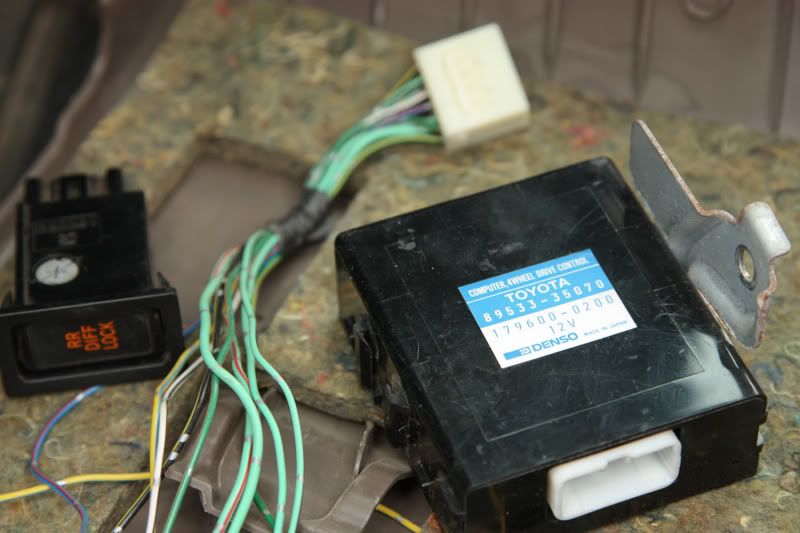
The following photo is the gutted harness from my donor vehicle. You can see the plug that runs into the 4WD control computer, the e-locker switch, and the computer itself.


Here is a comparison of the two plugs:

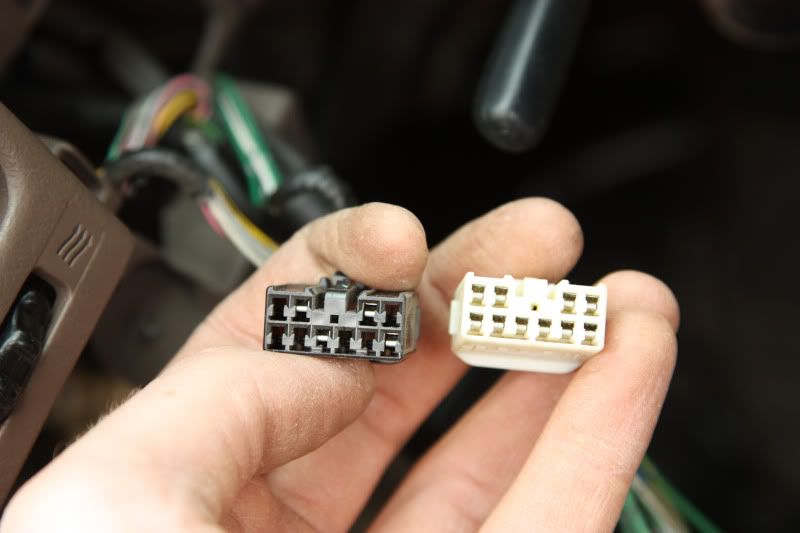
(They are rotated opposite, sorry)

As per the article posted above, I tried plugging in the 4WD control computer and the e-locker switch, engaged the truck in 4LO and tried to see if the "RR Diff Lock" light would illuminate in my cluster, it did not. It appears that the black plug has less wiring coming out of it than the "pre-wired" plug that was found under the dash in the article above.

I am just trying to find out where I stand. What is the black plug for, if not for the locker? Is my 4Runner only "pre-wired" for the e-locker switch? is this common among all 3rd gens?

FYI: my original thought was that I would simply pull the entire harness out of my donor vehicle and put it in my 98 4runner. This however, will be VERY difficult as the harness for the e-locker is intertwined into pretty much everything else under the dash. I would need to pretty much swap the entire wiring harness, and im NOT about to do that. I would do the 12V setup but dont want to spend a dollar more on this project if I can help it!
rickashay is offline   Reply With QuoteReply With Quote
Old 05-09-2011, 08:22 PM #2
Singtoe's Avatar
Singtoe Singtoe is offline
Senior Member
 
Join Date: Oct 2010
Location: Raleigh, North Carolina
Posts: 3,262
Singtoe will become famous soon enough
Singtoe Singtoe is offline
Senior Member
Singtoe's Avatar
 
Join Date: Oct 2010
Location: Raleigh, North Carolina
Posts: 3,262
Singtoe will become famous soon enough
If you have the plug for the switch, you probably have the plug for the ecm. I think that you are using the wrong plug. You need to remove the drivers kick panel, and there you will find a plug that has been taped up to a wire harness. Plug the box in and see if the diff light will come on.
Singtoe is offline   Reply With QuoteReply With Quote
Old 05-09-2011, 08:48 PM #3
rickashay's Avatar
rickashay rickashay is offline
Senior Member
 
Join Date: Dec 2010
Location: Nelson, BC
Posts: 2,552
Real Name: Addison
rickashay is a splendid one to behold rickashay is a splendid one to behold rickashay is a splendid one to behold rickashay is a splendid one to behold rickashay is a splendid one to behold rickashay is a splendid one to behold rickashay is a splendid one to behold
rickashay rickashay is offline
Senior Member
rickashay's Avatar
 
Join Date: Dec 2010
Location: Nelson, BC
Posts: 2,552
Real Name: Addison
rickashay is a splendid one to behold rickashay is a splendid one to behold rickashay is a splendid one to behold rickashay is a splendid one to behold rickashay is a splendid one to behold rickashay is a splendid one to behold rickashay is a splendid one to behold
Quote:
Originally Posted by Singtoe View Post
If you have the plug for the switch, you probably have the plug for the ecm. I think that you are using the wrong plug. You need to remove the drivers kick panel, and there you will find a plug that has been taped up to a wire harness. Plug the box in and see if the diff light will come on.
Yah, I pulled the kick panel and found nothing of the sort.....
rickashay is offline   Reply With QuoteReply With Quote
Old 05-09-2011, 10:46 PM #4
Singtoe's Avatar
Singtoe Singtoe is offline
Senior Member
 
Join Date: Oct 2010
Location: Raleigh, North Carolina
Posts: 3,262
Singtoe will become famous soon enough
Singtoe Singtoe is offline
Senior Member
Singtoe's Avatar
 
Join Date: Oct 2010
Location: Raleigh, North Carolina
Posts: 3,262
Singtoe will become famous soon enough
Quote:
Originally Posted by rickashay View Post
Yah, I pulled the kick panel and found nothing of the sort.....
Sorry bud, bad luck. Well you have the switch and the harness. It would be easy enough to make your self a subharness to get you going.

These are the 10 wires that come out of the Elocker ECM

Pin 1 to the diff light in the instrument cluster and to the "locked" switch in the elocker. (supplies ground signal when activated)
Pin 2 goes to the light green and red wire on the elocker.
Pin 3 goes to the light green wire on the elocker.
Pin 4 is the switch circuit. Must have a switch wire supplying +12 volts.
Pin 5 is +12 (original wiring had 20 amp fuse, so it wouldn't hurt to go ahead and install a fuse)
Pin 6 is goes to the light green with black stripe wire on the elocker.
Pin 7 goes to ground
Pin 8 is the 4wd low input from the transfer case. Ground this wire.
Pin 9 goes to light green and yellow wire on the elocker
Pin 10 is the speed sensor. Ground the VSS (speed) wire.

Other wires needed would be a ground going to the black and white wires on the elocker and +12 (10 amp fused) going to the other side of the RR DIFF switch.

Pretty easy.
Singtoe is offline   Reply With QuoteReply With Quote
Old 05-09-2011, 11:11 PM #5
JWaldz's Avatar
JWaldz JWaldz is offline
Moderator
 
Join Date: Oct 2010
Location: Colo Springs, CO
Age: 37
Posts: 5,150
Real Name: Waldo
JWaldz is a jewel in the rough JWaldz is a jewel in the rough JWaldz is a jewel in the rough
JWaldz JWaldz is offline
Moderator
JWaldz's Avatar
 
Join Date: Oct 2010
Location: Colo Springs, CO
Age: 37
Posts: 5,150
Real Name: Waldo
JWaldz is a jewel in the rough JWaldz is a jewel in the rough JWaldz is a jewel in the rough
I went through this not too long ago and swapped in a complete '97 elocker axle. I had no 'pre-wiring'. Singtoe is correct though, it's not all really that hard if you wanna keep your computer and button.

Another option would be, unless you really want the factory button and computer I would just suggest doing a wire retrofit and ridding of them both. It's fairly easy and you wont have to do the grey wire mod later. The locker will be fully independent. This is the route I took. PM me if you want some details and a list of items you would need.
__________________
'99 Toyota 4Runner LTD - Dual Locked | Geared | Mid-Travel | 35s | Armored
Sponsors: Coastal OR | Extreme LED | SherpaEC | Overland GG

3G Build: ShowGirl | Instagram: ^Click Above^ | FB Page: JWaldz4R | T4R Mod: Contact Me

Last edited by JWaldz; 05-09-2011 at 11:15 PM.
JWaldz is offline   Reply With QuoteReply With Quote
Old 05-09-2011, 11:59 PM #6
rickashay's Avatar
rickashay rickashay is offline
Senior Member
 
Join Date: Dec 2010
Location: Nelson, BC
Posts: 2,552
Real Name: Addison
rickashay is a splendid one to behold rickashay is a splendid one to behold rickashay is a splendid one to behold rickashay is a splendid one to behold rickashay is a splendid one to behold rickashay is a splendid one to behold rickashay is a splendid one to behold
rickashay rickashay is offline
Senior Member
rickashay's Avatar
 
Join Date: Dec 2010
Location: Nelson, BC
Posts: 2,552
Real Name: Addison
rickashay is a splendid one to behold rickashay is a splendid one to behold rickashay is a splendid one to behold rickashay is a splendid one to behold rickashay is a splendid one to behold rickashay is a splendid one to behold rickashay is a splendid one to behold
Quote:
Originally Posted by ARKRWLR View Post
Another option would be, unless you really want the factory button and computer I would just suggest doing a wire retrofit and ridding of them both. It's fairly easy and you wont have to do the grey wire mod later. The locker will be fully independent. This is the route I took. PM me if you want some details and a list of items you would need.
Are you talking about the dual relay standalone method?

And thanks for the info Singtoe!!
rickashay is offline   Reply With QuoteReply With Quote
Old 05-10-2011, 12:34 AM #7
Brandon250r Brandon250r is offline
Junior Member
 
Join Date: May 2011
Posts: 4
Brandon250r is on a distinguished road
Brandon250r Brandon250r is offline
Junior Member
 
Join Date: May 2011
Posts: 4
Brandon250r is on a distinguished road
Quote:
Originally Posted by ARKRWLR View Post
I went through this not too long ago and swapped in a complete '97 elocker axle. I had no 'pre-wiring'. Singtoe is correct though, it's not all really that hard if you wanna keep your computer and button.

Another option would be, unless you really want the factory button and computer I would just suggest doing a wire retrofit and ridding of them both. It's fairly easy and you wont have to do the grey wire mod later. The locker will be fully independent. This is the route I took. PM me if you want some details and a list of items you would need.
That would be awesome if you could post up. I'm just beginning my journey of gathering information to add this to my 3rd gen.
Brandon250r is offline   Reply With QuoteReply With Quote
Old 05-10-2011, 01:30 AM #8
JWaldz's Avatar
JWaldz JWaldz is offline
Moderator
 
Join Date: Oct 2010
Location: Colo Springs, CO
Age: 37
Posts: 5,150
Real Name: Waldo
JWaldz is a jewel in the rough JWaldz is a jewel in the rough JWaldz is a jewel in the rough
JWaldz JWaldz is offline
Moderator
JWaldz's Avatar
 
Join Date: Oct 2010
Location: Colo Springs, CO
Age: 37
Posts: 5,150
Real Name: Waldo
JWaldz is a jewel in the rough JWaldz is a jewel in the rough JWaldz is a jewel in the rough
1) DPDT Momentary switch body Click

2) "Rear Locker" Switch lens of your choice color. Can be found on that same site left side under the "CARLING TECH CONTURA ROCKERS/ACTUATORS ONLY" styles.
Blue
Red

3) Some kind of cable that is 18 gauge at least. You can make 3 runs of 2 conductor or one single run of 6 conductor. 18-6 is a little harder to come by than 18-2 and more expensive. You could maybe find a commercial or residential alarm company and see if they have some you can snag. I don't know if home depot or a hardware store will have any 18-6.

3) Wire loom and zip ties to run the cable in under the truck.

4) You'll want to solder your cable to the wires off the plug of the elocker as well as use some shrink wrap to melt around the solder to secure it. Make sure you write down what color wire goes to what from the plug cus you will need this during installment of the switch. You DO NOT need any other kind of elocker harness other than the harness that plugs into the elocker motor itself. It should have 6 or 7 (I can't remember) wires coming out of it.

5) A few crimp on female connectors to connect cabling to switch.

6) You'll need this

and

7) it might help to know this as well


I need to find my dang notebook I wrote all my color coding in. It would help out. Once I find it I'll finalize this write up. Here's another link that would be helpful if read 4x4Wire Elec Locker
__________________
'99 Toyota 4Runner LTD - Dual Locked | Geared | Mid-Travel | 35s | Armored
Sponsors: Coastal OR | Extreme LED | SherpaEC | Overland GG

3G Build: ShowGirl | Instagram: ^Click Above^ | FB Page: JWaldz4R | T4R Mod: Contact Me

Last edited by JWaldz; 05-10-2011 at 01:39 AM.
JWaldz is offline   Reply With QuoteReply With Quote
Old 05-10-2011, 01:47 AM #9
Brandon250r Brandon250r is offline
Junior Member
 
Join Date: May 2011
Posts: 4
Brandon250r is on a distinguished road
Brandon250r Brandon250r is offline
Junior Member
 
Join Date: May 2011
Posts: 4
Brandon250r is on a distinguished road
Awesome thank you!

is that basically the do it your self version of this?

Inchworm Gear - Toyota Rockcrawling Equipment
Brandon250r is offline   Reply With QuoteReply With Quote
Old 05-10-2011, 09:10 AM #10
JWaldz's Avatar
JWaldz JWaldz is offline
Moderator
 
Join Date: Oct 2010
Location: Colo Springs, CO
Age: 37
Posts: 5,150
Real Name: Waldo
JWaldz is a jewel in the rough JWaldz is a jewel in the rough JWaldz is a jewel in the rough
JWaldz JWaldz is offline
Moderator
JWaldz's Avatar
 
Join Date: Oct 2010
Location: Colo Springs, CO
Age: 37
Posts: 5,150
Real Name: Waldo
JWaldz is a jewel in the rough JWaldz is a jewel in the rough JWaldz is a jewel in the rough
Quote:
Originally Posted by Brandon250r View Post
Awesome thank you!

is that basically the do it your self version of this?

Inchworm Gear - Toyota Rockcrawling Equipment
Yes, pretty much. You wont have to deal with any resistors or fuses and will only have one switch to do all the work.

An another note, I found my notebook and I will whip up a color code diagram when I get off work. I'll prob start a new thread when I do.
__________________
'99 Toyota 4Runner LTD - Dual Locked | Geared | Mid-Travel | 35s | Armored
Sponsors: Coastal OR | Extreme LED | SherpaEC | Overland GG

3G Build: ShowGirl | Instagram: ^Click Above^ | FB Page: JWaldz4R | T4R Mod: Contact Me

Last edited by JWaldz; 05-10-2011 at 09:14 AM.
JWaldz is offline   Reply With QuoteReply With Quote
Old 05-10-2011, 03:32 PM #11
rickashay's Avatar
rickashay rickashay is offline
Senior Member
 
Join Date: Dec 2010
Location: Nelson, BC
Posts: 2,552
Real Name: Addison
rickashay is a splendid one to behold rickashay is a splendid one to behold rickashay is a splendid one to behold rickashay is a splendid one to behold rickashay is a splendid one to behold rickashay is a splendid one to behold rickashay is a splendid one to behold
rickashay rickashay is offline
Senior Member
rickashay's Avatar
 
Join Date: Dec 2010
Location: Nelson, BC
Posts: 2,552
Real Name: Addison
rickashay is a splendid one to behold rickashay is a splendid one to behold rickashay is a splendid one to behold rickashay is a splendid one to behold rickashay is a splendid one to behold rickashay is a splendid one to behold rickashay is a splendid one to behold
Quote:
Originally Posted by ARKRWLR View Post
Yes, pretty much. You wont have to deal with any resistors or fuses and will only have one switch to do all the work.

An another note, I found my notebook and I will whip up a color code diagram when I get off work. I'll prob start a new thread when I do.
Ok, that would be great! I haven't seen this method before but its awesome cause you dont have to use any relays, just the switch. Sweet I may be going this route.
rickashay is offline   Reply With QuoteReply With Quote
Old 05-10-2011, 06:14 PM #12
StreetKill831's Avatar
StreetKill831 StreetKill831 is offline
Member
 
Join Date: Oct 2010
Location: Chelsea MI
Age: 33
Posts: 363
StreetKill831 is on a distinguished road
StreetKill831 StreetKill831 is offline
Member
StreetKill831's Avatar
 
Join Date: Oct 2010
Location: Chelsea MI
Age: 33
Posts: 363
StreetKill831 is on a distinguished road
I plan on swapping the e-locker axle and front diff out of my 2000 into my '98. I need both to be completely functional when done. Would it be possible to just swap the harnesses? Or would that cause the push button 4w-hi on the 2000 to not function properly?
__________________
'98 SR5 v6 4x4- ARB Bullbar/bumper, OME HD 2.5" kit -881s up front, as well as 3/4" Toytec top plates. -891s in back, Pioneer Navigation, Rear diff breather extension, Shrockworks sliders, Budbuilt front and belly skids, ScanGuageII, deck mod, 285/75/r16 BFG Mud Terrains KM2s
2000 Ltd 4x4 w/ E-locker- Swapping both diffs with my '98
'90 SR5 4x4- SOLD
StreetKill831 is offline   Reply With QuoteReply With Quote
Old 05-12-2011, 11:23 PM #13
Brandon250r Brandon250r is offline
Junior Member
 
Join Date: May 2011
Posts: 4
Brandon250r is on a distinguished road
Brandon250r Brandon250r is offline
Junior Member
 
Join Date: May 2011
Posts: 4
Brandon250r is on a distinguished road
Didn't realize the first pic was the pin out of the 8 pin connector, deleted the post so it doesn't have wrong info in it.

No rush here on the diagram. I dont even have the axle under it yet

Thank you tons in advance tho!!!

Last edited by Brandon250r; 05-12-2011 at 11:36 PM.
Brandon250r is offline   Reply With QuoteReply With Quote
Old 05-12-2011, 11:34 PM #14
JWaldz's Avatar
JWaldz JWaldz is offline
Moderator
 
Join Date: Oct 2010
Location: Colo Springs, CO
Age: 37
Posts: 5,150
Real Name: Waldo
JWaldz is a jewel in the rough JWaldz is a jewel in the rough JWaldz is a jewel in the rough
JWaldz JWaldz is offline
Moderator
JWaldz's Avatar
 
Join Date: Oct 2010
Location: Colo Springs, CO
Age: 37
Posts: 5,150
Real Name: Waldo
JWaldz is a jewel in the rough JWaldz is a jewel in the rough JWaldz is a jewel in the rough
no.. that 1st diagram is only for a knowledge basis of knowing what color does what. In no way do both those diagrams correspond with each other. I'm working on the wiring write up but I'm trying to get pics and all my ducks in a row before I post it. I might go ahead and post it now, and worry bout more pics later.
__________________
'99 Toyota 4Runner LTD - Dual Locked | Geared | Mid-Travel | 35s | Armored
Sponsors: Coastal OR | Extreme LED | SherpaEC | Overland GG

3G Build: ShowGirl | Instagram: ^Click Above^ | FB Page: JWaldz4R | T4R Mod: Contact Me

Last edited by JWaldz; 05-12-2011 at 11:37 PM.
JWaldz is offline   Reply With QuoteReply With Quote
Old 05-12-2011, 11:37 PM #15
Brandon250r Brandon250r is offline
Junior Member
 
Join Date: May 2011
Posts: 4
Brandon250r is on a distinguished road
Brandon250r Brandon250r is offline
Junior Member
 
Join Date: May 2011
Posts: 4
Brandon250r is on a distinguished road
You rock!

*edited previous post
Brandon250r is offline   Reply With QuoteReply With Quote
Reply


Posting Rules
You may not post new threads
You may not post replies
You may not post attachments
You may not edit your posts

BB code is On
Smilies are On
[IMG] code is On
HTML code is On

Forum Jump

Similar Threads
Thread Thread Starter Forum Replies Last Post
My Next "Gotta-Have-It" Mod : ARB Locker KellyJ 3rd gen T4Rs 8 04-03-2011 06:10 PM
Zero point didnt work how to turn off "VSC TRAC" & "VSC OFF" & "ABS" lights sciff5 4th Gen T4Rs 6 09-27-2010 12:10 AM
SPARCO Racing Seats for Pickups & 4Runners "Bolt-On" (Everything needed is included) trdmcquade Classifieds - buy & sell (no commercial ads please) 0 03-24-2010 03:14 AM
A "Touch" of Advice needed alaskaman Maintenance/Detailing 4 02-28-2008 01:22 PM

Powered by vBadvanced CMPS v3.2.2

All times are GMT -4. The time now is 08:30 PM.

Powered by vBulletin® Version 3.8.11
Copyright ©2000 - 2024, vBulletin Solutions Inc.
Search Engine Optimisation provided by DragonByte SEO (Pro) - vBulletin Mods & Addons Copyright © 2024 DragonByte Technologies Ltd.
Feedback Buttons provided by Advanced Post Thanks / Like (Lite) - vBulletin Mods & Addons Copyright © 2024 DragonByte Technologies Ltd.
User Alert System provided by Advanced User Tagging (Lite) - vBulletin Mods & Addons Copyright © 2024 DragonByte Technologies Ltd.
***This site is an unofficial Toyota site, and is not officially endorsed, supported, authorized by or affiliated with Toyota. All company, product, or service names references in this web site are used for identification purposes only and may be trademarks of their respective owners. The Toyota name, marks, designs and logos, as well as Toyota model names, are registered trademarks of Toyota Motor Corporation***Ad Management plugin by RedTyger
 
Copyright © 2020