E-Locker and Differential Breather install, Trail Edition

DesertCanyons

New member
I read several threads on how to install the Scuba Mod for the rear differential and axle. I had to read a lot before I realized there's also a one-way valve for the E-Locker on the Trail Edition that should also be extended up to an elevated valve. This thread is about how I installed an air line from both of these rear differential units to a higher point.
Before I tried this mod I read the many threads about how to install the mod for just the differential/axle. I found them very helpful but limited to the diff/axle breather.
http://www.toyota-4runner.org/5th-gen-t4rs/150158-rear-diff-breather-mod-complete.html
http://www.toyota-4runner.org/1721720-post13.html
And one source for a filtered breather part. This part is too large to fit next to the gas cap. It's often mounted inside the jack tool compartment.
Differential Breather Kit - Raw Mind Engineering

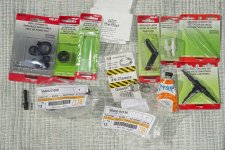
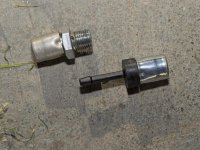
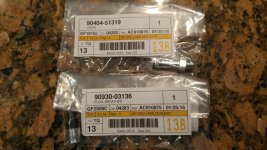
For the top end of the tube I used a Toyota part which looks like it might be a one way valve for one of the breather tubes on the front diff' or transmission, located at the front firewall. The Toyota part number is shown in the photos below. For the connection to the diff' I used the same part recommended in the links above and shown in the photos below. Both parts together cost about $16.

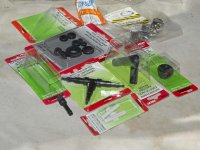
I also bought a set of couplers, a T-coupler, grommets, hose clamps and 1/4" and 5/16" fuel line hose from my local auto parts store, Pep Boys. The connector parts are shown below. I didn't use all of them but did use one of the PVC grommets, a T-coupler and a universal straight coupler. The tube on the breather part doesn't fit in the 1/4" tube so I used a 2nd piece of 5/16" hose.

Before you start, remove the spare tire and the left rear mud guard. Remove the inside edge of the plastic wheel well liner so it can be bent forward and outward. If anyone knows an easy way to pop those plastic body clips please speak up. It would have been easier if I had removed the whole wheel well liner.

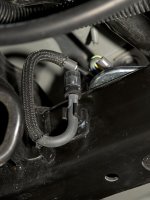
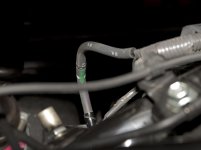
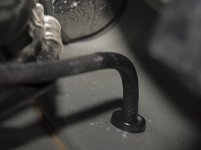
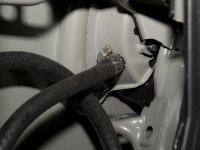
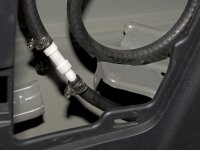
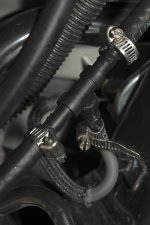
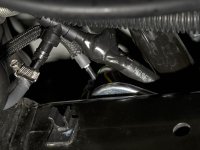
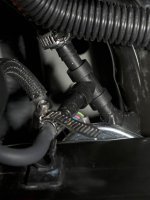
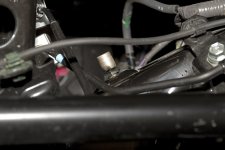
See the photos of the OEM one-way valves in place on the differential/axle and the E-Locker. In the photos notice the diff/axle valve, the tube leading from the E-Locker, the E-Locker valve extended to behind a frame cross bar, the parts from Pep Boys and the 2 original one-way valves after they were removed. The threaded valve is from the axle and the one with a small tube fitting is from the end of the small tube from the E-Locker.

Notice that the E-Locker tube runs through a grey plastic electrical bundle protector. The thin tube comes out of that bundle and loops down and then up to the valve behind the frame, which is next to that same bundled wire connector plug.

I've posted more photos in the next few posts. I used a 100 mm macro lens and strobe for these photos which prevented me from taking wide shots of the frame around the parts but I think this lens worked to show most of the parts.
 

Attachments
  • Breather7192.jpg
    Breather7192.jpg
    115.3 KB · Views: 14,153
  • Breather7195.jpg
    Breather7195.jpg
    129.2 KB · Views: 15,296
  • Breather7196.jpg
    Breather7196.jpg
    102.9 KB · Views: 13,687
  • Breather7214.jpg
    Breather7214.jpg
    135.7 KB · Views: 13,505
  • Breather7220.jpg
    Breather7220.jpg
    145.8 KB · Views: 13,565
  • Breather7231.jpg
    Breather7231.jpg
    134 KB · Views: 14,026
Last edited:
Register to hide this ad
Routing the diff' and E-Locker breather tube

For the tube location I tried to find the large OEM grommet that everyone else shows. I couldn't see it from the top, inside the jack tool compartment. I think it's hidden below the tool brackets. A couple of people posted pic's of the OEM grommet with crude holes carved in the rubber. At least one person did a better job using a tube to punch the rubber. Given its low, exposed location and the thin, oversized grommet, this install is likely to leak in a deep stream crossing.

I decided to buy a new grommet to fit the hose and drill a new hole in the wheel well where it's higher and easier to access from inside. I found a PVC valve grommet that fit the hose. It is about 3/8" thick and has a wide surface area for resisting leakage. Using an angled drill motor I drilled a hole from inside the tool compartment where the jack is mounted. I drilled a small test hole to verify it was high up in the wheel well area. Then I drilled a 1/2" hole and ground it out farther, to about 5/8", with a drill-mounted, 5/8" tapered cylindrical grinding stone. The grommet fit perfectly and provides more surface area around the hose and against the metal wheel well.

Some of you may find a better place to install a new grommet than up on the wheel well but it's really hard to locate where you're looking from the underside and relate it to where that is inside the tool compartment. If you find a generic PVC grommet verify the diameter of hole you need.

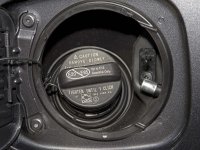
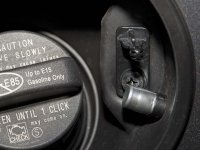
Next I drilled a small hole and located the breather part next to the gas cap, below the latch post. It's more upright here and these work simply by gravity, the weight of the metal cap on a tube end. The photo doesn't show the tube connector end but it fit's a 5//16" fuel line tube. The small connector goes through the body. The tube and clamp are located inside the jack tool compartment. A universal tube connector was placed inside the jack compartment to transition from 5/16" to 1/4" tube. The 1/4" tube goes through the PVC valve grommet. I left a coil of the tube in the tool compartment because, they sold me more than I needed, I have no other use for it and it makes it easier to access the tube later if the connector needs replacing.
 

Attachments

  • Breather7202.jpg
    Breather7202.jpg
    110 KB · Views: 13,345
  • Breather7204.jpg
    Breather7204.jpg
    129.6 KB · Views: 13,633
  • Breather7207.jpg
    Breather7207.jpg
    138.1 KB · Views: 13,471
  • Breather7208.jpg
    Breather7208.jpg
    132.1 KB · Views: 13,393
  • Breather7203.jpg
    Breather7203.jpg
    120.3 KB · Views: 13,466
  • Breather7211.jpg
    Breather7211.jpg
    106.4 KB · Views: 13,390
Running the tube under the frame

3rd and Final Post
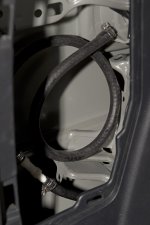
Moving away from the jack compartment through the wheel well and PVC valve grommet I routed the 1/4" fuel line tube next to the gas fill tube. I extended the tube to just over the OEM E-Locker valve location, where I installed a T-coupler. I installed the smaller OEM E-Locker tube end to the T and added another section of 1/4" tube extending towards the axle. I looped the tube loosely over the gas fill tube behind the gas tank in 3 big, 6" round loops and connected it to the Toyota union on the diff/'axle.

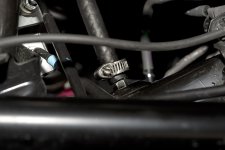
Where the T sits next to the E-Locker connection plug I wrapped the hose clamp with electrical tape so it won't wear on the wires or cause a short later, as the car moves.

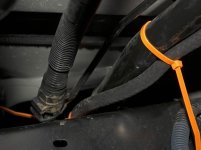
I used plastic wire ties (orange) to keep the 1/4" tube in place everywhere except over the axle, where it must move freely as the axle moves up and down. I have three loops of hose over the fuel pipe so it has plenty of slack to take up as the axle shifts. Using two ties I tied the T-coupler to the shiny metal plate on top of the frame, under the E-Locker bundled wire connection mount. These 2 anchor ties are not visible in the photos.

I believe this solution to the E-Locker and Differential/axle breather install is better and easier than the threads I've read, linked above. The holes in the metal body work were easy to access. The PVC valve grommet is a better seal than the OEM grommet which sits lower, behind the wheel well. If the OEM grommet leaks I don't think you can see that because it sits below the tool brackets. Routing the 1/4" tube was easy and direct, following the fuel filler tube. There's no pressure in the system since it's open all the time. The OEM E-Locker one-way valve was merely slipped inside the thin grey tube without a hose clamp. This solution works and after seeing what Toyota installed, it's much safer for protecting your expensive drive train from water intrusion.
 

Attachments

  • Breather7222.jpg
    Breather7222.jpg
    113.5 KB · Views: 14,227
  • Breather7223.jpg
    Breather7223.jpg
    120.7 KB · Views: 13,715
  • Breather7226.jpg
    Breather7226.jpg
    129.1 KB · Views: 13,991
  • Breather7234.jpg
    Breather7234.jpg
    120.8 KB · Views: 13,305
  • Breather7237.jpg
    Breather7237.jpg
    124.7 KB · Views: 13,357
  • BreatherLars.jpg
    BreatherLars.jpg
    139.6 KB · Views: 13,345
Don't forget that the whole point of relocating the breather is so you can get rid of those valves and use a filter instead.
 
[MENTION=115572]DesertCanyons[/MENTION],

Very nice write-up with descriptions & on all parts used.

Don't forget that the whole point of relocating the breather is so you can get rid of those valves and use a filter instead.

Just as [MENTION=136186]T5RUNNER[/MENTION], pointed out, you need a filter, not the one way valves.... pressures can equalize continuously!
 
Nice write-up! This will be my first mod in a week or two. I'm thinking I'll be lazy and order the ARB kit from Amazon Amazon.com: ARB 170112 Differential Axle Breather: Automotive but then run it up along the electrical sensor wiring along the passenger side up to the engine bay. I know it's more $ then I need to spend to get the same result but it will be time saved shopping and waiting for parts. Thanks Prime!
 
[MENTION=115572]DesertCanyons[/MENTION] thanks for the detailed writeup and pics, i was in the same situation, lots of reading available on the diff breather relocation but not much mention of the E-locker tie-in. this helps a lot

[MENTION=136186]T5RUNNER[/MENTION] [MENTION=103267]Saker[/MENTION] am i understanding this right, the Breather 90930-03136 is a 1-way valve and not a 2-way breather? this is something i'm still confused on after reading many of these threads.
 
Don't forget that the whole point of relocating the breather is so you can get rid of those valves and use a filter instead.

Pretty sure he is using the breather part# 90930-03136

It is not one way.. It just has a dust cap... no filter element. Same ones are up front at the top of the drivers fender for the ADD and front diff.... I think.
 
OEM Toyota "plug, breather" part

Don't forget that the whole point of relocating the breather is so you can get rid of those valves and use a filter instead.

[MENTION=136186]T5RUNNER[/MENTION] and [MENTION=103267]Saker[/MENTION]
Hi and thanks to everyone for questioning how the OEM Toyota "plug, breather" part works. This is a good question.

I saw the filter manifold and photos of how people install them in the jack tool compartment. The only downside is the top of the breather line is inside the truck. If it exhales those fumes are inside. If it malfunctions, and I've seen the GX 470 do this, it can spit oil up and out. Not sure how likely that is? The filter doesn't fit behind the gas cap filler door, AFAIK.

I have assumed the OEM Toyota "plug, breather" part can draw air. Otherwise the diff couldn't equalize the pressure as it cools in your garage. All diff's have an opening somewhere, right? Later today I'll test this with the parts I removed. If it can draw air and exhale air then my assumption is correct. And these are the same breathers Toyota uses in the front.
 
Last edited:
Pretty sure he is using the breather part# 90930-03136

It is not one way.. It just has a dust cap... no filter element. Same ones are up front at the top of the drivers fender for the ADD and front diff.... I think.

Correct. The part that he has (same as what I used) is not a 1-way. It is the same breather used by the front differential, which is a 2 way breather.
 
Don't forget that the whole point of relocating the breather is so you can get rid of those valves and use a filter instead.

The OEM part that [MENTION=115572]DesertCanyons[/MENTION] used is the same part that is used for the front differential, which is a 2 way breather. The rear OEM breather is one way, as it sits on the axle and is subject to being submerged. The front differential breather from the factory is mounted up on the passenger side firewall and hence is capped with a 2 way breather because it is not in danger of being submerged.
 
Nice write-up! This will be my first mod in a week or two. I'm thinking I'll be lazy and order the ARB kit from Amazon Amazon.com: ARB 170112 Differential Axle Breather: Automotive but then run it up along the electrical sensor wiring along the passenger side up to the engine bay. I know it's more $ then I need to spend to get the same result but it will be time saved shopping and waiting for parts. Thanks Prime!

If you're thinking of running the lines separately, the ARB is probably the best way to go. Looking back now, I should have done it that way. I ran separate lines and had to do some finagling to make it all work together. If you're just running the axle breather, its cheaper to do just the single line with OEM parts. My Toyota dealer had them in stock within 48 hours. Fuel/transmission line and hose clamps are readily available at an auto store.
 
The breather caps are one way valves, but only work properly when mounted vertically. When your diff cools it draws air in through the axle seals. That's fine in a parking lot, but not so good in a creek crossing. You can by special tiny filters made exactly for this.
 
I'm not a big fan of installing the breather tube at the gas cap area. There is no reason for it to be there. The gas cap area still gets VERY DIRTY. Its not a clean area. Yes it is higher up but there are plenty of areas under the vehicle that are higher up also.

When I go for a prolonged camping trip I usually have to hose down the gas cap area with water because its caked with dust from off roading.
 
Pretty sure he is using the breather part# 90930-03136

It is not one way.. It just has a dust cap... no filter element. Same ones are up front at the top of the drivers fender for the ADD and front diff.... I think.

Yes [MENTION=106176]wfo9[/MENTION] ,

The part numbers are shown in the photos. The last photo, in post#3, was taken by another forum member here. He used these last week to relocate the breather in his Lexus GX 470 and sent me that photo. He bought it at the Toyota dealer, which is what I did. Somehow we bought different "union" parts, as you can see for yourself, but they both work. :D

It has a loose metal dust/water cap. Yesterday in the "What did you do in/to your 5th Gen today" thread (see page 945) [MENTION=103267]Saker[/MENTION] says he took his old OEM breather apart and found a spring under the cap. He didn't say exactly how the spring assists with the one-way breather valve, but it's there. I'm tempted to take one of the two OEM breathers I removed apart and see for myself. Maybe I will... :photo:
 
The OEM part that [MENTION=115572]DesertCanyons[/MENTION] used is the same part that is used for the front differential, which is a 2 way breather. The rear OEM breather is one way, as it sits on the axle and is subject to being submerged. The front differential breather from the factory is mounted up on the passenger side firewall and hence is capped with a 2 way breather because it is not in danger of being submerged.

I guess this is possible but I've never heard of such a part. If you're going to all this trouble to protect the diff, why not just use a proper filter?
 
[MENTION=136186]T5RUNNER[/MENTION] and [MENTION=103267]Saker[/MENTION]
Hi and thanks to everyone for questioning how the OEM Toyota "plug, breather" part works. This is a good question.

I saw the filter manifold and photos of how people install them in the jack tool compartment. The only downside is the top of the breather line is inside the truck. If it exhales those fumes are inside. If it malfunctions, and I've seen the GX 470 do this, it can spit oil up and out. Not sure how likely that is? The filter doesn't fit behind the gas cap filler door, AFAIK.

I have assumed the OEM Toyota "plug, breather" part can draw air. Otherwise the diff couldn't equalize the pressure as it cools in your garage. All diff's have an opening somewhere, right? Later today I'll test this with the parts I removed. If it can draw air and exhale air then my assumption is correct. And these are the same breathers Toyota uses in the front.

The stock rear differential breather is a 1-way and will only let gasses out. The rear axle stock doesn't allow air in, creating a vacuum when cold.
 
ARB breather and location of breather

[MENTION=120701]Cymon[/MENTION] & [MENTION=129593]MTN4RNR[/MENTION]
Posted by Cymon: Nice write-up! This will be my first mod in a week or two. I'm thinking I'll be lazy and order the ARB kit from Amazon Amazon.com: ARB 170112 Differential Axle Breather: Automotive but then run it up along the electrical sensor wiring along the passenger side up to the engine bay. I know it's more $ then I need to spend to get the same result but it will be time saved shopping and waiting for parts. Thanks Prime!

This may be a better plan. I looked at running it forward but it's a lot farther and you need to feed it up above everything where it's out of the way from road debris and scraping. If you do it this way the breather will be upright and you'll be able to service or check it more easily.

I saw that part on Amazon two weeks ago. It's more expensive and I can't tell what the tube size is. I imagine it fits the ARB air locking differential. The tube shown is small. You need 1/4" fuel line to fit the Toyota Union. You could then transition to the ARB line with a universal coupler like the one I used.

The ARB is probably better than the Toyota OEM breather but it won't fit behind the gas cap so you need to find somewhere else to mount it. I think the gas cap area stays as clean as the engine bay firewall. Neither place is going to be submerged without much more serious consequences occurring.

Whether you use the grommet shown in other threads or follow my plan, a bigger question here, in my mind, is can the breather be run somewhere else up high in the back end, like behind a tail light or under the tailgate to avoid the hole in the wheel well area. The tailgate area outside the door seals gets much dirtier than the gas cap area on a dusty road because the back side and spoiler act like a draw for fine dust.

If you're thinking of running the lines separately, the ARB is probably the best way to go. Looking back now, I should have done it that way. I ran separate lines and had to do some finagling to make it all work together. If you're just running the axle breather, its cheaper to do just the single line with OEM parts. My Toyota dealer had them in stock within 48 hours. Fuel/transmission line and hose clamps are readily available at an auto store.

I ran hose from both the diff/axle and the E-Locker into one Toyota breather cap. There is no pressure on the system as it is always open at the top (if it's a 2-way breather). The E-Locker breather connection was held in place by a simple slip connection into the tube - that is, no hose clamp. My use of hose clamps is just to keep it from coming apart. They're way overkill for the pressure that's exerted. I think the air flow as the two units cool is slow and one line will be sufficient. That's just me thinking out loud though.
 

Members online

Forum statistics

Threads
278,316
Messages
3,554,105
Members
248,016
Latest member
Advally Service

Trending content

Back
Top