Rainy day project with ABS and bits to make rear compartment covers

zonzin

Member
I have been wanting to do something with the open compartments in the rear cargo area of my runner since day one. After making center console divider and glove box organizer out of ABS plastic, and inspired by 83mule's aluminum solution, I decided to use it for some covers for the cargo holds. Fun project and makes a world of difference.
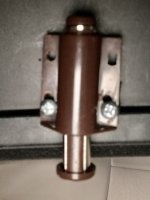
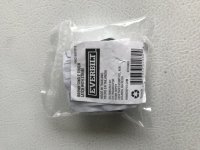
Ordered the ABS plastic sheet and the spring loaded push latches at Amazon. Some ABS glue and JB Weld Super Glue is all that was needed. With that size sheet of ABS you will have enough left over to make a glove box and center console organizers.

First step is to cut out some templates from cardboard. Do it carefully and accurately and it will make the ABS cut a lot easier. I just nibbled away at the cardboard with a good pair of scissors and it was pretty easy. Then cut the ABS using a jigsaw, cut a little oversized so you have material to work with to get the perfect fit.
Once the ABS is rough cut I used a belt sander clamped down to the work bench to put the final shape of the covers. It took quite a while only taking bits of material down slowly and checking the fit often, and then making adjustments. ABS works pretty well with the sander making for a great fit. After the fit was perfect, I heated up the ABS with a heat gun so I could form it to the curves on the compartment.
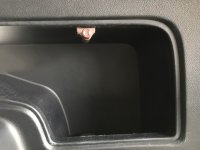
I then attached the push latches to the storage compartments by first shimming them up with a piece of ABS so they clear the edges of the compartment. Now the plastic in the 4runner doesn't adhere to ABS cement so I used the JBW SG to attach them.
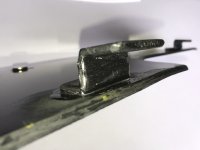
I then made 3 of the the "hooks" for the bottom end of the covers out of ABS and glued them to the covers. I used the heat gun to bend them to the correct shape to "catch the inside edge of the compartment. For the little lower cover I made a slot in the compartment and made a catch to insert into it opposite the push latch.
Now everything is secure and doesn't fly out of the compartment. Just give the cover a "bump" with your hand and the covers pop right off. Love it!

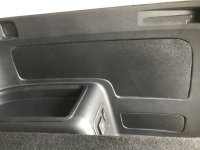
What I want to cover:

IMG_20200202_153047_zpsikbperec.jpg


Templates:

IMG_20200202_152559_zpskxpdvftm.jpg


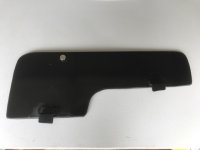
Cut ABS covers:

IMG_20200131_140950_zpsgs4evfp3.jpg


IMG_20200202_152640_zpsqjmgtuzy.jpg


Bottom cover slot and push latch:

IMG_20200202_135819_zpsq1d7m6s0.jpg


IMG_20200202_135833_zpsdlkne8rd.jpg


Upper push latch location:

IMG_20200202_153054_zpsu7vrurvg.jpg


Upper cover "hooks":

IMG_20200202_152649_zpsyiwhz8ly.jpg


Finished product:

IMG_20200202_154010_zpscz0ukkkb.jpg


IMG_20200202_153228_zpsqxt4izhu.jpg


.
 
Last edited:
Register to hide this ad
Great job....would like to see the covers offered on the after-market!!!!

There are a lot of us who would be interested in a product like this... just not enough to be worth mass producing. Injection molding is great when you want to make millions of something, but the initial setup costs are too steep for something you can probably only hope to sell in the hundreds.
 
*china enters the thread*

Maybe... if I was looking to mass produce this, here's what I'd do:

1. Find a 3rd party mold maker (possibly in China) to make molds for the two cover pieces. I'd have the catch tabs molded in place to keep production costs down. Though it makes the molds more expensive.
2. Find a plastics company here in the USA (who specialized in small batch runs) to produce the units.
3. Find a 3rd party supplier for the latch and possibly lock mechanisms, bundle them in a kit and then...
4. Approach the two independent Toyota distributors (Gulf States or Southeast) about buying them and selling them as a sweet dealer installed option...

That's if you want to make real money. These could be produced on a smaller hobbyist scale, but it'd be a labor of love.
 
This is a great idea. Just wondering about the long term durability though. ABS plastic has a reputation of deteriorating due to UV exposure. Maybe it won’t be a problem on the interior location. [MENTION=118321]Jetboy[/MENTION] has plastics experience and knowledge. Maybe he’ll offer some advice.
 
This is a great idea. Just wondering about the long term durability though. ABS plastic has a reputation of deteriorating due to UV exposure. Maybe it won’t be a problem on the interior location. [MENTION=118321]Jetboy[/MENTION] has plastics experience and knowledge. Maybe he’ll offer some advice.

ABS is not the best choice but...

Of the various textured plastic sheets that are readily available to the DIYer, the OP made a fair enough decision.

The OEM interior panels are made from a polypropylene blend (PP+E/P-TD20). But PP sheets are typically too floppy to use like this. They'd need internal ribs to stiffen the part. Like you see on the backside of the OEM parts.
 
That is awesome! Good job.

FJ Cruisers have a storage area in the same spot that has a cover that just snaps in. It's where I kept my tool kit and jumper cables and it was nice to have them out of sight and contained. It would be really nice to have something similar for the 4Runner.

FJ Cruiser storage cover
 
This is a great idea. Just wondering about the long term durability though. ABS plastic has a reputation of deteriorating due to UV exposure. Maybe it won’t be a problem on the interior location. [MENTION=118321]Jetboy[/MENTION] has plastics experience and knowledge. Maybe he’ll offer some advice.

I have no idea for these parts. Most of my experience is with FRP composites (fiberglass, carbon, etc). Manufacturing those is a lot different and WAY too expensive for something like this. You could very easily get sheets cut to a drawing that match the cutout shapes in any material you want. Then you'd need to make them like this with some sort of catch mechanism on the back side.

Space King is right that injection molding on a small scale isn't economical that I'm aware of. It does get cheaper every day though. So maybe you could get a 3d printed mold that would work for cheap enough to make them? For me the cost are just a wild guess since I haven't looked at a mold in around a decade now. Maybe you can get them 3d printed for cheap now? It seems like the prices should have come down a lot, but I really have no idea. In today's world I imagine you'd probably 3d scan it, make a mold CAD file and send it to someone to print the mold and/or also make the parts.

If you send it to China - you can all but guarantee that the shop you send it to will be selling your design on ebay in a few weeks. Probably before then even send you your own parts.
 
This is a great idea. Just wondering about the long term durability though. ABS plastic has a reputation of deteriorating due to UV exposure. Maybe it won’t be a problem on the interior location. [MENTION=118321]Jetboy[/MENTION] has plastics experience and knowledge. Maybe he’ll offer some advice.

Well it is behind tinted glass in an area that doesn't get much direct sunlight plus I treat my interior plastics with McGuire's. Don't think it will be an issue any time soon.


.
 
When I suggested the ABS I just thought it was easier to produce than my aluminum sheet version so more folks could try to make it. If you had a way to stamp the shape it could be made cheaply as well. I love the texture of the ABS as well......Great Job!
 
Can't figure out why Toyota deleted the cover on that compartment. My '08 had a snap in cover that let me store lots of stuff back there. Good job, OP.
 
Can't figure out why Toyota deleted the cover on that compartment. My '08 had a snap in cover that let me store lots of stuff back there. Good job, OP.

To meet CARB specs, they were 42 grams over weight causing MPG excess, so they left out the cover. ;)


/joking


.
 
Hey, thanks for this idea. Those open holes always drove me kind of nuts. For my shelter-in-place project I went to my local Tap Plastics store and got a 24in x 24in sheet of 3/16in black ABS with one textured side. It was about $25. I could have ordered a sheet from Amazon for about $16 but I didn’t want to wait.

I cut out patterns from cardboard and trimmed them to fit. For the lower small cover I cut the ABS with a jig saw and trimmed and cleaned up the edges with a sure-form shaver tool and sandpaper. Since I’ll never need to remove it, I glued the cover into place with E6000.

I cut the larger cover out and spend a lot of time trimming and shaping it. I beveled the inner edges with the sureform to fit a little better against the channels in the side panel.

I cut two grabber tabs, placed them in a vise, carefully heated them with a propane torch, and bent them to shape quickly with a block of wood. Two bends were needed. After test fitting and measuring I glued them to the lower edges of the cover with ABS cement.

At the top of the cover I glued a neodymium magnet to match a magnetic drawer catch (from HD) that was screwed into the inner ceiling of the larger opening. After some adjustments it gripped and worked ok.

To make the cover sit snug in the opening I used a hair dryer to heat and bend it in various places. That made the fit ideal and the magnetic latch held it snug. An extra push in the proper spot and the cover pops open a little for removal. It looks good and hides my tools.
 

Attachments

  • 2B2394D7-93D3-4E89-B9DF-A0E81D877164.jpeg
    2B2394D7-93D3-4E89-B9DF-A0E81D877164.jpeg
    109.1 KB · Views: 725
  • 47A82DFA-78B7-4888-9239-7653B237EF8C.jpeg
    47A82DFA-78B7-4888-9239-7653B237EF8C.jpeg
    47.9 KB · Views: 720
  • D7F2DA6C-FB24-4211-B2EA-701928BC8B67.jpeg
    D7F2DA6C-FB24-4211-B2EA-701928BC8B67.jpeg
    83.5 KB · Views: 734
  • D71B7CA0-1AD6-4906-BA62-03381CCD89C9.jpeg
    D71B7CA0-1AD6-4906-BA62-03381CCD89C9.jpeg
    49.3 KB · Views: 725
  • 4E42A4A5-6423-4DFC-AD18-C0865A0E2383.jpeg
    4E42A4A5-6423-4DFC-AD18-C0865A0E2383.jpeg
    61.6 KB · Views: 735
  • 9AEB878B-59A5-4ABB-AF82-A702765A2F5E.jpeg
    9AEB878B-59A5-4ABB-AF82-A702765A2F5E.jpeg
    83.2 KB · Views: 735
I just ordered the necessary stuff to do this. Since I'm an old bastard, I'm sheltering in place so this will be a good way to pass some time. I'll post pics when I get it done.
 
I received the ABS sheet and cut it to fit. A lot of fitting and sanding with the belt sander clamped in my bench vise but it's pretty good. I'm leaving the small opening as is for now, if I find a need, I'll do that at a later date. I'm waiting for the ABS cement to get here, Amazon is not sending things too quickly unless it's an item that's really necessary. As soon as I get it I'll post picks of the cover. It'll be pretty much like others here but I'm going to try a different latch. It might not work, we'll see.
Thanks to all you guys who already did this and posted it.
 

Members online

No members online now.

Forum statistics

Threads
278,316
Messages
3,554,112
Members
248,016
Latest member
Advally Service

Trending content

Back
Top