2014 Low Beam / Fog Light HID Retrofit

ksaldibar

Member
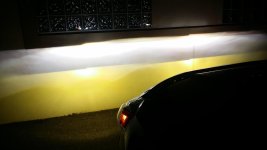
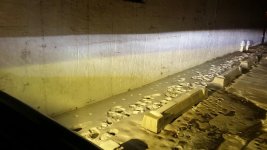
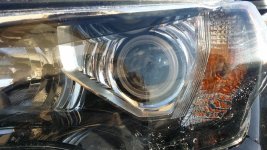
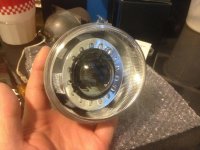
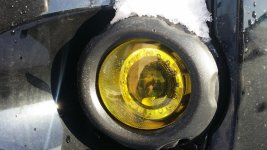
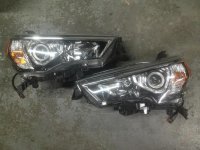
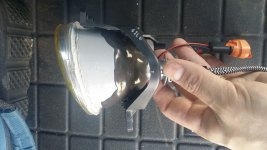
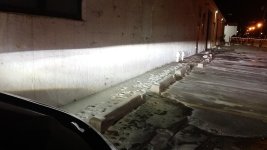
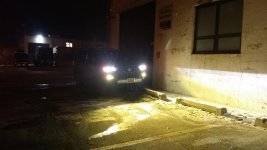
Hey all. I'm not much of a poster on the site, but I just had my low beams and fog lights retrofitted and had to share. As handy as I am, I chose to have the work professionally done by Richard at HID Illusionz in College Point, NY to ensure it came out perfect. As I'm sure your guys are aware from the few threads on here that the 2014 projectors feature a side mounted bulb with little to no clearance behind the headlight housings to do a traditional retrofit; hence the need for the GS projectors that also feature a side mounted bulb. The fog lights were tough! I originally wanted to install Lexus ES300 yellow lens HID projectors, but the factory housings are way too small. In fact, the Matchbox projectors barely fit with alot of cutting. Although I was a little disappointed with the initial color of the 3000k bulbs, I applied yellow Lamin-X to achieve the golden color I wanted with minimal output reduction. Overall, I am extremely satisfied with the results. It made the world of difference. Below are the specifics of the equipment and a few photos. I will try to get some more pictures up this weekend when I properly adjust them.

Low Beams
- Lexus GS projectors w/ TSX-R Lenses
- 4300k Morimoto D2S Elite HID Kit

Fog Lights
- Morimoto Matchbox 2.0 projectors
- 3000k Morimoto H1 XB35 Elite HID Kit
- Yellow Lamin-X film
 

Attachments

  • R20150109_053402.jpg
    R20150109_053402.jpg
    130 KB · Views: 1,694
  • R20150109_053311.jpg
    R20150109_053311.jpg
    131.7 KB · Views: 2,016
  • R20150109_053159.jpg
    R20150109_053159.jpg
    85.4 KB · Views: 2,049
  • R20150109_053300.jpg
    R20150109_053300.jpg
    133.2 KB · Views: 1,642
Register to hide this ad
Hey all. I'm not much of a poster on the site, but I just had my low beams and fog lights retrofitted and had to share. As handy as I am, I chose to have the work professionally done by Richard at HID Illusionz in College Point, NY to ensure it came out perfect. As I'm sure your guys are aware from the few threads on here that the 2014 projectors feature a side mounted bulb with little to no clearance behind the headlight housings to do a traditional retrofit; hence the need for the GS projectors that also feature a side mounted bulb. The fog lights were tough! I originally wanted to install Lexus ES300 yellow lens HID projectors, but the factory housings are way too small. In fact, the Matchbox projectors barely fit with alot of cutting. Although I was a little disappointed with the initial color of the 3000k bulbs, I applied yellow Lamin-X to achieve the golden color I wanted with minimal output reduction. Overall, I am extremely satisfied with the results. It made the world of difference. Below are the specifics of the equipment and a few photos. I will try to get some more pictures up this weekend when I properly adjust them.

Low Beams
- Lexus GS projectors w/ TSX-R Lenses
- 4300k Morimoto D2S Elite HID Kit

Fog Lights
- Morimoto Matchbox 2.0 projectors
- 3000k Morimoto H1 XB35 Elite HID Kit
- Yellow Lamin-X film

Can you share how much does this retrofit cost for the low beams and fog lights incl install?

Thanks
 
Hey all. I'm not much of a poster on the site, but I just had my low beams and fog lights retrofitted and had to share. As handy as I am, I chose to have the work professionally done by Richard at HID Illusionz in College Point, NY to ensure it came out perfect.

They do some pretty good work. I had them do a retro for an older F150 several years ago since I didn't have the time to do it myself.

Any pictures of the retrofitted fog lights prior to installing them on your 4R? I'd like to see how much they had to cut to make them fit since you say it was so tight with some of the smallest projectors out there.
 
Can you share how much does this retrofit cost for the low beams and fog lights incl install?

Thanks

Wasn't cheap... The fogs were $350 plus an H1 HID kit and the low beams were $550 for everything (projectors, HID kit, labor & clear lenses). The low beam price will vary depending on how cheap you can get the used GS projectors for. I don't know if his pricing may change now that he knows what is involved considering I was his first 2014 4Runner retro.
 
Could we get some close up shots? Without the lights on?

Here are some other shots of the lights. You'll notice the 2 metal retainer rings around the low beam projectors. He did this to offset the change from a 3" lens to a 2.5" lens.
 

Attachments

  • R20150109_144348.jpg
    R20150109_144348.jpg
    145.6 KB · Views: 1,467
  • RIMG952091.jpg
    RIMG952091.jpg
    132 KB · Views: 1,390
  • R20150109_144352.jpg
    R20150109_144352.jpg
    138.9 KB · Views: 2,406
  • RIMG953285.jpg
    RIMG953285.jpg
    133 KB · Views: 1,446
$550 for the lows is not a bad price at all considering more than half of that was the cost of materials anyway.

Was it an easy swap? Like... Did the Lexus projectors line right up with the mounting holes of the 4Runner projectors and therefore it was essentially a bolt in kind of job? Or did they have do cut/epoxy/yada yada yada? *im talking specifically about the low beams, as i know they had to cut for the fogs*
 
Last edited:
$550 for the lows is not a bad price at all considering more than half of that was the cost of materials anyway.

Was it an easy swap? Like... Did the Lexus projectors line right up with the mounting holes of the 4Runner projectors and therefore it was essentially a bolt in kind of job? Or did they have do cut/epoxy/yada yada yada? *im talking specifically about the low beams, as i know they had to cut for the fogs*

I didn't get into the specifics of the modifications required, but I believe minor trimming was required. iLuXoR817 has a thread with some pretty good pictures of the internal guts of the headlamp housing.

http://www.toyota-4runner.org/5th-gen-t4rs/169506-2014-hid-retrofit.html

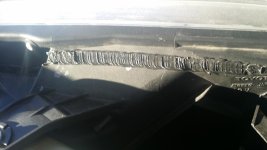
I was able to take a couple more photos of the external housing mods made. The fogs had to be cut up pretty good along with the trim ring, but the headlamp housings remains intact. In lieu of messing around with the permaseal, the retrofitter chose instead to cut open the back of the housings and melt it back together for a seamless look. I think he did a great job.
 

Attachments

  • 20150111_140537.jpg
    20150111_140537.jpg
    137.7 KB · Views: 1,369
  • 20150111_141351.jpg
    20150111_141351.jpg
    122 KB · Views: 1,277
  • 20150111_141416-1.jpg
    20150111_141416-1.jpg
    133.8 KB · Views: 1,287
interesting... They cut the housing instead of prying the permaseal open.

My thoughts exactly... He took a soldering iron and created a blade-like tip for it to allow him to slice right through the housing. This allow shim clean edges to melt back together. No Dremel whatsoever.
 

Members online

Forum statistics

Threads
278,316
Messages
3,554,120
Members
248,016
Latest member
Advally Service

Trending content

Back
Top