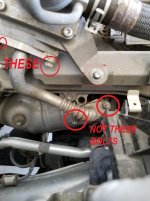
2016 4Runner spark plug replacement - broke emission tube stud

the clamp is gonna really throw off the next owner of that 4runner :lmao:

I didn’t see this for some reason, but I used a hex extension. The most difficult part was getting a dremel tool in there to cut/flatten the remaining stud portion of the stud. Once flattened and center punched, the stud was easy to drill out.

I just bought a new 4Runner and went ahead and removed these nuts on both sides, used a dab of antisieze on the stud, and reinstalled/ torqued the nuts…but of future proofing.

smart man
 
Why were you removing the nuts from that end of the air tube to replace the spark plugs? Only need to remove the bolts at the air valve holding that tube, then remove the valve.

To illustrate your point I performed a quick edit of one of the photos. When I change my 2018's plugs I'll try to get a better shot.

Does this look about right?
 

Attachments

  • Air Tube.jpg
    Air Tube.jpg
    82.8 KB · Views: 437
I did the same thing today to the left stud.
Used a 1" clamp as a temp fix (maybe it will work just fine permanently).
Will check it pediodically to see it the clamp got loose.

Reminds me of an oil pressure sender block crack I had to fix (gen2 RAV4 2.4.) The fix lasted the vehicle's remaining 95K km.

cCdnfn0.jpeg
 
Do you have a link for the extension you bought? I have the same issue on my 2018 4 Runner (both studs!). I have the studs ground flush, but I am struggling to find something to get a drill bit to reach the flange area.

Edit: So I got it sorted and just in case anyone stumbles across this thread here is what what I did...
- First, the only thing I could seem to find outside of the McMaster-Carr rod-with-a-collet (expensive) was a "drill chuck with a 1/4" hex shank". I couldn't find it locally so I ordered from Amazon and it was delivered by 10:00AM the day after I ordered it.

By 10:15AM I realized why it cost $9...the entire thing disintegrated halfway through the first hole. Fortunately, I remembered a local hardware store that somehow seems to have everything so I gave them a call and sure enough, they actually had one. It was made of steel and it did the job, though I'm not sure it will last a lifetime...

After that it was a matter of getting the drill centered and taking my time not to break anything. I ended up using the magnetic bit holder extension that I happened to have available, and that was pretty wobbly, though it did work. But if I had it to do all over again, I would order an extension that had two set screws to lock the drill chuck hex in-place (search for "Spade Bit Extention" to see what I mean).

Also, I drilled it to 1/4", which is slightly larger than the 6mm stud. And I did it in one shot, rather than start small and progressively drill it larger. I reason that it's a lot harder to break a 1/4" drill than a 1/8" drill, and I didn't want to have to deal with getting a small, broken drill out.

BTW, I didn't get an estimate of the cost to bring it to a dealer, but if I were to guess, I'm thinking it would be the better part of $1K if the manifold had to be replaced.

So used the 1/4 hex chuck adapter and were able to get at the studs from above where the hoses are? What did you attach to the 1/4” end of the chuck?

I understand the drill can’t get down there, so I assume you have your drill up above - but I’m curious what’s between your drill and they chuck you posted.

I didn’t see this for some reason, but I used a hex extension. The most difficult part was getting a dremel tool in there to cut/flatten the remaining stud portion of the stud. Once flattened and center punched, the stud was easy to drill out.

I just bought a new 4Runner and went ahead and removed these nuts on both sides, used a dab of antisieze on the stud, and reinstalled/ torqued the nuts…but of future proofing.

Can you show a photo of what this hex extension you speak of is?
 

Members online

Forum statistics

Threads
278,316
Messages
3,554,113
Members
248,016
Latest member
Advally Service

Trending content

Back
Top