2018 Limited Rear Jacking Point

sLADe781

New member
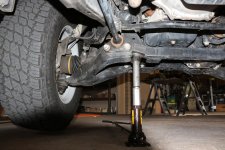
I have a 2018 4Runner Limited edition and was wondering where the proper rear jacking points are when lifting the vehicle?

I looked in the owner's manual and found the following instructions:
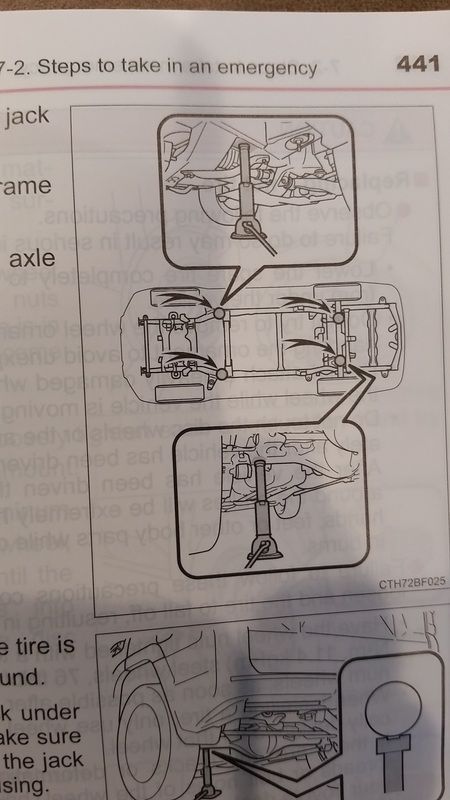


However, I can't see how this is safe seeing that the rear axle is round and placing the top of the jack there while attempting to lift the vehicle will more than likely slip.

I did do a search regarding my question but could not find a proper answer due to the conflicting information when compared to the answers given by other owners. IE, the jacking point pictures that other members have posted do not match what was in my manual. Also, not sure if maybe something changed this year or maybe others had a different trim with different instructions.

Anyways, where would a safe jacking point be in case I have a flat and needed to lift the vehicle? Any help would be greatly appreciated.

Thanks in advance!!
 
Register to hide this ad
Have a look at the jack. It has a slot in 2 directions that looks like a +

The top part is threaded, and can be used to rotate the cap to align a slot with the axle.
This is fine in an emergency.

Anything more than changing a tire on the side of the road, use a jackstand.


Go give this a shot in the driveway before you need to in an emergency situation. You'll learn more by trying it than time spent reading on here.
Additionally, take a look at the frame rails. There are lots of good places to jack your 4runner. Get acquainted.
 
Hi nb rob, thank you for responding.

I did look under the vehicle before (multiple times as a matter of fact) and tried looking for something that the jack goes into or around the axle but could not figure it out. I'll give it another shot when the wife gets home but if anyone has a picture of exactly what I am looking for that would be great.

Thanks again!
 
Hi nb rob, thank you for responding.

I did look under the vehicle before (multiple times as a matter of fact) and tried looking for something that the jack goes into or around the axle but could not figure it out. I'll give it another shot when the wife gets home but if anyone has a picture of exactly what I am looking for that would be great.

Thanks again!

The emergency bottle jack should be placed where you can get the most height off the ground with the least amount of extension from the bottle jack. I slashed a sidewall on a trail and limped it to the first turnout where the truck was slightly leaning towards the drivers side. Flat was on the passenger front. I found rocks to chock the rest of the wheels, engaged parking brake, and told everyone with me to stay on the passenger side of the vehicle. (up hill). If it were to tip, it would tip to the drivers. Used my bottle jack under the crossbeam, but that was not enough to lift the tire off the ground, so I used a buddy's bottle jack to slightly push the LCA off the ground to give me enough room to put the spare on. Once spare was on and lugs threaded, I lowered the LCA bottle jack. Tightened the rest, lowered the crossbeam bottle jack, then muscled the lugs again.

Just my experience... We also used bottle jacks on a trail when an adventure trailer's driver's side wheel bearing failed and the wheel popped off on the trail. You just have to find the best pivot point of the vehicle and make sure everything else is stable.

Also, take nb_rob's advice. Take out the bottle jack and use it on the vehicle in the driveway or the street.
 
I hope I didn’t make it more confusing with my words...it doesn’t go into anything. The “+” indentation o the top of the jack will keep the round axle tube from sliding off the jack.

I tried to take a picture, but my pictures were not as clear as the two you posted in your original post. Put the jack under the round axle and align the indentation while jacking. If your driveway is sloping, be sure to chock the front wheels.

It’s s a good idea to practice lowering the spare too. It’s good to know how it works before you need it and are flustered.


Regards,
Rob
 
I have a 2018 4Runner Limited edition and was wondering where the proper rear jacking points are when lifting the vehicle?

I looked in the owner's manual and found the following instructions:
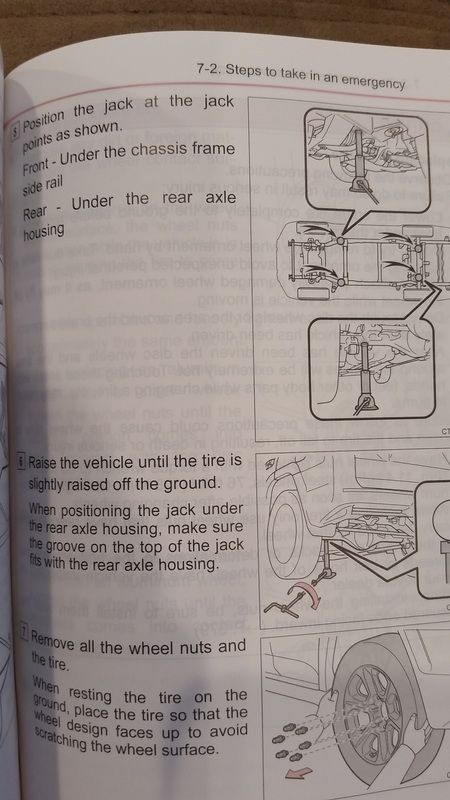


However, I can't see how this is safe seeing that the rear axle is round and placing the top of the jack there while attempting to lift the vehicle will more than likely slip.

I did do a search regarding my question but could not find a proper answer due to the conflicting information when compared to the answers given by other owners. IE, the jacking point pictures that other members have posted do not match what was in my manual. Also, not sure if maybe something changed this year or maybe others had a different trim with different instructions.

Anyways, where would a safe jacking point be in case I have a flat and needed to lift the vehicle? Any help would be greatly appreciated.

Thanks in advance!!
I think this could be handy.
Bottle Jack Recovery Kit With 6 Ton Bottle Jack https://www.amazon.com/dp/B00R207SHO/ref=cm_sw_r_cp_tai_J8JwBb98792C4
 
a4f582e282c30f2e3c55761372463e6b.image.397x550.jpg


The head of the jack should look like this one. There is a "+" indentation which allows the axle to rest there and stay there.
 
I hope I didn’t make it more confusing with my words...it doesn’t go into anything. The “+” indentation o the top of the jack will keep the round axle tube from sliding off the jack.

I tried to take a picture, but my pictures were not as clear as the two you posted in your original post. Put the jack under the round axle and align the indentation while jacking. If your driveway is sloping, be sure to chock the front wheels.

It’s s a good idea to practice lowering the spare too. It’s good to know how it works before you need it and are flustered.


Regards,
Rob

a4f582e282c30f2e3c55761372463e6b.image.397x550.jpg


The head of the jack should look like this one. There is a "+" indentation which allows the axle to rest there and stay there.

Okay, I think I'm beginning to understand what you guys are talking about. So you can lift from the rear axle without it slipping due to the indentation on the top of the cap. I've noticed the indentation before but did not know that that was enough to keep the rear axle from sliding off.

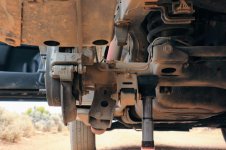
I've taken some pictures and if someone can verify my jacking points that would be great:

Driver rear:


Passenger rear:


Close-up of top of jack on rear axle:


Since it is safe to lift from the rear axle, I'm assuming it will be safe to place jack stands under the rear axle as well?


What if I want to lift the whole back end? Is it safe to lift from the rear differential? The reason I ask is because the drain plug is so close to the jack point:


NOTE: I wouldn't attempt to lift the whole back end with the bottle jack. I only used it to indicate my would-be lift point


As far as the front goes, would the section of the frame right in front of the subframe (I think that's the subframe?) be a good section (picture is taken from the driver side front):


And if I wanted to lift the whole front end, is this place to lift from?


It seems like that piece is a splash guard so would it need to be removed before jacking from that section? Or can we jack right over it?

Sorry for all the questions but I just want to make sure I have everything in order for when the time comes.

Thanks again!
 
yes to everything


The front skid plate jack point actually has proper reinforcement between the plate and the frame. You can jack against the skid plate [with a proper jack, as you noted] without taking the plate off.
 
Thank you nb_rob, I really appreciate all the help and your willingness to take the time out and explain everything to me!!
 
I too, want to thank you for the information. I was having difficulty trying to decide where to place the jack if it was needed, and felt like an idiot. I actually asked at my dealer and they were as insecure as I was as to where it should have been placed. They pointed vaguely under the truck and said something to the effect of "anywhere on the frame" is safe. Your information clarifies the issue.
 
The other thing is that you always loosen and torque down the lug nuts when the vehicle is on the ground. The leverage from trying to loosen the lug nuts could potentially cause something to tip on unstable ground, so leave the four wheels on the ground. When you go to remove the tire, jack only one corner up at a time. The weight of the vehicle on the jack will not allow for slippage, as long as you have the parking brake engaged and jack centered on the axle housing.
 
Thank you nb_rob, I really appreciate all the help and your willingness to take the time out and explain everything to me!!

Its a helpful thread OP. I always thought I would cross that bridge when I got to it, but as other have said, it is better to practice before getting flustered. So I may be jacking my T4R this weekend. :thanks:
 
Every t4r owner should get one of these. They are available for the 80/100/200 but I'm pretty certain that it'll easily work for the t4r.

Despite being a no brainer for adding a zero slippage factor, it adds and unparalleled level of safety.

No trolling or dog on this one. Family researching for a new limited.

Good luck!

Tons of pics in the threads!


80s https://forum.ih8mud.com/threads/jack-adapter-80-lx450-series-off-roader-must-have.937901/

100s https://forum.ih8mud.com/threads/100-series-jack-adapter.950016/

200s https://forum.ih8mud.com/threads/200-series-jack-adapter.944102/
 
Last edited:
Its a helpful thread OP. I always thought I would cross that bridge when I got to it, but as other have said, it is better to practice before getting flustered. So I may be jacking my T4R this weekend. :thanks:

Thanks 4runr4eva! I'm glad I wasn't the only one confused and that it was helpful for others as well. I was initially a bit hesitant to ask as some may see it as a dumb question but I'm glad I did as the responses received were extremely helpful!

Every t4r owner should get one of these. They are available for the 80/100/200 but I'm pretty certain that it'll easily work for the t4r.

Despite being a no brainer for adding a zero slippage factor, it adds and unparalleled level of safety.

No trolling or dog on this one. Family researching for a new limited.

Good luck!

Tons of pics in the threads!


80s https://forum.ih8mud.com/threads/jack-adapter-80-lx450-series-off-roader-must-have.937901/

100s https://forum.ih8mud.com/threads/100-series-jack-adapter.950016/

200s https://forum.ih8mud.com/threads/200-series-jack-adapter.944102/

I briefly browsed the links and am wondering what the difference between the 3 series were? The size of the clamps maybe? If so, what series would a 2018 4Runner Limited need (if you know)?
 
I briefly browsed the links and am wondering what the difference between the 3 series were? The size of the clamps maybe? If so, what series would a 2018 4Runner Limited need (if you know)?


I would think any would work really, they just slip over the top of the jack. The 100 has a deeper collar than the 200 and the 80 has one side adjusted.

Probably best to ask landcruiserphil but I would think any of them are better than the bald top, slippery, hard to place oem jack head, since they all fit and are secure. (unless in a perfectly paved/flat parking lot, and even then, you're still nervous of the jack placement / slippage, since it's so easy to happen)

The OEM jack is one of the best on the market, the "mounting point" is questionable.

Again, researching on a new t4r Limited, but thought this item would be of great value to the 4runner group, considering how often many of your are off road or just want an added safety factor for your or your family member. It certainly has been or great benefit to LC owners.
 
Last edited:
Landcruiserphil responded to my enquiry by suggesting the 100 series for my 2017 4 runner limited. The item came and looks well made. Earlier in this thread, it was said that the front jack position could be placed on the skid plate. Could that be done with replacement RCI skids? If so, exactly where would the jack be placed? Any additional pictures of the front jack placement would be appreciated.
 
This is a great thread, thanks for that.

I just got my 4R leveled 3 in front, 1.5ish in the back. I added 285 tires. It never dawned on me to consider this, but will the OEM jack be able to lift it high enough to change a tire? Thanks for the info- I appreciate it!
 
Hi guys let me introduce myself Im LandCruiserPhil and happy to be a part of the 4Runner community. We at Land Cruiser Products make the Jack Adapters talked about in this thread. The short of the long story is these were inspired by my wife while I was going over how to change a tire. She was surprised Toyota did not make a safer and easier way to jack. 100's of adapters later we now have 3 models for different size factory Toyota jacks.

All the 4Runner factory jacks so far have used the 1.5" model. For now when ordering select the 100 series (1.5") we will soon add a 4Runner button:nod:. The adapter is slightly oversized to allow the adapter to pivot while keeping the jack in the vertical position. We found by making the one adapter leg shorter than the other provided more jack placement options.

We also have found Toyota factory jacks can change any tire on your 4Runner.

Adapters are made in the USA and welded by a state certified welder.
We pride ourselves on having stock on hand and shipping daily.

https://sites.google.com/site/landcruiserproducts/jack-adapter
FREE SHIPPING
 

Attachments

  • IMG_5726 (1).jpg
    IMG_5726 (1).jpg
    139 KB · Views: 3,966
  • 20180902_133633 (1).jpg
    20180902_133633 (1).jpg
    140.3 KB · Views: 769
  • 4runner jack.jpg
    4runner jack.jpg
    118.6 KB · Views: 1,553

Members online

No members online now.

Forum statistics

Threads
278,309
Messages
3,554,071
Members
248,016
Latest member
Advally Service

Trending content

Back
Top