
You are using an out of date browser. It may not display this or other websites correctly.
You should upgrade or use an alternative browser.
You should upgrade or use an alternative browser.
30" LED Bar Behind Lower Grill
- Thread starter ARK_SWAMP_RIDER
- Start date

Net4n6
New member
How come people don't just bolt it directly into the cross member ( not sure that's the right name for it, but the bar at the very front) it seems like that would be way easier than having to make a bracket..
Sent from my iPhone using Tapatalk
It is not easy to drill holes in the cross member. We try to use the existing pre-drilled holes. But.... It just gave me another idea. Can we use industrial double sided tape to tape the light to the cross member. Has anyone try it yet? I think that's a lazy way to do it.
Last edited:

J-Roc
New member
It is not easy to drill holes in the cross member. We try to use the existing pre-drilled holes. But.... It just gave me another idea. Can we use industrial double sided tape to tape the light to the cross member. Has anyone try it yet? I think that's a lazy way to do it.
Have mine Duct Taped right to the front bumper....No vibration at all...[emoji39]

97BlackAckCL
Elite Member
That looks awesome...what light bar did you get? or which ones are recommended?
Also any ideas how to get around the whole front license plate rule Cali has?
I've seen 2 different approaches, 1 guy used 2 smaller led bars on each side of his plate, couldn't find a pic of that. But another guy a page back did this

Honestly I'd relocate the plate like this...

Does anyone have a "how to" for wiring all of this up? or know of a thread that describes it.
I'm fairly new to tooling and want to learn as much as I can.
Thanks.
The wiring is pretty straightforward, my bar came with a prewired harness, you simply attach 1 end to the battery, and run the switch inside the cabin. Not too bad at all.

03v8raleigh
New member
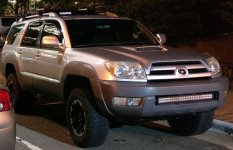
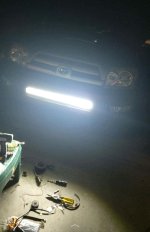
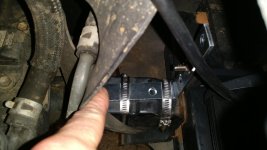
I also added a lightbar in this location and think it looks great there. All I did was cut out the grill, then mount the bar to 2 L-brackets from Lowes which I attached to the front bumper frame supports like the guy above did. However, I did not go through the pain of bolting them into the frame; I simply attached them using metal band clamps. Cinched them down tight and there's no wobble. My state doesn't have front licence plates so no issues there.
Attachments
Net4n6
New member
Do you have pictures of this ^^^^I simply attached them using metal band clamps. Cinched them down tight and there's no wobble.

Chiro22
New member
I've seen 2 different approaches, 1 guy used 2 smaller led bars on each side of his plate, couldn't find a pic of that. But another guy a page back did this
Honestly I'd relocate the plate like this...
The wiring is pretty straightforward, my bar came with a prewired harness, you simply attach 1 end to the battery, and run the switch inside the cabin. Not too bad at all.
That's a good call, I'll probably just screw the plate into the bottom holes and just have it mounted lower. Which bar did you get and how easy was it to run the cable into the cabin? did you go through the firewall?
03v8raleigh
New member
Do you have pictures of this ^^^^
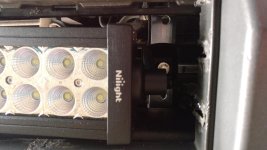
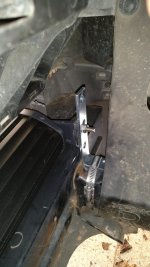
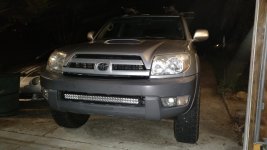
Pictures attached, hopefully they help. I like this method because it was easy, secure, and fully adjustable in x,y, and z direction so the light can be centered perfectly, simply depending on how you place the L-brackets on the frame supports. Drilling into the frame seemed like it'd be a pain in the butt so I prefer this. Hardest part was cutting the grill out, and figuring how to wire the damn switch into the dash. Brackets were ~$3.
This is a 32" Nilight spot/flood bar from Amazon with their $12 wiring harness, and an OEM-looking dash switch from Amazon as well.
Didn't have to take off the bumper or anything to get it mounted or wired.
Attachments
Last edited:
Chiro22
New member
Pictures attached, hopefully they help. I like this method because it was easy, secure, and fully adjustable in x,y, and z direction so the light can be centered perfectly, simply depending on how you place the L-brackets on the frame supports. Drilling into the frame seemed like it'd be a pain in the butt so I prefer this. Hardest part was cutting the grill out, and figuring how to wire the damn switch into the dash. Brackets were ~$3.
This is a 32" Nilight spot/flood bar from Amazon with their $12 wiring harness, and an OEM-looking dash switch from Amazon as well.
Didn't have to take off the bumper or anything to get it mounted or wired.
That looks awesome! I'm going to give that a try. And yeah, I'm not sure how to do the wiring really. did you have to go through the fire wall?
03v8raleigh
New member
That looks awesome! I'm going to give that a try. And yeah, I'm not sure how to do the wiring really. did you have to go through the fire wall?
So it's pretty simple once you know the method, which of course I didn't so it took me a whole day or working with constant intermediate researching to figure everything out. There's probably a nice easy comprehensive installation guide but I couldn't find one that included the specifics of wiring this particular switch into this particular model car.
I ordered these exact items:
https://www.amazon.com/gp/aw/d/B011KZGAC0/ref=yo_ii_img?ie=UTF8&psc=1&th=1
https://www.amazon.com/gp/aw/d/B0155W7EDS/ref=yo_ii_img?ie=UTF8&psc=1&th=1
https://www.amazon.com/gp/aw/d/B01DNYCJQW/ref=yo_ii_img?ie=UTF8&psc=1
Any other light bar and wiring kit will be the same basic thing. Only difference is that this fancy dash switch has some extra wires to hook up.
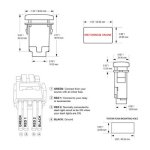
The wiring kit includes a wiring diagram that shows you everything you need for the included switch. Follow that diagram. Remember to do everything with the car battery disconnected until the very end. The relay and fuse get mounted under the hood near the battery, anywhere secure. Run the main +/- wires to the light bar and crimp/solder/attach with your preferred method. Red power wire goes to + battery terminal, but obviously don't hook that up until the end. Run the ground wire to any secure metal ground. Make sure to remove any paint before bolting down.
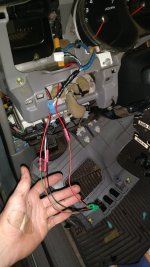
Run the white harness wire into the cab through the firewall. There is a rubber access point where other wires are going through, on the far right side if you're looking at the engine. Just cut a slit in the rubber and feed it through. You will also need to feed another red power wire (can splice into the same fused power wire feeding the light), and a black ground wire (splice into the ground you made). These three wires need to be run to the switch, and connected following the diagram (green switch wire to red power wire, red1 switch wire to your white harness wire, and black switch wire to black ground wire). This leaves only one remaining wire from the switch: "red 2". This wire is used to turn the switch's backlight on when the headlights are on. To wire this, you need to pop the dashboard off to gain access to the dash lights dimmer dial. There are a bunch of wires on this. Splice into the DARK GREEN ONE. This is the dimmer wire you want. After you connect that, everything should be good to go. make sure connections are solid, taped up, and out of harm's way. Reconnect battery and test it out.
Attachments
Last edited:
Chiro22
New member
So it's pretty simple once you know the method, which of course I didn't so it took me a whole day or working with constant intermediate researching to figure everything out. There's probably a nice easy comprehensive installation guide but I couldn't find one that included the specifics of wiring this particular switch into this particular model car.
I ordered these exact items:
https://www.amazon.com/gp/aw/d/B011KZGAC0/ref=yo_ii_img?ie=UTF8&psc=1&th=1
https://www.amazon.com/gp/aw/d/B0155W7EDS/ref=yo_ii_img?ie=UTF8&psc=1&th=1
https://www.amazon.com/gp/aw/d/B01DNYCJQW/ref=yo_ii_img?ie=UTF8&psc=1
Any other light bar and wiring kit will be the same basic thing. Only difference is that this fancy dash switch has some extra wires to hook up.
The wiring kit includes a wiring diagram that shows you everything you need for the included switch. Follow that diagram. The relay and fuse get mounted under the hood near the battery, anywhere secure. Run the main power wires to the bar and crimp/solder/attach with your preferred method. Run the ground wire to any secure ground on the frame. Make sure to remove any paint before bolting down.
Run the white harness wire into the cab through the firewall. There is a rubber access point where other wires are going through, on the far right side if you're looking at the engine. Just cut a slit in the rubber and feed it through. You will also need to feed another red power wire (can splice into the same fused power wire feeding the light), and a black ground wire (splice into the ground you made). These three wires need to be run to the switch, and connected following the diagram (green switch wire to red power wire, red1 switch wire to your white harness wire, and black switch wire to black ground wire). This leaves only one remaining wire from the switch: "red 2". This wire is used to turn the switch's backlight on when the headlights are on. To wire this, you need to pop the dashboard off to gain access to the dash lights dimmer dial. There are a bunch of wires on this. Splice into the DARK GREEN ONE. This is the dimmer wire you want. After you connect that, everything should be good to go. make sure connections are solid, taped up, and out of harm's way.
Thank you so much for the info.
Net4n6
New member
I ordered the light and harness. I will use your method. The light w/bracket is 34". I don't think they will match the pre-drilled holes on the frame. I will use three clamps instead of two for more secure. Thank you for showing us this.Pictures attached, hopefully they help. I like this method because it was easy, secure, and fully adjustable in x,y, and z direction so the light can be centered perfectly, simply depending on how you place the L-brackets on the frame supports. Drilling into the frame seemed like it'd be a pain in the butt so I prefer this. Hardest part was cutting the grill out, and figuring how to wire the damn switch into the dash. Brackets were ~$3.
This is a 32" Nilight spot/flood bar from Amazon with their $12 wiring harness, and an OEM-looking dash switch from Amazon as well.
Didn't have to take off the bumper or anything to get it mounted or wired.
03v8raleigh
New member
I ordered the light and harness. I will use your method. The light w/bracket is 34". I don't think they will match the pre-drilled holes on the frame. I will use three clamps instead of two for more secure. Thank you for showing us this.
Honestly it's super solid with 2 clamps holding each side's L bracket. Those clamps can hold a lot of force. The only flex you might get would be from the bending of the L-brackets, so buy fairly thick ones. I don't know the measurements but go to Lowe's and pick ones that you can't bend in you hand and feel really solid, but that still fit back there. You will have to drill a hole in each bracket for the light bar to bolt into, as seen in my pictures. I just eyeballed it to get the height right.
I'm actually really surprised no one else had done this method before me. It's way easier than bolting it to the frame.
Just get in there and try it and you'll find a way that you like the best.
The only thing that annoys me about mine is that, since I have an 03, I had to cut out the grill which was very difficult to do "clean." Takes some patience and trial and error. In the end I was just left with the 2 small, ugly, rusty bolts that hold on the license plate holders, as you can see if you zoom into my picture of the front view. 06+ shouldn't have these. They are just clipped into the bumper somehow but I couldn't figure out how to get in there to remove them. I could cut them down to look better, but I decided I really just don't care enough. So I'm leaving them there as is. I'm the only one that would ever notice them anyways.
I highly recommend that mictuning Toyota dash switch for it, mounted to the left of the steering wheel. It makes it look really clean and factory in the dash. The backlight for the switch is too bright but it still looks nice.

jsmith21
New member
https://www.amazon.com/KAWELL-Singl...rd_wg=1YIXx&psc=1&refRID=XAZ6TQHJ6HAST4MR7MSW
Anyone think these would work? I know the tacoma and 4runner share a lot in common.
Anyone think these would work? I know the tacoma and 4runner share a lot in common.
Ther00ster
New member
Pictures attached, hopefully they help. I like this method because it was easy, secure, and fully adjustable in x,y, and z direction so the light can be centered perfectly, simply depending on how you place the L-brackets on the frame supports. Drilling into the frame seemed like it'd be a pain in the butt so I prefer this. Hardest part was cutting the grill out, and figuring how to wire the damn switch into the dash. Brackets were ~$3.
This is a 32" Nilight spot/flood bar from Amazon with their $12 wiring harness, and an OEM-looking dash switch from Amazon as well.
Didn't have to take off the bumper or anything to get it mounted or wired.
How is the led bar holding up
Net4n6
New member
I did the 03v8raleigh's method over the weekend. I used the bigger L brackets at Home Depot. The pre-drilled holes matched perfectly with the light and the grill. Absolutely, no drilling for me at all. It mounted very good. Very strong. No way it's going to loose and vibrate. Thanks 03V8 for posting the idea.
Last edited:
03v8raleigh
New member
I did the 03v8raleigh's method over the weekend. I used the bigger L brackets at Home Depot. The pre-drilled holes matched perfectly with he light. Absolutely, no drilling for me at all. It mounted very good. Very strong. No way it's going to loose and vibrate. Thanks 03V8 for posting the idea.
Nice, glad it helped!
How is the led bar holding up
It is holding up great. The bar has seen a couple car washes and heavy rain, with no moisture inside yet. Hoping the bar holds up well despite how cheap it was. And the mounts are still solid, no wiggle.
I couldn't help but notice a lot of the trucks in this thread still have the original halogen reflector headlights. Not to stir the pot (too much  ) but I think anyone considering doing the LED light bar mod should consider doing a proper HID projector headlight retrofit first. With HIDs you get way better illumination than factory that you can use literally all of the time, unlike the LED light bars that can't be used on the street. The other nice part about HID projectors are the bi-xenon feature that "opens the eye" when you turn on the high-beams. Combined with the stock bulbs you effectively get quad high beams. The light output on my truck is awesome!
) but I think anyone considering doing the LED light bar mod should consider doing a proper HID projector headlight retrofit first. With HIDs you get way better illumination than factory that you can use literally all of the time, unlike the LED light bars that can't be used on the street. The other nice part about HID projectors are the bi-xenon feature that "opens the eye" when you turn on the high-beams. Combined with the stock bulbs you effectively get quad high beams. The light output on my truck is awesome!
Timberland
New member
I couldn't help but notice a lot of the trucks in this thread still have the original halogen reflector headlights. Not to stir the pot (too much
I'm not sure about the cheaper Amazon lights but I can't imagine HIDs having the same light output as a good quality led bar. I had HIDs on my Jeep and they weren't even close to the light bar. Technically I used it on the street, but never in town and never with on-coming traffic. Just treat it like your high beams on dark country roads and it's fantastic!
03v8raleigh
New member
I couldn't help but notice a lot of the trucks in this thread still have the original halogen reflector headlights. Not to stir the pot (too much
I completely agree. Getting a nice setup with my existing headlights would be ideal. However, for me, and probably most people, going the lightbar route is just easier, cheaper, and looks cooler haha. It would be nice to do that in the future as well. I just have no idea where to begin or how much money I'd need to spend to get a nice setup (I've seen way too many poorly done/cheap/useless HIDs kits on cars). Where as my entire light bar setup was $60 off Amazon, I knew exactly what I was getting, and it was very straightforward to install. Personally, I was actually perfectly happy with the light output of my stock lights for everyday driving, I just wanted a little something more for open highways and trails at night.
...........oh and to try to fit in with every single other truck and Jeep rolling around my college campus haha. When's the last time you saw a lifted Wrangler without a full lightbar across the roof, two more light pods by the mirrors, and another bar on the metal bumper?

Similar threads


- Replies
- 1
- Views
- 1K

- Replies
- 1
- Views
- 35K

- Replies
- 3
- Views
- 39K

