3rd Gen Dash Clock Fix

I will have to try this out this afternoon... did it unsuccessfully on my Forester, hopefully i can get it correctly on the 4Runner.
 
Guess I will have to try this next time I'm home and can spare a few minutes.
Excellent information in this site along with some very helpful folks.
 
Like others have said...I took mine apart that wasn't working and couldn't find any cracks or degradation that I could see in the springs or anything. Soldered the pins on anyway and removed the springs and plugged it in with no fix. Then just for hell of it I took it back apart and melted every solder point on the board while adding just a touch of fresh solder and it's back 100%. Thanks for your write up! Just a bit of extra info I found
 
I found the best way to solder it after destroying one clock in haste while trying to do many other things while having the dash apart. I have a parts hoard so no biggie.
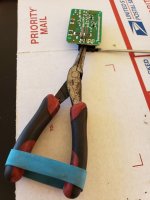
First of all, be relaxed and don't rush it. Pull out the pins and "tin" the ends that go in the board with a thin coating of solder. Get needle nose pliers and rubber band, or forceps roach clip would work. Hold the pin in exact position vertical, height, and plug slot alignment. You can shim the pliers or assembly to make it perfect for solder position. This makes it so you don't have to touch the pin at all while soldering, the pin cannot move while soldering. Heat the pin and float a nice small solder joint that goes around entire pin. Each pin can be lined up perfectly to the other. Mine worked perfect. Btw, putting back together, I put the clock plug in the empty ECT connection by mistake (I have a 5 speed), it fits in. I guess you could get confused on a perfect clock repair and have it not work by plugging it into the wrong connector.
 

Attachments

  • 20181226_115729.jpg
    20181226_115729.jpg
    56.7 KB · Views: 411
I found just reflowing the solder joints on my 98 T4R clock fixed my problem. I don't believe the 98 has springs in the clock mechanism and a poor solder job on the clocks seem to be a rampant problem.
 
most of us pride ourselves in diy. I sent to 99 clock to a guy that does this job everyday..found him via search on google...cost $7.50...came back working, put in again..has worked for years.
 
Discovered today that the plug to the back of the clock was plugged into the “dummy” port, so I got lucky and only had to plug mine back in. I was fully prepared to operate.

However, I will have to operate probably anyway because I want to remove the faded out puke green cover with blue.
 
Made my first attempt at soldering the pins to the board last night, but didn't have any flux handy. Clock works intermittently, which I expected with how poor the solders were. Going to reattempt in a few days.

Thanks for the great write-up though!
 
Well I bough my first 4runner last week.
1999 White 4x4 5speed E-locker with 268k miles
First thing I noticed was the clock wasn’t working. Pushed on it a little and it would intermittently work. Decided to try this mod and take the clock apart, the corner of the screen was all black. Someone was probably really pushing on it in the past. Decided to ditch the springs and solder the pins onto the board as per this thread.

Clock now works like a charm
 
A big thank you to all involved in this 9 year old post. I just picked up a 98 T4r this morning and two things are not working. The high beam indicator light and the clock. This post definitely gives me motivation to tear into the dash and get the clock working. This is my very first post on this forum by the way. I have a feeling I’m going to get a lot of answers on here. Thanks again!
 
Totally worked!

Thanks for the instructions. I'm not great at soldering, so will probably have to do it again, but for now, my clock works again! Next I'm going to try this on my 03 Corolla.
 
My clock has fortunately kept on ticking but... Since any aftermarket, modern or Android headunit has a clock I want to replace it with something that is OLED. Even been thinking of the comp/temp display from my mirror.
 
Will an amber clockk from a Taco work in the 99-00 dash? The connectors are the same, but I'm not sure about size
 
2001 4runner clock

Thanks for your great info. I just replaced my 2001 4runner clock in about 15 minutes thanks to your posting and pictures.:thanks:
 
wi1PEea
nALOZXJ.jpg

Decided to revive this thread. I fixed mine a month ago, cracked solder joint was the issue. Mine is a 1998 version, there might be a different layouts depending on MY but the problems are the same.

This issue was difficult to find, this was my 2nd attempt. If your trying this it might be a good idea to have some flux on hand, getting solder to flow on non-tin joints can be difficult. One more thing, use lead solder, it is more reliable than the lead free stuff.

Here is a list of things you should check so you don't have to take apart the dash twice like I did:
1. Check that springs aren't over compressed, just give them a little stretch
2. Clean spring contacts with alcohol
3. Check solder joints, especially ones on the resistors (recommend using a multimeter/VTVM)


Hopefully the photo posts correctly, if not here is a link
 
thanks for this. I elongated the springs and it works intermittend. i may have to check the soldering joints like you mentioned.
 
Thanks for the info. I pulled one from the JY hoping it would work to jo avail. Then just went over all the solder joints on the back with a soldering iron and now I have a working one and an extra. Anybody need a clock in the Sac, CA area?
Just PM me
 
Just to add my input since it took me many tries and many hours to ger my clock fixed. I tried all the steps on this post and searched for a long while before I figured it out.

Problem was that my clock would light up for a brief few seconds, then fade out, then shut off. Occasionaly I could press on it, and it would light for a bit. Or, if the weather was near 0, and it was a cold start, it might have stayed on for 5-10 minutes, just taunting me.

Reflowed pins as others have mentioned, I used a pencil style soldering iron, and just reheated the main 4 solder points, and gave some extra as needed. This worked for a bit, then stopped working. After some looking, turns out I needed to reflow the resistors on the back of the circuit board, little black boxes with numbers etched on them. After doing this, and reflowing any solder that looked questionable, problem has been solved for a year now, no issues.

TLDR, reflowing just pins might not be enough, you may need to reflow the resistors, and other solder joints on the board. Good luck!

 

Members online

Forum statistics

Threads
278,306
Messages
3,554,046
Members
248,016
Latest member
Advally Service

Trending content

Back
Top