

Tphocker
New member
Hey Guys,
If you are like me then you spend hours scouring the forum looking for some small detail explaining how to do something until you are comfortable enough to pull the trigger on your own vehicle. It can be very frustrating trying to find information on something you know a bunch of people have already done. I spend a fair amount of time figuring things out on my own even when I know a lot of people have already done the hard work for me.
That was the case when I went to do the rear cargo window switch mod. It isn't an overly complicated mod, but when it comes to cutting holes in the interior trim of my limited I want to make sure I'm sure I know what I'm getting into. I recently finished my cargo drawers/sleeping platform and wanted a way to operate the back window in the middle of the night without crawling up to the front and putting in the key just to crack the window.
There are a lot of people that have accomplished this but I wasn't able to find any threads with pictures and information on anything more that generalities. So this 1 hr mod took me several hours. Hopefully this thread will clear some things up and make it an easy decision for you to pull the trigger on this cheap, quick, and practical mod.
First lets talk a little about the overall plan of attack. The easiest way to do this mod is to tap into the trunk key cylinder. All 3rd gens (that I know of) allow you to operate the back window with your key. Turn the key one direction for up and the other direction for down. There is a 3 second delay before the window moves. This will also be the case for your switch on the interior. At first I thought this delay would bother me. But I actually prefer it now. It allows your gear to slide around and bump into the switch without anything happening right away.
After you get your trunk open you will need to pull of the interior panels to get to the guts. Here's a picture of what you will see.
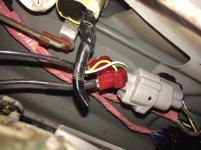
At the top of the picture there is a yellow connecter. That is the back of the key cylinder. There is three wires that come out of the yellow connecter. They head towards the passenger side and to into a white connecter. I unplugged the white connecter just to give me more room to tap into the wire. As you can see in the picture I used t-taps and tapped into all three wires. Then I plugged it back together.
The way three wires identify as:
Green w/ Red Stripe: Up
Green w/ Yellow Stripe: Down
White w/ Black Stripe : Ground
When you connect the G/R with the W/B (ground) the window goes up
When you connect the G/Y with the W/B (ground) the window goes down
So basically whatever switch you use, instead of bring power into the switch you are using the ground as your incoming line and taking the up and down out to their respectable locations.
The switch I used:
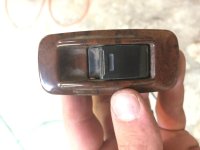
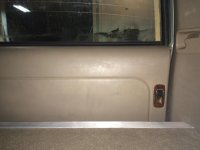
I found this at a salvage yard from the rear windows on a 3rd gen limited. It matches the wood grain of my interior and looks great. Best of all it was CHEAP!!!
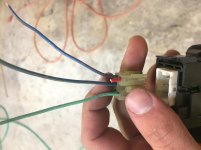
I also grabbed the wire harness for it. This made it really easy to connect. After a few minutes with a meter I was able to figure out which wires controlled the up and down functions. If the switch you get has the same wiring harness as this one, then these are the only three wires you need.
After a few minutes of measuring and marking I finalized the location I wanted to put my switch where it wasn't getting in the way of anything. I cut a rectangular hole with a jig saw that fit the switch body. Shoved the switch in and put a little hot glue to hold it in.
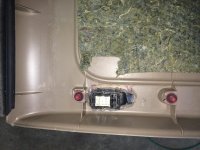
Then I had to cut the same size hole in the metal of the trunk hatch for the body of the switch to slide into.
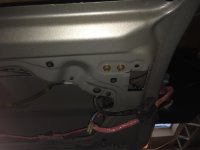
Then all you have to do is connect everything and enjoy. One of the things you have to be really careful of is to make sure your wires all stay out of the way from the window and mech. for when the window is unrolled. So I zip tied all my wires to the existing wires to make sure it stayed out of the way.
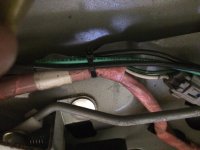
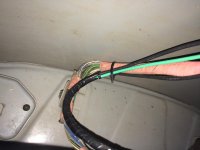
Here's the finished product. I think it came out great works like a champ.
If you are like me then you spend hours scouring the forum looking for some small detail explaining how to do something until you are comfortable enough to pull the trigger on your own vehicle. It can be very frustrating trying to find information on something you know a bunch of people have already done. I spend a fair amount of time figuring things out on my own even when I know a lot of people have already done the hard work for me.
That was the case when I went to do the rear cargo window switch mod. It isn't an overly complicated mod, but when it comes to cutting holes in the interior trim of my limited I want to make sure I'm sure I know what I'm getting into. I recently finished my cargo drawers/sleeping platform and wanted a way to operate the back window in the middle of the night without crawling up to the front and putting in the key just to crack the window.
There are a lot of people that have accomplished this but I wasn't able to find any threads with pictures and information on anything more that generalities. So this 1 hr mod took me several hours. Hopefully this thread will clear some things up and make it an easy decision for you to pull the trigger on this cheap, quick, and practical mod.
First lets talk a little about the overall plan of attack. The easiest way to do this mod is to tap into the trunk key cylinder. All 3rd gens (that I know of) allow you to operate the back window with your key. Turn the key one direction for up and the other direction for down. There is a 3 second delay before the window moves. This will also be the case for your switch on the interior. At first I thought this delay would bother me. But I actually prefer it now. It allows your gear to slide around and bump into the switch without anything happening right away.
After you get your trunk open you will need to pull of the interior panels to get to the guts. Here's a picture of what you will see.
At the top of the picture there is a yellow connecter. That is the back of the key cylinder. There is three wires that come out of the yellow connecter. They head towards the passenger side and to into a white connecter. I unplugged the white connecter just to give me more room to tap into the wire. As you can see in the picture I used t-taps and tapped into all three wires. Then I plugged it back together.
The way three wires identify as:
Green w/ Red Stripe: Up
Green w/ Yellow Stripe: Down
White w/ Black Stripe : Ground
When you connect the G/R with the W/B (ground) the window goes up
When you connect the G/Y with the W/B (ground) the window goes down
So basically whatever switch you use, instead of bring power into the switch you are using the ground as your incoming line and taking the up and down out to their respectable locations.
The switch I used:
I found this at a salvage yard from the rear windows on a 3rd gen limited. It matches the wood grain of my interior and looks great. Best of all it was CHEAP!!!
I also grabbed the wire harness for it. This made it really easy to connect. After a few minutes with a meter I was able to figure out which wires controlled the up and down functions. If the switch you get has the same wiring harness as this one, then these are the only three wires you need.
After a few minutes of measuring and marking I finalized the location I wanted to put my switch where it wasn't getting in the way of anything. I cut a rectangular hole with a jig saw that fit the switch body. Shoved the switch in and put a little hot glue to hold it in.
Then I had to cut the same size hole in the metal of the trunk hatch for the body of the switch to slide into.
Then all you have to do is connect everything and enjoy. One of the things you have to be really careful of is to make sure your wires all stay out of the way from the window and mech. for when the window is unrolled. So I zip tied all my wires to the existing wires to make sure it stayed out of the way.
Here's the finished product. I think it came out great works like a champ.
Attachments
-
 Photo Feb 21, 12 20 35 PM.jpg112.7 KB · Views: 13,525
 -
 Photo Feb 21, 12 20 49 PM.jpg118.8 KB · Views: 15,026
 -
 Photo Feb 21, 1 22 46 PM.jpg135.6 KB · Views: 13,609
 -
 Photo Feb 21, 1 23 00 PM.jpg134 KB · Views: 13,758
 -
 Photo Feb 21, 1 16 07 PM.jpg134.3 KB · Views: 13,142
 -
 Photo Feb 21, 1 16 19 PM.jpg128.6 KB · Views: 13,188
 -
 Photo Feb 21, 1 35 23 PM.jpg131.3 KB · Views: 14,274
 -
 Photo Feb 21, 12 03 09 PM.jpg127.2 KB · Views: 16,658
Last edited:


