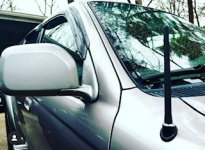
3rd Gen Stubby Antenna Mod

I always wondered why it wasn't possible to install the new antennas without taking off the dash and running the wires. Going to add this to my list of projects to do. Mostly use the stereo for bluetooth, so I don't care much for the radio anyhow.

Thanks for your post!
 
Hey all! I'm not sure if this has been done before or not. My retractable antenna was bent, broken and not doing much for retracting anymore so I figured out a way with some hardware to make this work. I figured I would make a post anyway in case others want to do this.

I started with buying a 4th gen stubby antenna.
Link: The Original Stubby Antenna Replacement for 2002-2013 Toyota 4Runner
It says it fits 02s, but it definitely does not so don't order thinking it will work.

Parts used:
(QTY: 1) #10-32 6" Threaded Rod
(QTY: 2) #10-32 Coupler
(QTY: 2) #10-32 Jam Nut
(QTY: 2) #10-32 Flat Washer

Step 1:
Remove the nut on the base of the antenna
XxYf4Rg.jpg


Step 2:
Remove the retractable antenna motor by unscrewing/clipping the fender liner in the wheel well
Uyl4ykx.jpg


Step 3:
Cut the bottom of the antenna stem off. I cut about 5" from the top of the antenna (the part you unthreaded the top nut off of).
XdoxfY1.jpg


Step 4:
Take the antenna, unscrew the little short threaded rod that comes with it. With a washer against the antenna followed by the coupler, followed by the jam nut, thread the rod into the antenna until it stops. Once you find that point, tighten the jam nut against the coupler to lock it in place.
vm1OzGq.jpg


Step 5:
Take the other coupler nut and thread it on the bottom of the threaded rod. Put that assembly you've made, with the threaded rod and antenna, through the base of the antenna that you cut. Thread the coupler nut down far enough to be flush with the cut you made (it is not flush in the pic, so you can see what I'm talking about).
JY39EjE.jpg


Step 6:
Put the other washer you have onto the threaded rod after the coupler nut. It should be just about the same diameter as the antenna base/tube. Then thread on the jam nut on top of that washer and tighten it down.
gDfxCaP.jpg


Step 7:
Remove the stubby antenna and washer from the top of the threaded rod. The threaded rod will fall out, so you can tape it in place if you want to, I just held it in place. Now you're ready to put the antenna assembly back up through the fender. While pushing the antenna back up through the fender, put that top chrome antenna nut back on and tighten it down so that the top of the coupler nut is flush with it (not flush in pic).
yQrjVeJ.jpg


Step 8:
Put the washer on top of the chrome antenna nut and screw on the stubby antenna until it's tight. BAM! Now you have a stubby antenna on your 3rd gen! My reception works just as good as before with no issues!
hdKGg3U.jpg


Thanks for reading, I hope this helps someone!

Thanks for the info. I am in the midst of doing this mod now. My antenna tube once cut has a rubber lining on the inside that doesn't allow my coupling nuts to go in easily. Is there a good way to get that rubber lining out?
 
Looks clean! Question - did you leave power attached to the motor? The reason I killed my antenna was due to the incessant grinding noise the motor made trying to extend the (broken, disconnected) antenna. My motor is unplugged and living in its regular location.
 
better solution than just ripping it all out like i did and 3D printing a cap. I really only listen to stuff from my phone or worst case, a CD, so i havent noticed but i probably should have gone this route just incase.
 
Put the saw down

Step 3:
Cut the bottom of the antenna stem off. I cut about 5" from the top of the antenna (the part you unthreaded the top nut off of).
XdoxfY1.jpg


You can skip any cutting by removing the plastic “poncho” over the motor cut the tape holding the stem to the motor section. It will just be a couple inches longer but saves some effort.
 
Hey all! I'm not sure if this has been done before or not. My retractable antenna was bent, broken and not doing much for retracting anymore so I figured out a way with some hardware to make this work. I figured I would make a post anyway in case others want to do this.

I started with buying a 4th gen stubby antenna.
Link: The Original Stubby Antenna Replacement for 2002-2013 Toyota 4Runner
It says it fits 02s, but it definitely does not so don't order thinking it will work.

Parts used:
(QTY: 1) #10-32 6" Threaded Rod
(QTY: 2) #10-32 Coupler
(QTY: 2) #10-32 Jam Nut
(QTY: 2) #10-32 Flat Washer

Step 1:
Remove the nut on the base of the antenna
XxYf4Rg.jpg


Step 2:
Remove the retractable antenna motor by unscrewing/clipping the fender liner in the wheel well
Uyl4ykx.jpg


Step 3:
Cut the bottom of the antenna stem off. I cut about 5" from the top of the antenna (the part you unthreaded the top nut off of).
XdoxfY1.jpg


Step 4:
Take the antenna, unscrew the little short threaded rod that comes with it. With a washer against the antenna followed by the coupler, followed by the jam nut, thread the rod into the antenna until it stops. Once you find that point, tighten the jam nut against the coupler to lock it in place.
vm1OzGq.jpg


Step 5:
Take the other coupler nut and thread it on the bottom of the threaded rod. Put that assembly you've made, with the threaded rod and antenna, through the base of the antenna that you cut. Thread the coupler nut down far enough to be flush with the cut you made (it is not flush in the pic, so you can see what I'm talking about).
JY39EjE.jpg


Step 6:
Put the other washer you have onto the threaded rod after the coupler nut. It should be just about the same diameter as the antenna base/tube. Then thread on the jam nut on top of that washer and tighten it down.
gDfxCaP.jpg


Step 7:
Remove the stubby antenna and washer from the top of the threaded rod. The threaded rod will fall out, so you can tape it in place if you want to, I just held it in place. Now you're ready to put the antenna assembly back up through the fender. While pushing the antenna back up through the fender, put that top chrome antenna nut back on and tighten it down so that the top of the coupler nut is flush with it (not flush in pic).
yQrjVeJ.jpg


Step 8:
Put the washer on top of the chrome antenna nut and screw on the stubby antenna until it's tight. BAM! Now you have a stubby antenna on your 3rd gen! My reception works just as good as before with no issues!
hdKGg3U.jpg


Thanks for reading, I hope this helps someone!


What is the need for both of the couplers? Any different than just using 2 jam nuts instead?
 
Since this popped up again......I never (put the time in to figure it out*, I suppose) understood this particular solution. Is the broadcast signal carried from the stubby along the tube you cut? Does the motor unit need to remain in the vehicle at ail? I pulled the antenna out when the extendo-drive gear failed and threw it away and unclipped the power to the motor. I still get FM in the city and a couple strong AM stations. I just live without the radio but I like to throw a baseball game on from time to time. Is there not an antenna wire in there somewhere that can be extended up to the roof rack area? I plugged the antenna hole with a round plastic splash-guard-liner-type fastener.

*Admittedly, I'm not the sharpest tool in the shed and have done no research.
 
Is there not an antenna wire in there somewhere that can be extended up to the roof rack area? I plugged the antenna hole with a round plastic splash-guard-liner-type fastener.

*Admittedly, I'm not the sharpest tool in the shed and have done no research.
There is a diversity antenna in the rear side glass (passenger) that is used by the OEM stereo to improve radio reception in certain situations. If you still have the OEM stereo, that is probably what is allowing you to get some reception. It is a smaller connector behind the radio than the main antenna, so they are easy to tell apart.

-Charlie
 
There is a diversity antenna in the rear side glass (passenger) that is used by the OEM stereo to improve radio reception in certain situations. If you still have the OEM stereo, that is probably what is allowing you to get some reception. It is a smaller connector behind the radio than the main antenna, so they are easy to tell apart.

-Charlie

That makes sense. I do have the OEM stereo unit still in use (CDs and cassettes, too!). Any reason I can't locate the main antenna wire somewhere in the vicinity of the quarter panel motor-bag and extend it myself to another location?
 
That makes sense. I do have the OEM stereo unit still in use (CDs and cassettes, too!). Any reason I can't locate the main antenna wire somewhere in the vicinity of the quarter panel motor-bag and extend it myself to another location?
That should work just fine with the right adapters, etc.

-Charlie
 
I caved and bought the conversion kit from Amazon:

Amazon.com: AntennaMastsRus - Power Antenna Mast Conversion Kit is Compatible with Toyota 4 Runner (1996-2002) - Toyota Hilux (1998-2005) : Electronics

I recently installed an ATOTO radio. The radio automatically turns on when starting the car which in turn raised the antenna mast. The only way to get the antenna mast to go down was to turn off the car. I didn't like not having control so opted to go with a stationary stubby.

I wanted to go the DIY route, but I'm getting old and it's cold outside. $$ = convenience. Works great so far and was an easy install.
 

Attachments

  • IMG_2574.jpg
    IMG_2574.jpg
    41.6 KB · Views: 530
This doesn't work - cutting power antenna mast

I'm working on putting in a whip antenna - necessitated by a snorkel install. I came across this thread when searching for antenna options to replace the power antenna.

Important note: The method of cutting the mast on the power antenna and adding a threaded rod to attach a whip doesn't work.

It may "work" because you can still get radio reception, but that's only because you're getting radio reception from the internal wiring harness or body of the car.

The antenna wire is not connected to that outer tube of the power antenna mast. There is a plastic insulating liner inside that outer tube and the tube is grounded to the body from the power antenna wiring.

The actual antenna signal connection is inside the tube and makes contact only with power antenna. Even if you were able to make contact with the signal wire inside, the entire assembly is still grounded to the body of the car.

The only way to setup a proper whip antenna is to replace the base with the non-powered version for a fixed antenna. Just FYI.
 

Members online

Forum statistics

Threads
278,309
Messages
3,554,075
Members
248,016
Latest member
Advally Service

Trending content

Back
Top