5100's at standard height with FJ springs? Can't do it?

rgcary

New member
I wanted to keep my 5100's at standard height and tech doing install said it's not possible because the shock post does not allow it to be tightened enough at the upper control arm? Is that the case? Since I had issues with this install I wanted to check to make sure what he's saying is known to be true? I know most put them at .85, but if you can't put them at standard with FJ springs people need to know this out here. So the front are at .85 and rear are standard 5100's with fj springs. It did "level" the ride, but I was still hoping for some of the factory rake. I'm worried that the rear may settle causing a reverse rake eventually.

Please let me know.

Thank you
 
Register to hide this ad
...it's not possible because the shock post does not allow it to be tightened enough at the upper control arm? Is that the case?

I don't think you should have a big problem since the front will sag too and it should remain mostly level, but I understand your frustration. I had the same setup and I never noticed the rear sagging more, although I only had the setup for a little more than a year.

I can't think of any reason the shocks wouldn't work on 0" I think your mechanic got into a job over his head (as with the ABS sensor). Not that it is terribly difficult but I'm almost positive there are several guys here with 0" on the 5100s.

The shocks do say 0-2.5" not .85-2.5", and the since they're built for the FJC using FJ coils should not be a problem.
 
tech doing install said it's not possible because the shock post does not allow it to be tightened enough at the upper control arm? Is that the case?

Did the tech mean there isn't enough "spring compression" for the shock to be seated/mounted correctly when set to .0 opposed to .85?

I don't quite understand the logic. I don't see why you can't install a shock on a taller spring when it works fine with a stock spring. I have my 5100s set on .0" on 1.6" toytec springs which are even taller and I never had any issues.
 
Last edited:
Update:

Did the tech mean there isn't enough "spring compression" for the shock to be seated/mounted correctly when set to .0 opposed to .85?

I don't quite understand the logic. I don't see why you can't install a shock on a taller spring when it works fine with a stock spring. I have my 5100s set on .0" on 1.6" toytec springs which are even taller and I never had any issues.

Well, what I'm trying to say is that when the 5100 is set to 0 and the FJ front coils are installed the shock bolt going through the upper control arm sticks up too much, so you can't tighten the shock all the way becuase you run out of threads. **Note this is from a tech that reversed the front springs by accident... So he had to do this setup 2x and he knows I wanted them on 0, but even the 2nd time around was a no go. I did not see it for myself, but since it was the 2nd time around I have more faith in trusting him. It's almost like the FJ front coils are not long enough when set on 0.

This is something that should be brought up in the posts as a possible concern. I will say that I did gain A LOT of lift at .85 in the front. I would imagine it's close to 2-3'' on a V6 4wd. The rear was maybe about 1''. Still not 100% used to it because you really notice the front end up in the air more, even when riding in it. Almost feels more like a truck than an SUV. Even getting in/out of driver seat is a different feel.
 
What was the problem with the ABS sensor?

When you drop the front coils/springs you need to make sure the ABS wires on both sides are free from the clips first. If not, you will pull then too far and split the B/W cable inside of the sleeve. That's what happened to the shop doing mine. ABS cable from dealer was $60, online about $45. Installed cable w/battery disconnected, drove about 100ft and all ABS/VSC and skid lights turned off and remained off. You can test for continuity on the cable ends if you think you have a bad one, that's what I did.
 
Did he install the shocks with the springs compressed all the way. You can't tighten them down under spring load.
 
Did he install the shocks with the springs compressed all the way. You can't tighten them down under spring load.

Good point. I was not there and it does not seem like when looking at the springs installed that there is much load on them right now. Anyone know how tall the fj front springs are not under load? These are from a 2011 4wd fj that only had 3000 miles on them. I did not measure how tall the 5100's are from 0 setting to top where spring would end. Could tell a store. Maybe motorsports place where I ordered knows...

Would be great for someone to chim in that has set them at 0, used no spacers and a set of fj front springs. I guess I could see if it could be done on 0 myself, but would have to pay labor for about 2 hours for entire front... This has worn my mind out... Maybe just attempting one side and if it can't, then only 1 hour wasted and paid for.
 
The Bilstein site has them rated for 0" of lift on an FJ or 4runner so there is no reason that shouldn't work.

I think he has to be doing something wrong. Perhaps the having them compressed thing is what it was.
 
Check to see if the tech put the top hat on, that could account for the extra stud height.

Keep us updated on your findings. ;):
 
Definitely odd. If the 5100s are made to work with the shorter 4r springs, the fjs shouldn't be an issue at all. Something isn't right for sure.
 
I believe the FJ springs add about 1" of lift by themselves. But you should be able to configure the 5100's to not add any more than that.
 
I gotta believe that he is not compressing the springs.

I have the 5100's installed at 0 , but I do have the Daystar Spacers installed as well..

It doesnt seem logical that it would not fit.

Good luck.
 
I have the 5100's installed at 0 , but I do have the Daystar Spacers installed as well..

The daystar spacers go on top the assembled strut right? So you have the same setup just with spacers added on top after the coilover is assembled, correct?
 
Check to see if the tech put the top hat on, that could account for the extra stud height.

Keep us updated on your findings. ;):

When you say top hat is that the large rubber bushing on top of the upper control arm? if so that is on. I think he had the springs compressed when putting them on like thread mentioned. That is the only thing I can think of...

So is it really worth seeing if they can be installed on 0'' and pay for the hour labor per side or just leave them at .85''? The .85 setting does an excellent job leveling the 4runner. Back is about 1'' higher than front. I know most out here don't do 0 setting.

Thanks again for all the replies and help!
 
I have my 5100's with stock coils set at 0 as well, no problem. I also have a 1" Daystar spacer in the front though and 2" in the rear.
I did the install myself without any prior experience. A couple observations.

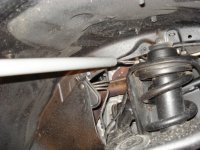
Are you saying the 3 studs coming out of the top hat won't tighten up to upper strut housing in the UCA? See picture below of my stock components before lift.

The studs I thought were threaded all the way and the top hat should be on the underside of the UCA, the studs stick through the housing and the nuts should tighten up.

1. There is a bottom plate with the 5100's that catches the adjustable ring for setting the height. I initally had this upside down until I studied the diagram further. That could drastically change the extension of the rod I believe. I think that's how I came to double check the diagram on the 1st build up.
2. With the 5100's, I remember my stock coils didn't have to compress much at all on the bench and I was concerned they would have enough reach to seat in the top hat, but they did barely. Then when installed, the weight of the truck put some pre-load on everything fine.

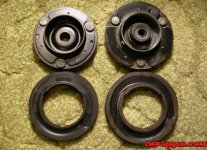
The top hat holds the top rubber piece (isolator) that sets ontop of the coil spring, between top bushing and coil. I did find a picture of my shock before I took it off so you can see the top components. The 2nd picture shows the isoloator and top hat components.
Additionally, I believe their is a flat washer above the bushing between the bushing and the nut. The flat washer + bushing has clearance in the UCL opening, just provides good pressure from nut and doesn't allow the nut to sink into the bushing.

I am really wondering if he has the bottom plate of the 5100's upside down? If I recall, this sets the shock about 1" different than it should be.

I was looking for pictures from my install, but I don't have any of the front strut on the bench with the 5100's.

Hopefully my discriptions were accurate, just trying to help here. I have been in your place and was frantic when I ran into problems.

Best regards,
Doug

 

Attachments

  • Helper Bar Back Shock Bolt.jpg
    Helper Bar Back Shock Bolt.jpg
    133.5 KB · Views: 185
  • top hat Isolator.jpg
    top hat Isolator.jpg
    73.2 KB · Views: 182
It's probably not worth paying the labor, but it seems like, with all the trouble they've caused you (they made you pay for a new ABS wire that they ripped too right?), they should be able to complete the original install (0" not 0.85") without tacking on extra labor.


If you don't mind it being level, which I think looks good, leave it alone.

edit- As with most members I have changed the suspension myself, actually several times, and never ripped that wire or ran into this kind of problem. There's no excuse for a qualified mechanic to do such a poor job and continue charging you.
 
Last edited:
I have my 5100's with stock coils set at 0 as well, no problem. I also have a 1" Daystar spacer in the front though and 2" in the rear.
I did the install myself without any prior experience. A couple observations.

Are you saying the 3 studs coming out of the top hat won't tighten up to upper strut housing in the UCA? See picture below of my stock components before lift.

The studs I thought were threaded all the way and the top hat should be on the underside of the UCA, the studs stick through the housing and the nuts should tighten up.

1. There is a bottom plate with the 5100's that catches the adjustable ring for setting the height. I initally had this upside down until I studied the diagram further. That could drastically change the extension of the rod I believe. I think that's how I came to double check the diagram on the 1st build up.
2. With the 5100's, I remember my stock coils didn't have to compress much at all on the bench and I was concerned they would have enough reach to seat in the top hat, but they did barely. Then when installed, the weight of the truck put some pre-load on everything fine.

The top hat holds the top rubber piece (isolator) that sets ontop of the coil spring, between top bushing and coil. I did find a picture of my shock before I took it off so you can see the top components. The 2nd picture shows the isoloator and top hat components.
Additionally, I believe their is a flat washer above the bushing between the bushing and the nut. The flat washer + bushing has clearance in the UCL opening, just provides good pressure from nut and doesn't allow the nut to sink into the bushing.

I am really wondering if he has the bottom plate of the 5100's upside down? If I recall, this sets the shock about 1" different than it should be.

I was looking for pictures from my install, but I don't have any of the front strut on the bench with the 5100's.

Hopefully my discriptions were accurate, just trying to help here. I have been in your place and was frantic when I ran into problems.

Best regards,
Doug

Thank you so much Doug. Check out this video as this is how the bottom part ot the ring is installed. It's at teh 8 second part of the clip.

BILSTEIN Shock Shop - 5100 Series Ride Height Adjustable - YouTube

My top of the strut looks just like yours and seems to be correct. I go back to him maybe having the shock compressed when installing. I'm just the weekend do it yourself guy, but it seems like all I need to do it have jack stands hold the front up by the frame and use the floor jack to raise the strut/coil into place. I bet he had this on a lift and compressed the spring, then put it on, etc. w/out doing it the way I'm thinking. That would also be the reason he split one of the ABS wires because arm was lowered too much... Seems like you don't even need a spring compressor if you do it my way, right? Again, I'm a weekend project warrior, not ASE certified! ;-)

Either way, it's not something that can't be fixed. I could very well drive with it "leveled" and then switch back to 0''.
 
It's probably not worth paying the labor, but it seems like, with all the trouble they've caused you (they made you pay for a new ABS wire that they ripped too right?), they should be able to complete the original install (0" not 0.85") without tacking on extra labor.


If you don't mind it being level, which I think looks good, leave it alone.

edit- As with most members I have changed the suspension myself, actually several times, and never ripped that wire or ran into this kind of problem. There's no excuse for a qualified mechanic to do such a poor job and continue charging you.

Hey Gaterose. I'll tell you this forum makes me feel like I have a lot of friends... The kind that you can really count on. Everyone is so friendly and willing to jump right in and help out or give you their opinion. VERY nice and glad to be part of it.

With that said, I know this has been an unusual case and a frustrating one. I'm the type of person that likes to do things right and will probably drive myself crazy. Forget painting because if the line is not straight I'll be paiting it all over... ;-) Anyway. Yes, the tech did pay for the $60 ABS cable, not me and he made good for al that was done wrong (You all don't know the half of it). I installed it though because I felt better that way.
I don't like to spill the beans, BUT besides the ABS cable being split ALL the rear lugs were also left finger tight when I got home after a 5 mile drive, cotter pins were missing and the passenger upper control arm nut was stripped. So over the past few days when they have worked on it I have crawled under it to make sure everything is okay. Again, he was very helpful and corrected all of this, but I feel they did rush. They fixed all of this 100% too...
 
Good deal,
Sounds like you're all set.
I'd never go back there for sure lol
Have a good weekend.

I figured out how the adjustment ring went on pretty quickly fooling around with it initally. Thanks for the video though. I keep all these tips from people on my computer for future reference :-)

Best regards,
Doug
 

Members online

Forum statistics

Threads
278,316
Messages
3,554,123
Members
248,016
Latest member
Advally Service

Trending content

Back
Top