A-Ha's Build.

Over the past couple months I've rounded up a few mod's hear and there from Christmas presents and a few black Friday sales.

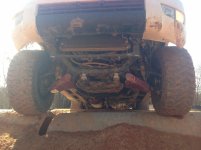
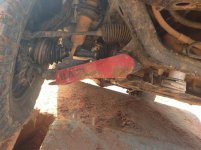
BAMF front LCA skids:

IMG_2447 (1024x768).jpg
IMG_2449 (1024x768).jpg

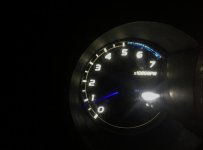
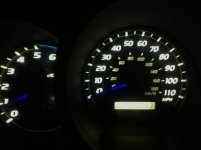
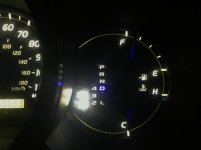
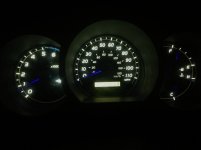
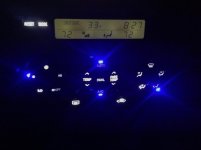
Also sent my gauges and HVAC panel to Alex's T4R gauge swaps I was fortunate enough to catch Alex during the giving season and he agreed to change my red line and temp gauge from red to blue. After battling the paint detail for a decent period he decided this was the last run of the blue RPM lines it really does prove to be a pain from pics Alex has sent me of the process. I love the new look though I've caught myself staring at them while driving at night lol they definitely give the truck a newer car detail opposed from the old boring orange lighting everywhere.
IMG_2422 (1024x757).jpg
IMG_2423 (1024x768).jpg
IMG_2424 (1024x768).jpg
IMG_2425 (1024x768).jpg
IMG_2426 (1024x768).jpg

The blue line came out unevenly coated so instead of beating alex's hands up any more He's gonna hook me up with the little bottle of blue paint to attempt some touch up work an see if I can get the coat more even. Even with the small discrepancy I'm thrilled with the new look

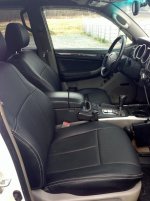
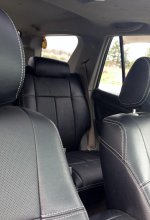
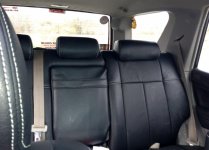
Also I purchased some Clazio seat covers Black with grey stitching still need to get some pics but the interior's a little dirty at the moment lol. I had PD come by an help install them they really do take some negotiating to get the covers tight and looking good. As well I recieved a rear back up camra from my secret santa that still needs to get installed. After class started this semester between work and school I've had zero wrench time for the truck.

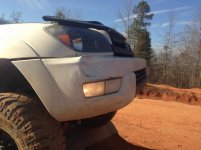
Also had a great time this weekend with Superman, darklight, audiness, and everyone else that came out to gulches ORV park in SC I managed to gain some clearance on the passenger side of the front bumper :biggrin2:
IMG_2450 (1024x768).jpg
pushed it into a tree while watching a rock on my driver side.. oops.. lol I'll post up some more photo's of the trail ride after PD and darklight get there pics uploaded. Can't wait to see some of the shots they got of everyone wheeling. :wave:
 

Attachments

  • IMG_2447 (1024x768).jpg
    IMG_2447 (1024x768).jpg
    83.1 KB · Views: 1,068
  • IMG_2449 (1024x768).jpg
    IMG_2449 (1024x768).jpg
    109.8 KB · Views: 1,064
  • IMG_2422 (1024x757).jpg
    IMG_2422 (1024x757).jpg
    35.3 KB · Views: 1,071
  • IMG_2423 (1024x768).jpg
    IMG_2423 (1024x768).jpg
    42.4 KB · Views: 1,088
  • IMG_2424 (1024x768).jpg
    IMG_2424 (1024x768).jpg
    43 KB · Views: 1,053
  • IMG_2425 (1024x768).jpg
    IMG_2425 (1024x768).jpg
    38.6 KB · Views: 1,065
  • IMG_2426 (1024x768).jpg
    IMG_2426 (1024x768).jpg
    31 KB · Views: 1,048
  • IMG_2450 (1024x768).jpg
    IMG_2450 (1024x768).jpg
    106.5 KB · Views: 1,074
Also sent my gauges and HVAC panel to Alex's T4R gauge swaps I was fortunate enough to catch Alex during the giving season and he agreed to change my red line and temp gauge from red to blue. After battling the paint detail for a decent period he decided this was the last run of the blue RPM lines it really does prove to be a pain from pics Alex has sent me of the process.

Aha, do you have access to an airbrush? A little masking and some thinned out paint through an airbrush and you will have a beautiful, consistent RPM line. I know that some people are scared to mess with airbrushes, but I find them quite easy to use. In fact, in my 2005 SE, the silver trim is looking kind of peaked. I do not care for the "dash kits" that some vendors retail as they look a little ghetto to me. Hence, I am in the process of airbrushing a deep silver color over the original silver trim using AUTO AIR colors, followed by a urethane sealer. I will probably do a write up on this, but I know I am digressing big time, so I apologize!

 
Aha, do you have access to an airbrush? A little masking and some thinned out paint through an airbrush and you will have a beautiful, consistent RPM line. I know that some people are scared to mess with airbrushes, but I find them quite easy to use. In fact, in my 2005 SE, the silver trim is looking kind of peaked. I do not care for the "dash kits" that some vendors retail as they look a little ghetto to me. Hence, I am in the process of airbrushing a deep silver color over the original silver trim using AUTO AIR colors, followed by a urethane sealer. I will probably do a write up on this, but I know I am digressing big time, so I apologize!

I'm a newbie here but wanted to offer another suggestion. I did a similar mod to a 2007 tacoma that is no longer with us (God rest it's soul). I used a light filter like the ones they use on spotlights in a theater. Just cut it a little larger, applied some spray adhesive to the filter and placed it on the back of the panel. Looked stock as the color was consistent all the way across.

Sorry to jump in without introducing myself with my own thread but I've enjoyed reading the build threads and have gotten some great ideas for my 07 sr5 from you guys. Thanks and good luck with the paint! Now.. guess I need to go introduce myself and take some pics of the rig.
 
... pushed it into a tree while watching a rock on my driver side.. oops.. lol

I see more steel in your future..... its still a little hazy but it becoming clearer now... yes! it's steel ! oh yes ! and its wrapped around your front end!
 
I see more steel in your future..... its still a little hazy but it becoming clearer now... yes! it's steel ! oh yes ! and its wrapped around your front end!

most definitely jon lol I noticed last night it actually got into my passenger fender a bit as well. It's certainly time to armor up front and rear just gotta put the paso's together.
 
Aha, do you have access to an airbrush? A little masking and some thinned out paint through an airbrush and you will have a beautiful, consistent RPM line. I know that some people are scared to mess with airbrushes, but I find them quite easy to use. In fact, in my 2005 SE, the silver trim is looking kind of peaked. I do not care for the "dash kits" that some vendors retail as they look a little ghetto to me. Hence, I am in the process of airbrushing a deep silver color over the original silver trim using AUTO AIR colors, followed by a urethane sealer. I will probably do a write up on this, but I know I am digressing big time, so I apologize!

nah I don't have and airbrush handy I've got a few little tricks up my sleeve I'll wait for a rainy weekend to get down an detailed with it. I certainly may look into perhaps a cheap airbrush setup if i can find one if I can't get a good out come with a tiny detail brush and a little wet sanding.
 
I'm a newbie here but wanted to offer another suggestion. I did a similar mod to a 2007 tacoma that is no longer with us (God rest it's soul). I used a light filter like the ones they use on spotlights in a theater. Just cut it a little larger, applied some spray adhesive to the filter and placed it on the back of the panel. Looked stock as the color was consistent all the way across.

Sorry to jump in without introducing myself with my own thread but I've enjoyed reading the build threads and have gotten some great ideas for my 07 sr5 from you guys. Thanks and good luck with the paint! Now.. guess I need to go introduce myself and take some pics of the rig.

that would certainly be a good plan of attack; however, the color blue paint is a mixture of two shades of paints that alex creates to match the blue led light fairly close in fact. So If the paint works it'll match more consistently than the films available your speaking of.
 
waiting patiently for this pic of the clazzios!

I haven't forgotten I wanted to post them up for you the most I really appreciate you passing them along to me they look great! The install was extremely tedious if you were curious a lot of kneading and pulling and smoothing and adjusting to get the seams lined up right; however, complete transformation of the interior!

unfortunately a crazy fun country girl decided she'd like to have my back window down while I was forging around through a back yard pond and mud/dirt is well covering a good bit of the interior now so I'd like to detail everything before i post the pics they're coming soon though for sure
 
nah I don't have and airbrush handy I've got a few little tricks up my sleeve I'll wait for a rainy weekend to get down an detailed with it. I certainly may look into perhaps a cheap airbrush setup if i can find one if I can't get a good out come with a tiny detail brush and a little wet sanding.

Here you go bruh! Saw this on TV the other night! Should work awesome!!!
 
Finally got around to snapping some photo's of the Clazzio's for you guys!

IMG_2487 (768x1024).jpg

IMG_2488 (768x1024).jpg

IMG_2489 (1024x768).jpg


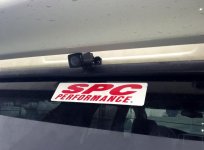
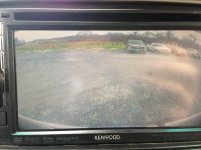
[MENTION=77080]OHP[/MENTION] I finally had some time this weekend to get to that back up camera! I mounted it in the location we had talked about and just ran the wiring through the window seal. Then through the existing factory grommet. At first the image came in upside down lol; however, i found I could reverse the mounting bracket on the camera portion.

Mounted center under the rear spoiler
IMG_2491 (1024x768).jpg


The view from the Head unit.
IMG_2492 (1024x768).jpg


Thanks again OHP for an awesome secret Santa gift!
 

Attachments

  • IMG_2487 (768x1024).jpg
    IMG_2487 (768x1024).jpg
    97.5 KB · Views: 1,058
  • IMG_2488 (768x1024).jpg
    IMG_2488 (768x1024).jpg
    73.8 KB · Views: 1,059
  • IMG_2489 (1024x768).jpg
    IMG_2489 (1024x768).jpg
    59.9 KB · Views: 1,067
  • IMG_2491 (1024x768).jpg
    IMG_2491 (1024x768).jpg
    52 KB · Views: 1,107
  • IMG_2492 (1024x768).jpg
    IMG_2492 (1024x768).jpg
    87.8 KB · Views: 1,110
Damn you Austin. I made a huge mistake! And to think, I waited all that time too!! I am crying in the corner.
 
[MENTION=77080]OHP[/MENTION] I finally had some time this weekend to get to that back up camera! I mounted it in the location we had talked about and just ran the wiring through the window seal. Then through the existing factory grommet. At first the image came in upside down lol; however, i found I could reverse the mounting bracket on the camera portion.

Mounted center under the rear spoiler
View attachment 81343


The view from the Head unit.
View attachment 81344


Thanks again OHP for an awesome secret Santa gift!

Glad you like it and finally got it installed. I did mine a couple of weeks ago and installed the camera by the trailer plug. I'm not satisfied with that location so at some point I'll move it up to the spoiler.
By the way, the clazzios look bad ass.
 

Members online

Forum statistics

Threads
278,309
Messages
3,554,068
Members
248,016
Latest member
Advally Service

Trending content

Back
Top