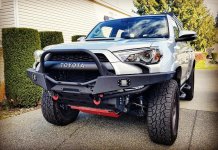
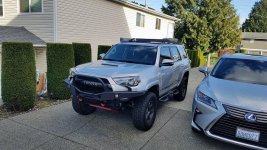
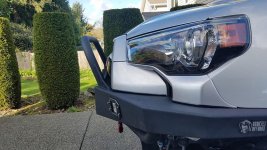
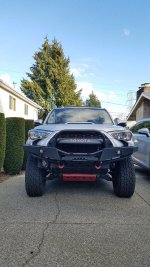
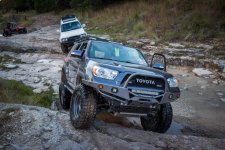
Addicted Offroad's new 5th gen 4runner bumper!

I ended up installing the 100w resistors, solved the hyper blink. I ran the truck for 10 min or so with the drls on, the resistors were hot for sure, but I was able to touch them without burning myself. I have to believe that they were up to peak temp after 10 min, and considering I mounted them in the air way in front of the rad (lower headlight support), I have to believe they shouldn't get any hotter especially when I'm driving.

Yea, I started running mine in DRL mode and so far so good. They get hot for sure, but so far so good.

I will give one warning about this bumper that should be obvious.. But the corners out near the fenders are not that strong. They really don't need to be since they are up so high.. and you are probably going to take out a fender anyway if you make contact in that area... but it is flexible there and not going to hold up if you hit something out on the tip of that wing.. The rest of it is super stout, but those corners are not near as strong as something like a shockworks.... It's fine as long as your contact is close to where the tubes are... The very tips of the wings is all I would be concerned about.
 
Last edited:
I will give one warning about this bumper that should be obvious.. But the corners out near the fenders are not that strong. They really don't need to be since they are up so high.. and you are probably going to take out a fender anyway if you make contact in that area... but it is flexible there and not going to hold up if you hit something out on the tip of that wing.. The rest of it is super stout, but those corners are not near as strong as something like a shockworks.... It's fine as long as your contact is close to where the tubes are... The very tips of the wings is all I would be concerned about.

Yea I thought it was just me. I leaned on the wing doing something and it flexed a bit...

But you shouldn't ever end up hitting it though.
 
Well, has anyone else put a winch on yet? I've tried three different fair leads so far and only managed to get a Warn Hawse style to fit....upside down.

Did some winching and the steel cable still started to dig into the edge of the bumper plate, and chewed through the fair lead pretty fast. Figured it would happen, but hoped I could find a replacement before the one I have gave out.


Edit: Scotty got back with me on the phone, and looks like I've been looking at the right fair lead without realizing it. Warn makes a steel hawse that'll fit.
 
Last edited:
Well, has anyone else put a winch on yet? I've tried three different fair leads so far and only managed to get a Warn Hawse style to fit....upside down.

Did some winching and the steel cable still started to dig into the edge of the bumper plate, and chewed through the fair lead pretty fast. Figured it would happen, but hoped I could find a replacement before the one I have gave out.


Edit: Scotty got back with me on the phone, and looks like I've been looking at the right fair lead without realizing it. Warn makes a steel hawse that'll fit.

I put a Warn vr10000-s on mine. Had to put my Warn hawes on upside down too, still looks fine IMO. I have it on good authority that a Superwinch hawes will fit too
 
The install of the 2014+ prototype Addicted Offroad bumper took a lot longer than I expected.

Taking off the stock bumper parts was easy. The hard AC line was in the way so I had to bend it so I can fit the crossmember onto the frames mounting plates. The AC line looked extremely awkward and I didn't feel comfortably with it that way. Took an angle grinder to the crossmember plate and made a notch to fit around the AC line with some pressure hose around it for extra protection.

How I initially bent the AC line to mount the crossmember. This wasn't gonna work for me...

2h66q8z.jpg


Took a grinder to cut a little notch to fit the AC line w/ some pressure hose wrapped around it.

vzh7y0.jpg


zwl0tk.jpg


Re-bent to AC line to its original shape and it fit snug into the notch I made.

104nsxc.jpg


From the get go, I did not want the bumper too close against the fender because if I go offroading the body might flex from the frame which may lead to bent fenders, that's expensive. Addicted said the the bumper can be adjusted for a larger gap. Me and my buddies could not figure out how in the world with the existing holes can the bumper to adjusted any lower. We tried a few different bolting patterns with no results. The only other was to actually "ovalize" the existing holes in order for the bumper to sit a tad lower.

We are not professionals at all, just amateurs who like to tinker around. Used our drill bits and attempted try "ovalize" one hole. Gave up after an hour of going through a few bits, increasing in size, then filing just to open up one hole. We said "F it!" and to just continued with the install with how the holes are from factory.

2udyryb.jpg


If we didn't grind the crossmember or try adjusting the bumper gap it would've been only an hour of labor getting the bumper on. We ended up working on it for 5 hours, including making extra trimmings to the plastic bumper piece for that good fit. Still need to relocate the washer reservoir and finish trimming the fender wells. Also, the the 2014+ bumpers you do not need to cut any brackets like the 2010-2013 models.

Overall, I am satisfied with the bumper. Will need to hit up the trails and see how it goes...

axfo6r.jpg
 
The install of the 2014+ prototype Addicted Offroad bumper took a lot longer than I expected.

Taking off the stock bumper parts was easy. The hard AC line was in the way so I had to bend it so I can fit the crossmember onto the frames mounting plates. The AC line looked extremely awkward and I didn't feel comfortably with it that way. Took an angle grinder to the crossmember plate and made a notch to fit around the AC line with some pressure hose around it for extra protection.

How I initially bent the AC line to mount the crossmember. This wasn't gonna work for me...

2h66q8z.jpg


Took a grinder to cut a little notch to fit the AC line w/ some pressure hose wrapped around it.

vzh7y0.jpg


zwl0tk.jpg


Re-bent to AC line to its original shape and it fit snug into the notch I made.

104nsxc.jpg


From the get go, I did not want the bumper too close against the fender because if I go offroading the body might flex from the frame which may lead to bent fenders, that's expensive. Addicted said the the bumper can be adjusted for a larger gap. Me and my buddies could not figure out how in the world with the existing holes can the bumper to adjusted any lower. We tried a few different bolting patterns with no results. The only other was to actually "ovalize" the existing holes in order for the bumper to sit a tad lower.

We are not professionals at all, just amateurs who like to tinker around. Used our drill bits and attempted try "ovalize" one hole. Gave up after an hour of going through a few bits, increasing in size, then filing just to open up one hole. We said "F it!" and to just continued with the install with how the holes are from factory.

2udyryb.jpg


If we didn't grind the crossmember or try adjusting the bumper gap it would've been only an hour of labor getting the bumper on. We ended up working on it for 5 hours, including making extra trimmings to the plastic bumper piece for that good fit. Still need to relocate the washer reservoir and finish trimming the fender wells. Also, the the 2014+ bumpers you do not need to cut any brackets like the 2010-2013 models.

Overall, I am satisfied with the bumper. Will need to hit up the trails and see how it goes...

axfo6r.jpg
It sure is pretty. I can't wait to get mine.

Sent from my SAMSUNG-SM-G890A using Tapatalk
 
It sure is pretty. I can't wait to get mine.

Best looking 5th gen bumper. It goes so well with the '14+ models' sharp angles.
 

Attachments

  • IMG_20161106_155341.jpg
    IMG_20161106_155341.jpg
    141.7 KB · Views: 3,900
  • 20161106_140123.jpg
    20161106_140123.jpg
    91.1 KB · Views: 1,623
  • 20161106_140044.jpg
    20161106_140044.jpg
    75 KB · Views: 1,419
[MENTION=117117]Seattle206[/MENTION] looks good. Having the lower mesh makes it look more complet. Btw, do you have a dead straight front view without the headlights on and a top front down view? Thx.
 
I hope this isn't a stupid question....based on my searches no one has asked it. What is different about mounting the 10-13 bumper and the 14+? I get it the the grill shape and headlights are different. However the cuts required are below those. I saw the one post about the a/c refrigerant line needing to be moved. So I guess here is the question in a nutshell.....why couldn't you just put the 10-13 on a 14+, if you understood your bumper cuts would be different?
 
I hope this isn't a stupid question....based on my searches no one has asked it. What is different about mounting the 10-13 bumper and the 14+? I get it the the grill shape and headlights are different. However the cuts required are below those. I saw the one post about the a/c refrigerant line needing to be moved. So I guess here is the question in a nutshell.....why couldn't you just put the 10-13 on a 14+, if you understood your bumper cuts would be different?

The 14+ sits further forward. The 10-13 is a tighter more tucked fit. The 14+ would probably work on a 10-13, but you would lose a little clearance.
 
Last edited:
[MENTION=117117]Seattle206[/MENTION] looks good. Having the lower mesh makes it look more complet. Btw, do you have a dead straight front view without the headlights on and a top front down view? Thx.

Here is a front view shot. I'll try to get a top down shot later by the time I get off work it'll be dark out.
 

Attachments

  • 20161106_140115.jpg
    20161106_140115.jpg
    101.2 KB · Views: 1,715
Update on my Addicted Offroad bumper. Not sure if your guy are experiencing this since I purchased the original prototype '14+ bumper. When it was installed the fitment was very tight. No gap in between the fender/bumper. Looks very clean that way.

The left side wing was making excessive contact with my fender when going over speed bumps or bumpy roads. At first I thought it was my suspension clunking but after I re-torqued all the suspension bolts the noise was still there.

After taking my rig to some offroad trails I noticed that the bumpers finish has rubbed off from contacting my fenders. Took off the bumper, used a plasma cutter and reamer to elongate up the mounting holes. I should've made the holes a little smaller but I able to adjust the bumper to give me a 1/2" gap. I can make it fit tighter if I wanted. This is the lowest the bumper can go and I have to use 1/2-13x1.5 Allen bolts to tighten the top two holes. Used additional grade 8 washers on the other 4 mounting bolts for extra grab. Now, no noise and a bit of gap for those flexing situations.

Some pics of my rig and the AO bumper in action(before the modifications)

2uqf4o9.jpg


otqnh3.jpg


You can see the edge of the fender where the bumper was rubbing against it.

2u9k469.jpg


zksaog.jpg


2hydpo2.jpg


15dwbvm.jpg


m79r7l.jpg
 
Humm. I don't seem to have any noise or rubbing... And I wheel and flex my truck all the time. I have about 1/4 max of clearance between fender and the bumper. First time out I did have the fender liner makeing noise... but quickly resolved that..
 

Attachments

  • Hidden_Falls-0096.jpg
    Hidden_Falls-0096.jpg
    144.2 KB · Views: 1,927
What winch are you guys running with the bumper.. and where is your solenoid box and control port. I'm thinking about going with a Warn m8000s. They have an extension for the box that would allow me to position the connector in a convenient location....
Hard to really know what room you have until you have the winch in hand...

I'm looking at
Warn m8000s
Engo E9000s
 
What winch are you guys running with the bumper.. and where is your solenoid box and control port. I'm thinking about going with a Warn m8000s. They have an extension for the box that would allow me to position the connector in a convenient location....
Hard to really know what room you have until you have the winch in hand...

I'm looking at
Warn m8000s
Engo E9000s
I went with a Warn M8000S. I mounted my control box underneath the hood latch, and cut a hole for the remote plug. It's temporary until I figure out a more permanent solution that will probably include a wireless remote.

Sent from my XT1254 using Tapatalk
 
What winch are you guys running with the bumper.. and where is your solenoid box and control port. I'm thinking about going with a Warn m8000s. They have an extension for the box that would allow me to position the connector in a convenient location....
Hard to really know what room you have until you have the winch in hand...

I'm looking at
Warn m8000s
Engo E9000s

Warn vr10000-s, control box is right below the hood release
 

Members online

Forum statistics

Threads
278,316
Messages
3,554,111
Members
248,016
Latest member
Advally Service

Trending content

Back
Top