

turbodb
Member
The plan with the 4Runner was always to keep it a little bit more tame than the Tacoma. After all, it's our family adventure vehicle - used mostly for home-base-style camping, and less for prolonged driving adventures. But, some systems need to work in both vehicles - and the fridge is a great example.
The Backstory
Up until this summer, when we ventured over to Washington's Olympic Peninsula, I'd always just nursed the fridge along - running it as we drove to camp, and then turning it off once we reached our destination. There were a few reasons for that - we'd generally only go for a single night, we generally park in the shade, and I knew that the battery in the 4Runner was on its last legs.
But - visiting the Peninsula for three days and two nights to hike to Obstruction Point - we needed the fridge to work. It didn't - but not for the reasons I would have thought. See, knowing that I'd need the fridge to work, I'd gone out and purchased a new Northstar 24F AGM battery. I'd also spent some time extending the 12V power cord for the ARB 50qt fridge so it could reach the only 12V receptacle in the 4Runner - the cigarette lighter at the front of the vehicle.

As we drove to the peninsula, everything was fine - the fridge keeping everything nice and cool. As we got to camp, I setup the solar panel to keep everything in tip-top shape - and proceeded to forget about it. A couple hours later, I looked in to check on everything and the battery was doing great, but the fridge was in error mode - low voltage!
Not sure what could be going on, I thought that perhaps my extension cable was losing voltage over its length. That shouldn't have been the case - the fridge uses less than 90W and I'd used 12ga wire - but I cut the extension and plugged the fridge back into the cigarette lighter. No dice!
Could I have gotten a bum battery? I hoped not, but I suppose I could have...was my next thought.
Needing to keep our food cool, my ultimate solution for the night was to run the truck for 30 minutes, letting the alternator charge the battery and run the fridge - because, as had been the case when we'd been driving over - when the truck was on, the fridge worked just fine! :frusty:
The next morning, I had an idea, since I couldn't believe a brand new battery would have failed: what if I was seeing voltage drop, but not because of my cable? What if the voltage drop was due to the OEM wiring to the cigarette lighter?
I hooked the extended fridge cable directly to the battery and - BOOM - everything worked just fine! Sure enough, the wiring to the 12v cigarette lighter was the culprit. No blown fuses, just a voltage drop that sent the fridge into error mode.
And, something I'd need to address.
Present Day
Moving with the swiftness of a sloth, it's been three months since our trip to the Peninsula. I'd ordered the parts for this modification upon our return, but of course, they'd sat in the living room for a while. Some might call that procrastination; I call it a virtue - because remember, good things come to those who wait. :wink:
In designing the solution, I decided I wanted to run power to the rear of the 4Runner that would solve the issue with the fridge, give me a convenient place to connect the solar setup in order to charge the battery while in camp, and also provide me anything I'd need in the future. I figured the following would be a reasonable solution:

With some sunny days in the forecast - good things come to those who wait :wink: - I figured that my "patience" had paid off, and it was time to get this project banged out!
I started by using a piece of cardboard to make a template where I planned to mount a piece of plywood in the rear storage area, in order to secure all of the components. Positioned on the driver side, right next to the fridge, this would be convenient and protected from all the other gear in the rear area.

It was easy enough to take that cardboard to a piece of ½" plywood and trace it, before cutting it out and rounding the corners a bit for a nicer look. A mock-up of two of the major components was also in order at this point.


Mock-up, with two slots in the panel for wiring to pass through - I figured keeping the wiring on the back side was both clean and good to protect it from getting caught on gear.
Next, was the part of the project that I'd been procrastinating - removing the various bits of the interior in order to run the 4 gauge cable from the engine bay to the rear compartment. My plan was to run it through a firewall grommet on the driver side, then through the door sills, and up through the rear panel of the storage area.
It turned out that removal of these panels was much easier than removing the interior of a Tacoma, and I had everything looking like the Tasmanian Devil had been there, in just a few minutes!
Panels removed, I ran the cable, securing it along the way with zip ties or existing OEM straps to keep it away from sharp edges and clip-points for the interior panels that would need to be reattached as everything was put back together.

Reassembly was easy, and the final step was to attach the plywood panel to the 4Runner and wire everything up.

3" stainless steel machine screws used for mounting, also make it easy to mark locations to drill in the plastic.

Rivnuts secured in the plastic will receive the screws that serve as stand-offs.
I mounted all of the components to the panel - the circuit breaker, fuse block, and two 12v sockets - on my workbench, where it was easy to crimp, solder and heat shrink the various connections. All that was left to do in the 4Runner was crimp on the 4ga lugs using a 16 ton hydraulic crimper, and attach them to the fuse block and circuit breaker.

Now, I've got plenty of power to the fridge, a great place to mount the Victron SmartSolar MPPT Solar Charge Controller when we're in the 4Runner, and plenty of room for future expansion. I'd call that success!
The Backstory
Up until this summer, when we ventured over to Washington's Olympic Peninsula, I'd always just nursed the fridge along - running it as we drove to camp, and then turning it off once we reached our destination. There were a few reasons for that - we'd generally only go for a single night, we generally park in the shade, and I knew that the battery in the 4Runner was on its last legs.
But - visiting the Peninsula for three days and two nights to hike to Obstruction Point - we needed the fridge to work. It didn't - but not for the reasons I would have thought. See, knowing that I'd need the fridge to work, I'd gone out and purchased a new Northstar 24F AGM battery. I'd also spent some time extending the 12V power cord for the ARB 50qt fridge so it could reach the only 12V receptacle in the 4Runner - the cigarette lighter at the front of the vehicle.
As we drove to the peninsula, everything was fine - the fridge keeping everything nice and cool. As we got to camp, I setup the solar panel to keep everything in tip-top shape - and proceeded to forget about it. A couple hours later, I looked in to check on everything and the battery was doing great, but the fridge was in error mode - low voltage!
Not sure what could be going on, I thought that perhaps my extension cable was losing voltage over its length. That shouldn't have been the case - the fridge uses less than 90W and I'd used 12ga wire - but I cut the extension and plugged the fridge back into the cigarette lighter. No dice!
Could I have gotten a bum battery? I hoped not, but I suppose I could have...was my next thought.
Needing to keep our food cool, my ultimate solution for the night was to run the truck for 30 minutes, letting the alternator charge the battery and run the fridge - because, as had been the case when we'd been driving over - when the truck was on, the fridge worked just fine! :frusty:
The next morning, I had an idea, since I couldn't believe a brand new battery would have failed: what if I was seeing voltage drop, but not because of my cable? What if the voltage drop was due to the OEM wiring to the cigarette lighter?
I hooked the extended fridge cable directly to the battery and - BOOM - everything worked just fine! Sure enough, the wiring to the 12v cigarette lighter was the culprit. No blown fuses, just a voltage drop that sent the fridge into error mode.
And, something I'd need to address.
Present Day
Moving with the swiftness of a sloth, it's been three months since our trip to the Peninsula. I'd ordered the parts for this modification upon our return, but of course, they'd sat in the living room for a while. Some might call that procrastination; I call it a virtue - because remember, good things come to those who wait. :wink:
In designing the solution, I decided I wanted to run power to the rear of the 4Runner that would solve the issue with the fridge, give me a convenient place to connect the solar setup in order to charge the battery while in camp, and also provide me anything I'd need in the future. I figured the following would be a reasonable solution:
- A 6-circuit fuse block from Blue Sea Systems - to provide fused power to several devices simultaneously.
- An 80A circuit breaker from Bussmann - placed between the battery and fuse block, to protect the cable run to the front of the 4Runner.
- 20' of 4ga welding cable - to provide a reasonably-large, but still manageable conduit for power to the fuse block and accessories. Additionally, this would reduce the voltage drop when the solar charger was sending power back to the battery.
- Some 4 gauge wire lugs - to connect the cable to the battery and fuse block.
- Two (2), 12V power receptacles - one of these would be used for the fridge, the other for future use.
- Miscellaneous 12ga wire, shrink tubing, 1/4 inch braided wire sleeve, and wire connectors to make connections.
With some sunny days in the forecast - good things come to those who wait :wink: - I figured that my "patience" had paid off, and it was time to get this project banged out!
I started by using a piece of cardboard to make a template where I planned to mount a piece of plywood in the rear storage area, in order to secure all of the components. Positioned on the driver side, right next to the fridge, this would be convenient and protected from all the other gear in the rear area.
It was easy enough to take that cardboard to a piece of ½" plywood and trace it, before cutting it out and rounding the corners a bit for a nicer look. A mock-up of two of the major components was also in order at this point.
Mock-up, with two slots in the panel for wiring to pass through - I figured keeping the wiring on the back side was both clean and good to protect it from getting caught on gear.
Next, was the part of the project that I'd been procrastinating - removing the various bits of the interior in order to run the 4 gauge cable from the engine bay to the rear compartment. My plan was to run it through a firewall grommet on the driver side, then through the door sills, and up through the rear panel of the storage area.
It turned out that removal of these panels was much easier than removing the interior of a Tacoma, and I had everything looking like the Tasmanian Devil had been there, in just a few minutes!
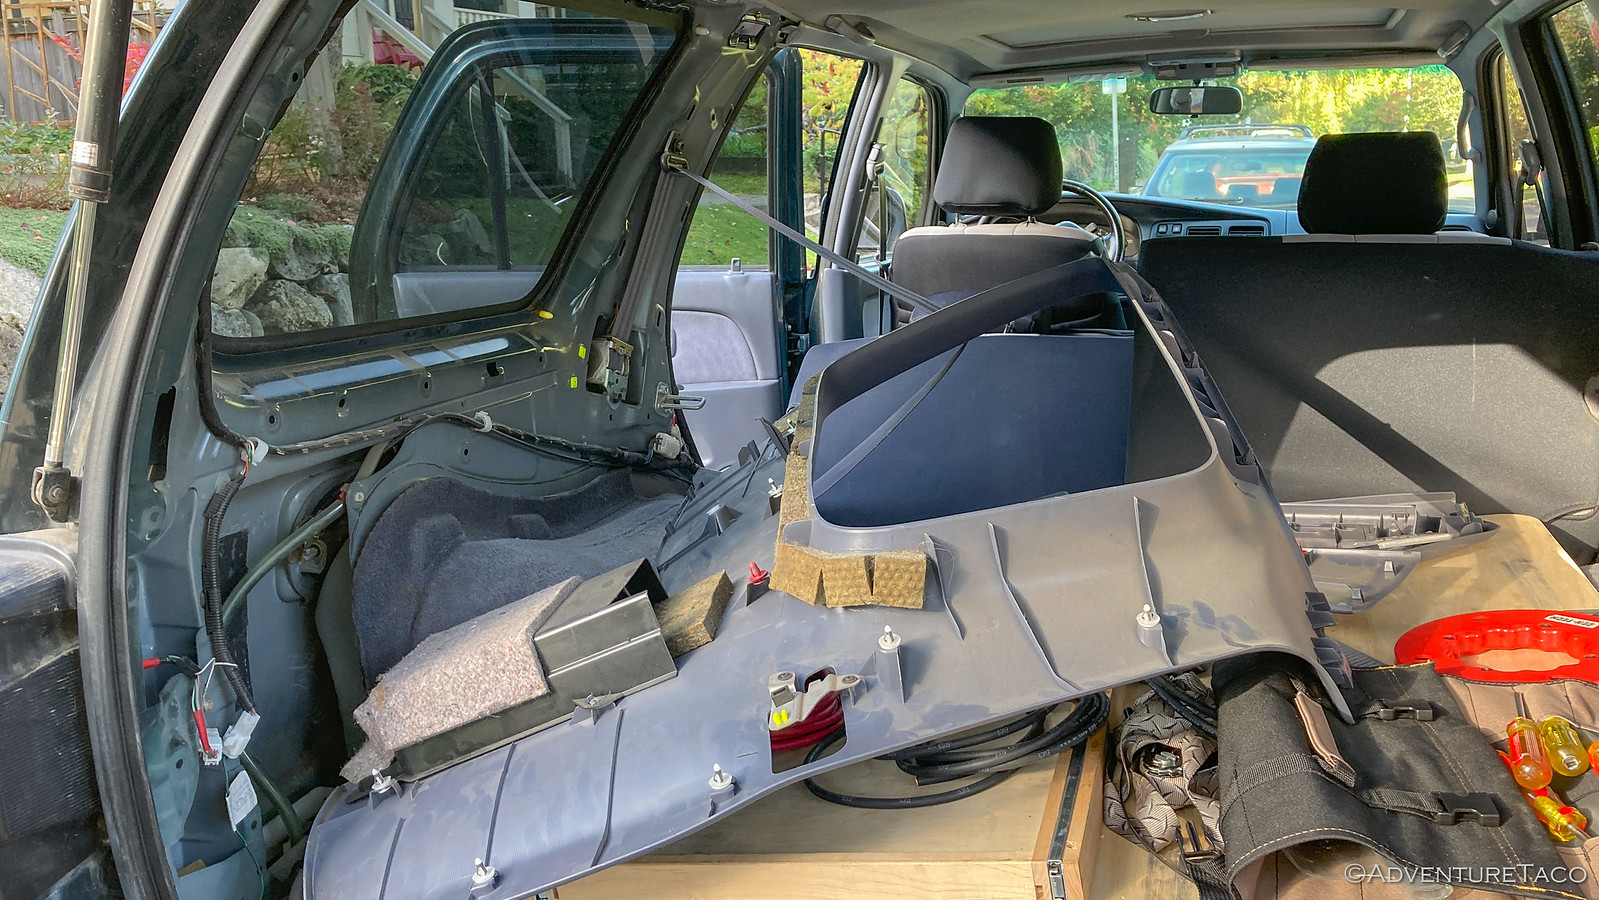
Panels removed, I ran the cable, securing it along the way with zip ties or existing OEM straps to keep it away from sharp edges and clip-points for the interior panels that would need to be reattached as everything was put back together.
Reassembly was easy, and the final step was to attach the plywood panel to the 4Runner and wire everything up.
3" stainless steel machine screws used for mounting, also make it easy to mark locations to drill in the plastic.
Rivnuts secured in the plastic will receive the screws that serve as stand-offs.
I mounted all of the components to the panel - the circuit breaker, fuse block, and two 12v sockets - on my workbench, where it was easy to crimp, solder and heat shrink the various connections. All that was left to do in the 4Runner was crimp on the 4ga lugs using a 16 ton hydraulic crimper, and attach them to the fuse block and circuit breaker.
Now, I've got plenty of power to the fridge, a great place to mount the Victron SmartSolar MPPT Solar Charge Controller when we're in the 4Runner, and plenty of room for future expansion. I'd call that success!


