Advice requested for adjusting parking brake for rear drums

Status
Not open for further replies.

mom

Banned
I've never worked with drum brakes before so I ask your advice on how best to perform a rear drum brake adjustment without taking the drums off again (if possible).

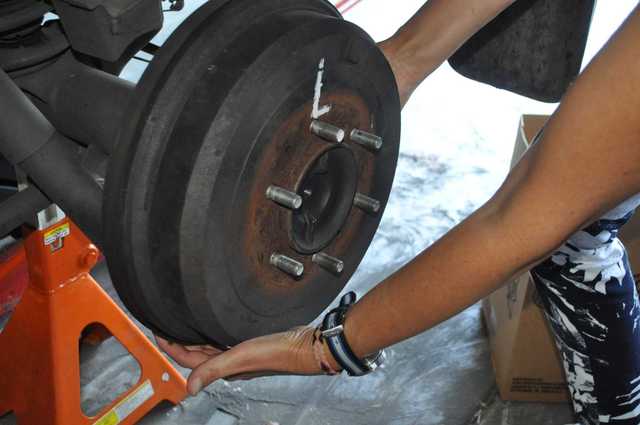
It has been 15 years since the drums were off my 4Runner so I tried to pull the driver side rear drum off but it wouldn't budge.
http://www1.picturepush.com/photo/a/9697124/img/9697124.jpg
9697124.jpg


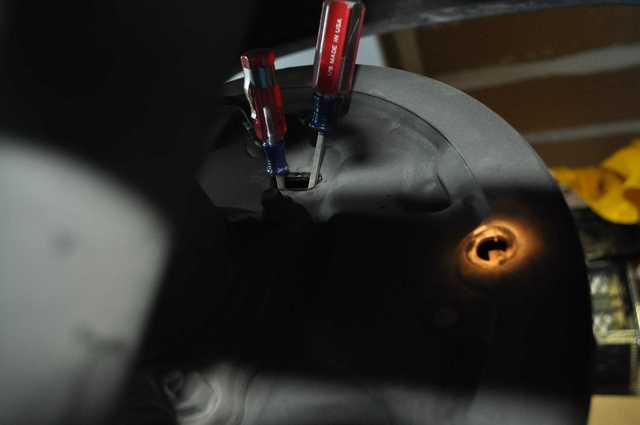
The oblong adjustment port 'seemed' like a good idea, until I actually tried to use it.

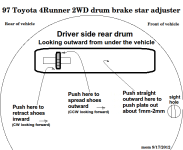
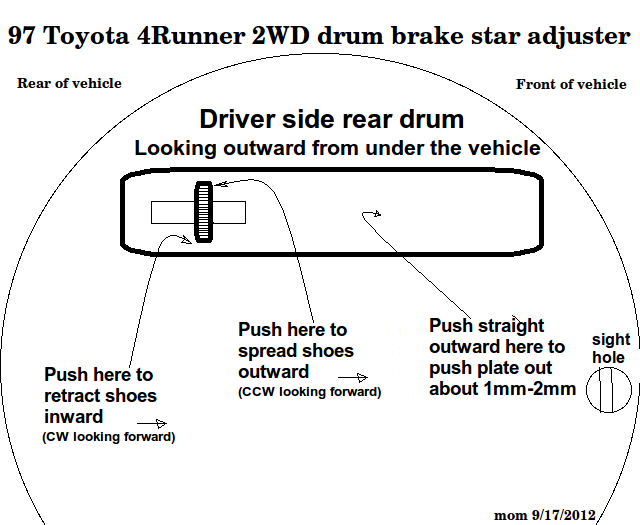
For example, neither the FSM nor the Chilton explains 'which way' to turn the adjuster in order to pull the shoes inward. I had to remove the drum first in order to figure it out - then I drew and printed this diagram & taped it in the FSM for future reference!
http://www3.picturepush.com/photo/a/9719526/img/9719526.png
9719526.png

EDIT: While the 1997 Toyota FSM doesn't show the direction to spin the star wheel, the 2002 FSM has better pictures.

Unfortunately, the round view hole only shows the midsection of the brake shoe; and even so, it's extremely difficult to get your head in there to see it clearly.
http://www3.picturepush.com/photo/a/9697246/img/9697246.jpg
9697246.jpg


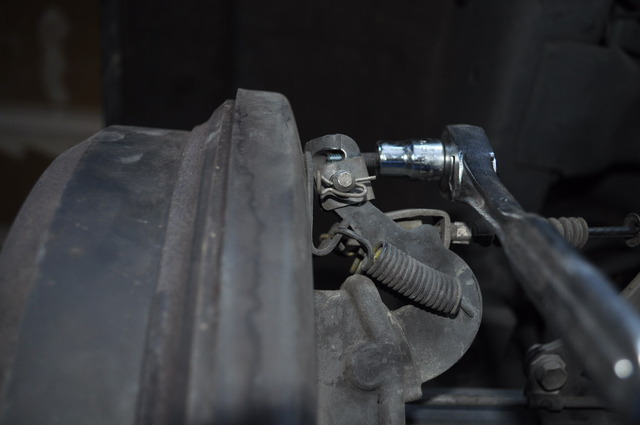
I loosened & even disconnected this parking brake "bellcrank", but it still didn't free up the drum:
http://www2.picturepush.com/photo/a/9697330/img/9697330.jpg
9697330.jpg


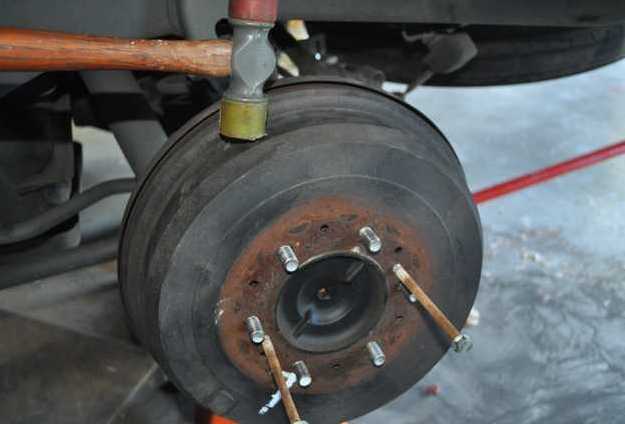
I then found some SAE threaded bolts that were 'similar' to the prescribed 8x1.25mm bolts - which, with a mallet, eventually freed the drum.
http://www2.picturepush.com/photo/a/9697725/img/9697725.jpg
9697725.jpg

EDIT: I later realized from this tutorial that I should havehttp://www.tundrasolutions.com/forums/brakes/149469-tundra-rear-brake-tutorial/ brushed off the rust and lubricated the center hub BEFORE removing the drum.

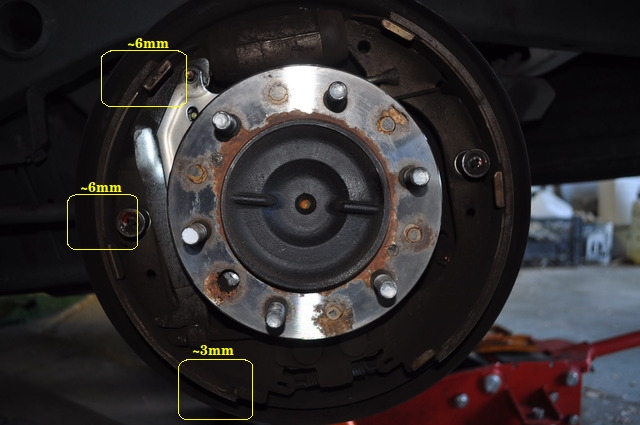
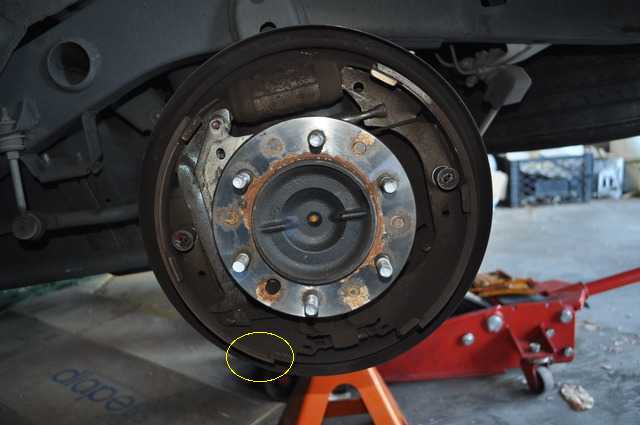
Once the drum was off, I could see the shoes were worn unevenly (which was not visible through the porthole):
http://www5.picturepush.com/photo/a/9699173/img/9699173.jpg
9699173.jpg


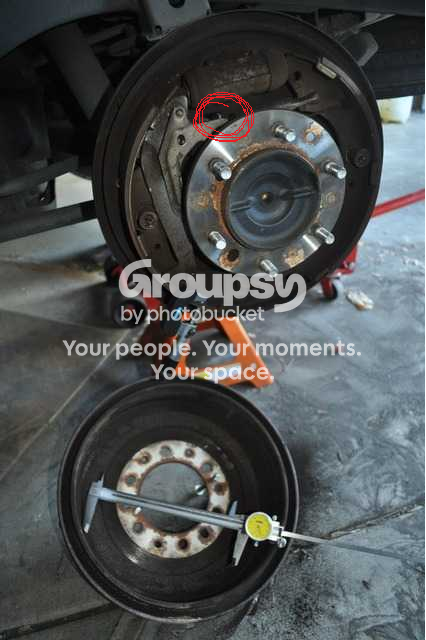
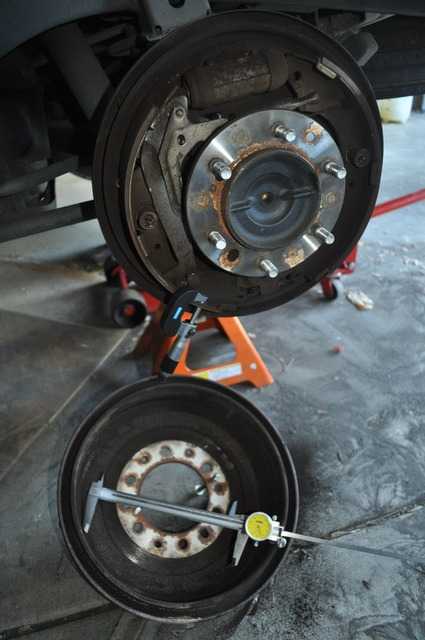
I carefully measured everything with a mic and calipers, and then put it all back together, not having a replacement set of shoes & drums on hand.
http://www5.picturepush.com/photo/a/9697558/img/9697558.jpg
9697558.jpg


My only problem now is that the drum brakes need to be adjusted (e.g., the parking brake pulls up all the way without engaging).

At midnight, I tried driving backward for a few hundred yards, continually applying the brakes - but that didn't seem to do anything.

I can crawl under tomorrow and try the painstaking start-adjustment procedure at the rear oblong port again.

I realize the FSM has a manual procedure for accurately measuring the drum and the shoes and then leaving 0.020" before replacing the drum (the Chilton manual says to leave 0.024") - which I might try tomorrow - but that requires removing the drums again. It's early in the morning so I will go to sleep after asking this question:

Q: Is there an easier way to adjust the rear drum brakes on the Toyota 4Runner?
 
Last edited:
Register to hide this ad
The shoes are not adjusted by an sort of backing up and stopping motion, the shoes are adjusted by pulling the parking break lever. You made sure your adjusters were not frozen correct?

In your case I would go back in there, and spin the adjuster the opposite way you did to remove the brakes (through that little hole) until you can hear the shoes rubbing on the drum, and a slight amount of resistance.

Then go and pull the parking brake lever until it seems to engage at the same spot every time (at first you will be able to pull it all the way, multiple times, until it settles into its adjusted spot)
 
  • Like
Reactions: mom
When I have serviced my rear brakes and need to adjust them properly, I sit in the driver seat and move the lever up and down while keeping the thumb button depressed. I listen carefully for the adjuster clicking during each up stroke. When the clicking stops, it's done. When both sides are good, I then check the parking brake lever for correct adjustment. So with both sides and the lever adjusted, it's road test time.
 
  • Like
Reactions: mom
First off, thank you very much for being polite and also for answering the question!

I was so afraid to ask last night because of many prior childish and unhelpful responses to similar simple questions! Thank you for helping me - even if it 'was' a simple question!

The shoes are not adjusted by an sort of backing up and stopping motion

Ah. That's my mistake. It wouldn't be the first time generic implications in the Chilton manual lead me astray!

Here's what it says, verbatim, on page 9-2 of the Chilton under "BRAKE: Basic Operating Principles" (which apparently does not apply to my 4Runner):
"Most modern drum brakes are designed to self adjust themselves during application when the vehicle is moving in reverse. This motion causes both shoes to rotate very slightly with the drum, rocking an adjusting lever, thereby causing rotation of the adjusting screw."
the shoes are adjusted by pulling the parking break lever.

Thanks! Last night, I had pulled about 10 times (or so) on the parking brake lever, but, neither the Chilton manual nor the Toyota FSM adequately explains this simple procedure. All it says is:
"pull the parking brake lever all the way up until a clicking sound can no longer be heard. Remove the drum. Measure the brake drum inside diameter and the diameter of the brake shoes. Check that the distance between the diameters is the correct shoe clearance (0.020"). If it is incorrect, check the parking brake system.
I greatly appreciate the courteous answer to the question!

Also make sure that the bellcranks (little lever on outside of back of drum where e-brake cable attaches) operate freely and gap is correct

Thanks also for being polite and helpful and for providing the FSM diagram. The description on page BR-23 of my paper FSM is similar to your PDF. Since I put the bellcrank back into the original position (it had a nut on the set screw that I left in place) - I 'think' it's adjusted correctly by default (since I did not remove the original shoes).

sit in the driver seat and move the lever up and down while keeping the thumb button depressed. ...When the clicking stops, it's done.

The Chilton implied driving in reverse would work; and the FSM only explained the shoe-to-drum clearance procedure.

Following instructions above, I sat in the driver seat, continually held the parking brake lever button down, and pumped the lever its full range about forty or fifty times. That worked!

Thank you everyone for being polite and for being helpful. I can now safely drive again in the hills!

BTW, would you be concerned with this uneven wear?
http://www5.picturepush.com/photo/a/9722193/img/9722193.jpg
9722193.jpg
 
Last edited:
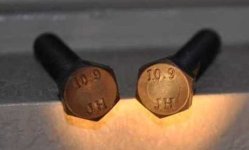
I picked up a set of M8x1.25 ISO Class 10.9 hardened steel bolts

UPDATE:

There's still a smell of 'burned brake' that I haven't figured out why yet. It might be the paste I put on the back of the front pads so the odor might have nothing to do with the rear drum work I did yesterday.

So that I wouldn't have to use SAE bolts again to remove the drums a second time, today I added two high tensile strength metric 8x1.25mm ISO Class 10.9 hardened steel bolts to my drum brake toolkit.

And, while my paper 1997 Toyota FSM doesn't show the direction to adjust the adjusters, this 2002 electronic PDF does!
- Toyota 4Runner 2002 FSM section on brake drums
 

Attachments

  • bolts_for_toyota_drum_brakes.jpg
    bolts_for_toyota_drum_brakes.jpg
    10.8 KB · Views: 28,878
Last edited:
LONG TERM UPDATE: At the time of the last post, I was smelling an asbestos smell, and I had removed the drums a second time and the smell disappeared over time. I'm not sure if it was merely the continual adjustment of the hand brake, or whether there was something awry, but the long term update is that the brakes are just fine.
 
I just saw this thread and wanted to mention this:

I had an extremely hard time getting my drums off until I explained my woes to my Dad and he told me I was using the wrong tool.

Like the OP I tried to hit the drum with a standard hammer. There is another type of hammer, I don't know its technical name but basically it is a large headed lead hammer. The head is much bigger than a standard and the metal is soft so that when you hit the drum the hammer not the drum will dent. That tool will help a lot.
 
Same here. I'm not really sure what the fuss is about the little hole in back of the hub to adjust the e brake tension.

Take a rubber mallet or hammer and hit the drum a few good whacks around in different areas. And try to pull it off. If that still doesn't get it off, take the bolts and screw them in evenly to pull the drum off the shoes.

CLEAN it, use a toothbrush or a soft wire brush and spray/brush the entire assembly: shoes, springs, cylinder, backing plate, everything.

Put the drum back on and test for the correct tension by pulling the E brake (should be around 5-7 clicks. i get 6 so im alright).

If it has less/more clicks than that, rotate the dial circled here until the proper tension is achieved.
(i believe down is expand, and up is contract; to rotate the dial up you need to pull the retaining plate forward)
diagram.png~original
 
you have to pull it up and down a lot to adjust it. then when you give up take the pannel off and use ur 10mm socket and tighten the cable from inside the car just under the handle
 
you have to pull it up and down a lot to adjust it. then when you give up take the pannel off and use ur 10mm socket and tighten the cable from inside the car just under the handle

This is kind of incorrect. The cable should only be adjusted if the bellcranks are not touching the brake backing plate.

In other words, If the cable has stretched and it takes a few clicks before the bell cranks start moving then yes, it needs to be adjusted other wise, the brakes need to be adjusted at the wheel.
 
This is kind of incorrect. The cable should only be adjusted if the bellcranks are not touching the brake backing plate.

In other words, If the cable has stretched and it takes a few clicks before the bell cranks start moving then yes, it needs to be adjusted other wise, the brakes need to be adjusted at the wheel.

might you happen to have the FSM pages for this?
 
[MENTION=56924]mom[/MENTION]

I Just found the diagram you made for the rear brake drum adjustment. Very useful. Thank you.

All the FSM links in this thread seem to be dead.
 
I Just found the diagram you made for the rear brake drum adjustment. Very useful. Thank you.

Thank you for recognizing that diagram, as I try to give back whatever I can, from the help provided to me by you guys.

PS: I bought the 8x1.25mm bolts bolts that push out the drums, and they're now in my special rear-brake kit for the next time I need 'em!

All the manual links in this thread seem to be dead.

Drat. I had lost my hard drive, so I don't even have the PDF myself anymore (although I still have my original paper manuals so all I need from a PDF is the search capability).

EDIT: OK. Googling, I found the FSM but it sure wasn't easy as almost all the web pages that used to exist, don't have it anymore.
I'll PM you with the link.
 

Attachments

  • toyota_4runner_brake_drum.png
    toyota_4runner_brake_drum.png
    53.4 KB · Views: 2,892
Last edited:
e brake and brake adjustment

i have a 1995 Toyota 100 sr5 4wd and tried the pulling of the emergency brake multiple times to adjust the rear and emergency brakes, guess what? it worked!
thanks for the info!
 
Interesting.

I need to do the rear brakes on mine and I noticed that the parking brake doesn't do anything. At first I thought the cable was busted, but when I move it up and down I can hear ticking from the rear wheels, so I do think it's connected.

But there's no resistance at all, and no matter how many times I work it up and down nothing changes. What does that mean? Brakes are completely shot, or the adjuster is busted, or something else?
 
Status
Not open for further replies.

Members online

No members online now.

Forum statistics

Threads
278,315
Messages
3,554,104
Members
248,016
Latest member
Advally Service

Trending content

Back
Top