ANTMAN'S Thread

#diabetics.. I just got an upgrade, received the Medtronic 630G so I can take advantage of their promotion for a free upgrade to the 670G, first closed-loop pump system on the market!

Great news! I appreciate you posting this info. I've kind of gotten lax in my pump research. I'm rocking the 530G. I will definitely be doing some research thanks to you. Good luck with your new "pancreas".

Sorry for hijacking your thread Antman. :hatsoff:
 
I will probably catch some heat for this one - but - once you have lost all fear of drilling and cutting into your 4Runner this stuff happens.

I have tried about 10 different ways to mount my phone in this truck. All of them had issues. Interference with the 4WD lever causing the phone to fall off, same with the driver's side mounting. Hard to see/ too low or high, blocking the air vents, big/clunky stupid looking mounts, etc, etc, etc.

So I did this by modifying a magnetic mount. I like it a lot! Surprisingly stable and secure on the radio knob and it's within eyesight (I angled the mount a little bit).
The magnets are STRONG and the phone will not fall off. It does not interfere with anything and I can easily plug the phone in to charge it. If I want to adjust the volume I have the steering wheel controls and I can still toggle the radio on/off by pushing on the phone. I really don't mess with the knob much at all anyway.

Pics of this craziness:

View attachment 248708

View attachment 248709

View attachment 248710

View attachment 248711

View attachment 248712

View attachment 248713

View attachment 248714

View attachment 248715

If anyone puts in the Metra aftermarket head unit adapter, there's room on the driver's side to sticky tape a nice big neodymium on the back side of the plastic - that's what I have set up and it works great as an "invisible" mount. Someday when I start a build thread I'll take it apart and take pictures.
 
Today I knocked out some projects I've been meaning to get to for a few weeks...

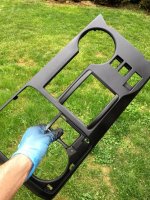
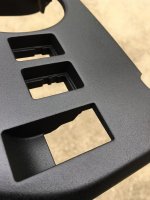
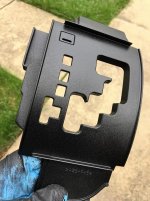
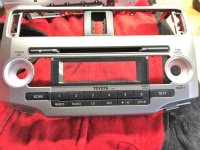
Project#1: My console and dash have taken a beating over the past 6 years with the ugly silver paint showing lots of scratches.

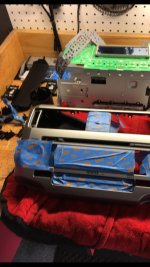
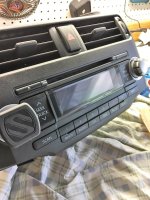
Time for paint- I really like the Rustoleum textured finishes- they are tough and easy to work with. What was supposed to be an easy project quickly took me to the edge of my comfort level, so pictures are unfortunately lacking. I did learn a lot about pulling the radio completely apart though. I kinda thought all the buttons were attached to the HU, but uh... they aren't I had to pop out every one, lol. There were other parts plastic welded to the faceplate so I spent some time masking things off carefully. Anyway, here are some pics...


IMG_1650.jpg

IMG_1651.jpg

IMG_1652.jpg

IMG_1653.jpg

IMG_1672.jpg

IMG_1656.jpg

IMG_1662.jpg

IMG_1664.jpg


I really like how it turned out- once the paint is cured I'll put some interior protectant on there to shine it up a little bit. This quick project took me 6 damn hours!!
 

Attachments

  • IMG_1650.jpg
    IMG_1650.jpg
    144.1 KB · Views: 1,150
  • IMG_1651.jpg
    IMG_1651.jpg
    137.4 KB · Views: 1,091
  • IMG_1652.jpg
    IMG_1652.jpg
    135.3 KB · Views: 1,095
  • IMG_1653.jpg
    IMG_1653.jpg
    136.7 KB · Views: 1,073
  • IMG_1656.jpg
    IMG_1656.jpg
    136.1 KB · Views: 1,074
  • IMG_1662.jpg
    IMG_1662.jpg
    136.6 KB · Views: 1,065
  • IMG_1664.jpg
    IMG_1664.jpg
    135 KB · Views: 1,147
  • IMG_1672.jpg
    IMG_1672.jpg
    104.6 KB · Views: 1,103
Project#2:
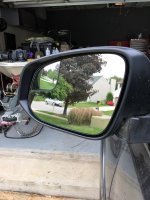
[MENTION=151841]Kenstyle[/MENTION] , awesome guy that he is, completed his folding mirror install over in Colorado last week. Ken was nice enough to send me an awesome gift back with my OEM mirrors. Ken sent me RAV4 blindspot mirrors! Awesome!! Of course, they don't fit the JDM mirror adjuster pucks, lol. Took about 10 minutes with a dremel and all is good. Very cool upgrade, especially when towing- which I tend to do sometimes...

IMG_1665.jpg


Thank you Ken- you are a standup guy!


Project#3:

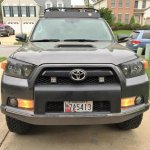
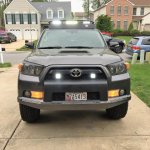
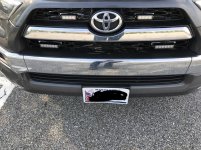
Yet another awesome forum member (made me promise not to divulge who) sent me some lightly used Rigid Dually Floods! He said he sent them as thanks for the write-ups and help I provide on the forum. :kiss:

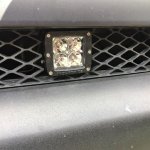
I decided to mount them in the grill. Once again- I was running out of time so not a lot of pics, BUT, if you want to do this it's super easy!

Take the grill off.

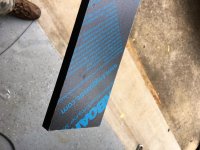
Behind the grill there is a metal core support. The spots where I mounted the lights is recessed a bit and flat- It'll be very obvious when you look back there. I cut some 1/2" starboard as a base for the lights, drilled a hole and mounted them up using Rigid's hardware. If you drill the hole too far forward or back you can slot it for adjustment. The Rigid brackets are slotted already so you can adjust them quite a bit.


IMG_1669.jpg


Now you can mount the lights, press the grill back (almost all the way) and mark around the light on the back of the grill with a silver sharpie.

Take a deep breath and cut with a metal cutting wheel/dremel. Then clean things up with a grinding bit. Little at a time. Leave room for adjustment.

Wire 'em up and your good!

I still need to do some final adjustments- but you get the idea.


IMG_1666.jpg


IMG_1668.jpg


IMG_1667.jpg


Fun Day!!!:usa:
 

Attachments

  • IMG_1665.jpg
    IMG_1665.jpg
    131.2 KB · Views: 1,156
  • IMG_1669.jpg
    IMG_1669.jpg
    133.9 KB · Views: 1,044
  • IMG_1666.jpg
    IMG_1666.jpg
    133.7 KB · Views: 1,105
  • IMG_1667.jpg
    IMG_1667.jpg
    136.8 KB · Views: 1,071
  • IMG_1668.jpg
    IMG_1668.jpg
    139.6 KB · Views: 1,082
Last edited:
Today I knocked out some projects I've been meaning to get to for a few weeks...

Project#1: My console and dash have taken a beating over the past 6 years with the ugly silver paint showing lots of scratches.

Time for paint- I really like the Rustoleum textured finishes-

Looks almost identical to the Rustoleum textured bed liner I used for my 3rd gen satoshi and for the light bar brackets on my 5th gen. I was really happy with how the texture looked and felt. Glad to know that the paint is similar.
 
Looks almost identical to the Rustoleum textured bed liner I used for my 3rd gen satoshi and for the light bar brackets on my 5th gen. I was really happy with how the texture looked and felt. Glad to know that the paint is similar.

Yup- the bedliner spray is has just slightly more texture but both are very similar.
 
Today I knocked out some projects I've been meaning to get to for a few weeks...

Project#1: My console and dash have taken a beating over the past 6 years with the ugly silver paint showing lots of scratches.

Time for paint- I really like the Rustoleum textured finishes- they are tough and easy to work with. What was supposed to be an easy project quickly took me to the edge of my comfort level, so pictures are unfortunately lacking. I did learn a lot about pulling the radio completely apart though. I kinda thought all the buttons were attached to the HU, but uh... they aren't I had to pop out every one, lol. There were other parts plastic welded to the faceplate so I spent some time masking things off carefully. Anyway, here are some pics

I really like how it turned out- once the paint is cured I'll put some interior protectant on there to shine it up a little bit. This quick project took me 6 damn hours!!

I like the black center console cover, maybe something I'll do down the road. Doubt I would do the dash, I assume about half the work most likely. I can handle some more wear and tear before I worry about this though.

The other mods look great!
 
I like the black center console cover, maybe something I'll do down the road. Doubt I would do the dash, I assume about half the work most likely. I can handle some more wear and tear before I worry about this though.

The other mods look great!

Thanks buddy.:tea:
 
Take the grill off.

Behind the grill there is a metal core support. The spots where I mounted the lights is recessed a bit and flat- It'll be very obvious when you look back there. I cut some 1/2" starboard as a base for the lights

Fun Day!!!:usa:

I feel like I should start talking to you before I do things....

I used 1" bar aluminum to make the back piece to mount strobes. Which is going to need to be cut down and rounded then painted black....
 

Attachments

  • IMG_8241.jpg
    IMG_8241.jpg
    139.3 KB · Views: 1,114
Great job on the console painting. The textured paint really suits the truck (wish Toyota did something similar from the get go). How many coats did you end up doing? Any plans to do the steering wheel and door inserts to match?
 
Great job on the console painting. The textured paint really suits the truck (wish Toyota did something similar from the get go). How many coats did you end up doing? Any plans to do the steering wheel and door inserts to match?

2 solid coats and then the third coat I apply from more of a distance- almost like a dry coat. This evens out the texture more. I have other plans for the steering wheel, stay tuned!

Thanks for the compliments.
 
Congrats on the Rav4 Mirrors and the Rigids! I love my Rav4 Mirrors. It is like I got the one good thing left from the 4th Gen Rav4s (I had and now miss a 3rd Gen Sport 4WD V6).

Quick question: What do you do to secure your lights?

I have some extremely inexpensive "AuxBeam" flood lights on my ditch brackets and my roof rack. While I have a great alarm system, I feel like my lights are just begging for someone with pliers to relieve me of them.
 
Today I knocked out some projects I've been meaning to get to for a few weeks...


Project#1: My console and dash have taken a beating over the past 6 years with the ugly silver paint showing lots of scratches.


Time for paint- I really like the Rustoleum textured finishes- they are tough and easy to work with. What was supposed to be an easy project quickly took me to the edge of my comfort level, so pictures are unfortunately lacking. I did learn a lot about pulling the radio completely apart though. I kinda thought all the buttons were attached to the HU, but uh... they aren't I had to pop out every one, lol. There were other parts plastic welded to the faceplate so I spent some time masking things off carefully. Anyway, here are some pics...


View attachment 250503


View attachment 250504


View attachment 250505


View attachment 250506


View attachment 250511


View attachment 250507


View attachment 250509


View attachment 250510


I really like how it turned out- once the paint is cured I'll put some interior protectant on there to shine it up a little bit. This quick project took me 6 damn hours!!


You are a true yota artist my friend awesome 4Runner always check in to see what you have devised next !


Sent from WV
 
Congrats on the Rav4 Mirrors and the Rigids! I love my Rav4 Mirrors. It is like I got the one good thing left from the 4th Gen Rav4s (I had and now miss a 3rd Gen Sport 4WD V6).

Quick question: What do you do to secure your lights?

I have some extremely inexpensive "AuxBeam" flood lights on my ditch brackets and my roof rack. While I have a great alarm system, I feel like my lights are just begging for someone with pliers to relieve me of them.

Tamper Proof Fasteners and Security Screws - LPF ? Tamper Proof Nuts, Bolts, Screws & More
 
Project#2:

[MENTION=151841]Kenstyle[/MENTION] , awesome guy that he is, completed his folding mirror install over in Colorado last week. Ken was nice enough to send me an awesome gift back with my OEM mirrors. Ken sent me RAV4 blindspot mirrors! Awesome!! Of course, they don't fit the JDM mirror adjuster pucks, lol. Took about 10 minutes with a dremel and all is good. Very cool upgrade, especially when towing- which I tend to do sometimes...

View attachment 250512


Thank you Ken- you are a standup guy!


Project#3:

Yet another awesome forum member (made me promise not to divulge who) sent me some lightly used Rigid Dually Floods! He said he sent them as thanks for the write-ups and help I provide on the forum. :kiss:

I decided to mount them in the grill. Once again- I was running out of time so not a lot of pics, BUT, if you want to do this it's super easy!

Take the grill off.

Behind the grill there is a metal core support. The spots where I mounted the lights is recessed a bit and flat- It'll be very obvious when you look back there. I cut some 1/2" starboard as a base for the lights, drilled a hole and mounted them up using Rigid's hardware. If you drill the hole too far forward or back you can slot it for adjustment. The Rigid brackets are slotted already so you can adjust them quite a bit.


View attachment 250516


Now you can mount the lights, press the grill back (almost all the way) and mark around the light on the back of the grill with a silver sharpie.

Take a deep breath and cut with a metal cutting wheel/dremel. Then clean things up with a grinding bit. Little at a time. Leave room for adjustment.

Wire 'em up and your good!

I still need to do some final adjustments- but you get the idea.


View attachment 250517


View attachment 250519


View attachment 250518


Fun Day!!!:usa:

Too awesome!

I think your truck has become the official 4R "test-mule" for donor parts, mods, upgrades, etc. Jeff. Lol.

Don't ever change! :) Glad you figured out how to custom install the RAV4 mirrors like I knew you would, and hope you took your family out to dinner and had a good time! Keep in touch buddy!

-Ken

P.S.
Those 5.5 gen JDM auto-folding mirrors look damn good on your truck. One of a kind! :)
 
Last edited:
Project#2:

[MENTION=151841]Kenstyle[/MENTION] , awesome guy that he is, completed his folding mirror install over in Colorado last week. Ken was nice enough to send me an awesome gift back with my OEM mirrors. Ken sent me RAV4 blindspot mirrors! Awesome!! Of course, they don't fit the JDM mirror adjuster pucks, lol. Took about 10 minutes with a dremel and all is good. Very cool upgrade, especially when towing- which I tend to do sometimes...

View attachment 250512


Thank you Ken- you are a standup guy!


Project#3:

Yet another awesome forum member (made me promise not to divulge who) sent me some lightly used Rigid Dually Floods! He said he sent them as thanks for the write-ups and help I provide on the forum. :kiss:

I decided to mount them in the grill. Once again- I was running out of time so not a lot of pics, BUT, if you want to do this it's super easy!

Take the grill off.

Behind the grill there is a metal core support. The spots where I mounted the lights is recessed a bit and flat- It'll be very obvious when you look back there. I cut some 1/2" starboard as a base for the lights, drilled a hole and mounted them up using Rigid's hardware. If you drill the hole too far forward or back you can slot it for adjustment. The Rigid brackets are slotted already so you can adjust them quite a bit.


View attachment 250516


Now you can mount the lights, press the grill back (almost all the way) and mark around the light on the back of the grill with a silver sharpie.

Take a deep breath and cut with a metal cutting wheel/dremel. Then clean things up with a grinding bit. Little at a time. Leave room for adjustment.

Wire 'em up and your good!

I still need to do some final adjustments- but you get the idea.


View attachment 250517


View attachment 250519


View attachment 250518


Fun Day!!!:usa:

Sorry to be a pesk, but whats the starboard for?

thanks again for the awesome write-ups and pics
 
Sorry to be a pesk, but whats the starboard for?

thanks again for the awesome write-ups and pics

Not a pest! I used the starboard as a base under the grill light brackets. Puts them at exeactly the correct height. Awesome for this application. No rust no worries. :)
 
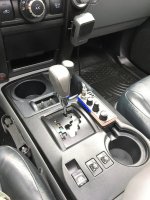
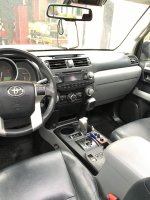
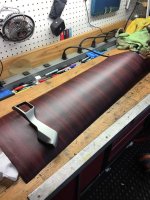
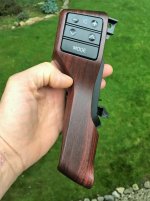
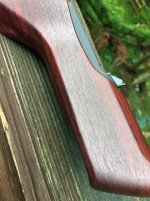
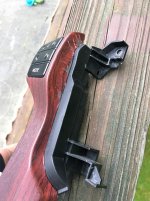
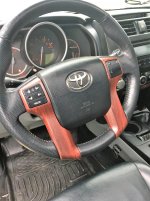
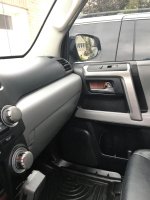
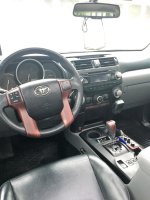
OK- I may get some heat for this one, but as part of my 130,000 interior make-over I decided to add some warmth to my cold interior. I know... I used to HATE fake wood interior panels, but I guess I'm getting old!

Most of the left-over silver trim in my interior was scratched and tired looking so I wrapped some of it.

I really like how this turned out! The vinyl I got is a dark wood- not too glossy- and it has a pattern molded into it. The effect is pretty realistic, and I love it! I got a sample- 1' by 5' for $23. Nice.

Wrapped the steering wheel spokes, the shift knob, the panel below the HVAC knobs and the panels behind the door handles so far. I don't want to overdo it.


What do you guys think?


IMG_1683.jpg


IMG_1682.jpg


IMG_1680.jpg


IMG_1681.jpg


IMG_1687.jpg


IMG_1688.jpg


IMG_1684.jpg
 

Attachments

  • IMG_1683.jpg
    IMG_1683.jpg
    137.5 KB · Views: 960
  • IMG_1682.jpg
    IMG_1682.jpg
    130.4 KB · Views: 937
  • IMG_1680.jpg
    IMG_1680.jpg
    138.5 KB · Views: 929
  • IMG_1681.jpg
    IMG_1681.jpg
    138.7 KB · Views: 988
  • IMG_1687.jpg
    IMG_1687.jpg
    137.8 KB · Views: 919
  • IMG_1688.jpg
    IMG_1688.jpg
    131.9 KB · Views: 909
  • IMG_1684.jpg
    IMG_1684.jpg
    134.8 KB · Views: 932
Personally I dig it. Not my style but I can appreciate the look and quality of your work!


Sent from my iPhone using Tapatalk
 
OK- I may get some heat for this one, but as part of my 130,000 interior make-over I decided to add some warmth to my cold interior. I know... I used to HATE fake wood interior panels, but I guess I'm getting old!

Most of the left-over silver trim in my interior was scratched and tired looking so I wrapped some of it.

I really like how this turned out! The vinyl I got is a dark wood- not too glossy- and it has a pattern molded into it. The effect is pretty realistic, and I love it! I got a sample- 1' by 5' for $23. Nice.

Wrapped the steering wheel spokes, the shift knob, the panel below the HVAC knobs and the panels behind the door handles so far. I don't want to overdo it.


What do you guys think?


View attachment 251175


View attachment 251176


View attachment 251177


View attachment 251178


View attachment 251179


View attachment 251180


View attachment 251181

Any instruction on how these panels are removed? Love the idea!
 

Members online

Forum statistics

Threads
278,306
Messages
3,554,045
Members
248,016
Latest member
Advally Service

Trending content

Back
Top